In essence, FlareSolverr is a proxy server to bypass Cloudflare protection. It serves as a bridge between Cloudflare’s anti-bot measures and the need for efficient data retrieval. By leveraging the power of Python, Selenium, and ChromeDriver, FlareSolverr enables you to overcome Cloudflare challenges and access protected web content seamlessly.
This guide offers a comprehensive overview of FlareSolverr. We will take a closer look at its installation on Linux, Docker, and Windows. We will also go through its configuration, from how to set variables to configure it for Plex, Prometheus, and other apps like Jackett and Prowlarr.

Disclaimer: This material has been developed strictly for informational purposes. It does not constitute endorsement of any activities (including illegal activities), products or services. You are solely responsible for complying with the applicable laws, including intellectual property laws, when using our services or relying on any information herein. We do not accept any liability for damage arising from the use of our services or information contained herein in any manner whatsoever, except where explicitly required by law.
Table of Contents.
- Introduction to Flaresolverr
- What is it?
- How does it work?
- Advantages and disadvantages
- Installing Flaresolverr.
- Linux (via terminal)
- Docker
- Windows
- Configuring Flaresolverr
- Changing Environment Variables.
- Cloudflare configuration
- Plex configuration
- Prometheus configuration
- Configuring FlareSolverr for other apps.
- Using Flaresolverr
- Using it with the “curl” command on Linux.
- Using it with the Python Requests library.
- Conclusions.
1. Introduction to Flaresolverr.
a. What is Flaresolverr and what is its relationship with Cloudflare?
Cloudflare provides anti-bot protection tools basically for maintaining website security (avoiding DDoS attacks), performance, and protecting user data.
To deal with bots and identify humans, CloudFlare presents obstacles (to the browser) that involve JavaScript code with mathematical challenges. Traditional access to Cloudflare-protected websites would involve undergoing various obstacles like fingerprinting challenges, CAPTCHAs, and other tests to prove human interaction. Such obstacles are basically built to stop malicious bot behaviors.
FlareSolverr is an open-source proxy server built to deal with (or bypass) these challenges posed by Cloudflare’s anti-bot measures.
Note: Not all bots are built for malicious behaviors! Bots are simply automated programs that perform tasks. While there are certainly bots designed for nefarious purposes, such as spamming, hacking, and fraud, there are also bots built for legitimate use cases. Examples would be search engine crawlers, chatbots, social media bots, web scrapers, monitoring and alerting bots, virtual assistance, etc.
b. How does FlareSolverr work?
FlareSolverr works as a proxy server designed to evade Cloudflare’s anti-bot protocols. It simulates an actual browser’s behavior, so it can tackle challenges, navigate security checks, and render webpage content.
Refer to the picture below.
- A user (i.e. Python HTTP Client) initiates a request
- FlareSolverr waits for user requests (in an idle state) and then uses Python Selenium and Undetected ChromeDriver to create a web browser (Chrome) instance.
- It then forwards the request to the site (which is protected by CloudFlare). It waits for the challenge to be solved.
- The target site responds to the request as usual. Cloudflare also responds to the request because its challenge was solved without any issues.
- The HTML code is scraped, and the cookies are sent back to the user.
- The resulting HTML code and cookies are accessible to clients for utilization with other HTTP clients like Python Requests.

c. Common Use Cases for FlareSolverr
Flaresolverr is constantly improving and adding integrations. These new integrations allow FlareSolverr to go beyond scraping—use it with SEO tools, AI model training, and automated search indexing workflows.
- Bypass Cloudflare protection for web scraping (news, e-commerce, price monitoring). Learn more about the basics of web scraping.
- Access torrent and Usenet indexers via Jackett, Prowlarr, and Sonarr/Radarr
- Enable stable remote access to the Plex Media Server behind Cloudflare
- Monitor protected APIs using Prometheus + FlareSolverr proxying
- Automate data collection for SEO tools scraping Google or Cloudflare-SERP protected sites
- Feed LLMs and AI models with scraped content from protected domains (for training or fine-tuning)
- Integrate with headless browser frameworks like Playwright, Puppeteer, or Browserless for stealth scraping
- Bypass CAPTCHA walls (with limited success or external solvers like 2Captcha or CapSolver)
d. Advantages and disadvantages.
FlareSolverr can be a valuable tool for bypassing Cloudflare’s anti-bot mechanisms. Users who want to access protected content will benefit from FlareSolverr. However, there are also some disadvantages and considerations to keep in mind when using it.
Advantages.
- Automated bypassing: FlareSolverr’s automated approach spares you from having to solve challenges manually.
- Efficient scraping: You can efficiently scrape data from websites hosted on Cloudflare’s CDN.
- Enhanced accessibility: It enables smooth access to Cloudflare-protected content by successfully impersonating a real web browser.
- Seamless integration: FlareSolverr uses Python Selenium, and Undetected ChromeDriver. This integration ensures that this solution can be easily incorporated into your existing scraping workflows.
- Versatility: You can use the HTML code and cookies obtained from FlareSolverr’s solution with other HTTP clients like Python Requests.
Learn how to web scrape with Python and the Requests library and incorporate FlareSolverr in your project.
Disadvantages.
- Legal and ethical concerns: The most significant use is its legal and ethical concerns. Bypassing anti-bot protection mechanisms might violate the terms of use of certain websites or services.
- Website stability: Using FlareSolverr or similar tools to bypass protections might put additional load on the target website’s server.
- Resource consumption: Bypassing Cloudflare challenges requires launching an extra browser instance and solving JavaScript puzzles. Both of these tasks consume more computational resources.
- Dependency on third-party services: FlareSolverr relies on Selenium, ChromeDriver, and other third-party tools. So, if these tools are not updated or working, FlareSolverr will also be affected.
- CAPTCHA challenges: While this tool can handle many anti-bot mechanisms, there may be instances where CAPTCHAs are presented. CAPTCHAs are intentionally designed to be difficult for automated systems to solve.
| 🔔Note: As of today, native captcha solvers still do not work out-of-the-box. However, third-party solvers like CapSolver and 2Captcha can be integrated manually or via middleware. |
2. Installing Flaresolverr.
In this section, we will provide you with step-by-step instructions for installing FlareSolverr on various operating systems. We will install FlareSolverr in Linux (via terminal and headless browser), on Docker, and finally on Windows.
Disclaimer: The information in this guide is provided for general purposes only and is not guaranteed to be accurate, complete, or up-to-date. We are not liable for any losses or damages arising from the use of this information. Links to external websites do not imply endorsement, and we are not responsible for their content. The use of FlareSolverr may have legal implications, so ensure compliance with relevant laws and terms of use. This guide is not a substitute for professional advice. By using this guide, you agree to these terms.
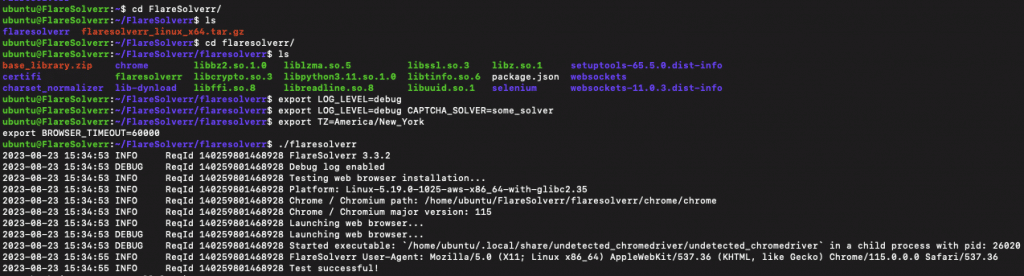
a. Installing FlareSolverr on Linux (via terminal)
Installation on Linux is a straightforward process, and this guide will walk you through the steps to get it up and running on your system. We will install FlareSolverr on an Ubuntu 22.04.
Prerequisites:
Before you begin the installation process, ensure that you have Python and Python Package Manager (pip). You’ll need pip to install and manage dependencies. As per FlareSolverr’s GitHub repository, it is recommended to have Python 3.11
Installation Steps:
Follow these steps to install Flaresolverr (pre-compiled binary) on your Linux system:
- Launch a terminal window on your Linux machine.
- Create a directory where you will save the FlareSolverr download.
For example:
|
1 2 |
mkdir FlareSolverr cd FlareSolverr |
- Download the Binary: You can use the wget command to download the binary directly from the official Flaresolverr’s URL (Check the latest release and copy the link)
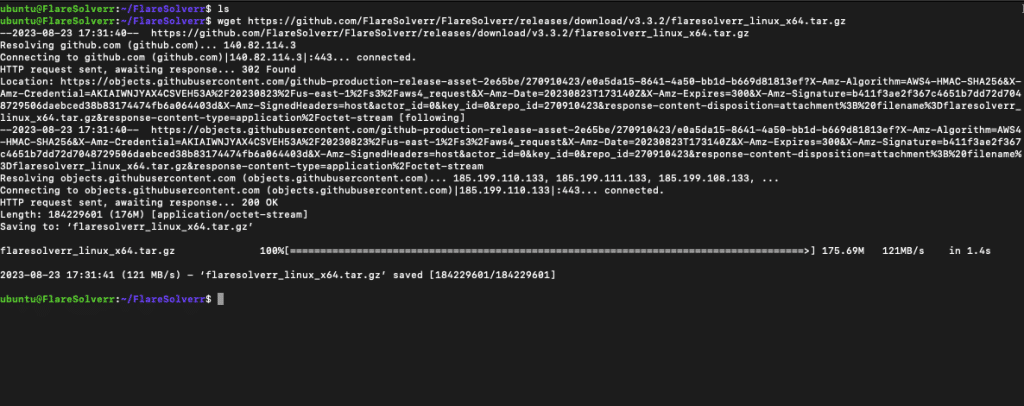
- Extract the Archive: Use the tar command to extract the contents of the downloaded archive:
|
1 |
tar -xzf flaresolverr_linux_x64.tar.gz |
- Change into the extracted directory.
|
1 |
cd flaresolverr |
- You can now run FlareSolverr using the ./flaresolverr command:
|
1 |
./flaresolverr |
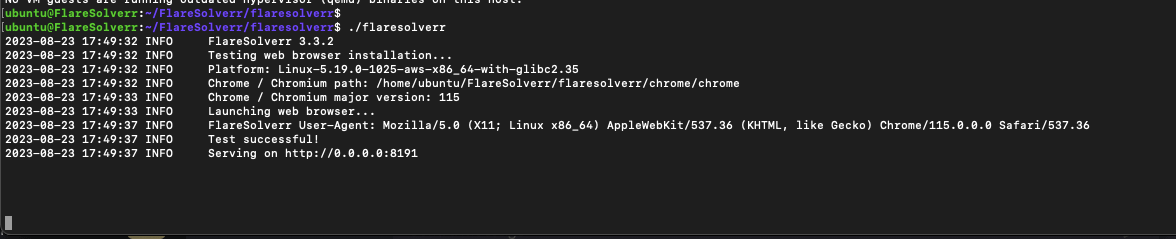
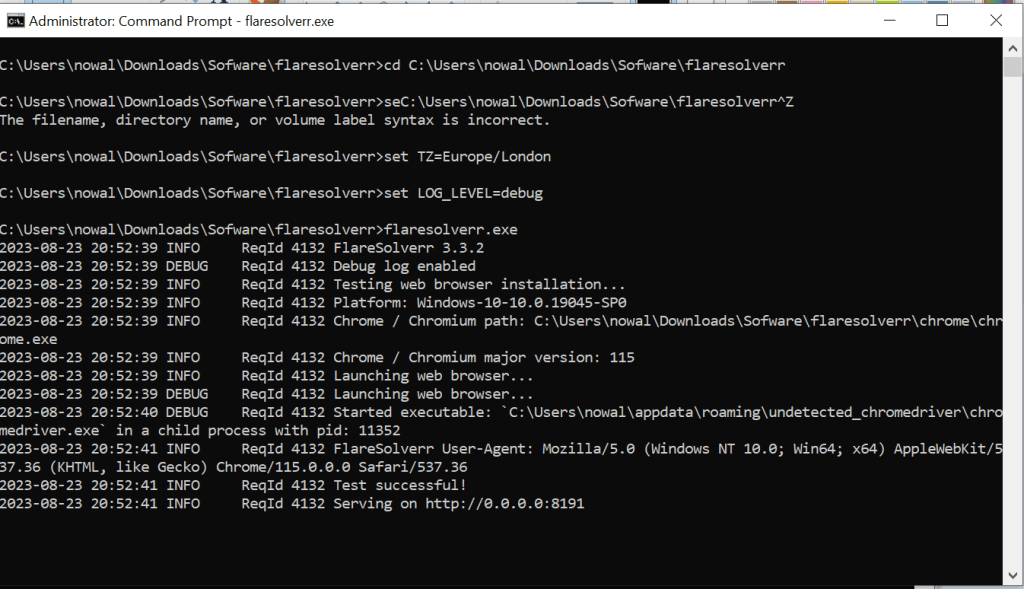
Congratulations! If you see a similar message as above, it means that your FlareSolverr is up and running. The output indicates that the test for web browser installation was successful, and the FlareSolverr service is now serving on http://0.0.0.0:8191.
Accessing FlareSolverr!
FlareSolverr should now be running in the background of your Linux machine. The address 0.0.0.0 indicates that Flaresolverr is binding to all available network interfaces on the host machine. This means that you can access it using the machine’s IP address or hostname from any device on the same network.
Troubleshooting!
Quick troubleshooting table!
| Problem | Solution |
|---|---|
libatk-1.0.so.0 missing | sudo apt install libatk1.0-0 |
| Xvfb not found | sudo apt install xvfb |
| CAPTCHA error | No solver configured – use 2Captcha or CapSolver |
Need support? Most FlareSolverr issues—like browser errors or CAPTCHAs—are actively discussed in the GitHub Issues page, where you can find fixes or even add your own bug reports.
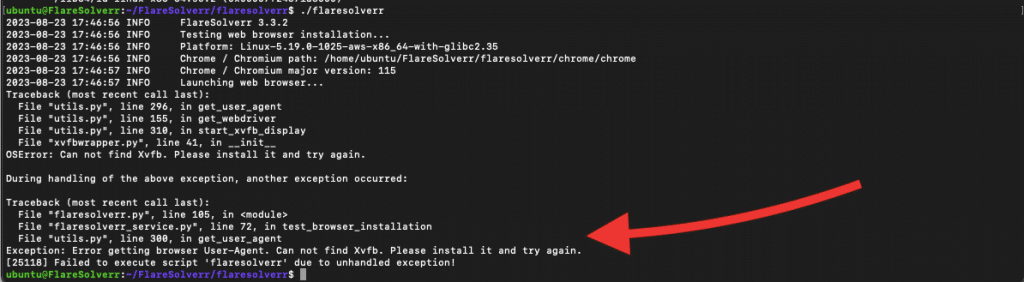
We are running FlareSolverr from a virtual machine (no GUI), so we’ve got the following errors.
- “If you are seeing the following error: “error while loading shared libraries: libatk-1.0.so.0: cannot open shared object file: No such file or directory” —- ERROR Chrome / Chromium version not detected!” you’ll need to install the necessary dependencies for the Chrome or Chromium browser.
Issue the following commands:
|
1 2 |
sudo apt-get update sudo apt-get install libxcomposite1 libxdamage1 libxrandr2 libxinerama1 libxcursor1 libxss1 libxext6 libxrender1 libasound2 libdbus-1-3 libatk1.0-0 libgtk-3-0 libgbm1 |
- If you see the error: “OSError: Can not find Xvfb. Please install it and try again.,” it means that Flaresolverr, cannot find Xvfb, which is required to launch the web browser for FlareSolverr’s functionality. Xvfb is a virtual framebuffer X server that allows applications to run graphical interfaces without a physical display. Xvfb is used to simulate a display environment for the headless browser. It is required for the headless browser to operate properly even when there is no physical display available.
Install Xvfb using the following command:
|
1 |
sudo apt-get install xvfb |

| 🧠Ditching Xvfb — Use Native Headless Chrome Instead Historically, FlareSolverr users on Linux needed to install Xvfb (X virtual framebuffer) to simulate a display for headless browser automation. While this still works, modern Chrome versions (v59+ on Linux, v60+ on Windows/macOS) can run in headless mode—no X server required. |
Also, if you are using a headless browser, you’ll need to define it later in FlareSolverr’s environment variables. More on this in the next section.
b. Installing Flaresolverr on Docker
The following is a step-by-step guide on installing FlareSolverr in Docker. We assume that you already have Docker installed on your computer. To get the latest features, always download from the official FlareSolverr GitHub repository, where new updates and community fixes are regularly pushed. You can also add FlareSolverr to your toolset via Docker, which simplifies setup and improves update management.
Quick Start!
|
1 2 3 4 |
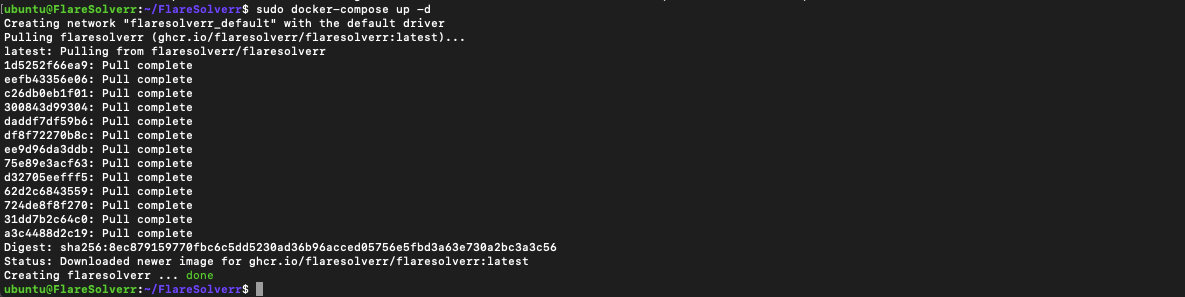
git clone https://github.com/FlareSolverr/FlareSolverr.git cd FlareSolverr sudo docker-compose up -d |
We will show this step-by-step guide using version 24.0.5, running on Ubuntu 22.04 Jammy. For more information on how to install Docker, refer to the following official guide.
- Find the related images in DockerHub. The image is supported on different architectures, including, x86:
linux/386, x86-64:linux/amd64, ARM32:linux/arm/v7, and ARM64:linux/arm64. - Start the FlareSolverr container. Use either Docker Compose or the CLI. FlareSolverr provides a docker-compose.yml configuration file— which is much easier than CLI (if you have Docker Compose installed). Also, pulling the image is unnecessary, as this is already referenced in the compose file.
- Clone the repository containing the
docker-compose.ymlconfiguration file:
- Clone the repository containing the
|
1 |
git clone https://github.com/FlareSolverr/FlareSolverr.git |
- Navigate to the repository directory:
|
1 |
cd FlareSolverr |
- Start the container using Docker Compose (ensure you have admin permissions to run this command or use the sudo):
|
1 |
sudo docker-compose up -d |
Verify the installation.
Check if the FlareSolverr container is running by executing:
|
1 |
sudo docker ps |
- You should see the
flaresolverrcontainer in the list.

Accessing FlareSolverr
FlareSolverr should now be running in the Docker container. You can access it by going to ‘http://localhost:8191’ in your web browser.
That’s it! You have successfully installed FlareSolverr using Docker containers. You could now use it to bypass challenges from websites protected by Cloudflare.
c. Installing FlareSolverr on Windows
It is recommended to install FlareSolverr on Windows using the precompiled binaries— which are available only for the x64 architecture on Windows. Although it is also possible to install from source, that is not recommended for Windows due to the architecture limitations. Additionally, the Docker container ‘image’ is primarily designed to be run on a Linux-based host machine (not Windows).
To install FlareSolverr on Windows, you can follow these steps:
- Download the binary: Go to the FlareSolverr Releases page on GitHub. Find the latest release under the “Assets” section, and find the appropriate download for Windows. It should be a zip file. Download the FlareSolverr zipped file for Windows x64.
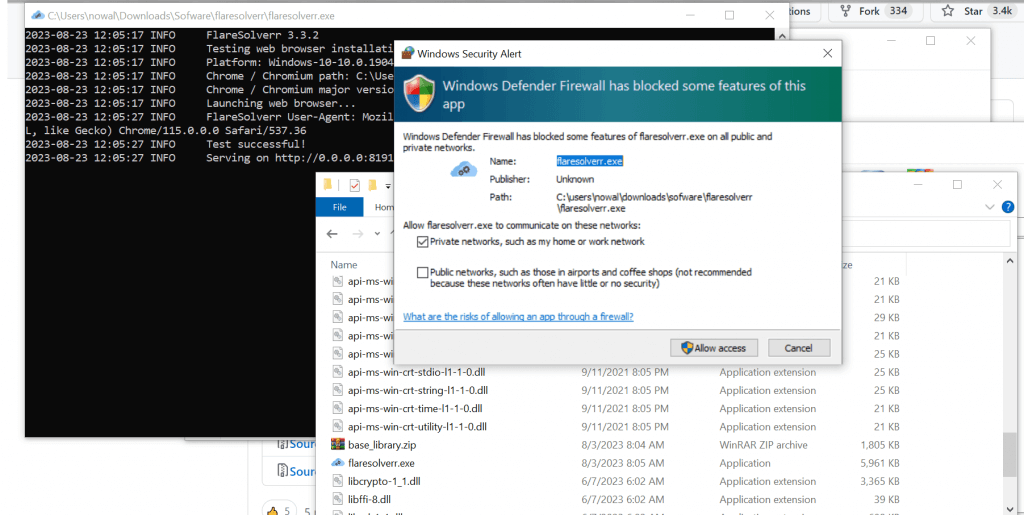
- Uncompress and execute the FlareSolverr binary: Run the downloaded FlareSolverr.exe executable. Once you run it, the terminal will open, letting you know that FlareSolverr User-Agent is already running successfully.
- Allow access to this application from your Windows firewall.
That’s it! You’ve successfully installed and executed FlareSolverr on Windows using the precompiled binary.
3. Configuring Flaresolverr.
Now that you have managed to successfully finished the installation, it is time to configure it.
Configuring FlareSolverr for web applications and services like Cloudflare and Plex involves configuring the necessary environment variables. So, if you installed the software successfully, you should now be able to modify its environment variables.
FlareSolverr provides environment variables that you can use to configure its behavior. You can find information about these variables in the documentation of FlareSolverr’s GitHub Repository.
🔁 Rotate. Refresh. Retry.
Pair FlareSolverr with rotating residential proxies to cycle through trusted identities.
Explore Rotation →a. Changing Environment Variables.
Set up variables in Linux.
Change FlareSolverr’s environment variables in Linux, by setting them with the “export” command, before starting the FlareSolverr process in the terminal. Here’s how:
- Export the environment variable(s) you want to change.
- For example, to change the LOG_LEVEL to debug, and change the time zone you would run:
|
1 2 |
export LOG_LEVEL=debug export TZ=America/New_York |
Changing variables in Docker.
To change FlareSolverr variables, you’ll need to open and modify the docker-compose.yml file in a text editor.
- Find the services section corresponding to your FlareSolverr service— in our case, it’s named flaresolverr. Within the service definition, you’ll see the environment section. This is where you can update your environment variables.
- For example, you can change the LOG_LEVEL environment variable to debug, TimeZone, default ports, run webbrowser in headless mode, etc.
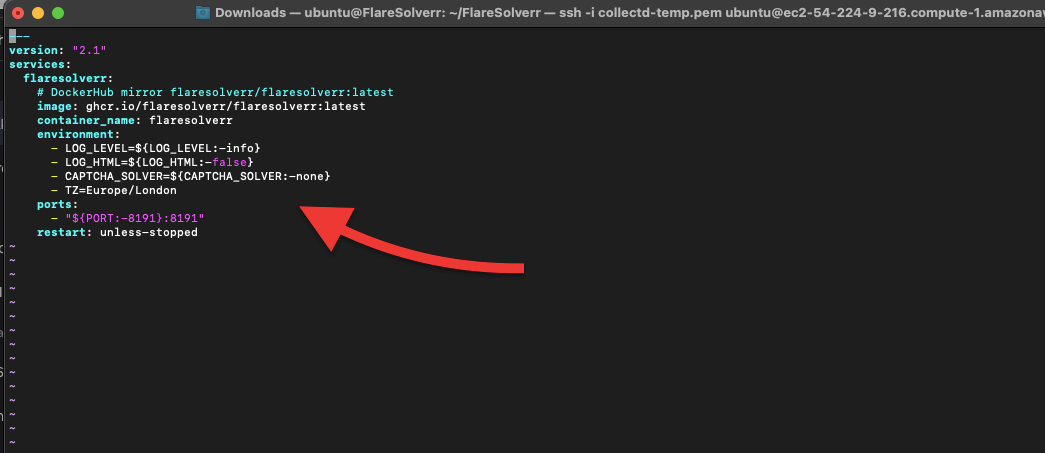
Below are the steps to configure FlareSolverr for each of these scenarios:
Configuring variables in Windows.
To change variables in Windows: First, go to the directory where FlareSolverr is installed, then run the “set” command followed by the variable that you want to modify.
|
1 2 |
set TZ=Europe/London set LOG_LEVEL=debug |
Now, that you know how to set up FlareSolverr’s variables, let’s see how to change them for specific web applications.
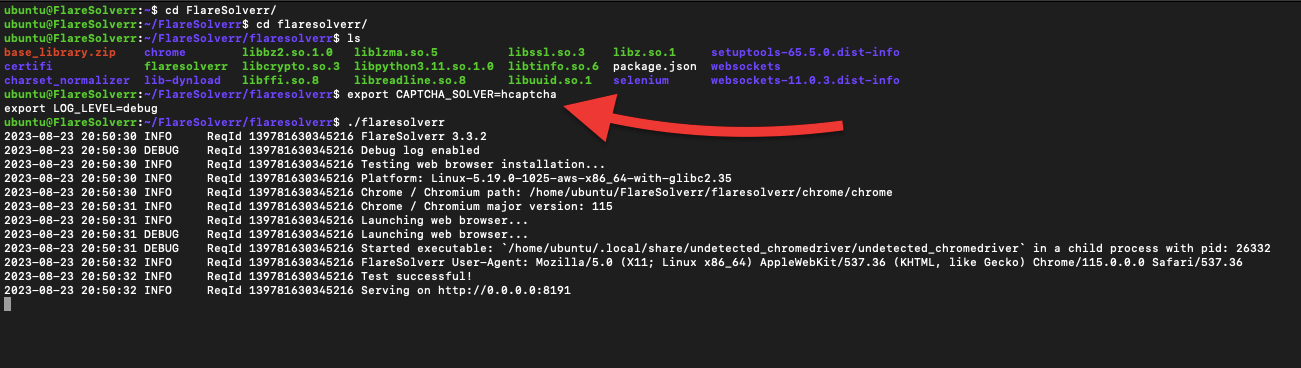
b. Configuring FlareSolverr for Cloudflare:
You can configure how FlareSolverr bypasses Cloudflare challenges by adjusting its environment variables. The key ones are the CAPTCHA_SOLVER and LOG_LEVEL variables.
- The following change will set the CAPTCHA solver to “hcaptcha” and increase the logging level to debug.
|
1 2 |
export CAPTCHA_SOLVER=hcaptcha export LOG_LEVEL=debug |
- Start FlareSolverr:
|
1 |
./flaresolverr |
- FlareSolverr should now be configured to handle Cloudflare challenges effectively.
c. Configuring FlareSolverr for Plex:
Configuring FlareSolverr for Plex might be necessary in situations where your Plex Media Server is behind Cloudflare protection. As you might know already, Cloudflare’s security measures may lead to challenges for accessing Plex content.
By integrating FlareSolverr with Plex, you can improve the reliability of your Plex Media Server. This setup ensures that your media content is easily accessible to authorized users without encountering obstacles.
How to do this?
- Set Up Environment Variables: For Plex, you’ll typically need to set the PROXY environment variable. This proxy variable will route Plex’s traffic through the proxy server. Also, ensure to adjust other relevant environment variables such as LOG_LEVEL (if needed.)
|
1 2 |
export PROXY='{"url": "http://proxy-server-address:proxy-port"}' export LOG_LEVEL=info |
- Replace “http://proxy-server-address:proxy-port” with the actual address and port of your proxy server.
- Start FlareSolverr:
|
1 |
./flaresolverr |
- This will configure FlareSolverr to work as a proxy for Plex traffic.
d. Configuring FlareSolverr for Prometheus.
FlareSolverr is quite useful if you are using Prometheus (the open-source monitoring tool) to keep track of web services or APIs protected by Cloudflare. If you are using Prometheus, you are likely to encounter challenges with accessing the endpoints due to Cloudflare’s protection mechanisms. When you integrate FlareSolverr with Prometheus, you can configure Prometheus to make requests through the FlareSolverr proxy.
To integrate Prometheus with FlareSolverr, follow these steps:
- Enable Prometheus Exporter:
- Set the environment variable PROMETHEUS_ENABLED to true in FlareSolverr.
- If using Docker, expose the Prometheus exporter port (PROMETHEUS_PORT) in your Docker configuration.
- Configure Prometheus Exporter Port:
- Set the environment variable PROMETHEUS_PORT to specify the exporter’s listening port.
- Run FlareSolverr with the configured environment variables. If using Docker, ensure the Prometheus exporter port is exposed.
- Open your Prometheus configuration file (prometheus.yml) and add a scrape_config section to specify scraping metrics from FlareSolverr. For more on how to configure Prometheus, check the official guide.
e. Configuring FlareSolverr for other applications:
Two amazing indexer managers/proxies, including Prowlarr and Jackett seem to be affected by CloudFlare’s challenges. Since some torrent and Usenet indexers use Cloudflare protection to avoid being targeted by DDoS attacks, these tools can’t programmatically access some sites.
Both Jackett and Prowlarr now offer built-in support for FlareSolverr as an indexer bypass option. Make sure to check their config pages to enable FlareSolverr in your search workflows.
In FlareSolverr, set to the appropriate CAPTCHA_SOLVER environmental variables (if available). You might also need to add the FlareSolverr’s IP or hostname on the target application. Below are a few examples:
- Jackett. To allow Jackett to successfully communicate with torrent trackers and Usenet indexers, ensure the following:
- Ensure Jackett is up and running. Configure the FlareSolverr URL (for example flaresolverr:8191) and apply the changes. If you want to use this configuration long-term, disable the Updates.
- Check Jackett’s complete guide to learn how to install, configure, and use Jackett.
- Prowlarr. To allow Prowlarr to successfully talk with torrent and Usenet sites, it needs to overcome the CAPTCHA challenges.
- Go to the Prowlarr’s settings. Navigate to “Add an Indexer Proxy” and select FlareSolverr.
- Enter the Host. It should be something like http://flaresolverr:8191. Check our Prowlarr guide to learn how to use and configure this tool.
In addition, PVR automation tools like Sonarr, Radarr, or Bazarr which access media and subtitle information from some of these sites, are also indirectly affected. They use both Jackett and Prowlarr to access the site’s information and are quickly challenged and stopped by Cloudflare’s algorithms.
4. Using FlareSolverr.
You can use FlareSolverr with the “curl” command in Linux or by using Python Requests.
a. Using FlareSolverr with the “curl” command on Linux.
With the “curl” command on Linux, you can interact with the FlareSolverr’s API to perform various actions. The curl command helps make HTTP requests from the command line. It’s useful for quick and simple requests, so it is your best option if you are testing FlareSolverr’s API endpoint. But know that “curl” can become more complex when dealing with more complex interactions, like data processing and automation.
i. Creating a new session
To launch a new browser instance and create a session:
| curl -L -X POST ‘http://localhost:8191/v1’ \ -H ‘Content-Type: application/json’ \ –data-raw ‘{ “cmd”: “sessions.create” }’ |
ii. Listing active sessions
To get a list of all active sessions issue the following set of commands:
| curl -L -X POST ‘http://localhost:8191/v1’ \ -H ‘Content-Type: application/json’ \ –data-raw ‘{ “cmd”: “sessions.list” }’ |
iii. Destroying a Session
To destroy an existing session issue the following command.
| curl -L -X POST ‘http://localhost:8191/v1’ \ -H ‘Content-Type: application/json’ \ –data-raw ‘{ “cmd”: “sessions.destroy”, “session”: “session_id_here” }’ |
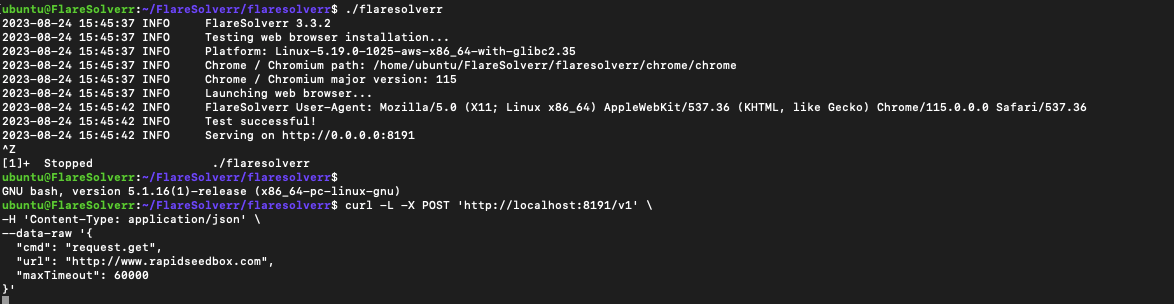
iv. Making a GET request
To make a GET request using a specific session.
| curl -L -X POST ‘http://localhost:8191/v1’ \ -H ‘Content-Type: application/json’ \ –data-raw ‘{ “cmd”: “request.get”, “url”: “http://www.example.com”, “maxTimeout”: 60000 }’ |
An example of using the curl command for a GET request:
b. Using FlareSolverr with the Python Requests library.
Python provides many extensive libraries and tools for working with web APIs (which is perfect for FlareSolverr). With Python, you can create more sophisticated scripts for interacting with FlareSolverr. This approach is ideal for automation and creating custom scripts. Of course, to use Python, you’ll need to develop a script, which can be more time-consuming and challenging than using the ‘curl’ command.
To use Python, you’ll need the following:
- Make sure you have Python installed on your system.
- Install the Requests Library: Use this library to make HTTP requests.
- Ensure FlareSolverr is up and running before executing the script.
- Ensure that FlareSolverr is configured correctly and is listening on the expected port (e.g., 8191).
- Your system should have network connectivity to access the http://localhost:8191 address.
Below is an example of a Python script using the requests library.
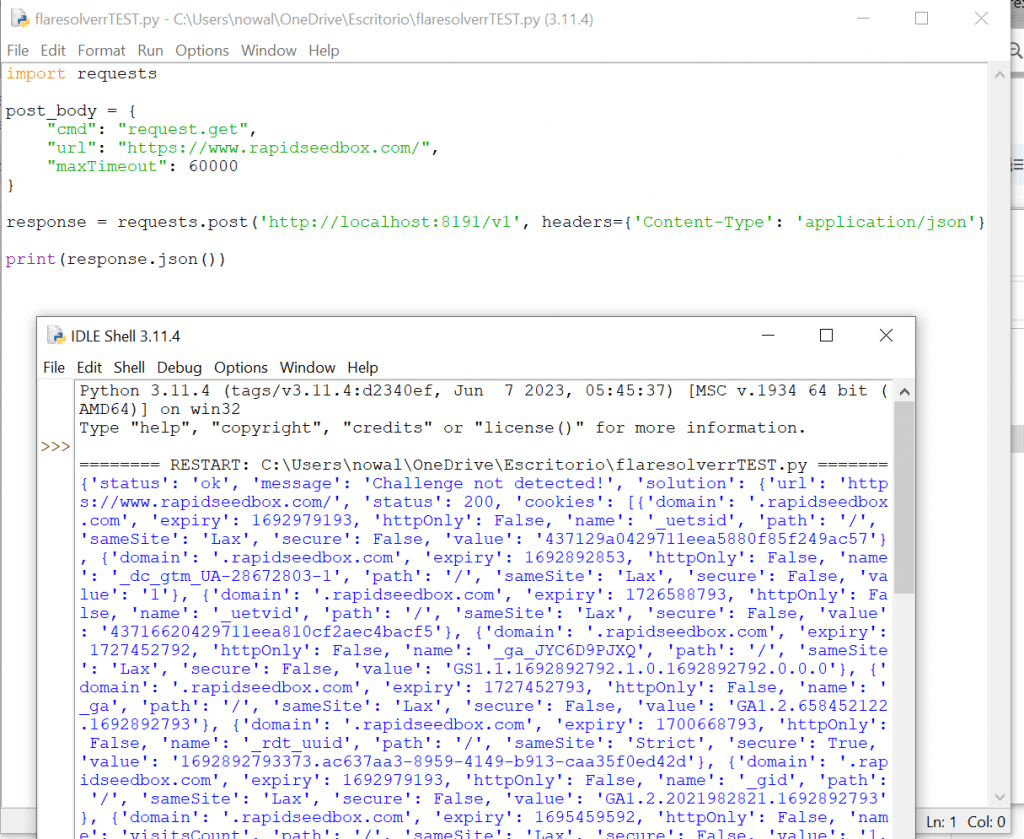
Note: We are using our own URL (rapidseedbox.com) to do this test. But you can simply replace the site with your own target site.
import requests post_body = { “cmd”: “request.get”, “url”:”https://www.rapidseedbox.com/”, “maxTimeout”: 60000 } response = requests.post(‘http://localhost:8191/v1’, headers={‘Content-Type’: ‘application/json’}, json=post_body) print(response.json()) |
- You can copy the above script and save it as .py. Then run it in your Python environment.
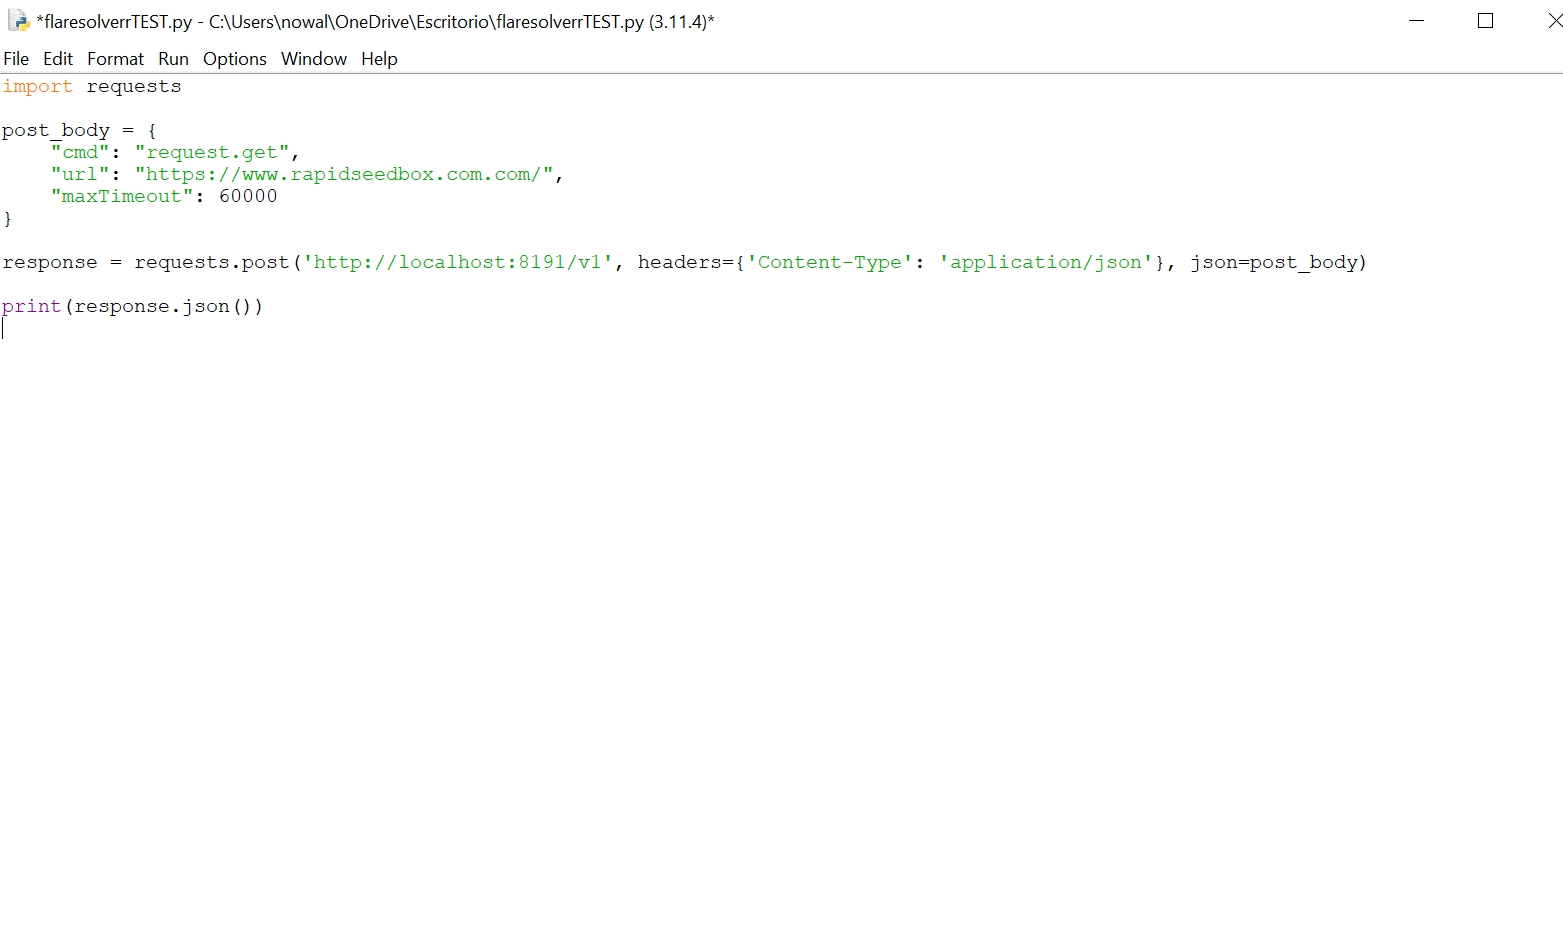
- The result should return the HTML code with the cookies (from the session).
- From the script module running on IDLE Shell (as shown in the picture below), you’ll see on the first line that this specific site is not giving out a Cloudflare challenge.
- You can try the script with sites that are behind Cloudflare and that present a challenge.
5. Conclusions.
FlareSolverr is an invaluable tool for enhancing web scraping and data retrieval capabilities. It is also a crucial tool if you are using Prometheus to monitor web services or APIs protected by Cloudflare. Additionally, FlareSolverr goes hand in hand with tools like Jackett and Prowlarr, to help establish communications with torrent and Usenet sites (behind Cloudflare’s CDN).
In this guide to FlareSolverr, we went through the installation of FlareSolverr on Linux, Docker, or Windows. We learned how to configure it for different services like Prometheus, Plex, and other apps. Additionally, we also briefly learned how to use it with the curl command and with the Python Requests library.
We hope you found this guide informative. If you have any questions and suggestions about FlareSolverr do not hesitate to leave them in the comments section below.
🧪 Test FlareSolverr at Full Power
FlareSolverr works best with stable, real-user IPs that don’t trigger alarms.
Try With Proxies →
Thanks for the guide ! A way to update docker Will be a great addition to the guide
Thanks Noryn!
We’ll keep your suggestion in mind with the next update!
maybe correct the first line of code so it acoustically works. Kind of embarrassing don’t you think. At least give it one proof read ffs
Thank you for the kind reminder. For some reason the double-dashes are not appearing correctly. We will resolve this as soon as possible.
Oi ,
Uma parte que ficou claro foi a nota de sobre o CAPTCHA da cloudflare onde você deu export de variável de ambiente para hcaptcha, isso vai fazer os CAPTCHAs serem resolvidos ou somente ativa para um tipo de CAPTCHA?
Hi Renato, Definir a variável de ambiente hCaptcha otimiza o FlareSolverr para desafios hCaptcha. Isso não limita o FlareSolverr a resolver apenas o hCaptcha. Seu objetivo é melhorar o desempenho e a taxa de sucesso na resolução específica do hCaptcha, ao mesmo tempo em que tenta resolver outros tipos de CAPTCHA.
This is not a very thorough guide for widows users. “First, go to the directory where FlareSolverr is installed, then run the “set” command followed by the variable that you want to modify. ” so I am first supposed to go to this directory? Ok? There’s no set command in this directory. So I am assuming now, that I need to get here, through a command prompt or PowerShell, both of which while functioning similarly, tend to take commands and paths a bit differently depending on the use case. “Opening in terminal” opens a powershell instance which the following set commands don’t work.
A little clarity and consistency would go a long way. I do appreciate the effort, though.
Yeah, I’m stuck after running the .exe file. I can’t figure out “where FlareSolverr is installed” and have no idea how to run the “set” command. I’ve tried a command prompt, I’ve searched for another install folder – nothing.
Hey James and Ryan, thanks for the feedback! We’ll make sure to update the guide for clarity.
Here’s a quick walkthrough to help you out in the meantime.
When you extract the .zip file, it creates a folder like flaresolverr_windows_amd64 – this is the directory you need to “go to.”
Then, open the command prompt and type in:
cd C:\Users\YourName\Downloads\flaresolverr_windows_amd64
Once you are in the folder, run FlareSolverr via flaresolverr.exe (in CMD again)
I’m a total newbie at this stuff. To be clear, is there no way to install FlareSolverr through RapidSeedbox (via one-click apps)? It must be configured separately in order to work inside Prowlarr?
Hi noob, Unfortunately, FlareSolverr isn’t available as a one-click app on most seedboxes.
Doesn’t work with kickasstorrent anymore.
I’ve run the .exe file – but I cannot figure out the next steps. Where is Flaresolverr installed?!? It opens a terminal and shows “Test Successful” and “serving on http://0.0.0.0:8191” but I cannot figure out what to do next!
Hi Ryan,
If you’re seeing “Test Successful” and serving on http://0.0.0.0:8191, that means FlareSolverr is running correctly.
Keep in mind you don’t use it directly in a browser. Instead, it works like a middleman for apps like Jackett, Prowlarr, or custom scripts. You send it a request, and it returns the solved page for you.
If you want to test it, you can use Postman or curl to send a request like this:
POST http://localhost:8191/v1
{
“cmd”: “request.get”,
“url”: “https://example.com”
}
I should add – that when I try to run the command exactly as you typed it in command prompt to set the time zone – even setting to London like in your example I get the following error “is not recognized as an internal or external command,
operable program or batch file.”
I downloaded and unzipped the x64 file from GitHub – version 3.3.25. Run the .exe – then I’m stuck.
Hi Ryan,
Make sure you’re in the folder where the .exe is when you run it.
I’ve already replied to the other comments regarding you being stuck. Hope this helps!
As i own a rapidseedbox will there be some simple instructions on how to install it soon?
Hi Dave,
We are working on it!