Welcome to our guide on managing duplicate files like a master. This guide will show you how to reclaim valuable storage space and declutter your computer. We’ll dive deep into the world of duplicate files and its challenges. We’ll introduce you to dupeGuru— an exceptional free cross-platform app that empowers you to find, scan, and effectively delete redundant files.
We’ll delve into the dupeGuru’s features, benefits, and pros and cons. We’ll also provide a detailed review on how to use it and also highlight some noteworthy alternatives.
Without further ado, let’s start dealing with those nasty duplicate files like a true boss!

Table of contents.
- Understanding the Duplicate Files Problem
- Introducing dupeGuru.
- The Benefits of Using dupeGuru
- Pros and Cons of dupeGuru
- Getting Started with dupeGuru
- Download and Installation
- Set up your first scan.
- Reading the Results
- Taking Action
- Additional Options
- Tweaking dupeGuru’s settings (the more options menu).
- Standard Mode’s Settings
- Music and Image Modes’s unique settings.
- Alternatives to dupeGuru.
- Final words.
1. Understanding the Duplicate Files Problem
Duplicate files are files that can be identical in either content or filenames. They can be created either intentionally but also unintentionally. Duplicate files can accumulate on your computer for any of the following reasons:
- Accidentally downloading duplicate files because you forgot or are uncertain about previous downloads.
- Backup files to multiple locations. Backups can amass duplicate files if you forget to set version controls.
- Sharing files can result in duplicates if you or the recipient saves them without checking for existing versions.
- Intentionally create copies. You might generate duplicate copies of files (original and edited versions) for different contexts, projects, or modifications.
- Bad data organization practices. When you sort files into diverse folders you can inadvertently create duplicate files scattered across the system.
- Compressed archives can inadvertently lead to duplicate files due to having multiple versions. Learn how to compress and archive files like a pro with 7zip.
Duplicate files make your file management and organization more challenging, and worst of all, they waste your precious storage. These identical files create more clutter, which makes it also more difficult to locate the specific files you need. On top of that, duplicates also create confusion which hurts your productivity and leads to dangerous complications with your file synchronization and backup processes.
Although you could manually attempt to identify and manage such duplicate files, the process can be quite challenging and ineffective. The real way to address these challenges effectively is to use a comprehensive solution that can efficiently identify and manage duplicate files.
2. Introducing dupeGuru.
dupeGuru is a cross-platform tool (written in Python 3) that can help you find and manage duplicate files on your computer. It is efficient, customizable, and safe to use.
dupeGuru scans your computer (specific directories or drives) in an attempt to find duplicate files by filename or content. Once dupeGuru finds duplicates, it will display them in a list with information about each file. You can also filter and sort the results to easily find the files you want to work with.
This duplicate manager allows you to do whatever you want with each duplicate. You can go through each duplicate, check its information like size, location, and last modified date, and make a decision. For instance, you can delete, move to a different location, or rename duplicates.
a. Key Features of dupeGuru
- Cross-platform GUI: dupeGuru’s GUI allows you to find duplicate files in Linux, OS X, or Windows.
- Efficiency: dupeGuru uses a quick fuzzy matching algorithm to scan and find similar filenames quickly.
- Customizable: You can tweak dupeGuru’s matching engine to find exactly the kind of duplicates you want to find.
- Safe: dupeGuru’s safety-focused engine has been specially designed with safety in mind. It prevents you from deleting files you didn’t mean to delete.
- Gives you decision-power. dupeGuru gives you the last word and what you want to do with the duplicates found.
- Media-tailored. The tool comes with a special mode for music and pictures to scan and identify potential media duplicates.
b. The benefits of using dupeGuru.
Using dupeGuru to find duplicates gives you various advantages. By finding and deleting duplicate files, you can free up valuable storage space on your hard drive. Additionally, by removing those duplicates, you can declutter, and improve your file management and organization. It simply makes it easier to find the exact files you need.
Additionally, dupeGuru is quite handy in scenarios where you download many files to your computer or seedbox (for seeding/peering purposes). Once your files are downloaded and stored on the seedbox, you’ll need a way to manage the downloaded content (especially if it contains duplicate files). With dupeGuru, seedbox users can optimize their storage and also avoid transferring duplicates inadvertently.
c. Pros and Cons Review of dupeGuru.
Pros
- Cross-platform compatibility: One of the standouts of dupeGuru is that the tool is available for Windows, macOS, and Linux.
- Open-source and free: Being an open-source tool means that dupeGuru has a solid community of contributions, is transparent, and can be potentially customization by its users. Being open-source also means that dupeGuru is 100% free to use
- Advanced filtering: dupeGuru does a great job when filtering scanning results. It offers advanced filtering options, which allow you to customize your search criteria and fine-tune the duplicate file detection process.
- Content-based matching: Aside from finding filename duplicates (any tool can do that) DupeGuru also uses content-based matching to identify duplicates. This feature is highly beneficial for finding files with similar content but different names.
- Support for multiple file types: dupeGuru supports various file types. With it, you can scan and find duplicates in different types of media, documents, and more.
Cons
- Limited visual interface: Many users find the dupeGuru’s interface less intuitive and visually appealing compared to other alternatives.
- Performance issues: Many users have also reported performance-related issues, especially when dealing with large datasets, which might lead to longer scanning times. Although the tool is lightweight it does consume the computer’s resources when scanning large datasets.
- Less intuitive for beginners: The advanced “more” options and settings can be overwhelming for beginners who are not familiar with duplicate file management tools. Those new users might experience a learning curve when trying to understand and make the most out of this tool. But this complexity does not only affect beginners, it also affects any user seeking a simple and quick duplicate detection without advanced options.
- Lack of visual duplicate detection: Unlike specialized tools like VisiPics (image file duplicate detection), dupeGuru doesn’t offer visual (side-by-side) similarity comparisons for image files. For many users focused on finding image duplicates, this might be a big limitation.
3. Getting Started with dupeGuru
This section will guide you through the initial steps of getting started with dupeGuru. If you follow this step-by-step guide to dupeGuru, you’ll be identifying and managing duplicate files in no time.
Disclaimer: The content provided here is meant to offer educational insights and information. Please be aware that Rapidseedbox is not liable for any installation or maintenance of dupeGuru on your computer. By following this guide, you acknowledge full responsibility for the installation of dupeGuru on your resources.
a. Download and Installation.
- Downloading and installing dupeGuru is quite straightforward. Simply, visit the official site— which will redirect you to dupeGuru’s GitHub official repository.
- Find the latest version of dupeGuru for your specific platform. dupeGuru offers compatibility with Windows, Mac, and Linux operating systems.
- dupeGuru Download. Download the Installer and uncompress it. Run the executable file (likely .exe). There is no installation wizard, the executable file will immediately open the app.
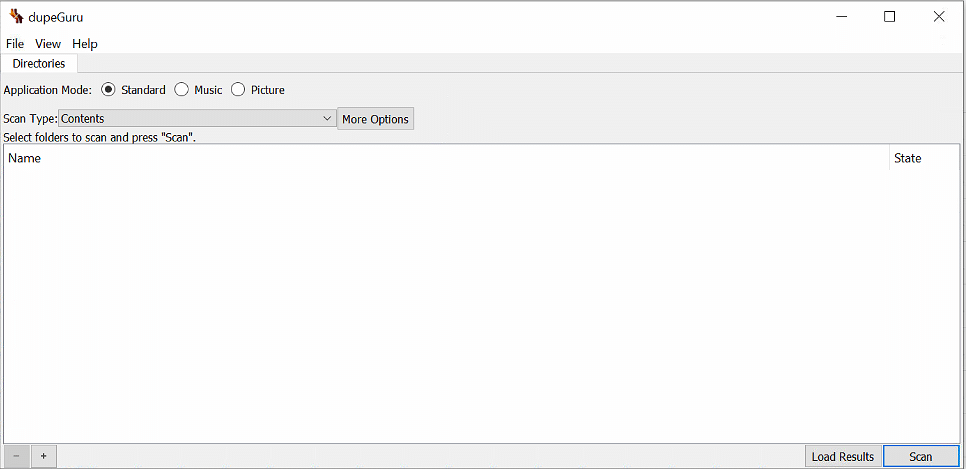
Once dupeGuru is installed, it’s time to configure it to suit your preferences and requirements. By investing a little time in this initial setup and configuration, you’ll ensure that dupeGuru is ready to give you what you are looking for.
b. Set up your first scan.
- Choose a Scanning Mode: dupeGuru offers various scanning or application modes including Standard, Music, and Picture. Select the mode that aligns with the type of files you want to scan for duplicates.
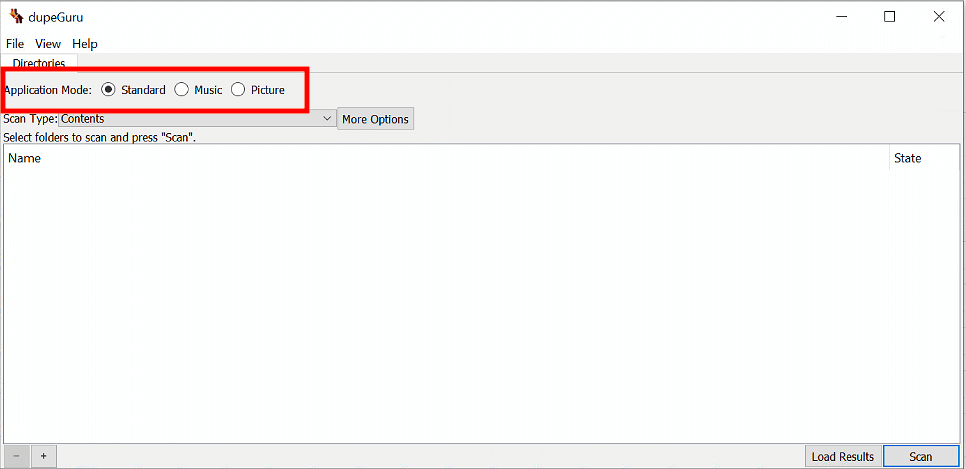
- Select the scan type: Each application mode varies in its scan type. You can choose any of the following scan types based on each application mode.
- Standard: Filenames, Content, and Folder.
- Music: Filename, Filename – Fields, Filename – Fields (No Order), Tags, and Content.
- Picture: Contents, EXIF (Timestamp).
- More options: Dive into the “more options” menu where you will be able to fine-tune dupeGuru’s settings to match your preferences. Each scan type can be further customized. Here, you can customize scanning methods, match criteria, and other advanced options such as how dupeGuru displays and debugs results. More on this in the next section > Tweaking dupeGuru’s settings (the more options menu).
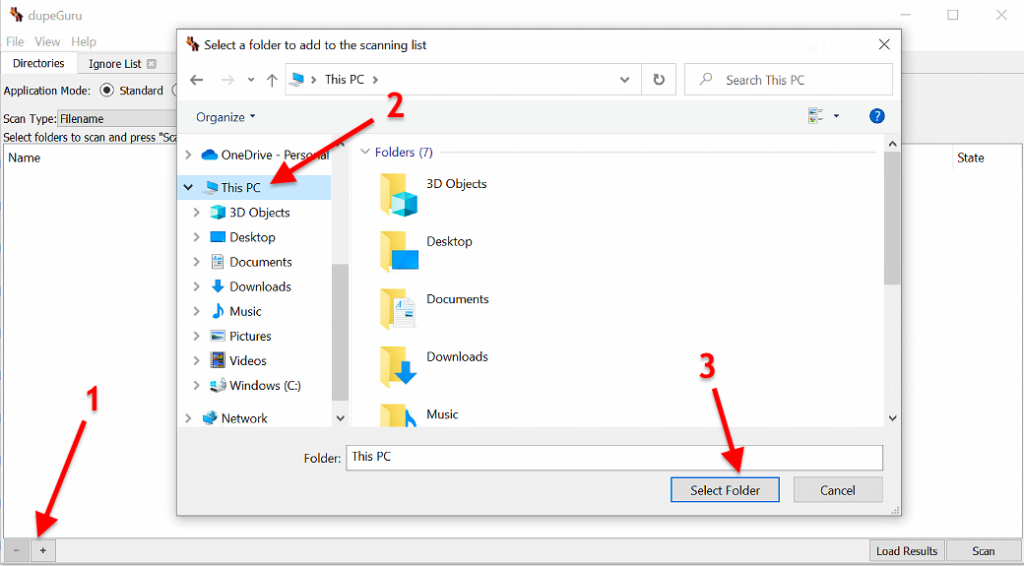
- Select the directory to scan files. Without a directory to scan, dupeGuru will not help you much. You’ll need to define the scanning scope for the deGuru to find duplicates. The larger the scope like C: or “This PC,” the longer the scanning will take to complete.
- Go to the + arrow (1) on the bottom left side of the dupeGuru interface.
- Find your directory (2)
- Hit on select Folder (3)
- Scan: Once you are happy with your application mode, scan type, and additional options, and you have already selected the scanning directory, go ahead and click on “Scan”. dupeGuru will begin to scan the target folder for duplicates.
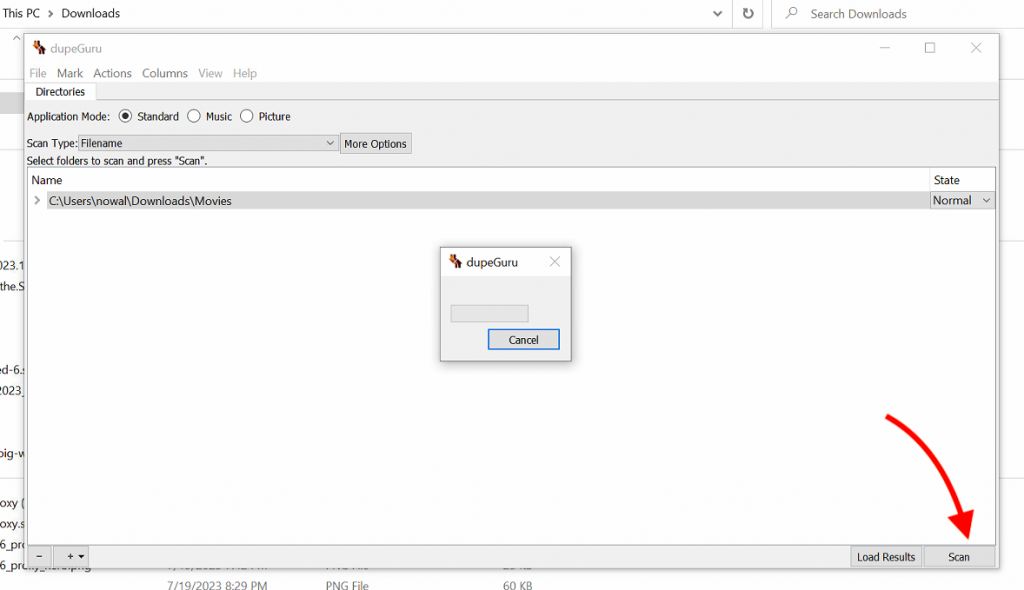
c. Reading the results.
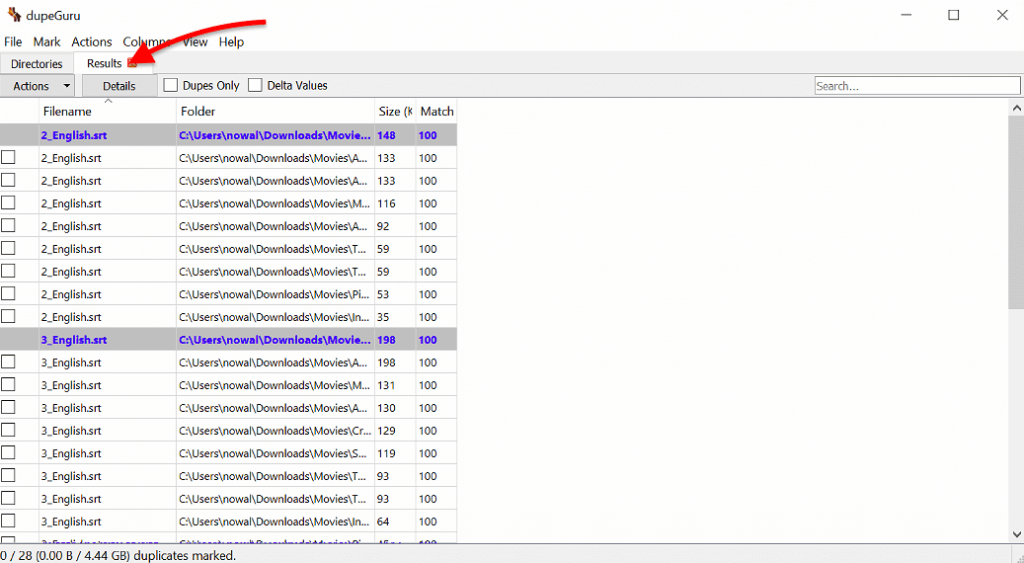
As soon as the scan finishes, dupeGuru will open a new window tab labeled “Results”. This tab will show all the results, so you can compare them one by one.
Note: What’s important here is to consider your previous configuration set on the “scan type” and “more options”. So, getting the right results that you are looking for might take you a few rounds of trials changing the scan type and options values.
- Refer to the below screenshot. For example, dupeGuru found lots of .srt file duplicates (filename duplicates). Although we know that the name “English.srt” for subtitles with a 100% match doesn’t mean they are the exact file. So the “size value” provides us with the determining value (most of those are not duplicates!).
- Also, visually inspecting the folder paths can help you determine the next step.
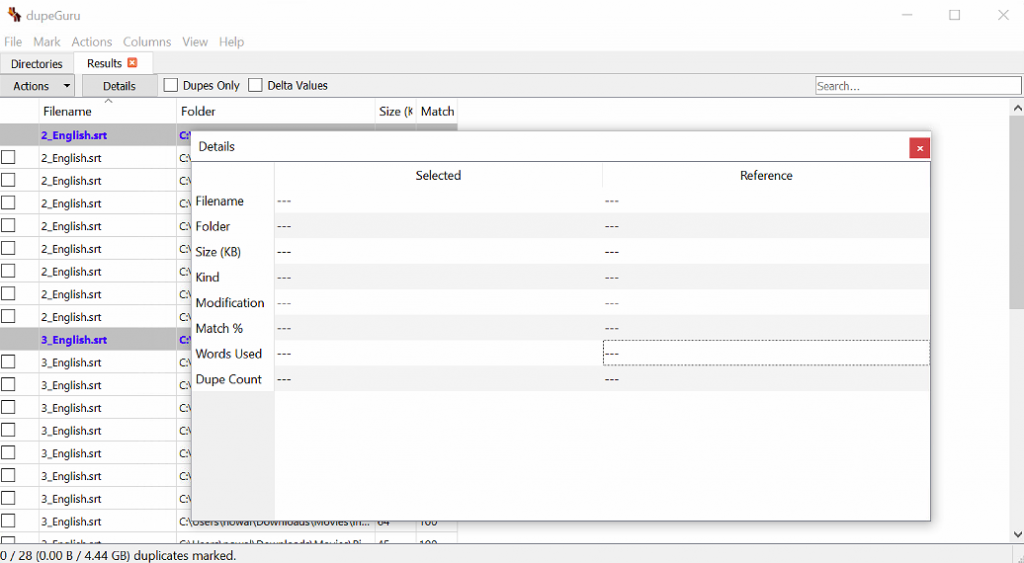
- In addition, from the results page, you can also see “more details” (if available), or toggle between dupes only or delta values.
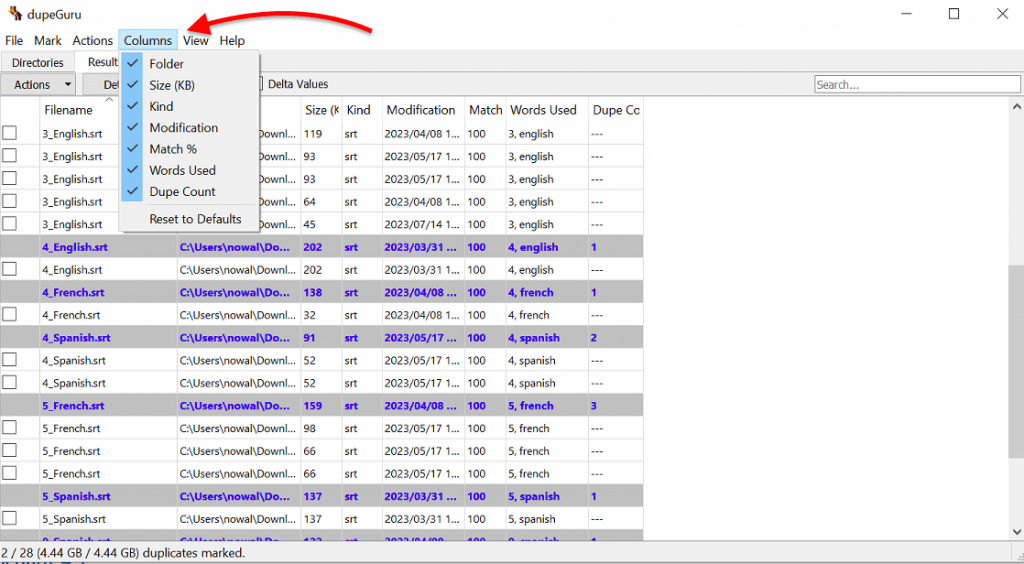
- Plus, if you want to see more information from the duplicates found, you can go to “Columns” on the main menu, and select any of the available column values. This will modify your results with more or less details.
d. Taking action.
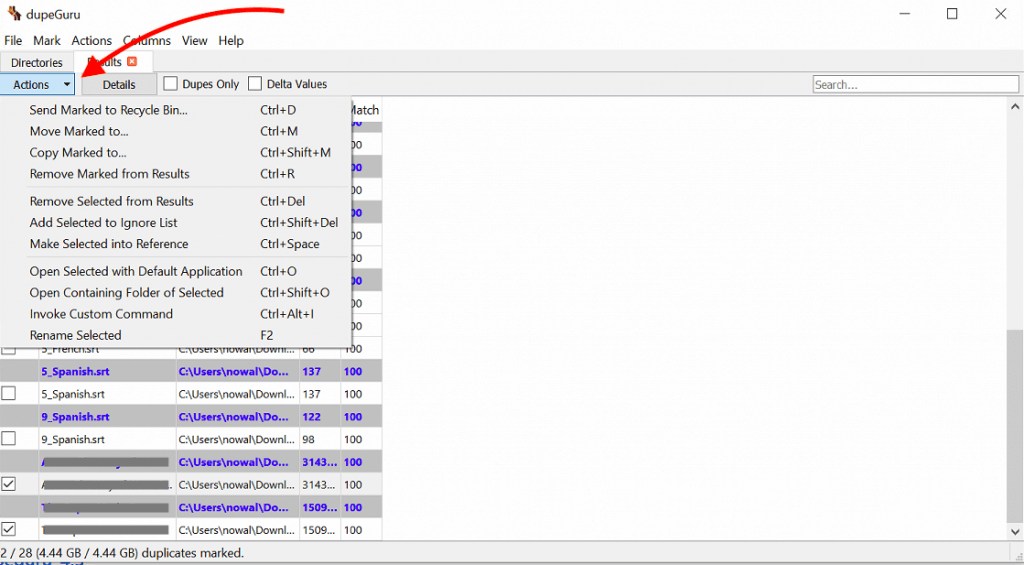
Once, you visually inspect all the duplicates found by dupeGuru, go ahead and select them by checking the checkbox. dupeGuru gives you full control over the duplicates found so that you can avoid any accidents. Some of the actions are: send to recycle bin, move to, copy to, ignore, rename, open, etc.
Now, on the top left of the Results window, you’ll see an “Actions top-down menu” with the following options:
- Send Marked to Recycle Bin
- Move Market to …
- Copy Market to …
- Remove Marked from Results
- Remove Selected from Results
- Add Selected to Ignore List
- Make Selected into Reference
- Open Selected with Default Application
- Open Containing Folder of Selected
- Invoke Custom Command
- Rename Selected
Note: dupeGuru’s renaming action can be a tedious process. We recommend instead moving them to a new folder with the (Move Marked to) and then renaming them in batch using a proper tool. We recommend using Filebot, one of the best tools to automatically rename batch files.
e. Additional options.
dupeGuru also provides additional tools to help enhance the scanning process. These tools allow you to customize how certain files are treated during duplicate scanning process. Two of these useful tools are the “Ignore list” and “Exclusion filters”.
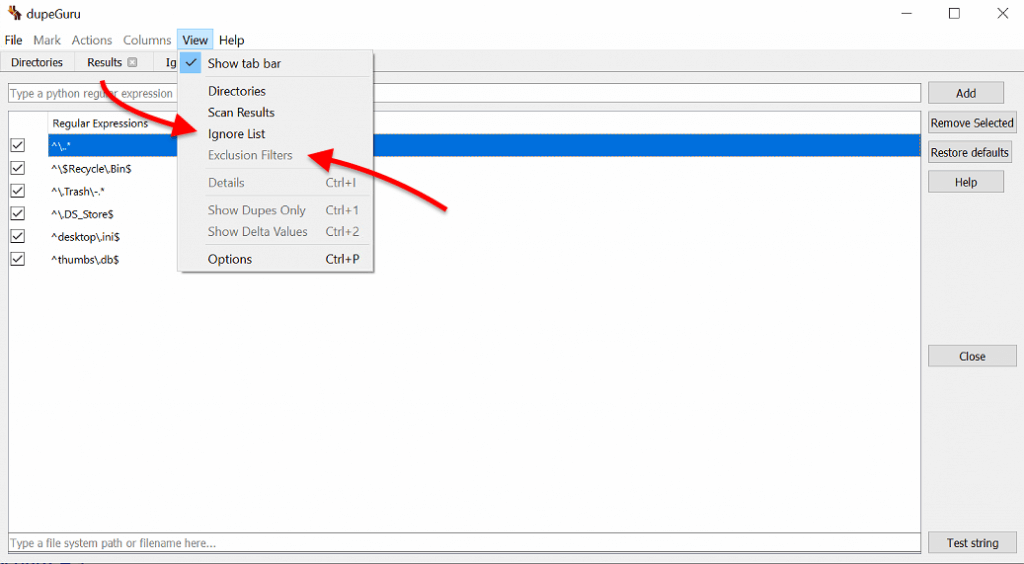
- The Ignore List lets you specify specific file paths that should be excluded from the scanning process. This feature is quite useful when you have certain files or folders that you want dupeGuru to bypass during duplicate searches. You can manually add one or more file paths to the Ignore List
- Exclusion Filtering is another powerful tool that helps you define rules that will prevent certain files from being considered during the scan. Exclusion filters are based on Python regular expressions, which are used to match and manipulate text. Examples of these expressions are (aside from the ones present in dupeGuru):
- \.txt$
- Backup|temp
- \/cache\/
- COPY
- \d+
4. Tweaking dupeGuru’s settings (the more options menu).
When using dupeGuru’s scan you’ll find a range of advanced options under the “More Options” menu. These advanced settings can be overwhelming for many new users but it is the best place to fully customize the scanning and results to your unique preferences. These options will allow you to fine-tune your duplicate file detection process. They are great for customizing the scan according to your specific needs and preferences.
dupeGuru’s best settings? Your best settings would generally depend on your specific case. The needs and preferences for everybody, and the files you are managing are not the same. So although you can leave the following settings by default, you can also tweak them to improve your scanning speed and duplicate finding precision. Regularly reviewing and adjusting your settings will ensure optimal duplicate file management.
a. Standard Mode’s Settings.
Let’s delve into the various sections of the More Options, menu of the Standard Application mode.
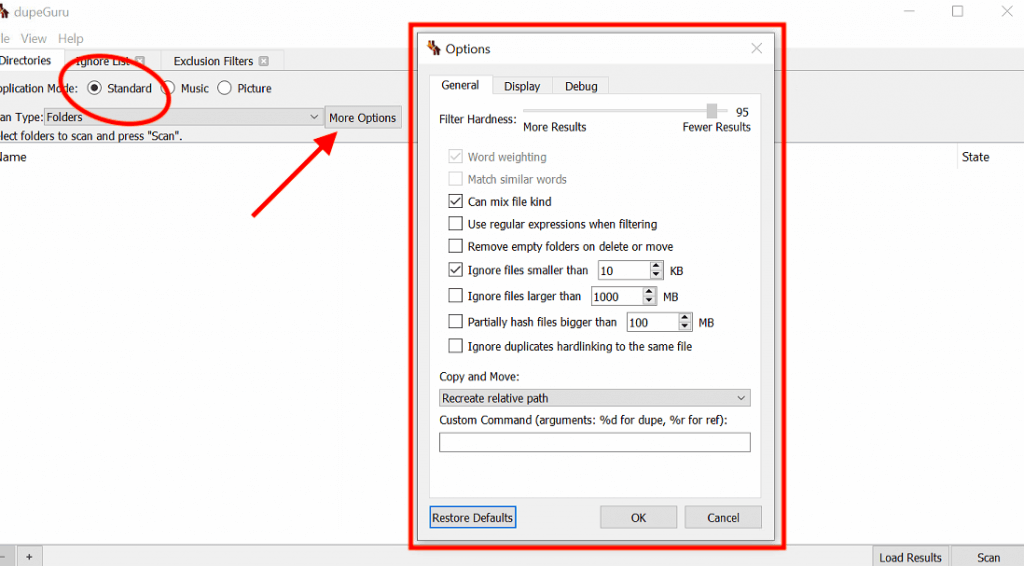
Under General:
- Filter hardness (0-100): Adjust the filter hardness to control the sensitivity of duplicate detection. A higher value yields fewer results, while a lower value provides more results.
- Wore weighting: When enabled, this option modifies the matching percentage calculation by giving more weight to larger words.
- Match similar words: This feature counts similar words as matches, expanding the scope of duplicate identification.
- Can mix file kind: This option allows you to mix different types of files within a group for comparison.
- Use regular expressions when filtering: Incorporate regular expressions (regex or regexp) to filter and identify duplicates more precisely.
- Remove empty folders on delete or move: Choose to automatically remove empty folders when files are deleted or moved. A great option for keeping your computer organized and decluttered.
- Ignore files smaller than … KB: Set a threshold size to ignore files that are smaller than the specified size.
- Ignore files larger than … MB: Set a maximum file size beyond which files will be ignored during the scanning process.
- Partially hash files bigger than…: Hash only a portion of larger files to speed up the scanning process.
- Ignore duplicates hard linking to the same file: Prevent the detection of duplicates that are hard-linked to the same file.
- Copy and move: Specify how duplicates should be handled during copying or moving, including options for right in the destination, recreating relative paths, or recreating absolute paths.
- Custom Commands: Utilize custom commands with placeholders (%d for dupe, %r for ref) to execute specific actions based on detected duplicates.
Under Display:
dupeGuru also allows you to change the way you want to see the results.
- General Interface: Adjust interface settings, including language preference, default tab bar position, native OS dialogs usage, and dark style preference.
- Result Table: Customize the appearance of the result table by adjusting font size, using bold font for references, and modifying foreground and background colors for references and delta values.
- Details Window: Configure the display of the details window by enabling the title bar, vertical title bar orientation, and modifying delta foreground color.
Under the Debug:
- Debug Mode (Restart Required): Activate debug mode to access advanced debugging capabilities. Keep in mind that a restart will be required to apply this setting.
- Profile scan operation: Enable this option to profile the scan operation for in-depth performance analysis.
- Logs located in…: Specify the location where logs are stored for reference and analysis.
b. Music and Image Modes’s Unique Settings.
The other modes on dupeGuru, follow a similar pattern as the standard mode. However, they do differ in some options. Since dupeGuru can explicitly scan music and picture files, the approach is different.
The music mode.
In the music application mode of dupeGuru, you have access to specific options that focus on music-related metadata tags. These options enable you to refine the scan based on specific attributes of music files.
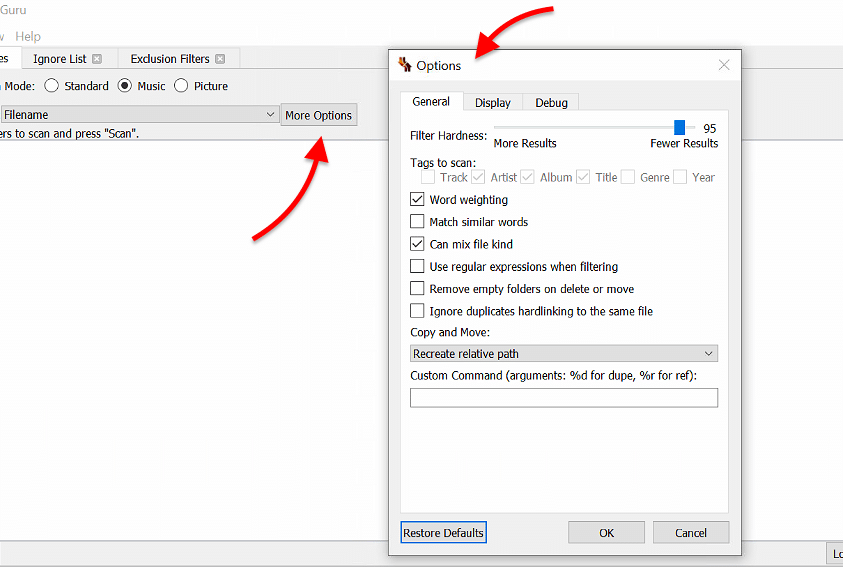
The music mode has the following unique options:
- Tags to Scan: This option allows users to select which music metadata tags will be considered during the scanning process. The following tags are available for scanning: Track, Artist, Album, Title, Genre, and Year.
Picture Application Mode:
The picture application mode in dupeGuru is designed to handle duplicate image files. Here’s a description of the options available in the picture application mode:
- Match pictures with different dimensions: This option determines whether dupeGuru should consider images with different dimensions (sizes) as potential matches. This picture-custom option will help you evaluate images with varying dimensions and find similarities and potential duplicates.
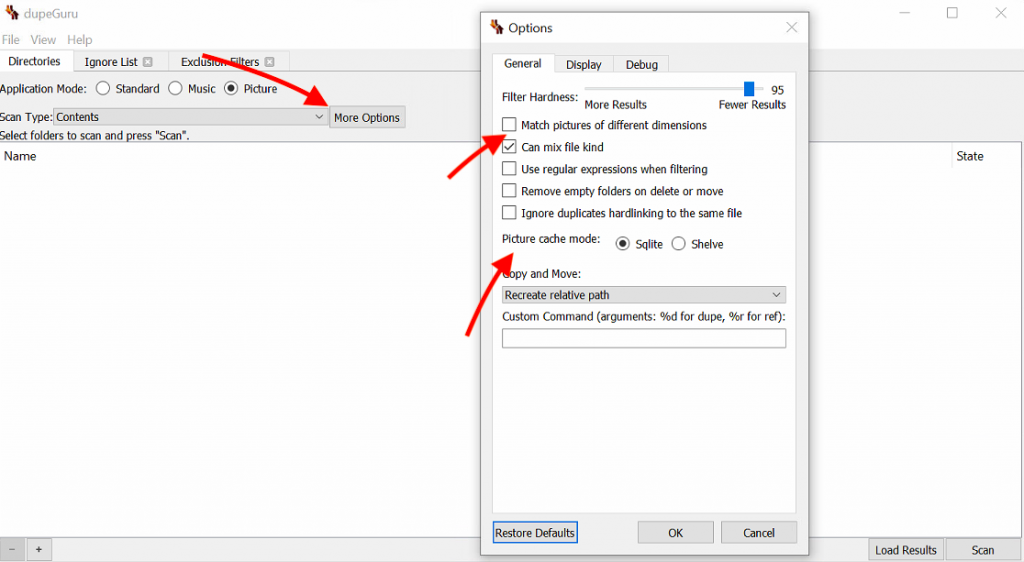
- Picture cache mode: This option allows users to select the type of cache used to store image data for comparison purposes. Two cache modes are available SQLite and Shelve. Choosing between either cache mode can impact the speed and efficiency of the scanning process.
5. Alternatives to dupeGuru.
There are several powerful file management tools available in the market if you’re looking for an effective alternative to dupeGuru. These tools can also help you efficiently identify and remove duplicate files. Whether you’re a Windows, Mac, or cross-platform user, these alternatives offer a range of features and capabilities that might not exist on dupeGuru.
In this section, we’ll explore some of the standout alternatives to dupeGuru that can help you declutter your digital space and optimize your file organization.
a. Czkawka.
Czkawka is a fast, open-source, and cross-platform duplicate file finder tool. Just like dupeGuru, this tool offers multiple scan modes and advanced filtering options. Czkawka offers the ability to match files by various attributes, plus it is open-source which makes it a very similar tool to dupeGuru.
b. CCleaner
Beyond its system cleaning capabilities, CCleaner includes a duplicate file finder tool to help you identify and remove duplicates efficiently. CCleaner’s user-friendly interface and reputation for reliability make it a great choice if you are looking for a compelling alternative to dupeGuru.
c. Duplicate Cleaner
Duplicate Cleaner is designed for Windows. This tool features a user-friendly interface and powerful scanning options to find duplicates. It comes with the ability to identify and remove duplicate files based on various attributes, including content.
d. Auslogics Duplicate File Finder
Just like dupeGuru, this user-friendly tool compares files and focuses on content-based matching. Auslogics Duplicate File Finder has helpful preview options before deletion and an easy-to-understand interface.
e. Easy Duplicate Finder
Easy Duplicate Finder attends to the needs of a range of users (comes with simple and advanced modes). If you are looking for an efficient alternative for duplicate file management, this tool supports various file types and criteria, scanning types, and on top of that, it is coupled with a user-friendly interface.
f. CloneSpy
Optimized for efficient duplicate identification and removal, CloneSpy uses byte-by-byte comparison and can manage duplicates on network drives. Many users love this tool because is free. Plus, its emphasis on network use and precise matching makes it an attractive alternative to dupeGuru.
g. AllDup
AllDup is a powerful duplicate file (mp3, movies, pictures, etc.) finder for Windows users. It comes with support for multiple drives and networks. AllDup’s different approach to duplicate detection includes techniques like advanced filtering and powerful controls.
h. Anti-twin
Anti-Twin is a freeware built for lightweight duplicate detection. It is one of the best alternatives to dupeGuru if you are looking to compare files based on content. It is simple to use, lightweight and comes with outstanding content-focused matching.
i. VisiPics
Tailored for image duplicate detection in Windows systems, VisiPics can find and remove duplicate and similar images. This tool is the best if you are looking to remove duplicate photos, you can compare visual similarities of photos (something not available in dupeGuru). VisiPics is a specialized alternative to dupeGuru for users handling image files.
j. Gemini 2
Gemini 2 specializes in finding duplicate files on Mac systems. Its byte-by-byte comparison and organizational features make it a standout alternative for Mac users aiming for efficient duplicate management.
6. Final words.
The problem of duplicate files can be a big headache. But, if you are armed with a tool like dupeGuru, you can effortlessly reclaim control over your storage space. This free and versatile app, available on Windows, Mac, and Linux, will efficiently scan, find, and remove duplicate files.
As you explore the array of features and benefits offered by dupeGuru in this guide, remember that alternatives do exist. Such alternatives serve different needs and preferences.
By learning how to efficiently manage duplicate files with DupeGuru (or any of its alternatives), you’ll end up having a decluttered computer and running smoothly with ample storage.
Re:Con # 4 – Lack of visual duplicate detection
You missed this one, as DupeGuru does have this, and has had it as long as I’ve been using it which is quite a few years now. When browsing the results of a picture based scan, the “Details” button opens a second window to display these side by side images. The selected match shows on the left, the reference on the right. If you have selected the reference it will be the only one shown and will be on the right. This it makes it easy to spot small differences by focusing on the right side image only while you use the arrow keys to change back and forth between the reference and the match. Or even among multiple possible matches.