Bonus Material: 25% OFF + FREE 5-day Seedbox Optimization Course
HandBrake is a free video transcoder used to convert, compress, and optimize video files.
In this HandBrake guide, I’ll show you how to use HandBrake step by step, explain the best HandBrake settings for common tasks, and break down presets, file size control, and advanced options in plain language.
I’ve used HandBrake for everything from DVD backups to Blu-ray compression and streaming-ready files. If you want a practical HandBrake tutorial that actually answers “which settings should I use?”, you’re in the right place.
Disclaimer: This material has been developed strictly for informational purposes. It does not constitute endorsement of any activities (including illegal activities), products or services. You are solely responsible for complying with the applicable laws, including intellectual property laws, when using our services or relying on any information herein. We do not accept any liability for damage arising from the use of our services or information contained herein in any manner whatsoever, except where explicitly required by law.
Table of Contents.
- What is Handbrake?
- Video Encoding 101
- Codecs vs Video Containers.
- Video Encoders.
- Getting Started with Handbrake.
- Download
- Install Handbrake.
- A Quick Overview of the Handbrake UI.
- Opening a Source
- Presets
- Activity Log.
- Creating a Configuration Template
- Preview
- Using Queues.
- Optimizing Audio and Video with Handbrake.
- How to Optimize Videos for the Web.
- Modifying Output’s Video Size and Cropping.
- Optimizing Audio Settings.
- Adding Subtitles into a Video File with Handbrake Like a Pro.
- Configuring the Subtitle’s “Selection Behavior”.
- Adding Subtitles to a Media File.
- Burned-in Subtitles.
- Matching Subtitle Timestamps With the Video.
- How to Encode a Video Using Handbrake.
- Quality vs File Size?
- Encoding Technology Offered by Handbrake?
- Codec vs Quality vs Frame-rate in Handbrake?
- Trimming Videos with Point-to-Point Encoding.
- Encoding Specific Chapters.
- Ripping DVDs with Handbrake.
- Download Libdvdcss
- Insert the DVD and choose what to rip.
- The Best DVD Preset.
- Optimal Handbrake settings
- Converting a Video from AVI (Divx or Xvid) to MP4.
- How to convert MKV to MP4 video format (and vice-versa)?
- Reducing the Resolution of a Video to 480p (or 360p, 240p).
- Reducing the resolution of a video to 480p.
- How to convert 4K to 1080p with Handbrake?
- Advanced Handbrake Operations
- Using Handbrake with other Tools to Streamline the Workflow.
- Using HandbrakeCLI to Step Up your Game.
- General Troubleshooting.
- My video encoding is slow?
- Problems with ripping certain DVDs.
- Common problems when adding subtitles.
What is Handbrake?
Handbrake is an open-source video transcoder that converts video files from one format to another.
You use it to compress large videos, rip DVDs or Blu-rays you own, and optimize files for streaming, storage, or sharing.
HandBrake supports modern codecs like H.264, H.265 (x265), and AV1. It works on Windows, macOS, and Linux. Most people use it to reduce file size without destroying quality, especially for movies and TV shows.
In simple terms:
- You load a video
- You choose a preset or tweak settings
- HandBrake re-encodes the video into a smaller, more efficient file
That’s it. Everything else is about choosing the right settings.
Video Encoding 101.
Skip this section, if you are familiar with the definition of codecs, containers, encoding, and compression. Otherwise, keep reading.
So what’s video encoding?
Video encoding is the process of preparing a raw video for output. Digital video needs to be encoded to meet standards and formats for playback and to reduce its size (compress). Video compression is sometimes referred to as video encoding, and decompression is referred to as decoding.
- The protocol that does the video compression (encoding) is known as codec.
- The final package resulting from these encoding processes is known as a video container.
Codecs vs Video Containers.
A codec is a protocol or method for encoding/decoding information for a video file. In other words, a codec is a set of rules to compress video information and control how this information is displayed on a screen. Choosing the right codec can result in the desired quality, file size, or encode speed. Xvid, FFMpeg, H.264, and H.265 are examples of codecs. H.264 is the most popular codec and is widely supported for now.
For commercial use, codecs must work alongside containers. A container is also referred to as a video format and is a bundle of media files. A container is what “contains” or holds the grouping of compressed video (which was defined by the codec), it also holds metadata, subtitles, audio codec, etc. Examples of video containers are MP4, MKV, AVI, WMA, MOV, FLV, etc.
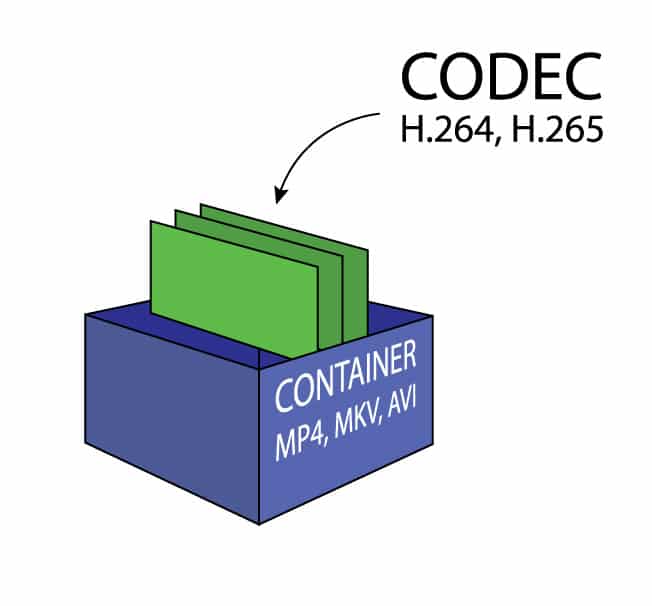
As mentioned earlier, H.264 is supported by most devices and is widely accepted by almost all platforms online. So far H.265 (HEVC) is supported by some devices and players, but it will take some more time until the codecs are supported everywhere.
Video Compression.
Compressing videos is one of the most important processes from every video production, whether it is a Hollywood blockbuster or a simple homemade Youtube video. Video compression allows portability. Simply put, a compressed video is altered to take less space on digital storage while retaining a good degree of image and sound quality.
This is where Handbrake comes into place.
Handbrake is a post-production tool. It can take a raw production video, encode it, compress it, and make it ready for our everyday screens.
Click here to get your 25% OFF discount and a FREE 5-day Seedbox optimization course now. 🤑
Getting Started with Handbrake.
Download and Install Handbrake.
Handbrake is open-source and free software under license GNU GPLv2. The initial release was in 2003 and has been up to date. As of 2026, the latest stable version is 1.10.2 and is available for Windows, Linux, and macOS. To see a full list of fixes and improvements, check Handbrake’s release notes on GitHub.
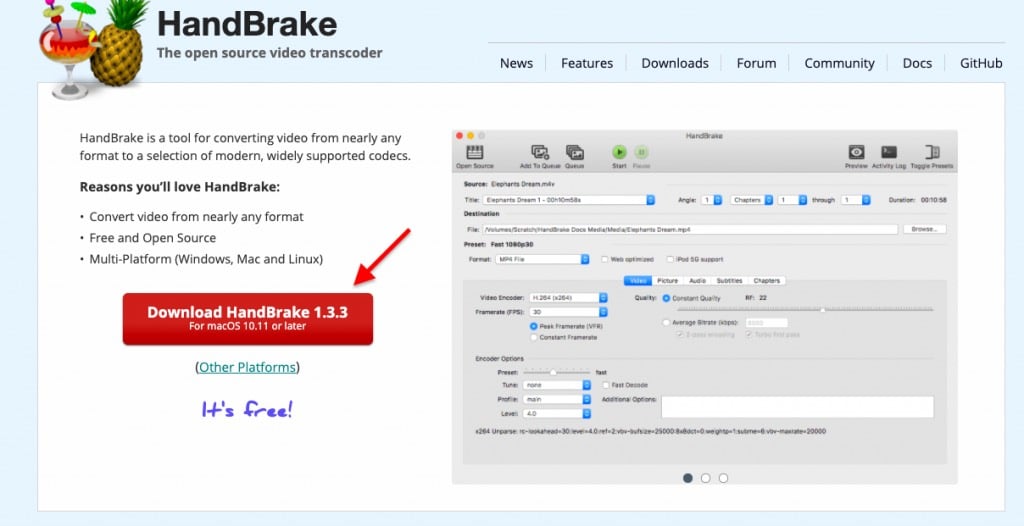
Download Handbrake.
Visit Handbrake’s official website and download their latest stable version.
- The website will recognize your OS.
- Click Download.
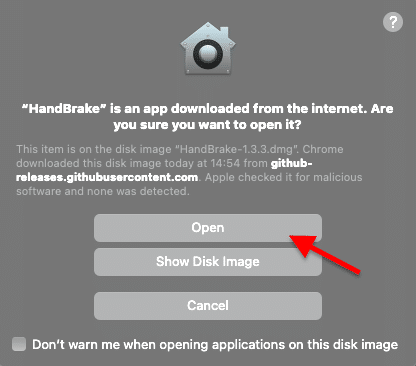
Install Handbrake.
- You can open it as a disk image or install it on your computer. The installation process is self-intuitive.
- For macOS, just double-click on the “HandBrake-1.3.3.dmg” file and follow the installation wizard.
- Click on Open, to open as a disk image.
Handbrake will launch automatically. Handbrake’s GUI will vary from OS to OS. For macOS, the main console should look something like this…
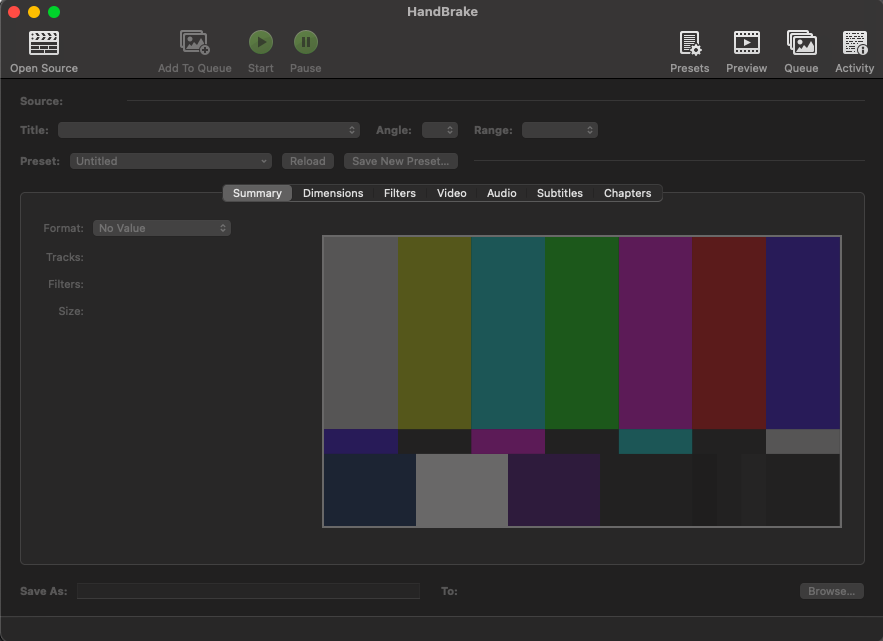
A Quick Overview of the Handbrake UI.
Handbrake’s most common features can be accessed via the main toolbar located on top.

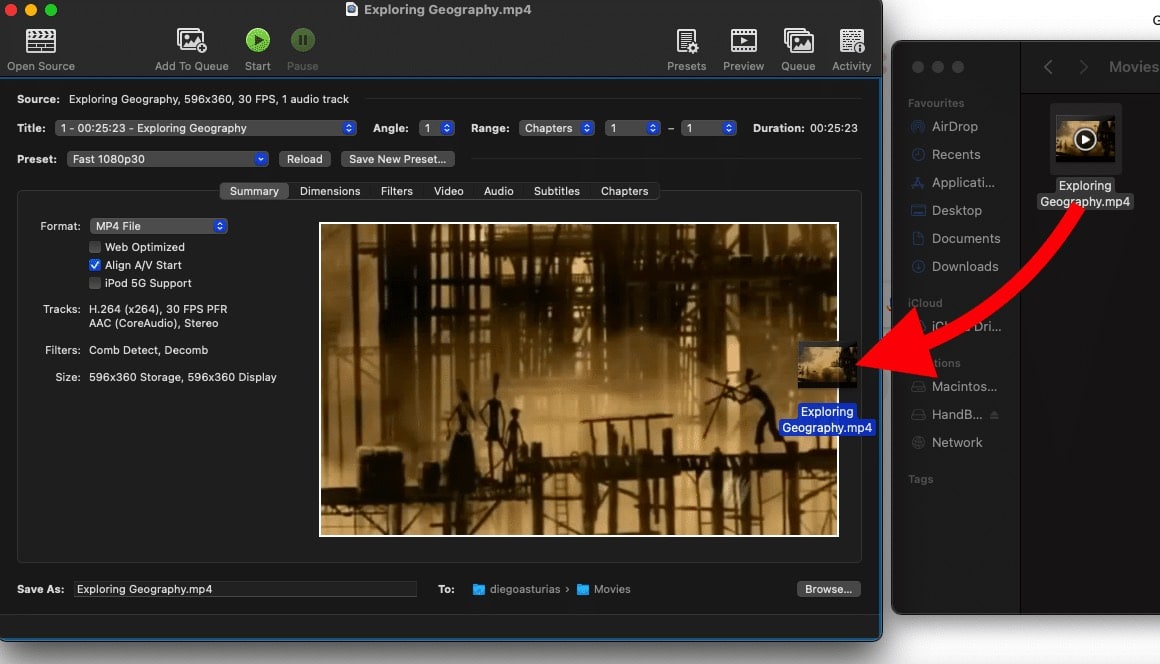
The “Open Source” button in the top-left corner allows you to input the video that you want to encode.
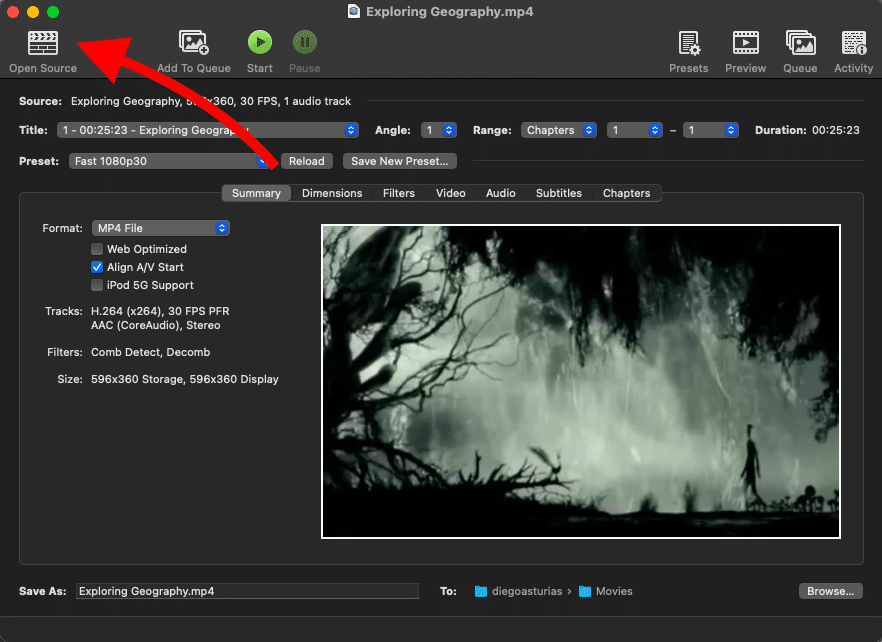
Dragging and dropping the video into Handbrake’s main window can also do the work.
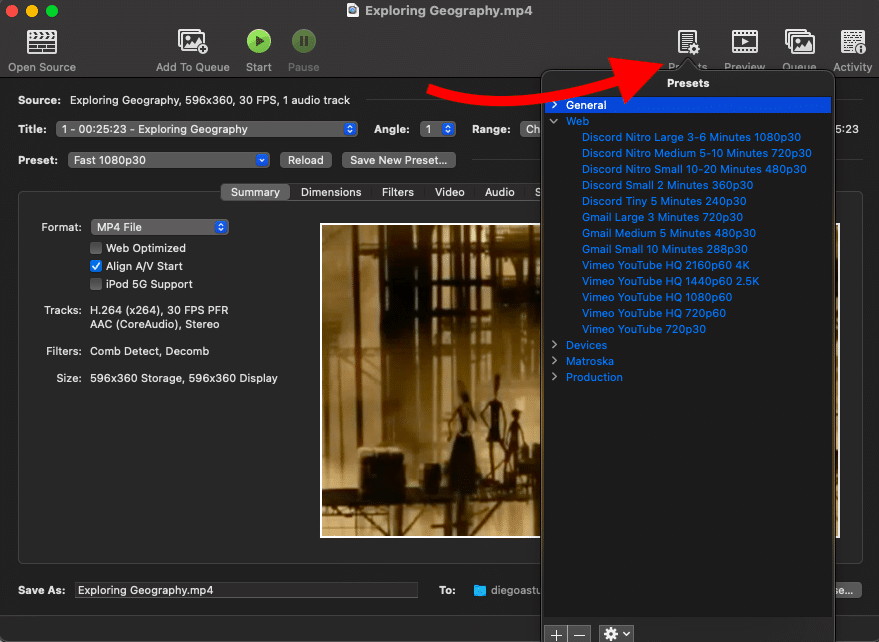
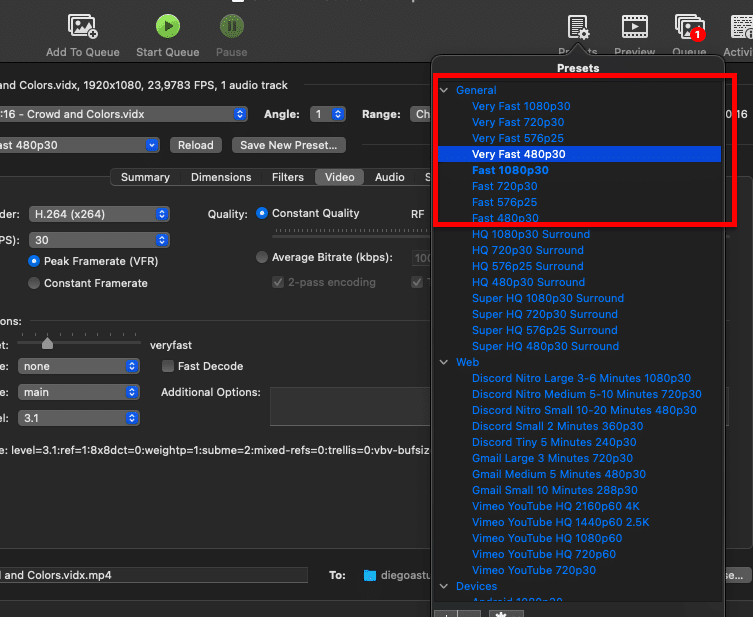
Presets.
Once you open the video source, the “Presets” option will become available. The presets in Handbrake are really helpful for quick video conversion from one format to the other. Presets are basically a set of output video properties that are optimized for particular common devices. The Preset drop-down list contains predetermined configuration sets for common devices including the iPod, iPad, and AppleTV.
The presets provide different categories, including General usage, Web, Devices, Matroska (Media Container), and Production.
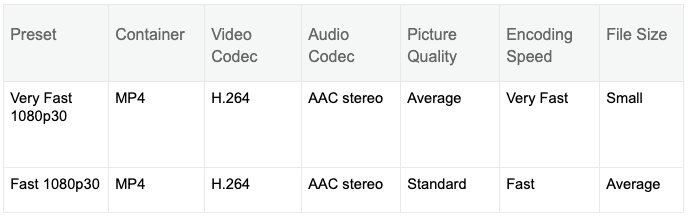
As an example, the following table shows a couple of the popular 1080p30 presets. All of these presets will result in the same Full HD resolution (1080p) and 30fps (frames per second). What varies between these presets is their sound output, quality RF (Rate Factor), encoder speed, and file size.
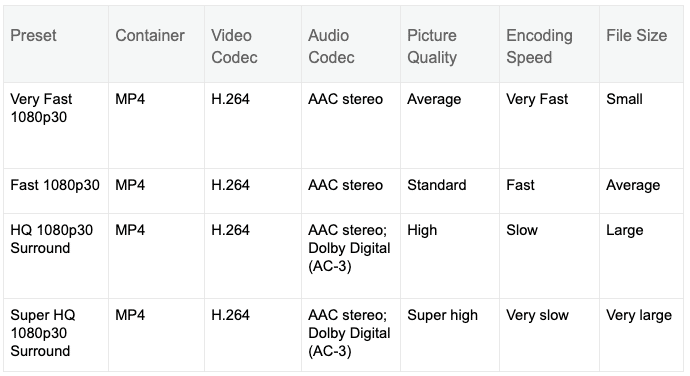
There are also presets for specific devices, from Android, Apple, Chromecast, Amazon Fire, etc. As an example, a preset configuration for an Apple device that requires resolution 2160p60 (4K) and surround sound will utilize HEVC (H.265 encoding) at 60 FPS (Frames Per Second).
Activity.
The “Activity” icon on the far right-hand side of the toolbar gives you access to a log of information including all activity since you opened Handbrake. It will log information such as, the time when you open a new file, convert, encode, or when a conversion faced an issue, and which type of issue.
The Activity log is really useful for troubleshooting and viewing the performance.

Creating a Configuration Template.
If you adjusted a video preset or tweaked your video settings and would like to save the current video configuration settings for the future, you can save your own video preset.
Working out from a preset is very useful. For example, Handbrake’s default preset is Fast 1080p30, but if you begin to modify it, the (Modified) tag will appear next to it. If you want to save all those configurations for the future click on “Save New Preset”.
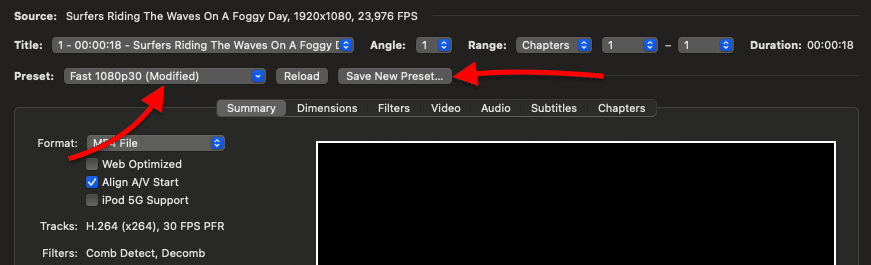
You’ll need to provide a Preset Name, optional description, and additional parameters like dimensions, audio, and subtitles, for each specific video.
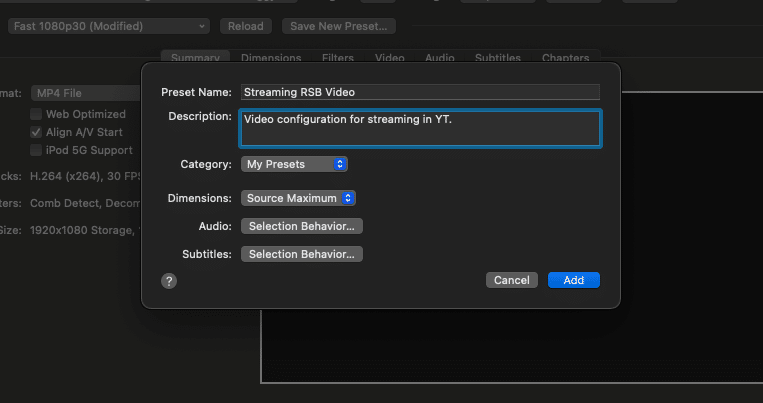
Once ready, click on “Add”.
Preview.
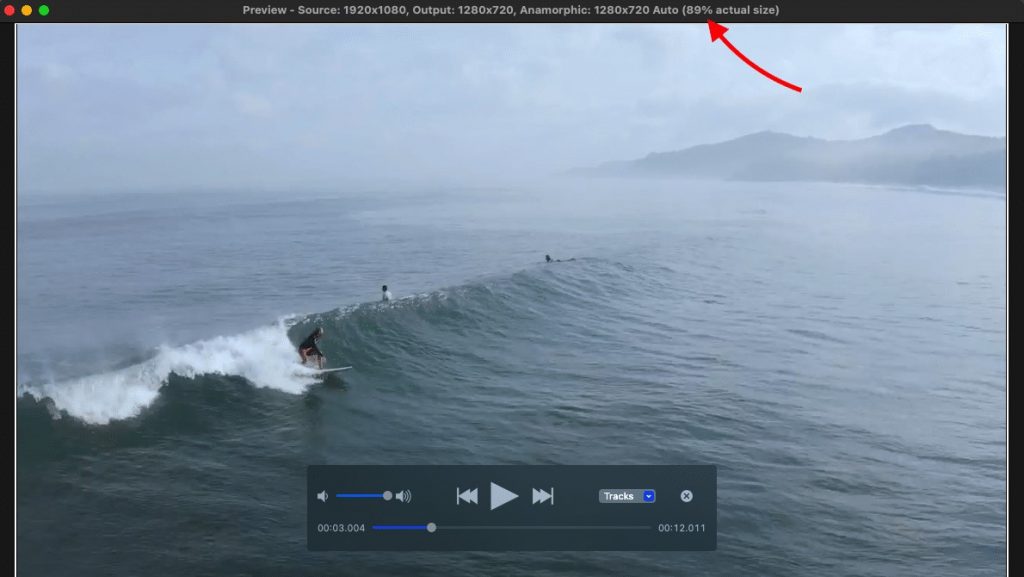
After you made all your adjustments and are ready to encode or compress a video, you can preview your video using the “Preview” icon, found on the top right corner of the toolbar.

The “Preview” window is very useful because it shows you how the end-product is going to look after compression or conversion. The Preview also gives you a summarized view of your settings (input and output), the resolution, and the size of the window (in %).
How to Use Queue in Handbrake?
You can use Handbrake’s queuing feature to configure multiple conversions and let the software do everything while you go out and take a break. Conversions usually take a long time and can also utilize computational power, so this feature is very useful.
The “Queue” function found at the right-hand side of the top toolbar is very handy when you want to convert or encode many videos at once, without your manual intervention.
To use it, just add the video, set up its configuration, then click “Add To Queue” on the top left. The “Queue” icon on the right-hand side of the toolbar will show you a counter (red number) with the number of videos on the Queue.
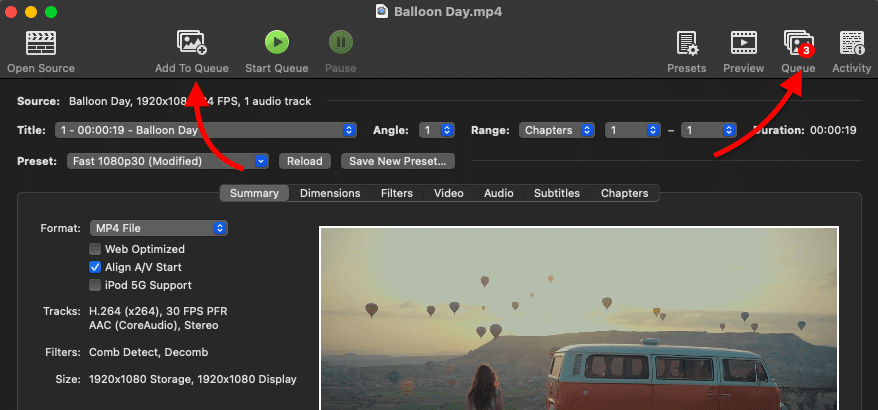
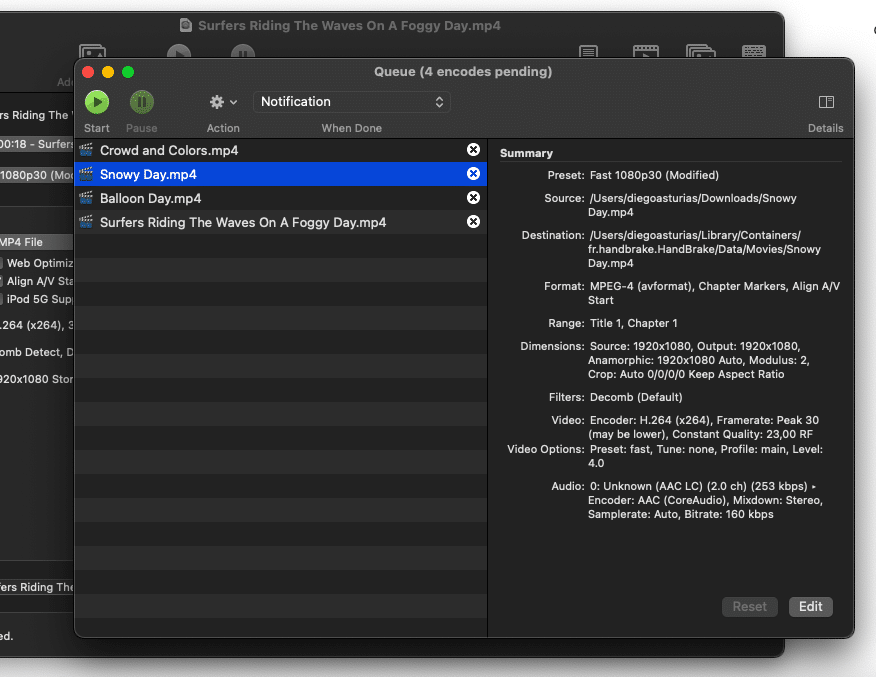
Click on the Queue menu in the top right corner.
This will show you the Queue window with the pending encodes. From this window, you can “Start” the Queue process or “Pause” it. You can also remove jobs from the process by clicking on the X. Additionally, you’ll get the summary of the “encode,” in case you would like to double-check all your encodes.
If you are not happy with a current video configuration on the queue, you can always go back to it. You can edit the preset for a particular video in the Queue by clicking on “Edit” in the bottom right corner.
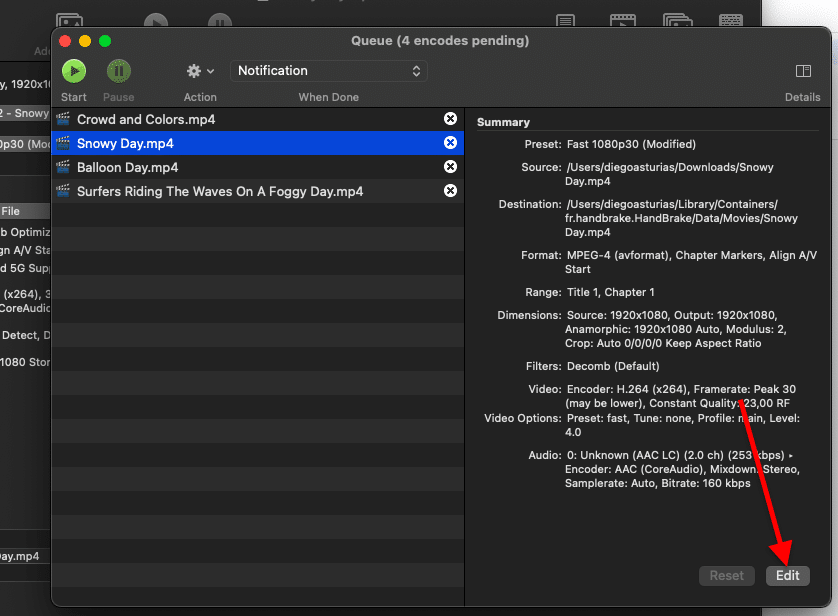
This will remove the video from the Queue and put it back in the configuration window. You can always go back with (Ctrl+Z) for Windows or (Cmd+Z) for macOS. If you are already converting videos, editing a video in the queue will not interfere with the output video properties of the other video clips in the same queue.
Additionally, you can also configure Handbrake to perform some action when the encoding is complete, for example: Send a notification, an alert, put the computer to sleep, or turn it off.
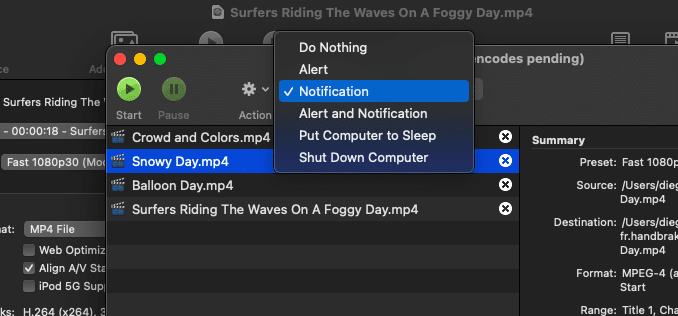
When ready, select the Start button on the Queue window or on the toolbar.
Click here to get your 25% OFF discount and a FREE 5-day Seedbox optimization course now. 🤑HandBrake settings
The best HandBrake settings depend on your goal: file size, quality, or speed.
For most users in 2026, H.265 (x265), Constant Quality RF 20–22, and a built-in preset like “HQ 1080p30” give the best balance between quality and compression.
Recommended HandBrake settings by use case
| Use case | Encoder | RF value | Preset |
|---|---|---|---|
| Small file size | H.265 (x265) | 22–24 | General ▸ HQ 1080p |
| High quality | H.265 (x265) | 18–20 | General ▸ Super HQ |
| Fast encoding | H.264 (x264) | 20–22 | General ▸ HQ |
| Blu-ray backup | H.265 10-bit | 18–20 | Matroska ▸ H.265 |
| Streaming | H.264 | 20 | Web ▸ HQ |
RF (Constant Quality) controls quality, not file size.
Lower RF = higher quality and larger files.
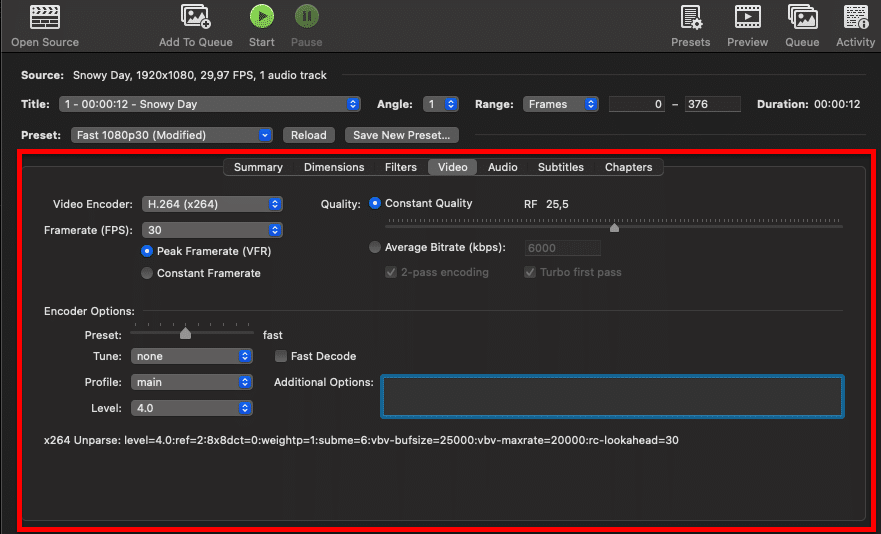
Optimizing Video and Audio with Handbrake.
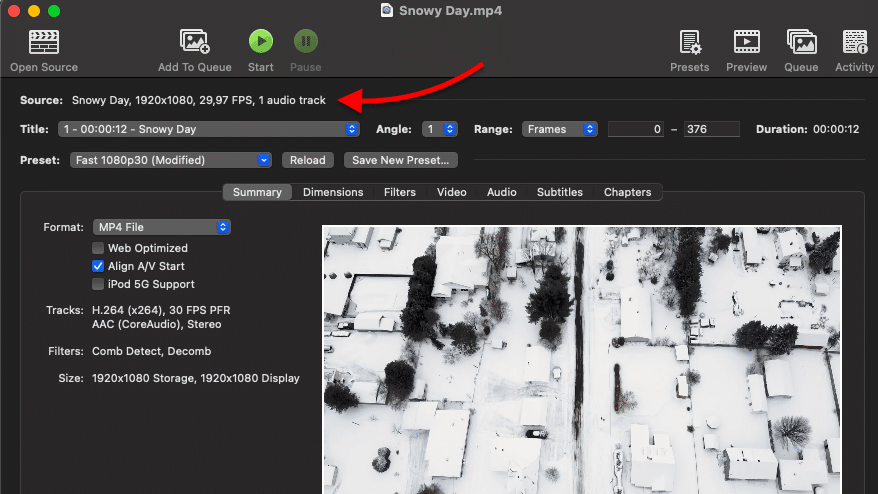
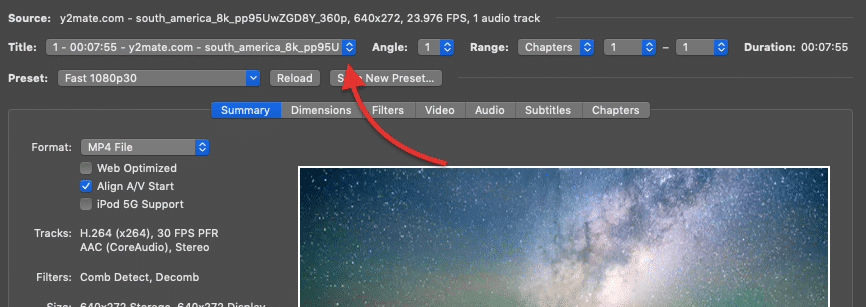
When changing video and audio parameters, having the source information close by (for comparison) can be very handy. This information is on “Source” found on top of the main Handbrake console.
To optimize your video go to the “Video” tab, located on Handbrake’s main window. This window contains the settings for changing the video properties of the output.
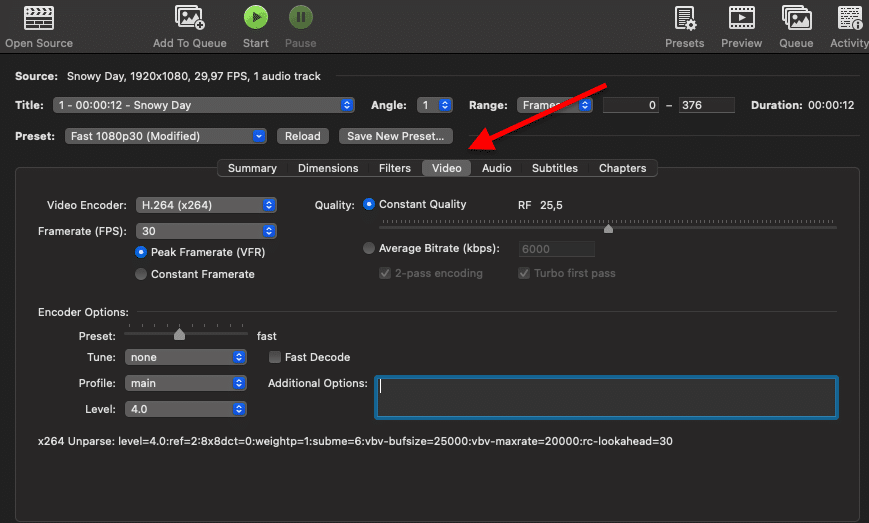
The video tab is useful when you want to change video parameters, like codec (encoder), manually adjust quality, bitrate, or tweak framerate. (More on this later in how to encode a video using Handbrake)
How to Optimize Videos for the Web.
Although many online video platforms (such as YouTube) already compress videos, none of them has the advanced capabilities that Handbrake provides.
If you are producing videos that you want to upload to the web, but you are only getting large file sizes you can optimize them for the web with Handbrake. A handy tool to quickly compress videos for the web is the “Web” preset.
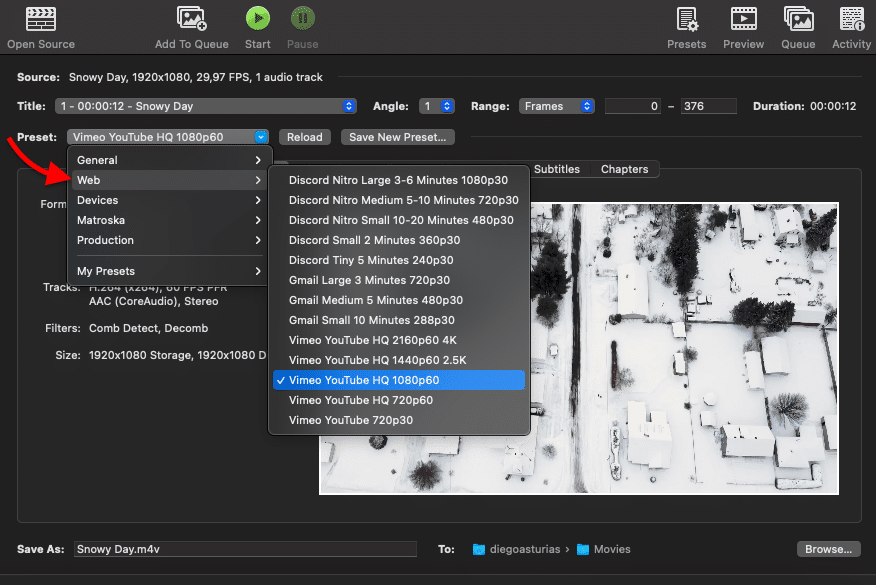
The web-optimized option is fantastic when you pair it with the Queue option. For example, you can take one video source (for example 2160p@60) and queue multiple and different resolutions for output.
This web optimization feature gives you different preset options to choose from, such as Gmail, Vimeo, YouTube, and now Discord.
Modifying Output Video Size and Cropping.
In the “Dimensions” tab you can find the general picture proportions and the settings that allow you to modify the output video size and cropping.
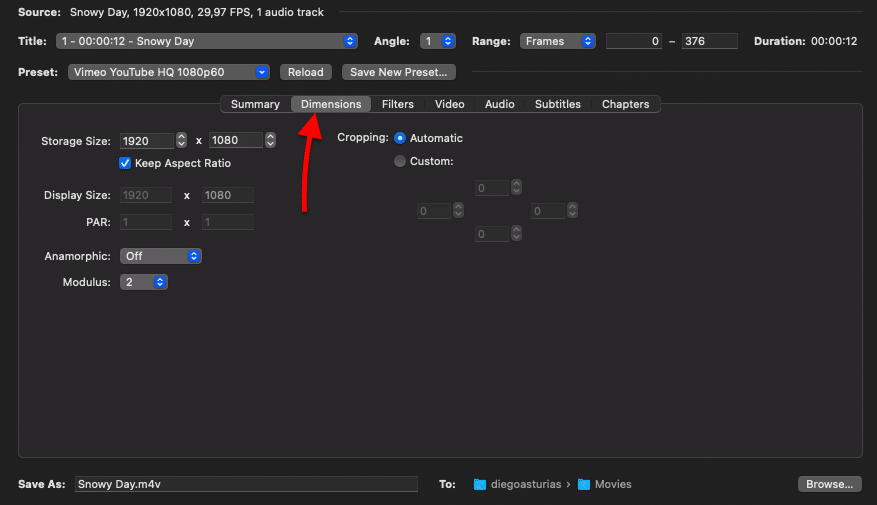
Storage Size vs Display Size?
On the left-hand side within the Dimensions tab, you can find the video “Storage Size,” which is the total number of pixels that will be encoded.
The “Display Size” is the total number of pixels that the video will appear to be at its native resolution. The display size is the result of scaling the storage dimensions by the pixel aspect. This is why “Display Size” is grayed out unless you uncheck the “Keep Aspect Ratio”.
By default two these values Storage Size vs Display Size remain the same. If they change from one another, the video image could get stretched and transformed into an anamorphic projection. An anamorphic projection refers to when a video stretches (distorts image) to cover the entire screen. An anamorphic setting may result in a higher quality but distorted image.
Handbrake comes with the Anamorphic feature that “allows inconsistent storage dimensions while preserving the original aspect ratio during playback.” The storage size may be different from the display dimensions depending on the anamorphic settings.
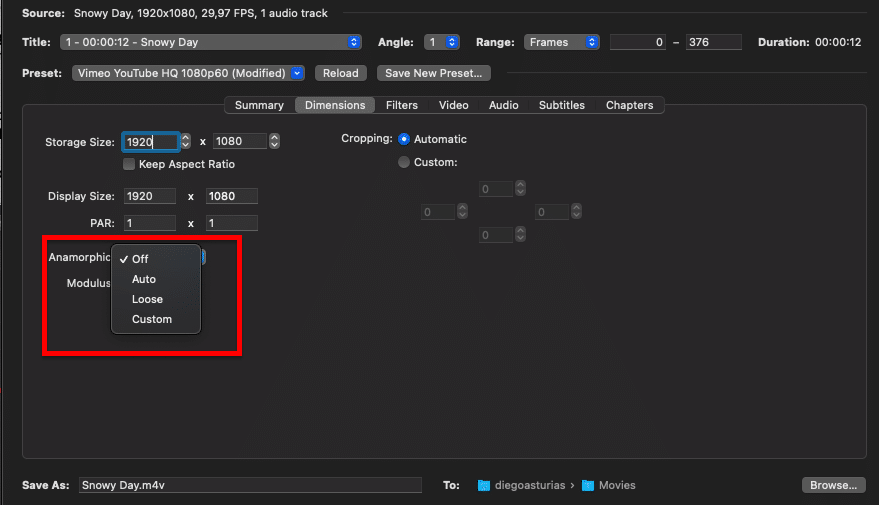
Anamorphic options are:
- Off: Turns off anamorphic. Storage size and Display will be the same.
- Auto: The recommended option. It maximizes storage resolution and keeps the original aspect ratio.
- Loose: Tries to keep the storage aspect ratio but can result in small storage resolution loss.
- Custom: Allows manual settings of parameters.
A Quick Tip!
Turning off the anamorphic option allows you to optionally alter both “width” and “height”. The settings used for “width” and “height” should be based on the target output device (or screen dimensions).
Cropping.
Handbrake’s cropping mode can be set to automatic or custom. The automatic cropping will attempt to detect and remove the common black bars from videos.
You can also perform customized cropping if you are trying to readjust values manually. To do this, select “Custom” and define the crop values in pixels. For example (as shown in the screenshot below), you can manually crop (remove) 100 pixels from both sides of the video.
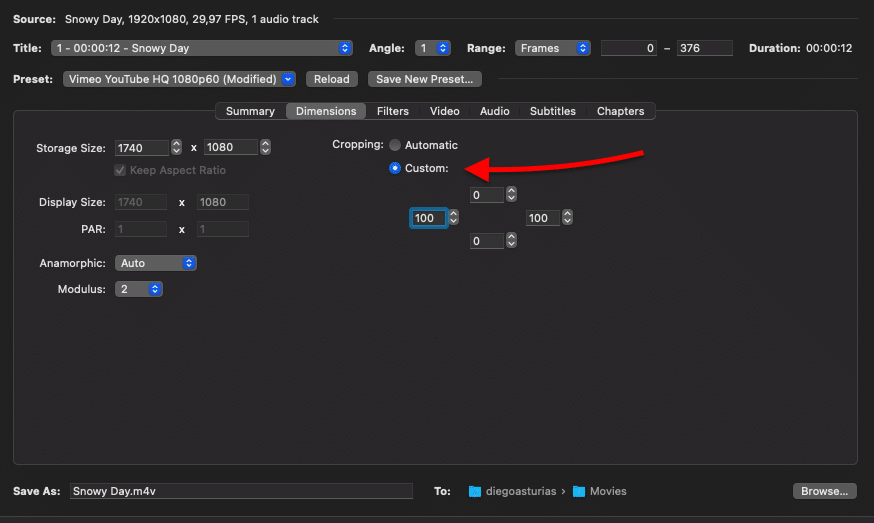
When cropping either manually or automatically use the Preview window. This window is helpful to inspect the cropping changes and make sure that you are not removing any valuable image.
Optimizing Audio Settings.
In the same way, as you can independently manipulate video, you can also adjust, optimize, or encode your audio.
Handbrake allows you to change audio encoding (codec type) from a source audio track. It supports ACC, HE-ACC, ACC pass-thru, AC3, E-AC3, and MP3 audio codecs. For example, Handbrake can take the AC3 audio track from a DVD or BluRay and transcode it to an AAC for mobile devices. Additionally, you can also change the sound mixdown (Stereo, Mono, etc), sample rate, bitrate, and adjust Gain and DRC (Dynamic Range Compression) from the same toolbar.
To check your current audio settings go to the “Audio” tab on the main console. Handbrake allows you to optimize audio using an Audio Track List.
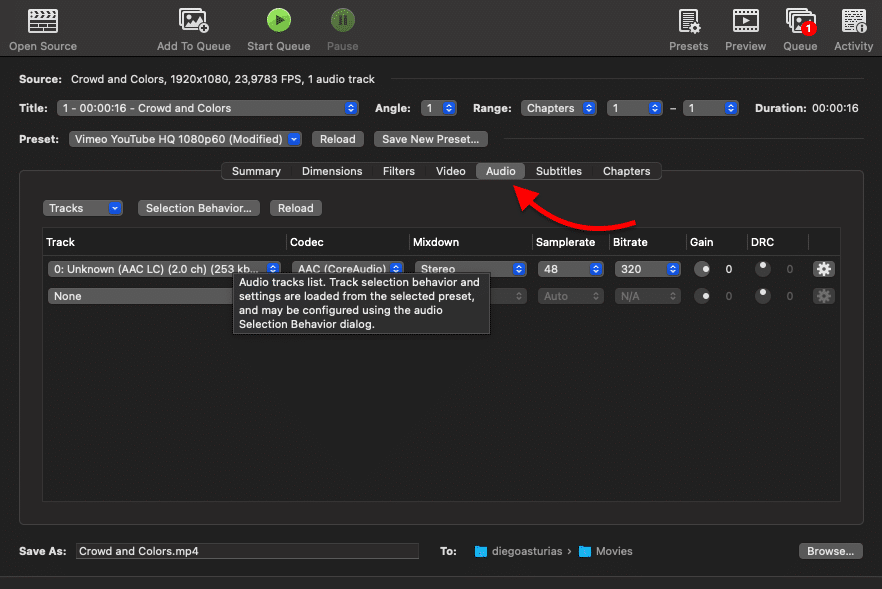
Sound mixdown depends on the source. If your source has a surround sound, the multi-channel audio format can vary to Dolby Pro Logic, Dolby Digital Surround, Digital Theater System (DTS), Digital Theater System Master Audio (DTS-HD), and TrueHD.
Downmixing is the process of combining Right, Left, Center, and surround channels to output for stereo and mono speakers. With Handbrake, audio can be downmixed to a format that sounds good on both stereo and multi-channel audio systems.
Looking to master video conversion with Handbrake?
Enhance your media handling with RapidSeedbox’s high-speed seedboxes. Enjoy faster conversions, reliable performance, and exceptional support to make the most of your Handbrake experience.
How Are Audio Tracks Selected?
Handbrake comes with a “Selection Behavior” feature that helps configure how audio tracks are selected and the settings for each track. This behavior will automatically affect the tracks that will be added to the “audio tracks list.”
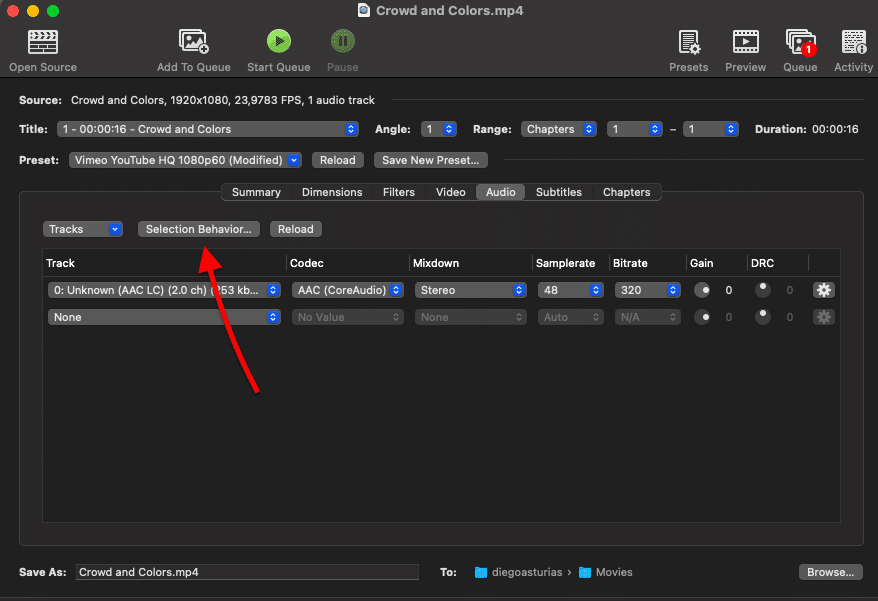
In the Selection Behavior window, you can define the matching languages. For example, if a source (DVD) comes in English and Spanish language, Handbrake will match both selected languages (English and Spanish, if they are selected on the configuration) and add them to the audio tracklist. If you are ripping a DVD that has multiple language options, you can let Handbrake find them and display them under “Tracks”. Tracks will show you which language and type of codec you are about to encode.
This can be useful, for example, if you want to always encode movies in English, you can configure the “Selection Behavior” to automatically select English by default.
From this window, you can also select the preferred auto pass-thru, and the audio encoder for each selected track.
Quick Tip! To keep a good sound quality, try using the “pass-thru” option. You can set it up for each track or configure it, in the Selection Behavior. Passing sound through means the sound is passed bit-for-bit without altering it. The common sounds formats which can be passed through include but is not limited to AC3, MP3, AAC, DTS, and FLAC.
Click here to get your 25% OFF discount and a FREE 5-day Seedbox optimization course now. 🤑Adding Subtitles into a Video File with Handbrake Like a Pro.
Handbrake is not only capable of encoding video files, but it can also help you put subtitles into your video files.
There are a couple of ways to get subtitles into your media files.
- When you rip a DVD, you can keep the subtitles in the video.
- If you don’t have subtitles, you can find them online and add them to your video.
To see the current configuration for Subtitles, go to the “Subtitles” tab found in the main window console.
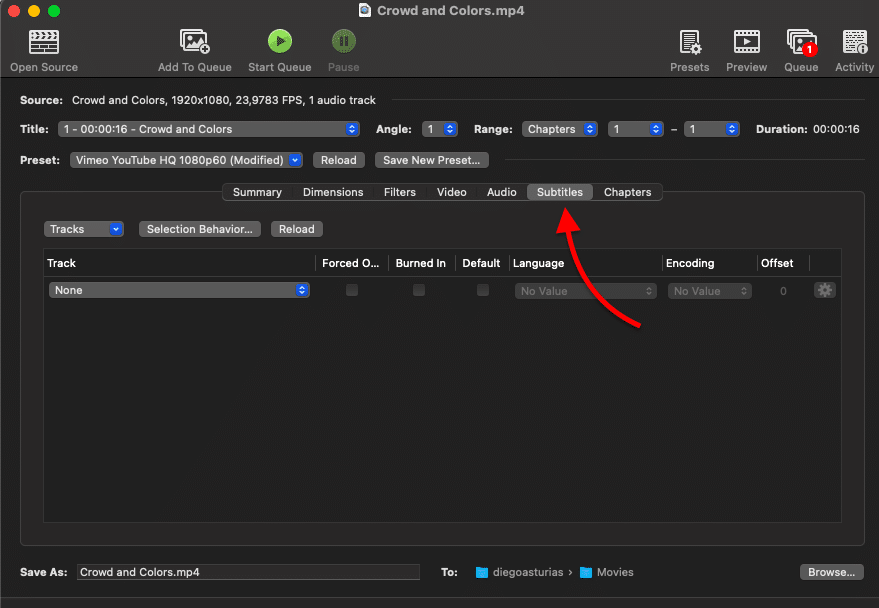
If you are ripping a DVD or BluRay, it is very likely that the subtitles will be automatically included under Subtitle tracks. In this case (as shown in the screenshot) there is no available subtitle in the media file, so I will have to download it and synchronize it.
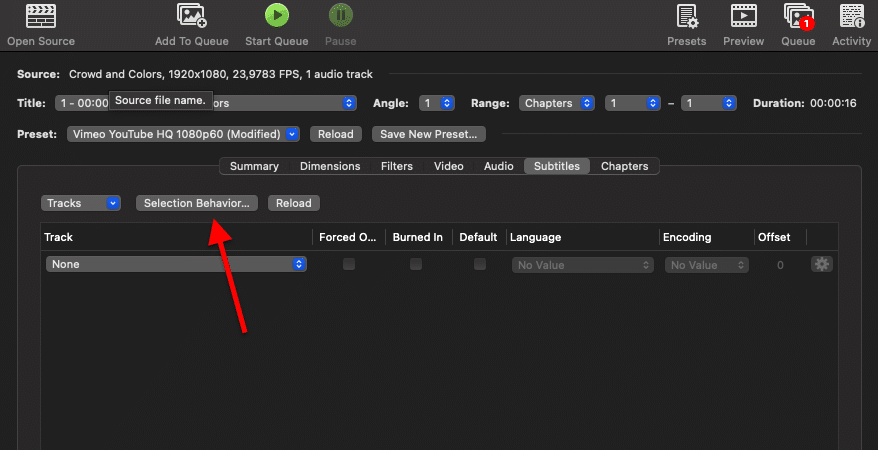
Configuring the Subtitle’s “Selection Behavior”.
Every time you scan a new source or select a title, the “Selection Behavior” rules can be re-defined to automatically select preferred audio and subtitle tracks. Selection Behavior is simply the rules used for automatically selecting the right audio and subtitle tracks every time Handbrake scans a new source.
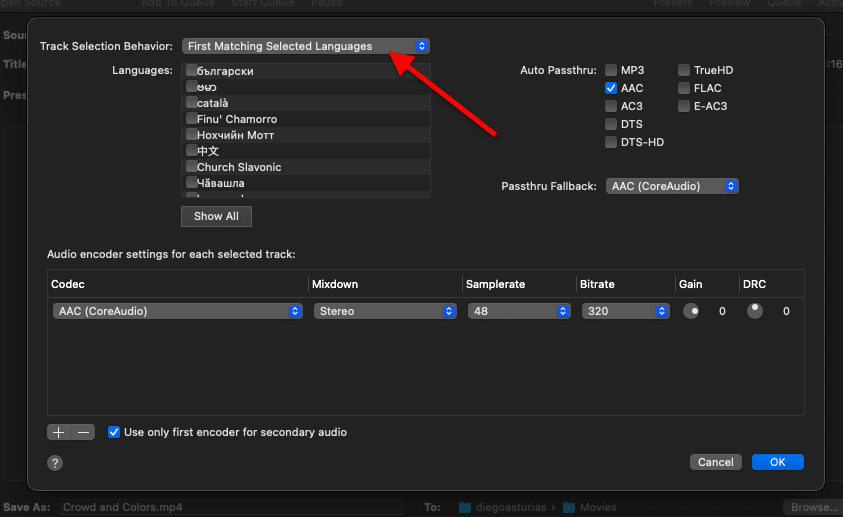
To configure the track selection behavior, go to the “Subtitle” tab then “Selection Behavior.”
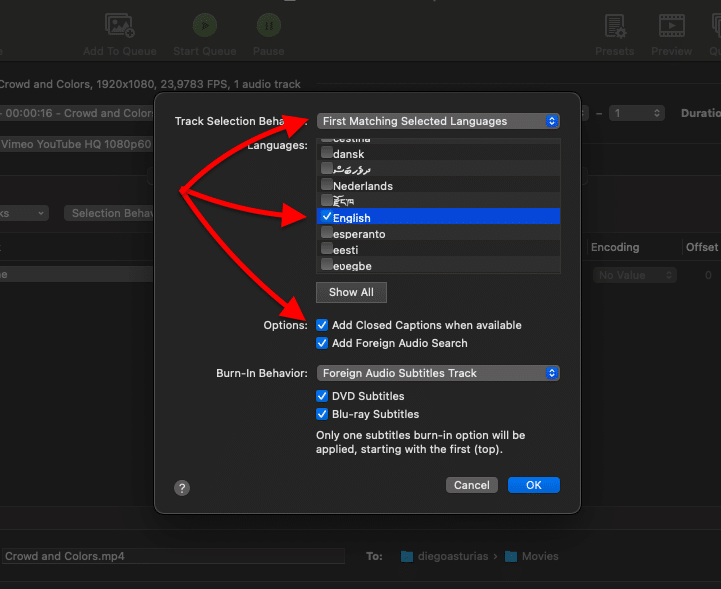
In the Selection Behavior window, you can select your preferred track behavior, such as “First Matching Selected Languages” or “All Matching Selected Languages”.
For example, if you always want to add closed captions in English to your videos, select your tracking selection behavior, “First Matching Selected Languages” then “English” in languages, and “Add Closed Captions When Available.”
Adding Subtitles to a Media File.
Start opening the source or inserting the DVD disc, and allow Handbrake to find it. Go ahead and click the “Subtitles” tab.
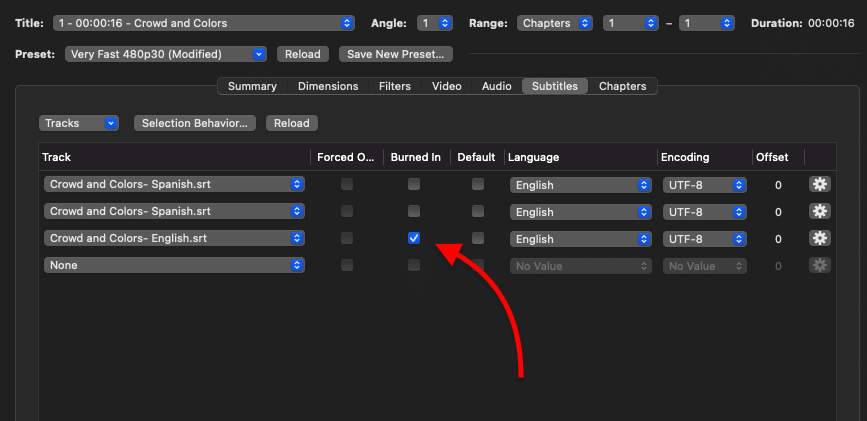
- How to add subtitles from DVD or Blu-ray Disc. If you are ripping a DVD and embed the subtitles in the video, Handbrake should automatically detect the subtitles’s language and the SRT encoding. Choose the language of the subtitles that you want to add in the video and click on the “Burned In.” The following screenshot does not show a DVD rip with subtitles. A normal DVD rip, should show you the subtitles track.

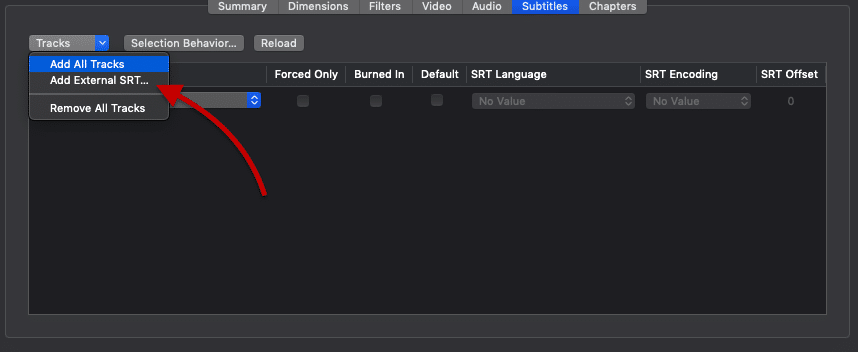
- How to add an SRT file? Adding external subtitles. If you have a digital file and have the external subtitles (an SRT file), you can configure Handbrake to embed the subtitles in the video. To do this, click the “Tracks” drop-down menu inside the “Subtitles” tab, then “Add External SRT” and select the subtitles file.
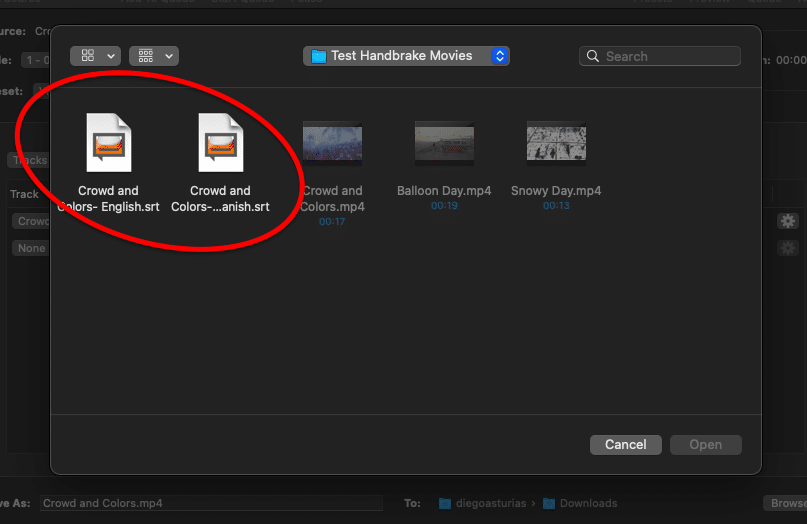
- Go ahead, browse and select the right .SRT file that you want to add and then click “Open”. You can repeat this process, if you want to add different languages.
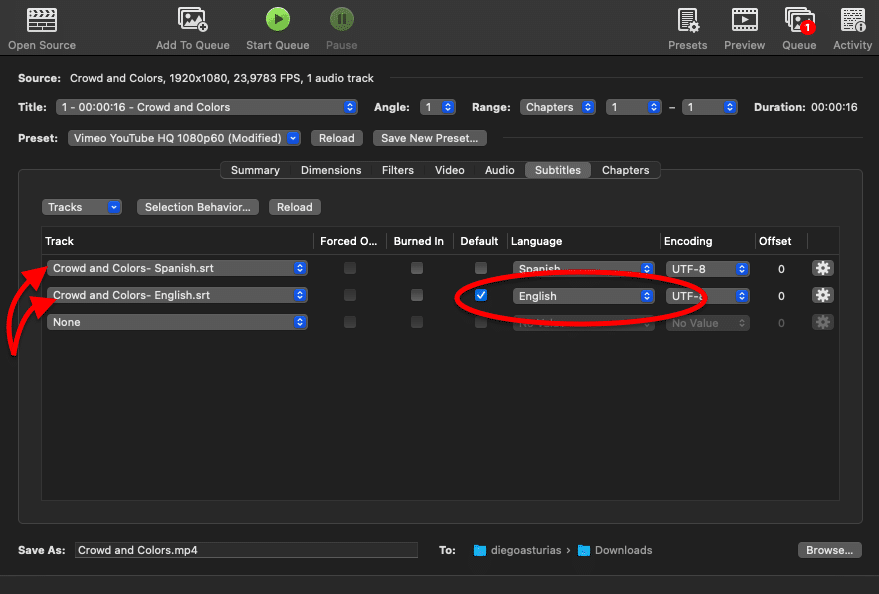
For example, in the following screenshot, you can see two subtitles, select the subtitle with the default language.
Burned-in Subtitles.
The Burned-in option overlays subtitles or captions in the video. If burned-in is disabled the subtitles can be turned on and off by the viewer. The burned-in option will burn the subtitle track checked within the encoded file.
If you configured the “Selection Behavior” correctly, Handbrake will find the right SRT file automatically (as long as it is in the same folder and has the same name as the video file). If these rules have not been configured, you can add the subtitle file manually.
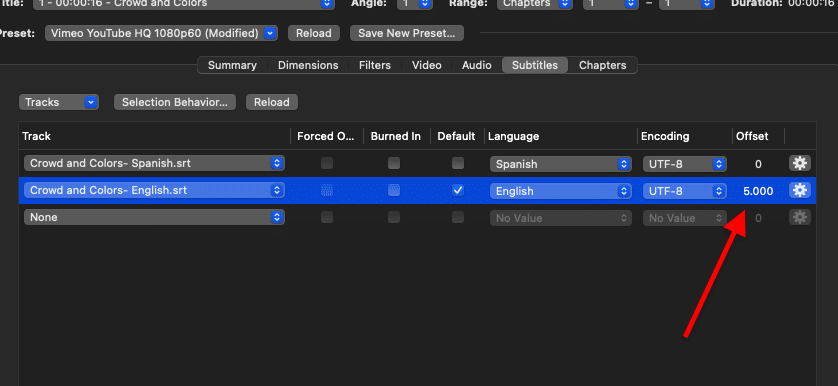
Matching Subtitle Timestamps With the Video.
In some cases when the subtitle does not match the timestamps of the video, or the timing of the subtitles is offset with the timing of the video audio, you can configure Handbrake to match them.
Synchronizing a subtitle with audio can be a challenging and repetitive task. When you import an external SRT, you can synchronize the file by counting the seconds, and set the SRT Offset in positive or negative values in milliseconds (ms), depending on where the audio is in relation to the timestamps.
Handbrake only supports SRT files for this offsetting feature. In the following example, I am offsetting the time for 5000 milliseconds.
How to Encode a Video Using Handbrake.
Video encoding is the process of compressing and changing video format. The idea of compressing a video is to “lose information on the video” to gain a leaner file size without compromising quality.
Traditional video production has always resulted in raw video outputs that are usually massive in size, and do not always meet the proper video format and screen specifications. This raw and uncompressed video makes it hard to transport it and play it. For example, it would be impossible to stream video in HD (1080p @ 60fps) to everybody, as not everybody has the right bandwidth to receive that kind of stream. Additionally, playback technology, screen types, and sizes vary a lot, so video needs to adjust. This is where Handbrake comes in handy— as a post-production tool.
Handbrake helps prepare the video for output. It encodes video to compress and make it meet the right formats and specifications.
Quality vs File Size?
It is very likely that you are using Handbrake to compress videos, to find the optimal balance between small file size and high quality.
What determines these factors?
The file size is always determined by bitrate. Bitrate is the measure of data (bits) used per second of the video. Simply put, lower bit rate and you’ll have a smaller file size output (but the quality is not strictly bound to the bit rate).
According to LarryJordan’s pro editor the quality of an image is based on the following six factors:
- Codec
- Video bit depth (8, 10, or 12-bit)
- Compressed frame size
- Compressed frame rate
- The amount of movement between frames
- Compression bit rate (Kbps or Mbps)
As with the Handbrake’s presets, the settings to compress a video will vary with what you input and output. For example, if you want a fast video compression with a high bitrate to use for social media, codec H.264 is the way to go. But if you don’t care about compression rate, and want to keep good quality at a lower bitrate, H.265 is a better option.
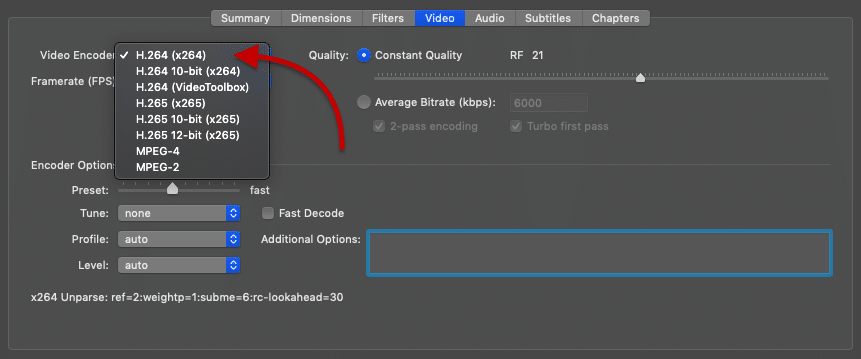
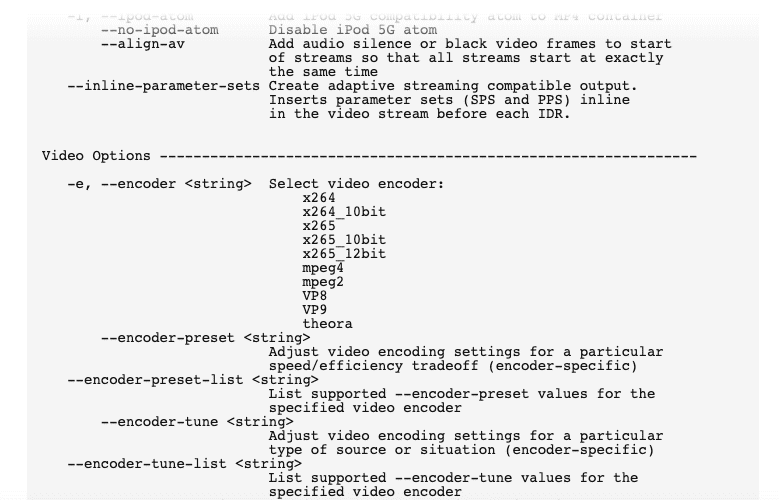
Encoding Technology Offered by Handbrake?
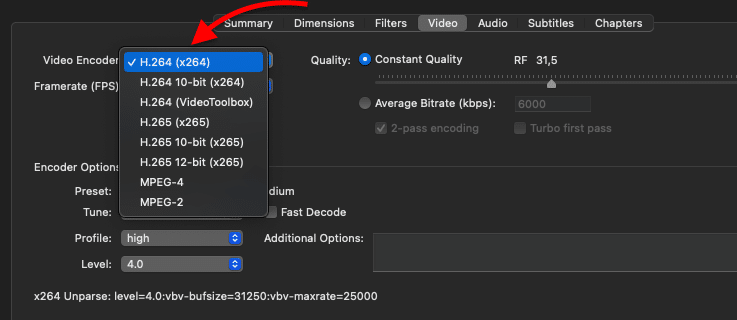
Handbrake offers:
- H.264
- H.265
- MPEG-4
- MPEG-2
Although video compression starts at production (at the camera level), you can transcode to different encoding standards or compress more. Cameras are usually built-in with encoding (H.264 video codec, in the majority of cases) that take raw images, encode, and store them in the device.
The newest video compression standards like codec H.265, provides a lot more advantages than traditional H.26.4 in terms of efficiency. H.265 offers from 25% to 50% better compression at the same level of video quality or significantly improved video quality at the same bit rate. But H.265 takes a long time to transcode video files, and it is still not supported by the majority of devices.
Encoding With Handbrake?
The recommended settings to compress a video are the following:
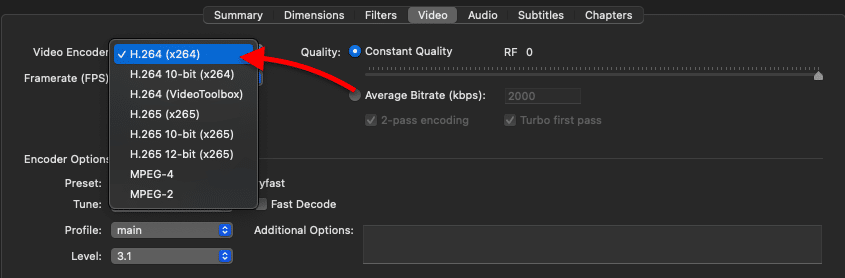
Codec.
Use H.264 video encoding, which is the default on Handbrake. H.264 is much faster than H.265 (HEVC) and is widely supported. In some exceptions, you can use (H.265) HEVC, especially for large frame sizes such as 4K. Additionally, H.265 supports 10-bit (color) which is perfect for distributing HDR.
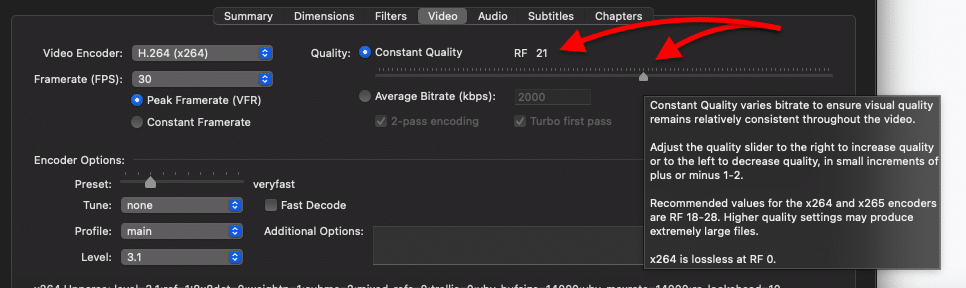
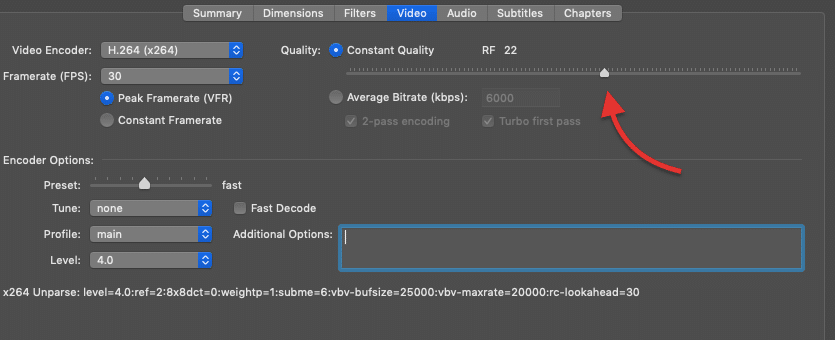
Quality.
Quality: Handbrake comes with two options for Quality: Constant Quality and Average Bitrate (kbps).
- The Constant Quality method helps you have control over the output quality, but you give Handbrake control over bitrate (file size). Constant Quality can be adjusted using the RF (Rate Factor) bar. For example, an RF ranging from 18 to 22 is optimal for Standard Definition, 19 to 23 for High Definition, and so on. According to Handbrake’s guide: “Small decreases in [Constant Quality] value will result in progressively larger increases in the resulting file size. A value of 0 means lossless and will result in a file size that is larger than the original source.”
It is advised not to go below RF 18. Low-quality settings will show a significant loss of detail on output videos.
- The Average Bitrate Method. With this quality setting, you have control over the bitrate (filesize) but give Handbrake control over the output’s video quality. The metric for Bitrate is in kbps (kilobits per second).

Don’t know which video bitrate to use? Use the following Video Bitrate vs Resolution Table as a reference.
| Video Bitrate | Video Resolution |
| 300 kbps | 240p |
| 500 kbps | 360p |
| 1000 kbps | HD 480p |
| 1500 kbps | HD 720p |
| 2250 kbps | HD 720p |
| 3000 kbps | Full HD 1080p |
| 4500 kbps | Full HD 1080p |
| 6000 kbps | Quad HD 1440p |
| 9000 kbps | Quad HD 1440p |
| 13000 kbps | 4K (UHD) 2160p |
| 20000 kbps | 4K (UHD) 2160p |
Framerate (Frames Per Second – FPS).
Framerate is the number of pictures displayed per second. Handbrake comes with two options Constant Frame Rate (CFR) and Peak Frame Rate (PFR). The CFR option makes the video strictly one frame rate throughout, while PFR allows you to select the peak of FR based on a threshold.
There is also another option when you select “same as source”, Handbrake automatically unlocks Variable Frame Rate (VFR) and to detect frame rate and ensure the entire video is made with the same rate.

Trimming Videos with Point-to-Point Encoding.
Handbrake allows you to compress large videos even more, by trimming them. You can use a feature called point-to-point encoding (Range) which allows you to encode part of a video instead of the whole. It gets the name because you’ll need to define a start point and an end point. In some way, it is similar to a split or cut functionality found in video editing software.
Trimming (or point-to-point encoding) can be done from the “Range” menu, which allows you to define a range based on:
- Chapters
- Seconds
- Frames.
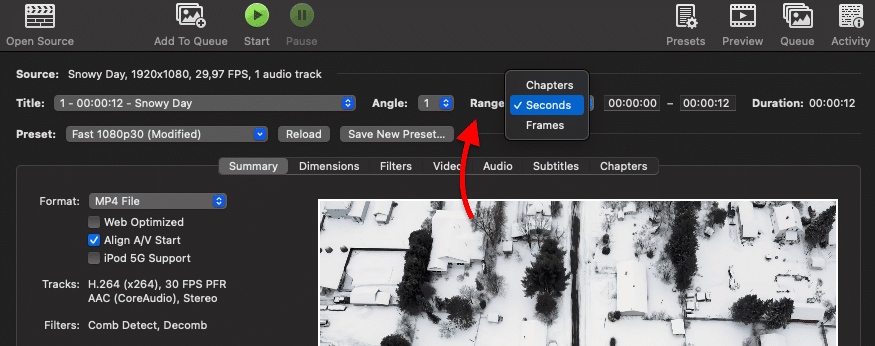
For instance, the option “Seconds” lets you define the start and the end time in (H:M:S). Alongside there is the Duration, which gives you the total time for the “trimmed” video. The total duration for that particular video is 00:00:12, so you can define its start and finish within that range.
“Frames” is another option, which is simply trimming your video based on the frame number.
A very useful feature from Range is Chapters.
Encoding Specific Chapters.
Videos in DVDs or Blu-ray discs are usually divided into logical chapters, which allow you easier navigation through the entire video. If the source is a DVD or Blu-ray, Handbrake will automatically detect chapters and add them to this Range “Chapters” menu.
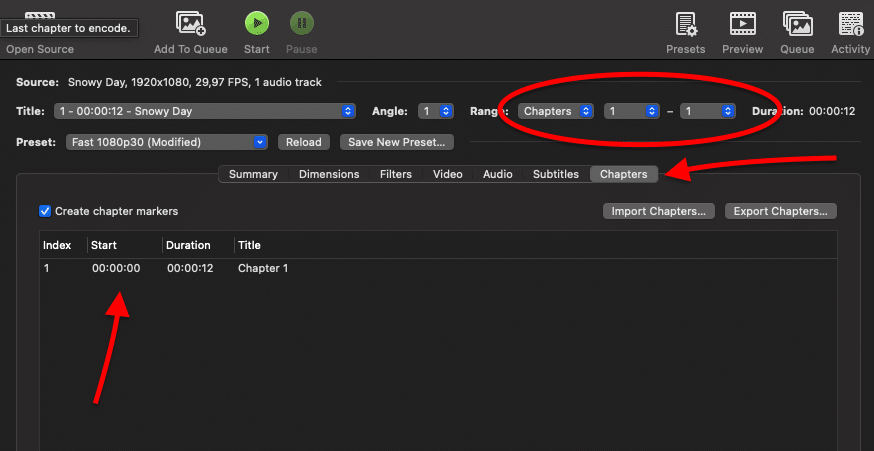
My video only has one chapter, which is why you can’t see more chapters on the screenshot.
Once you define the range of chapters (for instance chapters 2 through 6, or 2 through 8, etc), you can use the “Chapters” tab to see the detected Chapter markers. HandBrake will copy the Chapter Markers from your source to the output file.
Detected chapters will look as in the following screenshot.
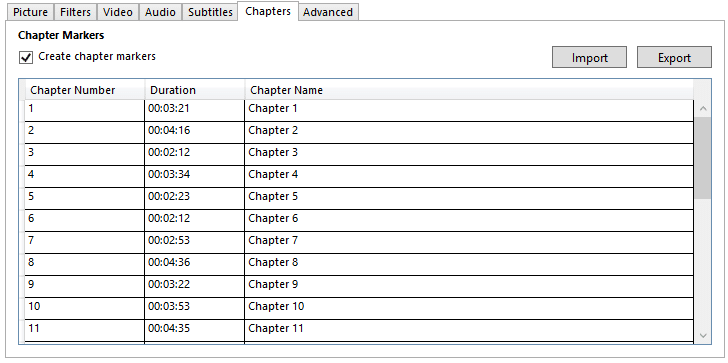
Additionally, you can Import or Export chapter markers using a CSV file.
Click here to get your 25% OFF discount and a FREE 5-day Seedbox optimization course now. 🤑How to Rip a DVD with Handbrake?
Handbrake is the go-to software to rip your DVD and BluRay movies. You can digitize your movie collection and use media library platforms, such as Plex, to organize it. With Handbrake, you can rip copyrighted and non-copyrighted DVDs. Ripping non-copyrighted DVDs (with no encryption) is a very straightforward process (we’ll describe later). But the process of ripping copyrighted DVDs requires more time and third-party “libraries”.
DVDs come with protection. Most DVDs are encrypted with digital-rights managers like the Content Scrambling System (CSS) to do exactly what the name implies: to scramble content— to make video data look gibberish. Although you could still literally rip it (or copy it)… no DVD system would be able to play it. Both DVDs and DVD players know how to speak CSS (or are CSS-licensed). Meaning that both understand how to encrypt and decrypt video data.
Handbrake can rip copyrighted DVDs, but it needs some help.
You’ll need to download and install libdvdcss.
libdvdcss (or libdvdcss2 in some repositories) is a free and open-source software library for accessing and unscrambling DVDs encrypted with the Content Scramble System (CSS). libdvdcss is part of the VideoLAN project and is used by the VLC media player and other DVD player software packages.
Download Libdvdcss
To rip a copyrighted DVD, you need to download and install Libdvdcss to your computer. Libdvdcss is an open-source library used to circumvent the CSS used on DVDs. The process to install Libdvdcss varies from different versions of OS.
Libdvdcss is currently supported by the following platforms: GNU/Linux, FreeBSD, NetBSD, OpenBSD, Haiku, Mac OS X, Solaris, QNX, OS/2, and Windows NT 4.0 SP4 (with IE 5.0) or later.
Here is the GitHub Repository.
Windows
Note that different Windows OS versions (32-bit and 64-bit) require different versions of libdvdcss. Download the Libdvdcss (.dll file) and drop it in the Handbrake installation folder. By default, this folder is C:\Program Files\Handbrake (but it can vary).
The screenshot below shows the default path:

Linux
On Linux, mainly Debian and Ubuntu, the relevant files can be grabbed from VideoLAN and installed via:
|
1 |
sudo dpkg -i libdvdcss2_version_arch_.deb |
macOS
For versions older than Yosemite, you can download Libdvdcss here. Unfortunately, Libdvdcss is no longer supported by macOS versions after “El Capitan”. Still, there are ways to install it using a Command-line utility known as Brew.
For more on how to install libdvdcss.2.dylib via Brew for newer versions of macOS. Follow the instructions from this link.
After installing libdvdcss, the copyrighted DVDs can now be loaded and decoded.
Insert DVD and Choose What to Rip.
Once you insert the DVD and proceed to open Handbrake, the software will recognize the DVD mounted on your computer. Choose and open the DVD title that you want to rip, and Handbrake will automatically fill in all the information.
Pick the right output folder and the video preset.
Choose a destination folder or “Save As” to store the ripped files. Then go to Presets to choose your output video.
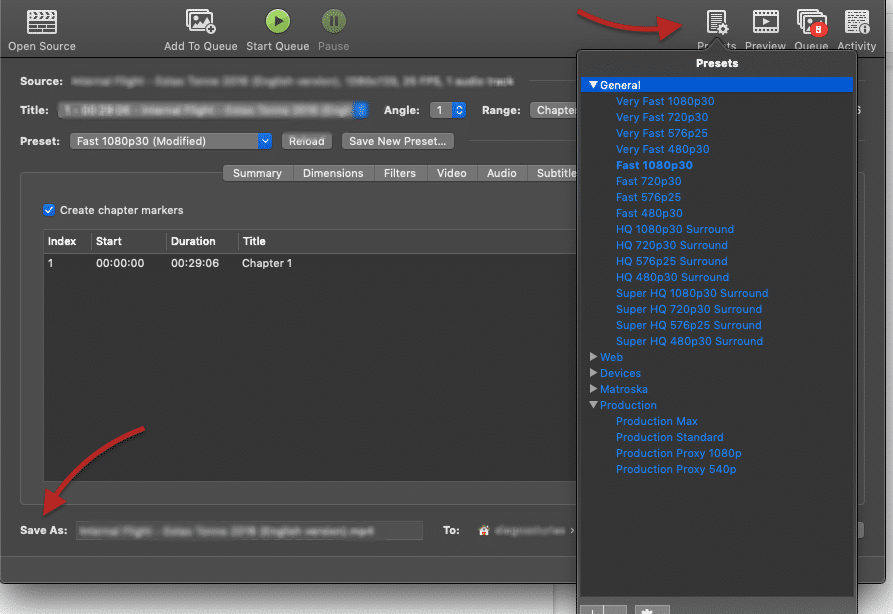
A Quick Tip! Although presets are a great way for a fast and easy DVD rip, you can also adjust other output parameters manually, such as picture, video filters, video, audio, subtitles, chapters, etc. This allows you to make your media files more personalized.
The Best DVD Preset.
The best DVD preset in Handbrake depends on your desired output. As mentioned before, think about the final resolution which should be related to your viewing display, the encoding speed, and the file size.
The best quality with the smallest file size?
Referring to the table above, the presets Very Fast 1080p30 and Fast 1080p30 are good options if you are looking for a fast encode and small-average file size.
Optimal Handbrake Settings.
Converting a Video from AVI (Divx or Xvid) to MP4.
Video container formats like AVI are typically known to be much heavier than formats like MP4. Although AVI uses Divx codec, to deliver amazing quality, the output size tends to be large. MP4, on the other hand, uses more efficient codecs such as MPEG-4 AVC/H.264 for smaller file size but still good quality video.
How to convert an AVI file to MP4?
- Load your AVI file into Handbrake.
- Select your preset configuration.
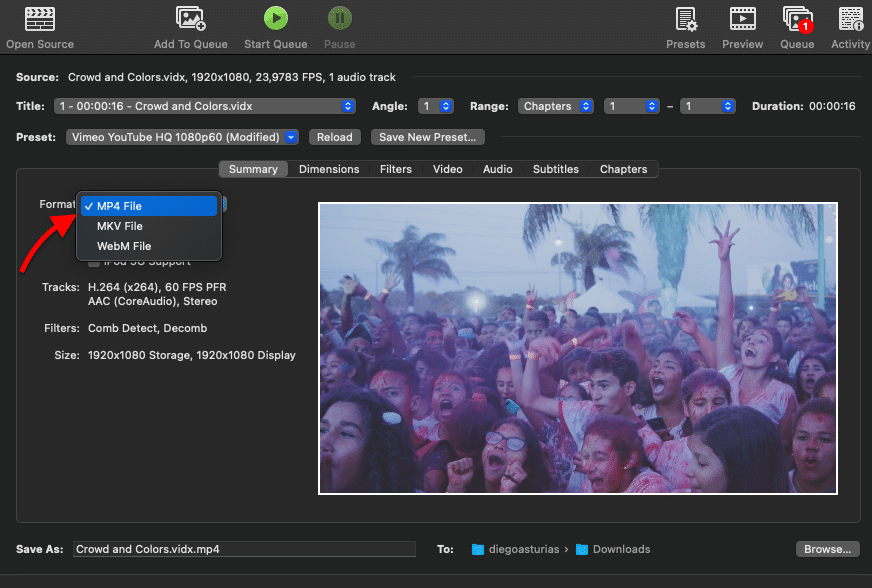
- Select “Format” on the Summary tab and select MP4 file.
- And hit that green “Start” button.
You might want to further squeeze the size of a video file that is already encoded in Handbrake’s supported codecs. A few other variables such as pixel dimensions, frame rate, constant or variable bitrate streaming, and audio sample rate, can help you compress it more.
How to convert MKV to MP4 video format (and vice-versa)?
MKV (Matroska Video format) is another container format. MKV is very popular because it can incorporate video, audio, and subtitles, and even save chapters in a single file. Another benefit of MKV is that it supports H.264 for video playback. Still, MKV has drawbacks like its output video size (which tends to be larger), and its lack of support, as compared to MP4.
MP4 tends to be smaller and widely supported. So, some people would rather stick with MP4.
How to convert MKV to MP4 with Handbrake?
- Open the video source.
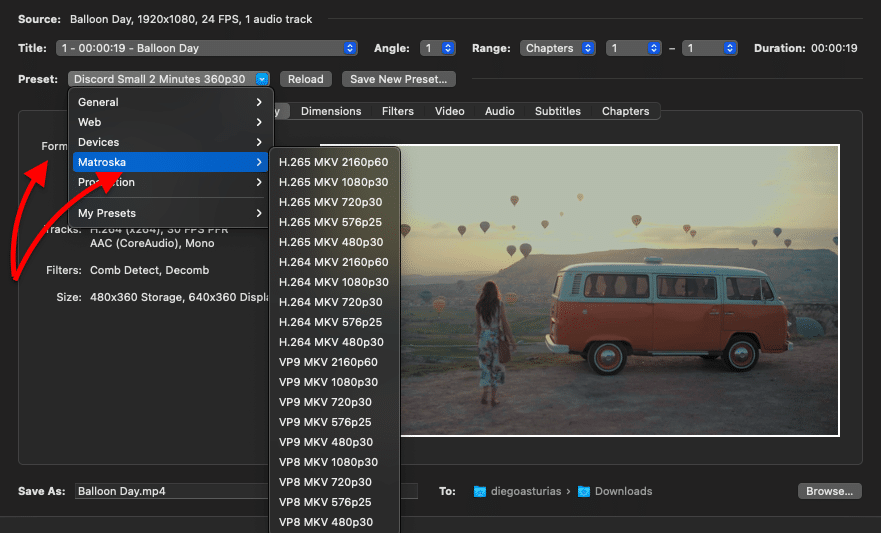
- Select your Preset. To convert from MKV to MP4, almost all presets found in categories like General or Web will be converted to MP4. For Matroska, Handbrake comes with a full list of MKV presets to make the conversion from MP4 to MKV, faster and easier. Either choose a Preset from the sublist “Matroska” or go to the “Summary” tab and choose MKV as the format.
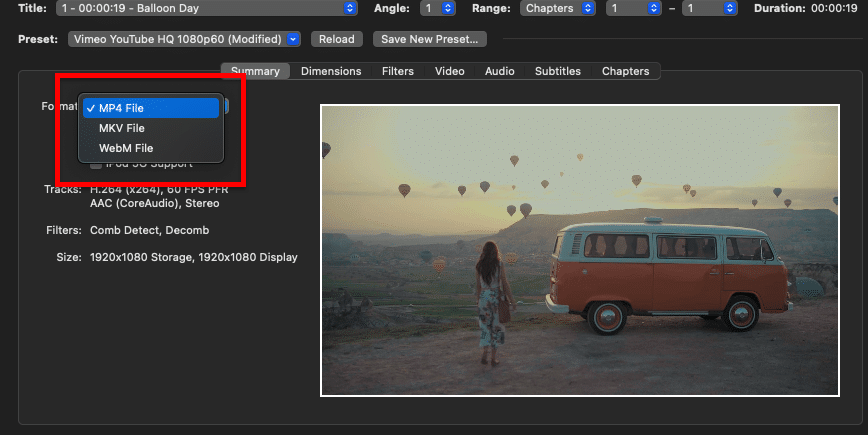
- After you select the present, check on the “Summary” tab, and make sure the right container is selected. Check on “Format”and select MP4 or MKV file.
- It is recommended to encode your new video with H.264. Go to the “Video” tab, and select H.264 as the video encoder. Leave the Frame-Rate Per Second (FPS) to “Same as Source” and “Constant Quality” option with default values.
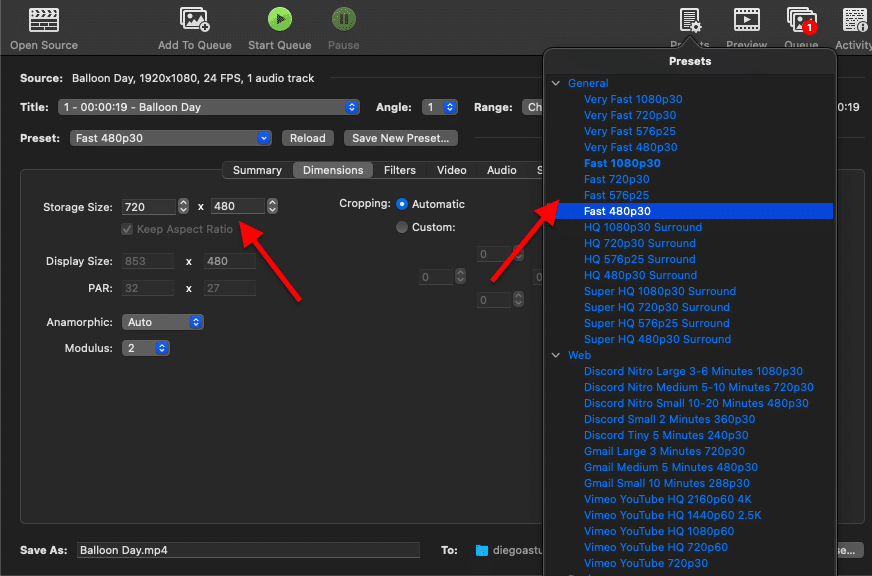
Reducing the Resolution of a Video to 480p (or 360p, 240p).
The easiest way to reduce the resolution of a video to 480p, 360p, or 240p with Handbrake is to either use a Preset or do it manually. To reduce the resolution of a video with a preset:
- Go to “Presets” on the top bar menu.
- Choose the “General” sub-menu, and select “Fast 480p30”.
If you want to review the output size, you can either go to the Preview window or to the Dimensions tab. The “Storage Size” under the “Dimensions” menu will be automatically adjusted to 480 pixels.
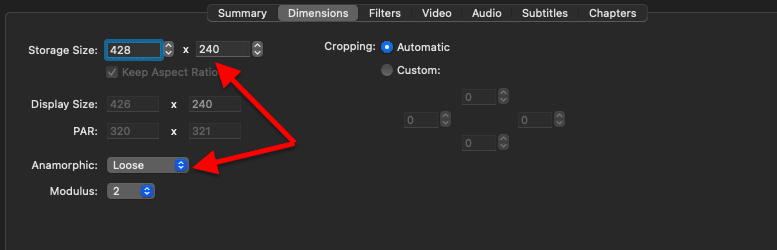
To reduce it even more, for example to 240p, go ahead and manually change the dimension settings to 240 (height). For the width, Handbrake will automatically calculate the dimensions in order to keep the aspect ratio. Make sure to keep Anamorphic to Loose.
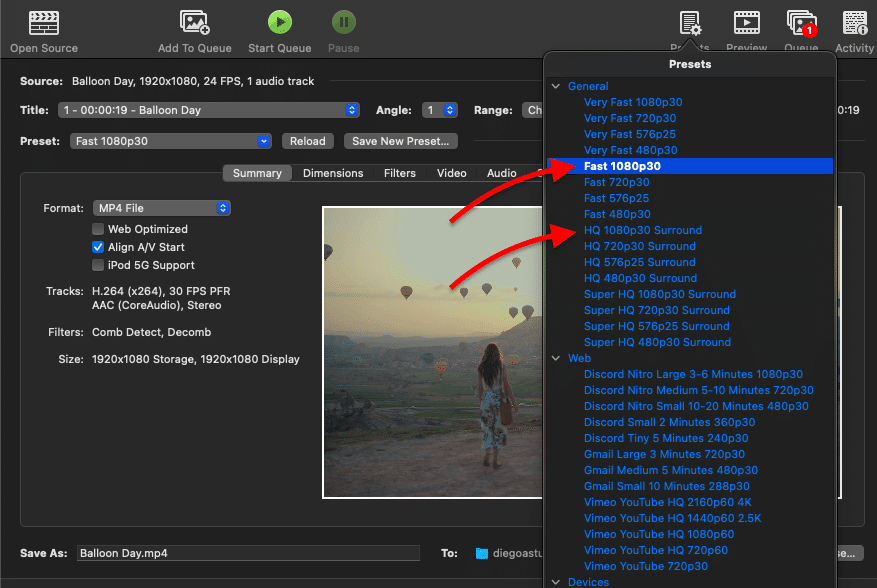
How to Convert 4K to 1080p with Handbrake?
4K or Ultra High Definition “UHD” is based on 3840 x 2160 pixels dimensions. 4K UHD screens are four times (4x) the pixel count of Full HD (1920 x 1080 pixel) displays. BluRay movies use Full HD, while UltraHD BluRay uses 4K.
If you compress or downscale a 4K video to HD 1080p, you won’t have the image sharpness of 4K, but still have a good quality with a small file size.
- Open the file. To compress a 4K, open the video source with Handbrake. You’ll likely have the 4K video in formats such as MP4, MKV, or MXF.
- Pick a 1080p preset. Choose two of the recommended 1080p30 presets: HQ 1080p30 or Fast 1080p30. Both will output with the MP4 container format and encoded with H.264.
- Fast 1080p30 preset. This preset has a fast encoding and average file size. It is standard in terms of size and image quality.
- HQ 1080p30 Surround preset. This preset has a slower encoding and larger file size but has high picture quality.
If you are not happy with the preset configuration results, you can also manually adjust the settings for the 4K conversion to 1080p. The recommended settings are:
- Choose H.264 (x264) as video encoder. The H.264 10-bit is also a good option for 4K because it can preserve better color in the image but at the same time, it will increase the size of the file a lot. You can experiment with both options.
- Disable the “2-pass encoding”. This option analyzes the entire source before converting it. Handbrake uses the information collected to make decisions based on quality and bitrate. Without this option, Handbrake will compress the video much faster, but the quality of the final output will be slightly degraded.
- Leave Framerate and Quality values by default.
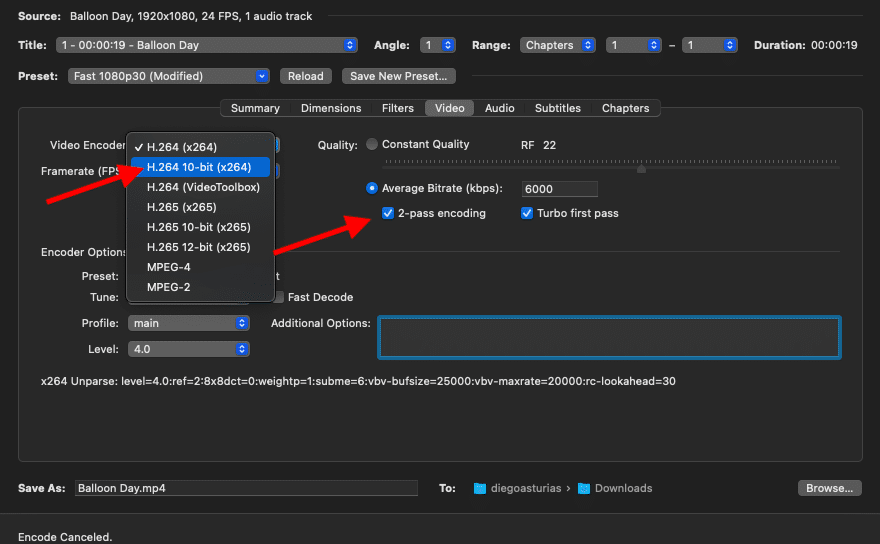
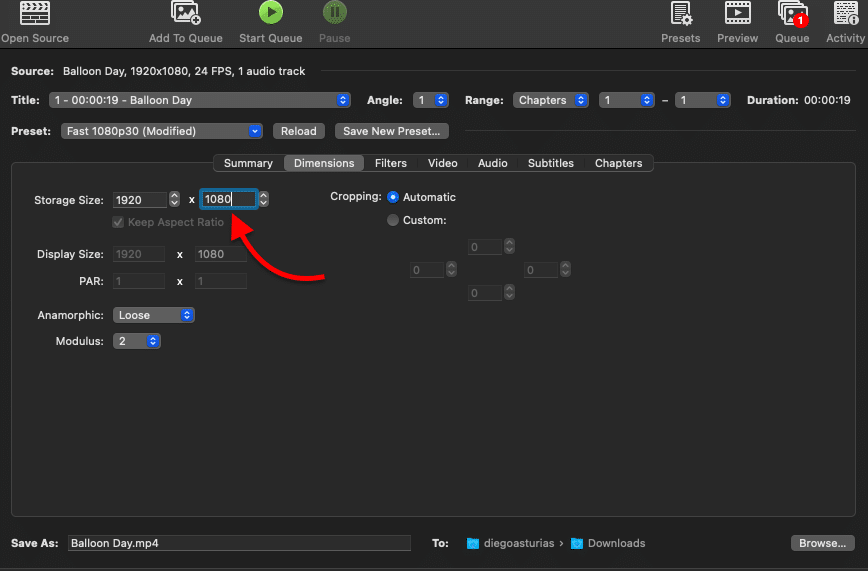
Now, go to Dimensions, and manually change the Storage size to 1920 (vertical) x 1080 (height) pixels.
Advanced Handbrake Operations
Using Handbrake with other Tools to Streamline the Workflow.
If you are a regular “movie downloader” and DVD ripper, you might have already noticed that most of those new video files will come through different video formats, from MP4s, AVIs, to MOVs, dimensions, languages, audio systems, etc. Handbrake provides a perfect solution to add some structure to your media library.
The best of Handbrake is that you can combine it with other multimedia tools to enhance your experience. For example, you can set up a media collection tool (Plex) and let Handbrake convert all that media so you can play it seamlessly on all your devices. If you are trying to create an organized media library, consider the following steps.
- Building. To build up a media collection use a Seedbox to help you automate torrent downloads and protect your anonymity at the same time.
- Organizing your media collection, with Plex Media Server. Plex can help you centralize all your media into a single platform, present it in a (Netflix-like) dashboard, and allows you to play videos with any client device, and even share libraries with your remote friends. Although Plex adapts the video quality on0the-fly for each specific device, it utilizes high resources to compress streaming video. This is when Handbrake becomes really handy because you can prepare and optimize all your media files beforehand.
- Standard encoding. To standardize all those different video formats, use Handbrake to automatically grab files and encode them to a specific preset format.
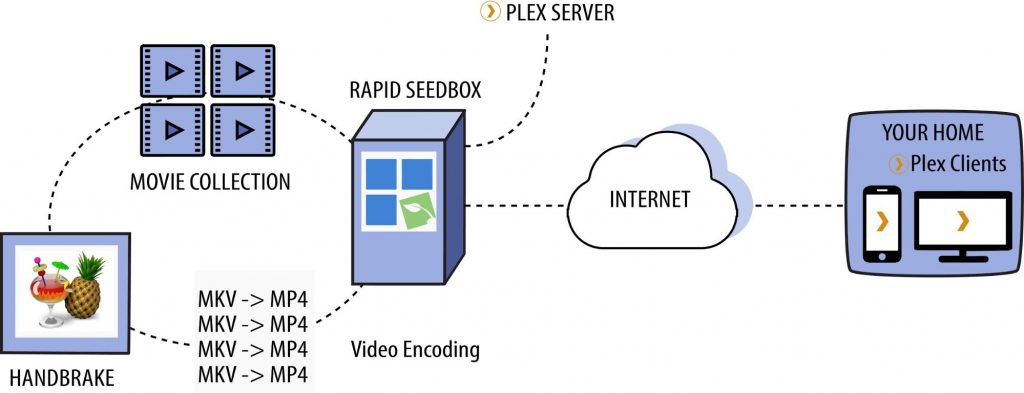
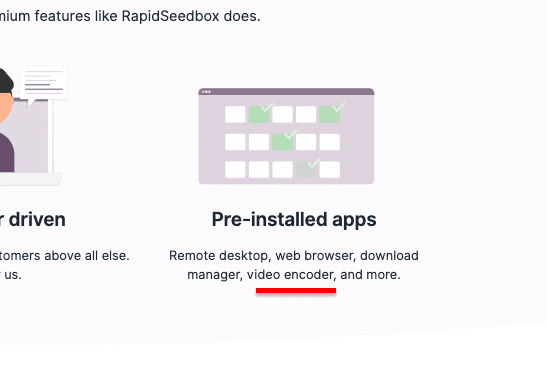
The advantage of a VPS such as RapidSeedbox is that you can have everything in one place (The seedbox, Plex, and Handbrake). The service comes with one-click app installers that lets you easily install all those applications in a cloud-based VPS and streamline all your multimedia workflows.
Seedboxes can even go beyond to help you track and download torrents automatically for your favorite movies. Download media anonymously to your online seedbox, let Handbrake deal with video encoding automatically, and use Plex Media to organize all that media into one place, so you can stream it anywhere and anytime.
Using HandbrakeCLI to Step Up your Game.
Handbrake comes with a Command Line Interface (CLI), known as HandbrakeCLI, which provides a lot more configuration flexibility than the traditional GUI version. HandbrakeCLI is more complicated to learn and use, but the effort in learning it and using can is worth the effort.
HandbrakeCLI can be handy if you want to automate tasks using scripting. If you can create scripts through bash commands, using Python or PowerShell you can automate many tasks in Handbrake and save tons of time. For example, if you downloaded a couple of media files to a Seedbox and want to convert them right away to stream them on your display, but the files are too big and the encode time could take too long. In this case, you can write a batch script and run it through Handbrake’s CLI.
Installing and opening HandbrakeCLI.
- Go to the Handbrake download page.
- Download the appropriate version for your OS.
- Extract and Install HandbrakeCLI.

To run HandBrakeCLI on a modern macOS, you’ll need to install it via macOS/Linux package managers such as Homebrew. With Homebrew, you can install HandbrakeCLI using the following command:
|
1 |
brew install handbrakeCLI |
How to open HandbrakeCLI?
To access the HandbrakeCLI, go to the terminal in macOS or Linux or the CMD Prompt in Windows. Navigate to the file where you extracted the HandBrakeCLI installer (for example C:/downloads). Once in the same folder as HandBrakeCLI, you can open a source and define the destination.
To get more information on HandbrakeCLI and all details about its commands type:
|
1 |
HandBrakeCLI --help |
The Handbrake’s CLI commands reference shows all the options for encoding videos through commands.
Common Command syntax:
|
1 |
HandBrakeCLI [options] -i <source> -o <destination> |
An example command of HandbrakeCLI?
|
1 |
HandBrakeCLI -i VIDEO_TS -o movie.mp4 -e x264 -q 20 -B 160 |
This command will encode (-e) a source video “VIDEO_TS” to an output called “movie.mp4”. It will use codec x264 (H.264) with a Constant Quality of 20 and encode the audio as 160 Kbps AAC.
Creating commands in HAndbrakeCLI can give you further flexibility to integrate them with automation tools such as Windows PowerShell and create scripts to automate Handbrake. For instance, the following simple bash script in Linux downloads and converts a file without your intervention.
|
1 |
wget -o destinationfile <a href="https://pathtofile">https://pathtofile</a>handbrake-cli -i destinationfile -o convertedfile |
Another example. With HandbrakeCLI, you can automatically encode everything that falls onto a folder to MP4 and encode all subtitles to English. With the help of a script, for instance, you can run these commands every time a new MKV file downloads to a folder.
Click here to get your 25% OFF discount and a FREE 5-day Seedbox optimization course now. 🤑General Troubleshooting.
My video encoding process is slow?
Before attempting to label this as a problem, let’s define what is encoding speed.
Encoding speed can vary according to many different factors, such as encoder technology, H.264 is faster than H.265 or MPEG, filesize, bitrate, and Framerate. Many of these factors are usually defined by default in Handbrake but you can alter them to make your encoding process faster. There are three variables that can affect your encoding speed.
- Your hardware resources.
- The encoder settings.
- The source file.
1. Your Hardware.
Handbrake can scale to up to 6-8 CPUs cores, meaning that the hardware you are using to encode with, will definitely affect encoding speed. On the new Intel Processors with onboard HD graphics, Handbrake supports Intel QuickSync which offers very high-performance encoding at a reasonable quality.
If your encoding speed is slow, make sure that you leave enough processing power on your computer. Do not open many applications while encoding, as it can be a strenuous process depending on your computer.
2. Encoder Settings.
Handbrake’s default encoder settings might not be the best most of the time. They included the Presets with different options in terms of encoding speed, from ultrafast to very slow. Bear in mind that fast encoding speeds usually pay in video quality and file size. A fast encoder can reduce quality or increase the file size, while a slow encoder uses algorithms that take longer but result in higher quality.
Handbrake provide those very fast and fast presets that can help you speed up the encoding process.
If you are still experiencing slow encoding speeds, try experimenting by adjusting the presets with the Constant Quality slider. The recommended RF values for H.264 range from 18-28, to not compromise quality. An RF above 28 will produce a smaller file size and faster encoding speeds.
You can also try faster encoders such as H.264. For example, a high profile H.264 10-bit will take longer to decode than a standard H.264 format.
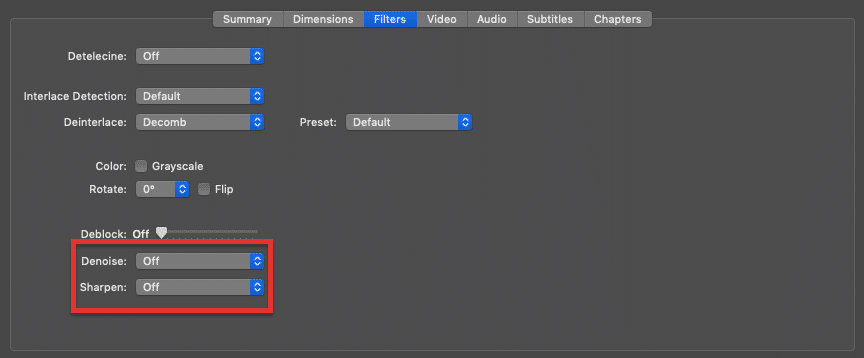
Filters are another type of setting that can be memory-intensive. Filters like denoise or sharpen can slow down your encoding process. If you are looking to speed up your encoding, make sure that these filters are off.
3. The Source File.
Last but not least is the source file. Large files will also affect performance mainly based on the resolution and format. If you are compressing a 4K video, you’ll definitely have a slower encoding process, than if you are encoding a 1080p file.
Problems with Ripping Certain DVDs.
By default, Handbrake will not rip all DVDs, especially copyrighted ones. You’ll need to empower Handbrake with the proper tools. If you have not installed libdvdcss, go back to the (Rip a DVD with Handbrake) section.
In summary?
- Libdvdcss? Check whether you have downloaded and copied the right and the last version of the library files libdvdcss into Handbrake folders to help circumvent the Content Scramble System (CSS) used on DVDs.
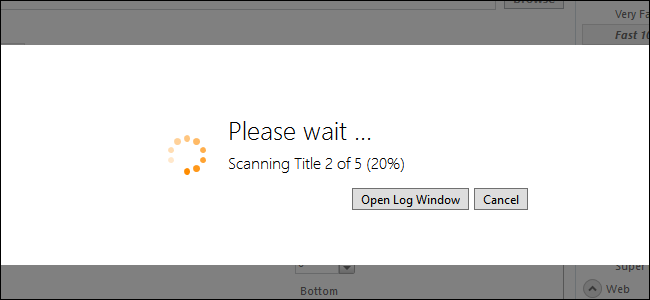
- Make sure you are scanning the disc and choosing the right title. By default, Handbrake will scan the entire disc and will give you the titles, from deleted scenes, bonus clips, extras, etc. Having so many options makes it difficult for you to choose the right one. Play the main feature and write down the name of the main title.
- Scan the DVD. Go to Handbrake > Open Source (Main Title) > Scan DVD. Handbrake will scan the entire disc. If the library libdvdcss was not installed properly and you are scanning a copyrighted movie, Handbrake will not be able to finish scanning it.
Once it is finished scanning the DVD, make sure you choose the right Title and the entire range of Chapters, for example from 1 – 30.
Common problems when adding subtitles.
If you are unable to transfer subtitles from a DVD to an MP4 file, try changing the Burn-in Behavior parameters.
- Go to the “Subtitles” tab, select the right track and make sure that only the “Burned In” option is checked.
- If you are still unable to burn in the subtitles, go to Selection Behavior > Burn-in Behavior. There are three behavioural options you can choose from, for “automatic selection”: Foreign Audio Scan, First Track, Foreign Audio Preferred, else first. Try choosing “none” and try again, or make sure tracks and languages are selected properly.
The burn-in behavior helps you select which subtitles you can make permanent by overlaying them on the video image. Choosing “none” as burn-in behavior, forces only subtitles and does not force any Close Captions (CC) tracks. Sometimes CC tracks are unsupported, so this option will only force subtitles.
Click here to get your 25% OFF discount and a FREE 5-day Seedbox optimization course now. 🤑HandBrake FAQ
Use H.265 with RF 22–24. It offers the best compression with acceptable quality loss.
Yes. HandBrake is open-source and completely free.
No. HandBrake only works with unprotected discs unless third-party tools are used.
Yes, for unprotected Blu-ray discs you own.
Summary
The best of Handbrake, despite being one of the most powerful encoders, is that it is 100% free and open source.
People love Handbrake because it comes with fantastic preset parameters and queuing functionality. So anyone can convert a big list of MKV movies to MP4, or compress 4K movies, and take a break from the computer. Another big benefit of Handbrake is that it lets you rip your DVD or Blu-ray disc collection into media files.
If you want to improve your media, even more, Handbrake can be paired with other sets of tools, like a Seedbox and Plex media server. Just download different media formats safely and anonymously from the Internet into your Seedbox, automate and optimize the video encodings with HandbrakeCLI, and organize your media collection with the Plex Server.
Looking to master video conversion with Handbrake?
Enhance your media handling with RapidSeedbox’s high-speed seedboxes. Enjoy faster conversions, reliable performance, and exceptional support to make the most of your Handbrake experience.
FROM THE HANDBRAKE WEBSITE: “A lower RF number produces higher quality video, and a higher RF number produces lower quality video.”
So i can’t trust a thing with this tutorial when you have the RF completely backwards. From what I remember, 20DVD, 16/720P, 18/1080P, 16/1440P, 14/4K (but don’t quote me).
You had me questioning myself for a moment. I’ve been using RF as lower is better and seeing the appropriate results for years. I thought there’s no way I have it backwards. Thankfully, I don’t.
Mike, thanks for the observation. The incorrect wording on the tutorial has been updated.
Hi,
I have been using Sorenson Squeeze for years but since they went belly up I’m needing a good & flexible video/audio encoder. Handbrake could be it, but it isn’t. Specifically in the area of audio, and setting audio “paths” and saving them in a preset for specific project uses (of which I have many).
The problem I encounter is when I have MOV files (from a recorder like AJA’s KiPro in Prores422 HQ format) that have different languages on different audio tracks and the language can’t be set in the KiPro.
So I need to (say) set track 1 (of 6 embedded tracks) to only encode to the left output, and track 2 to only encode to the right output (for me track 1 is English content recorded at an event and track 2 is Spanish content from a translator in a booth at the same event).
The result I get from Handbake is both tracks in both outputs and I can’t do anything unless I use QuickTime 7 (no longer supported by Apple – not 64 bit) to associate a “language” to my source tracks.
It would be great (for me) to be able to map a source audio track (or channel – we also use Samurai recorders and they use many channels) to an encoded output channel, an audio matrix if you will. Sorenson had this feature and it’s configuration could be stored in a preset. So different audio configurations could easily mapped and stored.
Has anybody else had anything like this type of need? I can’t be the only one doing this on the planet, surely!
I’d love to hear what you could do/suggest for this need. Meantime I continue searching for a Sorenson Squeeze replacement, everything else about Handbrake is great!!
Thanks for your considerations.
Thanks for your observation, Richard.
I am trying to reduce the file size of my videos and I get as result a much larger size than the original. I modified the RF factor to 18 or less and get no change in the size of the video. Can you help me.
When you choose Constant Quality, it means that you are adjusting the output video quality and you are letting HandBrake figure out the bit rate (size). On the other hand the “average bitrate,” lets you control the size of the output file but will no let you control the video’s quality.
So, choose Avg Bitrate mode, as it enables you to decide the bit rate which influences the output file size. Remember, “the higher the bit rate is, the larger output file will be”.
Hello, I have figured out most things in handbrake but one thing is nagging at me. I can’t figure out how to duplicate a 1.66:1 aspect ratio film. I know it can be done because I have downloaded films like Dr. No and they have the proper aspect. How would I go about doing that? Thanks
If you are trying to duplicate a movie with certain aspect ratio settings, under “Picture” tab leave the Anamorphic option to “Automatic” or “Strict” and make sure the “Keep Aspect Ratio” is with width and height of 1.66:1 (5:3) — or 1280×768 (or whatever dimensions you want).
Hello,
Many of the MKV’s Handbrake makes will not fast forward greater than 2x on a dvd player or TV. Anything greater than 2x will cause it to stop and restart. Are there any settings in constant vs. variable frame rate or other areas that would remedy this?
Hello Gregg…
If you can’t play those files in VLC, then it might be a problem with errors within the container. If they work in VLC, you can try to explicitly put a frame rate in the FPS field other than the “Same as Source” option.
According to Handbrake’s documentation: “A video’s frame rate is how many still pictures are displayed per second. Common frame rates are 23.976/24 for film, 25/50 for European broadcast standards, and 29.97/59.94 or 30/60 for North American broadcast standards. Modern video formats can be variable frame rate, switching between different frame rates on the fly, e.g. from 23.976 films to 29.97 NTSC and back.”
For more information: https://handbrake.fr/docs/en/latest/technical/frame-rates.html
My handbrake will only concert up to 43 minute files
How do I change it for 2 hour file
Has anyone tried to fix the issue with LibDVDCSS not working on titles that have the form “”
between the quotes is supposed to say ‘greater than symbol’ title ‘less than symbol’
My Settings from Full HD/HD Video with High Data Rates 2k & Up to convert to Small File Size with Good Quality
Format: MP4
Dimension: Same as Source
FPS: Same as Source
Bitrate: 1,500
2-Pass Filter: Enabled
1st Pass Turbo: Disabled
Encoder: Slow
Audio: Auto Pass Thru
The Results are amazing.
after reading this, i use my previous settings then i disabled the 2 pass then use denoise hq-medium & sharpen lapsharp-medium.. the result is better.. it is close enough with the original..
why use 1080p for DVD encodes? Is their native resolution not 480p?
Hi, I’m having trouble with Handbrake skipping chapters. I have a large number of homemade DVDs. I’m trying to digitize them to an external hard drive. The DVDs are recordings of VHS tapes I recorded years ago. Almost all the videos are in SD. I’m fine keeping the dubs mono. How do I make sure the Handbrake dubs always do all chapters? Thanks!
i have 2 mp4 videos from my dad’s memorial service and want to burn them to a dvd that will play on my mom’s dvd player at home — what is the best preset / settings for me to use in order to do this and keep good quality as well?
Maybe give convert x to DVD
Very easy to use
Hi. I’m getting “Encode failed” message after pressing “start”. I had silent family 8mm film transferred to dvd. Now I’m trying to transfer the dvd to my computer and hopefully put the footage into chapters so I can send it out to various family and friends. Any advice on settings in handbrake to make this work would be greatly appreciated!
I want output fike if 720p resoulution and Is there a difference in video qulity if i encode a video from a 1080p source or a 720p source .
The document contains the statement:
It is advised not to go below RF 18. Low-quality settings will show a significant loss of detail on output videos.
It’s high RF values that result in loss of detail.
I didn’t read every single thing here, but I skimmed through the sections I was interested in.
I would like to share some info about bitrate that I have figured out.
When there is loads of little details (ex: grass/leaves/mesh patterns) and high speed motions in my video,
I have to increase bitrate to not get blocky artifacting.
When there is low detail and/or low motion, bitrate can be kept lower.
In my use cases, I require 10k+ bitrate for high motion 3d gameplay with little details and high motion.
For movies or vlogs with still shots and low detail I prefer 3-5k bitrate.
Just thought I’d share my experience, happy testing and encoding!
Thank you for sharing your experience Wakadooey!
so I’ve seen encoders achieve 40-60min videos with an incredible file size of 250-450mb.
specifically I saw a 1080p h264 video with a file size of 2.4gb get brought down to a whopping 383mb in 720p h265. I would love to know how to achieve this.
Now I’ve tested some with similar length in duration and size but I can never get below 700mb.
My settings are pretty basic coz I’m new to this.
My encoder preset is set at Fast. I keep the framerate constant and same as source. video encoder on h265 10 bit and my RF at 21 or 22 (using the recommended RF by Handbrake).
would love help with this.
Hi Bradley…. You’re on the right track! The main things that shrink files that much are:
1. Resolution drop (1080p → 720p cuts file size a lot).
2. RF & bitrate: RF 21–22 is solid, but size depends on content—action scenes need way more bits than static ones. If you want predictable size, try Average Bitrate (e.g., 800–1000 kbps for 720p).
3. Preset: switch from Fast to Slow—it takes longer but squeezes the file down better.
4. 10-bit x265: good call, keep it.
For a quick test: 720p, RF 23–24 (or bitrate target 800–1000 kbps), preset “Slow.” That should get you closer to the 400 MB range.
I hope that helps!
Diego