Important note (2026): Plexdrive is a read-only Google Drive mount and is no longer actively developed. It works well for media streaming, but it should always be paired with rclone for uploads and file management.
Plexdrive is a FUSE-based filesystem that enables efficient media streaming from Google Drive directly to your Plex media server.
Integrating your Google Drive cloud storage with your Plex will unlock a world of possibilities.
In this guide, we will explore Plexdrive in detail. You will learn everything, from installing FUSE and preparing Plexdrive to creating a custom Google Drive Client ID and mounting Google Drive to Plexdrive.
We will cover every step of the setup process.

Disclaimer: This material has been developed strictly for informational purposes. It does not constitute endorsement of any activities (including illegal activities), products, or services. You are solely responsible for complying with the applicable laws, including intellectual property laws when using our services or relying on any information herein. We do not accept any liability for damage arising from the use of our services or information contained herein in any manner whatsoever, except where explicitly required by law.
Table of Contents.
- Introduction to Plexdrive.
- How to set up Plexdrive.
- Customizing Plexdrive Settings.
- Setting up Google Drive content with Plex.
- Plexdrive FAQ.
- Final words.
1. Introduction to Plexdrive.
Plexdrive allows you to mount Google Drive as a read-only FUSE filesystem, making it possible to stream media directly into Plex without storing files locally.
This setup is commonly used by advanced Plex users who want to scale large media libraries while keeping local disk usage minimal. Plexdrive is not designed for uploads or torrent activity and works best when combined with rclone for file transfers.
Plexdrive does offer a “direct delete” option on the filesystem, which means that if you delete a file or folder within the mounted Plexdrive, it will be immediately deleted from your Google Drive account as well. This feature helps maintain synchronization between the virtual filesystem and the actual Google Drive content.
Plexdrive Pros and Cons.
- Pro – With Plexdrive you can stream content directly from Google Drive.
- Pro – You don’t need to move your content to your Plex server.
- Con – Plexdrive only works with Google Drive.
- Con – Plexdrive is read-only.
Interesting Fact!
The core developer of Plexdrive used rclone for a long time (an alternative to Plexdrive) but got API Quota errors every time. He jumped to node-gdrive-fuse, another Plexdrive alternative, but this mount program missed some of his media files. As a result, he started implementing his own file system library. Plexdrive was born.
When should you use Plexdrive?
Plexdrive is best suited for users who stream large media libraries directly into Plex and want to minimize local disk usage. It works well if you already upload content to Google Drive using rclone and only need read access for streaming.
Plexdrive is not recommended if you plan to upload files, download torrents, or perform frequent file operations on the mounted drive.
2. How to set up Plexdrive.
In this section, we will go through the step-by-step process of setting up Plexdrive. From installing FUSE to preparing Plexdrive, creating a custom Google Drive Client ID, and mounting your Google Drive, we will cover each crucial aspect of the setup.
Pro Tip! For seedbox users: Instead of having to manually transfer files from the seedbox to the Plex server, Plexdrive enables a seamless connection between the two. In the Seedbox + Plexdrive setup, the seedbox acts as the torrenting powerhouse, while Plexdrive bridges the gap between the cloud storage and the Plex media server. If you have a Rapidseedbox VPS seedbox, you can leverage One-Click apps and skip the entire Plexdrive installation.
Disclaimer: If you choose to use Plexdrive on your resources, you acknowledge and accept that you are doing so at your own risk and assuming full responsibility for the setup and maintenance.
a. Installing FUSE
One of the key advantages of using FUSE (Filesystem in Userspace) is that it enables secure and non-privileged mounts— something that can expand the potential applications of filesystems. You can find more information on FUSE’s Github Repository including information about userspace library and utilities.
How is FUSE’s supportability?
FUSE is widely used and well-supported on various Linux distributions. For macOS, there is macFuse, a FUSE implementation specifically designed for macOS. In Windows, there is a similar project known as WinFsp, which in reality is a Windows File System Proxy. Bear in mind that Windows doesn’t have native support for FUSE.
Installing FUSE on your System (Ubuntu Linux).
- Update your system:
|
1 |
sudo apt update |
- Install fuse:
|
1 |
sudo apt install fuse |
- Check the installation:
|
1 |
fuse-version (or dpkg -l | grep fuse) |

- Load the FUSE kernel module:
|
1 |
sudo modprobe fuse |
- Add user to the FUSE group (optional):
|
1 |
sudo usermod -aG fuse username |
- Reboot your system for the changes to take effect.
b. Download and Prepare Plexdrive.
Download Plexdrive latest’s release into the bin folder. The “/usr/local/bin” directory and the “~/bin (user’s home directory)” directory are great locations for user-specific executables.
|
1 2 |
mkdir -p ~/bin wget -O ~/bin/plexdrive https://github.com/plexdrive/plexdrive/releases/download/5.2.1/plexdrive-linux-amd64 |

- Change the permissions. Make the downloaded Plexdrive binary executable using the chmod +x command.
|
1 2 |
chmod +x ~/bin/plexdrive or > chmod 755 ~/bin/plexdrive |
- Add ~/bin to PATH (Optional) If ~/bin is not already in your PATH, add it to ensure you can run Plexdrive from any directory.
|
1 2 |
echo "PATH=\$HOME/bin:\$PATH" >> ~/.bashrc source ~/.bashrc |
- Create a directory where you want to mount your Google Drive. For example, you can create a directory named “plexdrive_mount” in your home directory.
|
1 |
mkdir ~/plexdrive_mount |
- Verifying your configuration.
|
1 2 3 |
ls -l ~/bin/plexdrive ls ~/plexdrive_mount (or ls) |

c. Creating a Custom Google Drive Client ID for Plexdrive.
Creating a custom Google Drive client ID is needed for configuring Plexdrive. This is because Plexdrive uses the Google Drive API to access and interact with files stored on Google Drive.
- Log in to the Google API Console using your Google account. Select a project or create a new project.

- Open APIs & Services.

Getting the OAuth Consent Screen.
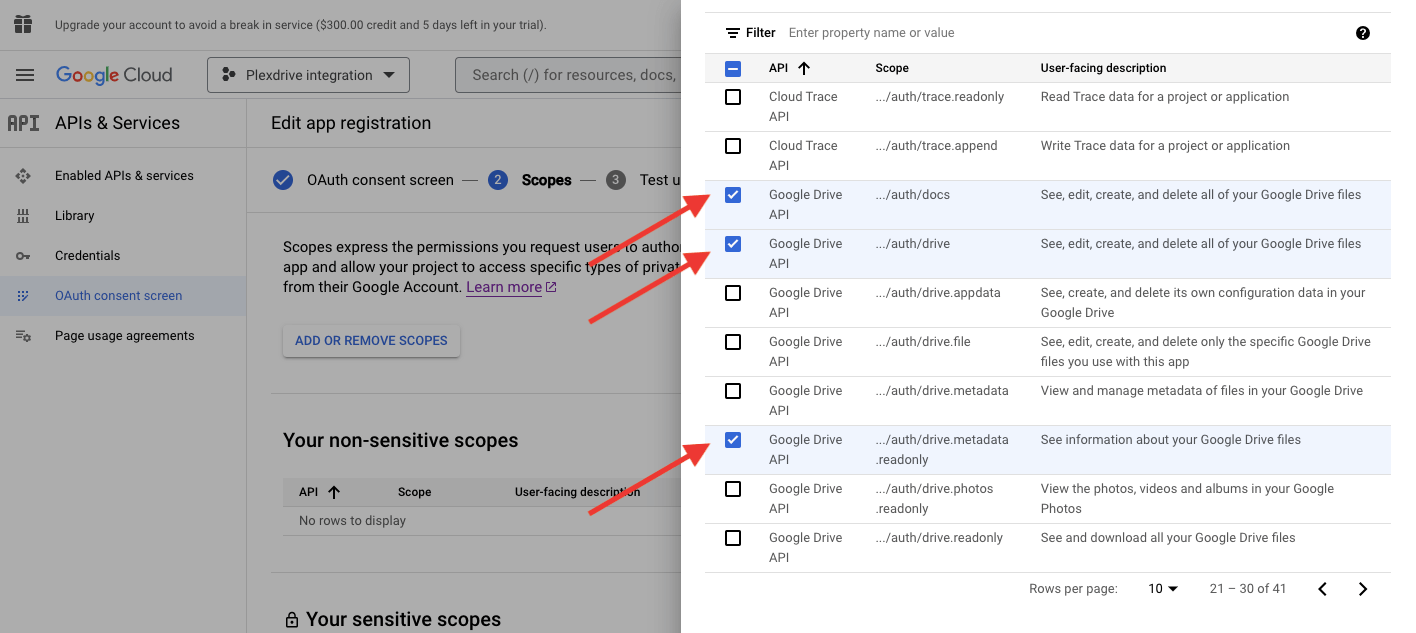
- If you haven’t configured an “OAuth Consent Screen,” click on “CONFIGURE CONSENT SCREEN.” Choose your user type. Enter an “Application name” (e.g., “rclone” or “Plexdrive”), and fill out the rest.

- Add scopes like …/auth/docs and …/auth/drive to enable editing, creating, and deleting files with Plexdrive. You may also add the …/auth/drive.metadata.readonly scope. Click “Save and continue” to add test users, ensuring you add your own account as a test user.
Creating Credentials.
- Go back to APIs & Services > On the “Enabled APIs & Services” > click on + “Enable APIs & Services”. On the Google API Library, search for “Drive”, double-click on it, and click on enable the “Google Drive API.”
- Click on “Credentials” in the left-side panel. Click “+ CREATE CREDENTIALS.”

- On Credential Type, select Google API. You can optionally select the scopes for the credentials. Choose an application type of “Desktop app”. Select the “OAuth client ID.” Finally download (or record) your credentials in a JSON format.

Publishing the App.
- If you selected “External” go to “Oauth consent screen” and click “PUBLISH APP.” Add yourself as a test user.
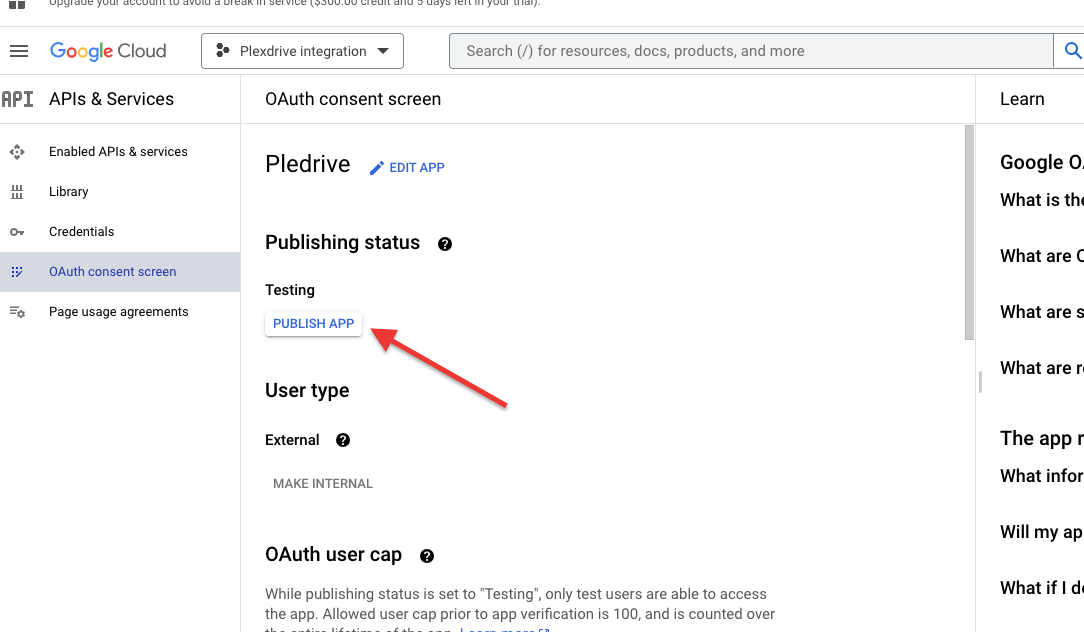
Note: Being an external user means that Google will require you to “submit your app for verification.” Still, you can use the client ID and secret with Plexdrive without verification. Keep in mind that the confirmation screen when connecting via the browser will appear. If you keep the application in “Testing” mode, grants will expire after a week.

- Last but not least, you will need the recorded client ID and client secret on Plexdrive for configuration (for mounting).
d. Mounting your Google Drive to your server.
Mount Google Drive. Go back to your Linux server and issue the following command: Keep in mind to change the generic parameters “path_to_plexdrive,” “path_to_config_directory,” and “path_to_mount_point”
|
1 |
sudo path_to_plexdrive mount -c path_to_config_directory -o allow_other path_to_mount_point |
a. Recommendations before mounting:
- Do not mount on your home folder, including ~, $HOME, or an absolute path to your home folder. This can cause performance issues with your system
- Create a new screen session. Optionally (but highly recommended) you can create a new screen session with the command “screen -S plexdrive”. This allows you to continue working with your terminal while Plexdrive is mounting Google Drive in the background. Once you mount Google Drive with your plexdrive (with an active screen session), you’ll now be able to detach from it without stopping Plexdrive. To do this, press “CTRL + A” and then “D” (CTRL+A, D).
- You can tweak the mount command with a few options. For example change the verbosity level (-v 2, -v3, or -v4), or set intervals for refreshing metadata (–refresh-interval=1m).
b. An example of a mount with default settings.
|
1 |
sudo ~/bin/plexdrive mount -c /root/.plexdrive -o allow_other ~/plexdrive_mount |
Decomposing the “mount” command:
- ~/bin/plexdrive: This specifies the location of the plexdrive executable that you want to run. Replace this with where your Plexdrive executable is.
- -c /root/.plexdrive: This specifies the location of the configuration directory for plexdrive.
- -o allow_other: This is an optional command. It allows other users to access the mounted filesystem. This parameter is not necessary all the time. It is intended for situations where Plex runs on its own user account and can allow other users on a shared system to access your mounted data.
- ~/plexdrive_mount: This is the local directory where you want to mount your Google Drive. You may want to replace this with where your directory is.
- /home/ubuntu/bin/plexdrive: This appears to be an additional argument that doesn’t belong in the command. It looks like a mistake or a repetition of the plexdrive executable path. It should be removed from the command.
c. Getting the Google API Credentials and authorization code.
- Once you execute the “mount” command, you’ll be prompted for your client ID and client secret that you got in the previous section. If you lost them, you can still retrieve them by going to Google Developers Console > Credentials > Click on Edit to see the API information.

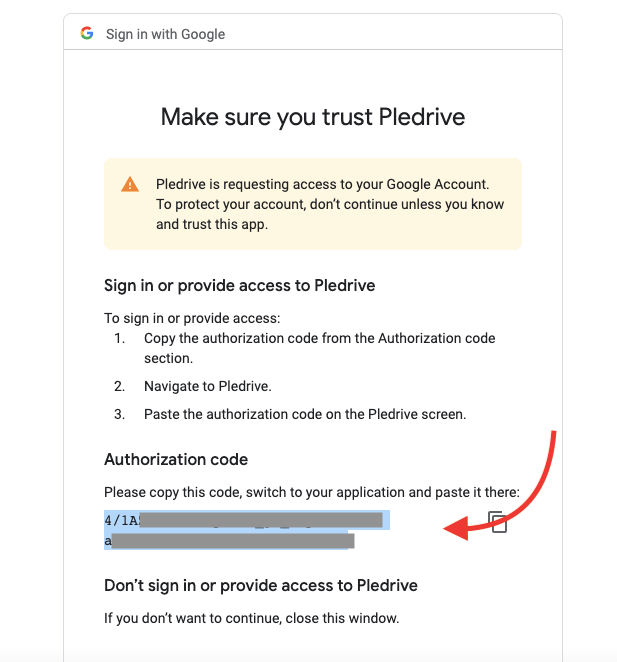
- Go back to your terminal and fill out the information. Once you enter the credentials and hit enter, you’ll receive instructions to visit a link generated by the API. Copy this link and paste it into your browser.
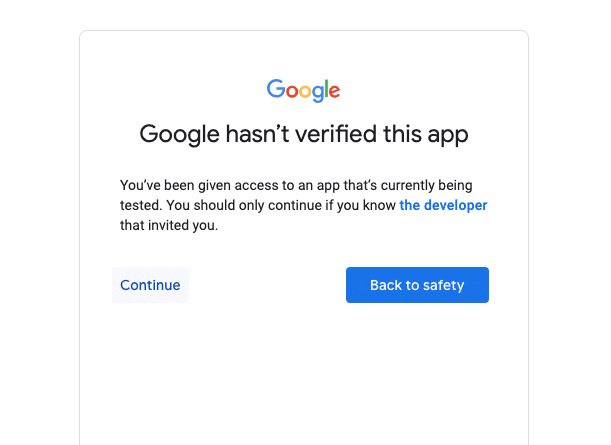
- Click on Continue to help Google verify your app. You’ll then receive the authorization code, which you must copy and paste into your terminal.
- Wait for Cache Generation. Plexdrive will initiate the cache generation process. The cache creation process may take some time. You can safely detach from the screen session by pressing “CTRL + A” and then “D” (CTRL+A, D)” once the cache creation process slows down to 1 or 2 items at a time.
Why do I encounter the error “mount helper error: fusermount: failed to open /etc/mtab: Permission denied” when using FUSE mounts without root privileges? As mentioned before, an advantage of using FUSE is that it enables non-privileged mounts. This error is expected when using FUSE mounts without root privileges and can be safely ignored.
3. Customizing Plexdrive Settings.
Plexdrive allows you to tweak certain settings, in order to optimize its performance. You can also change settings regarding cache and buffer options.
To learn more about all the parameters that can you tweak (away from the default settings), issue the following command:
|
1 |
plexdrive --help |
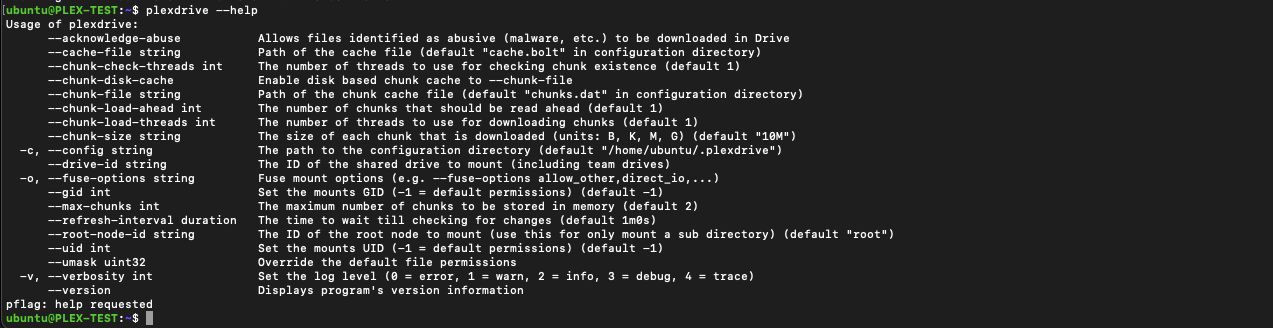
The recommended parameters for mounting Plexdrive to Google Drive depend on your specific use case and hardware resources. However, some common parameters that are often recommended for optimal performance and stability are as follows:
Plexdrive key parameters for customizing your mount.
- –chunk-load-threads: Specifies the number of threads used for downloading chunks. Increasing this value can improve the speed of chunk downloads and, subsequently, the streaming performance.
- –chunk-load-ahead: This parameter determines the number of chunks that should be read ahead. Preloading chunks can help ensure a smoother streaming experience, especially when playing media files.
- –max-chunks: This setting changes the maximum number of chunks that Plexdrive will store in memory. Higher values may improve performance but consume more memory.
- –refresh-interval: This option defines the time interval between checks for changes in the Google Drive. A shorter interval can help keep the mounted content up-to-date but may increase API usage.
- –verbosity: This parameter sets the log level, allowing you to control the amount of logging information displayed. A value of 0 (error) or 1 (warn) is often recommended for typical usage to avoid excessive logs.
- –gid
and–uid: These parameters allow you to set the GID and UID of the mounted files and directories. This is a useful value for ensuring appropriate permissions for the mounted content. - –umask: This option lets you override the default file permissions. Specifying appropriate file permissions is essential for managing access to the mounted content.
- –fuse-options: This parameter allows you to specify additional Fuse mount options if needed. Common options include
allow_otherto allow other users to access the mounted files anddirect_ioto bypass the page cache.
Remember that the optimal parameters may vary based on your server’s hardware specifications, the number of concurrent media streams, and the size of your media library. You may need to experiment with different values to find the best configuration for your specific setup.
4. Setting up Google Drive content with Plex.
After successfully mounting Google Drive to your system using Plexdrive, it’s now time to set up a new library in Plex for your media content.
e. Scanning Media Library: Initiate a library scan in Plex to update the content. Plex will catalog the media files available in the mounted folder, making them accessible for streaming through the Plex interface.
- To ensure a smooth integration, restart your Plex server.
- In Plex, create a new library for your media content. In Plex, create a new library, giving it a name of your choice.
- Select “Add folders” and input the following path: “path_to_mount_point” ( or as in our previous example: ~/plexdrive_mount).
- Point the library to the mounted folder where Plexdrive has connected Google Drive to your system. Plex will now recognize this folder as part of your media library.
- Click “Save changes” and initiate a library scan to update the content.
- Configuring Plex Media Server and its libraries is outside the scope of this guide. For more information on this, check our Ultimate Guide to Plex Media Server.
Once the integration is complete, Plex will treat the media files stored on Google Drive as part of your local library. As a result, you will be able to seamlessly stream your media content through Plex, just as you would with locally stored files.
Whether it’s movies, TV shows, music, or photos, Plexdrive ensures that your entire library is effortlessly accessible via Plex’s user-friendly interface.
5. Plexdrive FAQ.
a. Rclone vs. Plexdrive – Which one should I use for media streaming with Plex?
Rclone and Plexdrive serve different purposes and are often used together.
Plexdrive is optimized for read-only media streaming into Plex. Rclone supports uploads, downloads, syncing, and encryption.
For best results, use rclone to upload content to Google Drive and Plexdrive to stream it into Plex.
b. What are some alternatives to Plexdrive?
Projects including rclone, google-drive-ocamlfuse or node-gdrive-fuse, share something in common. By leveraging cloud storage services and mounting them as local filesystems, users can expand their media libraries, enjoy seamless media streaming, and optimize the overall performance of Plex when handling large media collections.
c. Can I use FUSE-mounted folders with BitTorrent clients?
No, it is not recommended to use FUSE-mounted folders with BitTorrent clients. Doing so can lead to issues and instability with the setup.
d. Is it safe to download torrents or upload data from mounted remote storage with Plexdrive?
It is not recommended to download torrents or upload data directly from mounted remote storage. Doing so can lead to issues with Plexdrive and is not supported.
e. Can I move data directly to my mounted remote storage using Plexdrive?
No, Plexdrive is not designed for direct data manipulation in mounted remote storage. Instead, upload data to the remote storage first using methods like rclone’s copy or move functions.
f. Can I connect my apps directly to the mounts made by Plexdrive?
Connecting your apps directly to the mounts can make them highly unstable. If your apps stop responding, you will have to troubleshoot the issues yourself, as direct connections are not supported.
g. I’m receiving the error “cannot stat plexdrive.” What can I do?
The error “cannot stat plexdrive” typically indicates that the system is unable to locate or access the Plexdrive executable. This issue could occur due to incorrect installation, incorrect path settings, or other configuration problems. Make sure you have installed Plexdrive correctly.
h. Does Plexdrive work in Windows?
Plexdrive is not supported on Windows. Plexdrive is specifically designed for Unix-like systems, and it relies on FUSE (Filesystem in Userspace), which is not natively available on Windows. Therefore, if you are using Windows and looking for similar functionality to Plexdrive, you may explore alternative solutions such as Rclone, which provides similar capabilities for mounting and accessing cloud storage within Windows environments. In addition, there is a similar project as Plexdrive for Windows known as WinFsp, which in reality is a Windows File System Proxy. Bear in mind that Windows doesn’t have native support for FUSE.
6. Final Words.
We hope you completed the “How to set up Plexdrive” guide. By integrating Google Drive with Plex, you’ve certainly improved your media streaming environment. Now, you will be able to enjoy seamless access to your media library from the cloud, expanding your collection without limits.
Plexdrive remains a practical solution for Plex users who stream large libraries from Google Drive, provided it is used correctly and paired with rclone.
If you want a reliable environment for Plex streaming, automation, and large media libraries, choosing the right seedbox infrastructure makes a measurable difference.
Happy streaming with Plex and Plexdrive!
0Comments