ruTorrent is a web-based front-end for the powerful command line-based torrent client “rTorrent.” It allows you to create, upload, and manage all your torrent downloads in one place through a web interface (rather than using the rTorrent’s command-line interface).
ruTorrent is designed to emulate the look and feel of µTorrent WebUI, so its appearance is quite similar. The name “ruTorrent” comes from the combination of rTorrent + µTorrent.
Disclaimer: This material has been developed strictly for informational purposes. It does not constitute endorsement of any activities (including illegal activities), products or services. You are solely responsible for complying with the applicable laws, including intellectual property laws, when using our services or relying on any information herein. We do not accept any liability for damage arising from the use of our services or information contained herein in any manner whatsoever, except where explicitly required by law.
Table of Contents.
In this tutorial, you will learn everything there is to know about ruTorrent. You’ll learn how to use ruTorrent, how to install it, and how to configure it. You’ll also learn why it’s such a popular client in our niche and a few tips and tricks to optimize it like a pro!
- Introduction to ruTorrent (vs. rTorrent.)
- Getting Started with ruTorrent/rTorrent.
- Installing and configuring with ruTorrent.
- Using ruTorrent via GUI
- ruTorrent Main Dashboard.
- How to optimize speed and anonymity in ruTorrent.
- Bonus ruTorrent Tips and Tricks!
- ruTorrent FAQ.
- Final Words.
1. Introduction to ruTorrent (vs rTorrent.)
As mentioned in the introduction, ruTorrent is the web-based graphical interface version of the text-based rTorrent client. ruTorrent is also ultra-light so you can install it on servers with low resources, low-powered devices such as raspberry Pi, and even on Small Office Home Office “SOHO” routers. Being lightweight and extensible makes ruTorrent an excellent choice for seedbox users.
Many of Rapidseedbox’s Seedbox clients choose ruTorrent as their favorite client for many good reasons. First, using a seedbox allows users to easily manage and monitor their torrents through ruTorrent’s web browser rather than using the command line. And second, ruTorrent has many plugins and features that can be added to customize the user experience and automate specific tasks, such as automatic downloading and unpacking of completed torrents, RSS, and scheduling.
rTorrent, on the other hand, is a command-line-based torrent client based for Unix-like operating systems. The goal of rTorrent is “to focus on high performance and good code,” according to the rTorrent author, Jari Sundell (a.k.a. rakshasa).
Let’s see more of the differences between rTorrent vs. ruTorrent.
rTorrent.
- Popular CLI-based BitTorrent client.
- Used frequently in Seedboxes.
- Very light and made strictly for performance.
- Designed for Unix-like operating systems.
- rTorrent is written in C++
rTorrent is known for being a highly stable, super-light, powerful, and flexible torrent client. rTorrent also covers a torrent client’s foundational features, including prioritization, MSE/PE for security, selective downloading, PEX, Magnet links, and DHT.
ruTorrent.
- PHP-based front-end for rTorrent.
- Open Source (GPLv3 License).
- Extensible and has many custom plugins.
- Supporting all major browsers.
- It is the “graphical interface” of rTorrent.
- Ultra-light and highly portable.
- Allows plugins and add-ons.
ruTorrent is based and depends on rTorrent for almost all operations. A significant difference is that ruTorrent brings plugins to the table, resulting in a highly usable, feature-rich, extensible, and powerful torrent application.
2. Getting Started with ruTorrent
To start with ruTorrent, head over to ruTorrent’s official GitHub repository.
- Where to download rTorrent? – Torrent GitHub repository.
- Where to download ruTorrent?– ruTorrent GitHub repository.
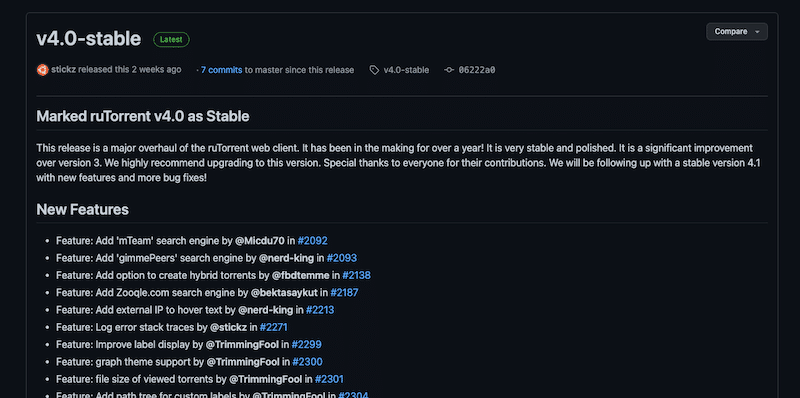
As per ruTorrent’s official site, the latest stable release is v5.1.5. This latest release is a complete renovation of the ruTorrent web client and a significant improvement on the latest version (v3). Although this release took too long to be published, it is finally here.
To find the latest releases for ruTorrent, go to its GitHub repository.
2.1 Before downloading and deploying ruTorrent.
ruTorrent (along with rTorrent) is one of the preferred seedbox interfaces mainly because it is open-source, super light, and highly flexible due to its integration with plugins. Rapidseedbox’s seedboxes come pre-configured with ruTorrent and are ready for seeding.
You can get ruTorrent in two ways:
- Pre-installed in a Seedbox. The fastest and easiest route is to use an already deployed Seedbox with ruTorrent. Premium seedboxes are fast and ready to start downloading and uploading torrents.
- Installing ruTorrent into a Virtual Private Server (VPS). You may experiment and install rTorrent and ruTorrent from scratch into a VPS. The following section will guide you through the steps and resources to help install your own ruTorrent client.
2.2 Installing ruTorrent and its dependencies.
Ensure the server you intend to use for ruTorrent is hardened and secured. Do not use the root user; instead, create a new user with super privilege. To install ruTorrent, you’ll need the following:
- rTorrent 0.8.2 or later (compiled with xmlrpc-c)
- A web server with PHP5
- A web browser (local client) with IE 7.0 – 11.0, Firefox 2.x – 31.x (or Opera 9.x/10.x, Konqueror 3.5.9, and Google Chrome 4.1.249.1045).
2.3 Installing rTorrent.
Why do you need rTorrent to run ruTorrent? To use ruTorrent, you must have rTorrent installed and running on your system, as ruTorrent connects to and communicates with the rTorrent process in order to manage your torrents. rTorrent provides the underlying functionality for downloading and uploading torrents, while ruTorrent provides a convenient and user-friendly way to access and control that functionality.
You can install rTorrent via pre-compiled packages (which is the easiest way to get started with rTorrent), or you can also look into installing rTorrent from the source (more challenging but better in the long run).
The most straightforward way to install rTorrent client is to use the pre-built package. Since rTorrent v0.7.8 most Linux distributions have compiled rTorrent with xmlrpc-c. So, if you use a relatively modern distribution (in our case, Ubuntu 20.04), installation is as simple as using your favorite package manager.
- Before installing rTorrent, update your server.
|
1 |
$ sudo apt-get update |
- Check the distribution version.
|
1 |
$ sudo apt-cache show rtorrent | grep Version |
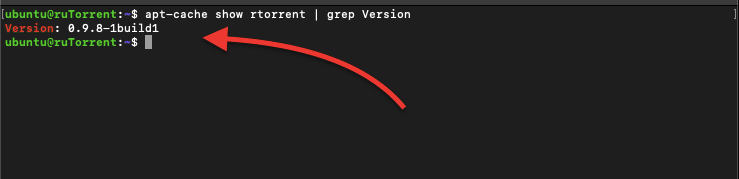
As you can see from the previous picture, version: “0.9.8-1build1” is the latest stable version of this specific rTorrent.
To install rTorrent (with the version shown in the previous section), issue the following command:
|
1 |
$ sudo apt-get install rtorrent -y |
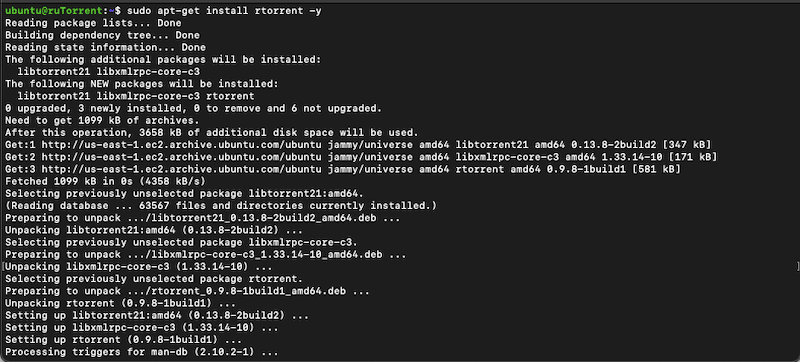
Using the (apt-get install rtorrent -y) command is the easiest, but you are limited to specific versions and features of libtorrent, xmlrpc, and rTorrent (see previous picture). Keep in mind that this libtorrent project is not the same as the one used in Deluge (and other clients). To know more about rTorrent’s libtorrent, refer to the libtorrent-rakshasa and libtorrent-rasterbar.
Once satisfied with the installation, you can proceed to configure rTorrent.
a. Install rTorrent from source?
This installation method provides you with more flexibility but can be quite long and challenging.
Begin by updating and upgrading your platform to the latest version (as done in the previous installation method).
If you want the latest version of rTorrent, you can compile it yourself. But bear in mind that this configuration is for advanced users. You’ll need to install the following dependencies: gcc, ncurses, libsigc++-2.0, libssl, and xmlrpc-c. The complete installation of rTorrent from the source is outside the scope of this tutorial.
b. Running rTorrent for the first time.
- If rTorrent was successfully installed, you could run rTorrent for the first time. You can start rTorrent by running the command:
|
1 |
$ rtorrent |
- By default, rTorrent will look for the configuration file in the location ~/.rtorrent.rc, you can also specify a different location for the config file by using the -n option followed by the config file’s path.
Note: If you are looking for the .rtorrent.rc in the home directory and you can’t find it, it is because the (.) in the file means that it is a hidden folder. It may also be possible that it does not exist yet, as it is usually created the first time you run rTorrent.
- To find it, head over to the home directory and run the following command (to look into hidden folders and files):
|
1 |
$ ls -a ~ |

- Start rTorrent and load the settings from the specified configuration file.
|
1 |
$ rtorrent -n -o import=~/.rtorrent.rc |
- In addition, you can also check the rTorrent’s manual to learn more about its configuration. Use the following command:
|
1 |
$ man rtorrent |
2.4 Installing the Web server (Lighttpd and PHP)
Why do you need a webserver to run ruTorrent? You need a webserver to run ruTorrent because it is a web-based application. ruTorrent uses a web interface that can be accessed through a browser rather than a standalone application that runs on a computer. In order to access the ruTorrent interface, the web server must be running and configured to serve the ruTorrent files. Additionally, the web server will handle the communication between the browser and the ruTorrent application, allowing users to interact with the application through the web interface.
You need Apache (or another web server such as lighttpd) and PHP to allow access to ruTorrent’s WebGUI from anywhere. Apache is available within Ubuntu’s default repositories, so you can install it using the traditional package tools.
a. Here are a few points to consider when setting up your server.
- Your web server must be set up for PHP.
- PHP requires mbstring extension.
- ruTorrent communicates with rTorrent via an SCGI gateway. SCGI (Simple Common Gateway Interface) is a protocol that allows web servers to communicate with application servers.
- To allow this SCGI gateway communication, you need either:
- A Webserver with mod_scgi or something equivalent. Or
- The RPC Plugin.
- HTTPRPC Plugin
Note: in this guide, we will install Lighttpd as the web server and configure the RPC plugin. But keep in mind that there are multiple ways to get your web server up and ready for ruTorrent.
b. Installing your web server
- Install Lighttpd
|
1 |
$ sudo apt install lighttpd -y |
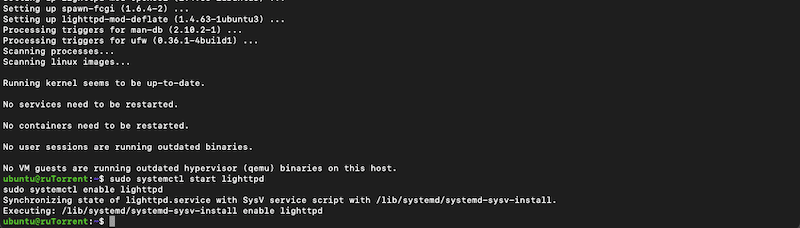
- Start and enable the service
|
1 2 |
$ sudo systemctl start lighttpd $ sudo systemctl enable lighttpd |
- Install PHP, php-cgi, and php-fpm
|
1 2 3 |
$ sudo apt install php $ sudo apt install php-cg $ sudo apt install php-fpm |
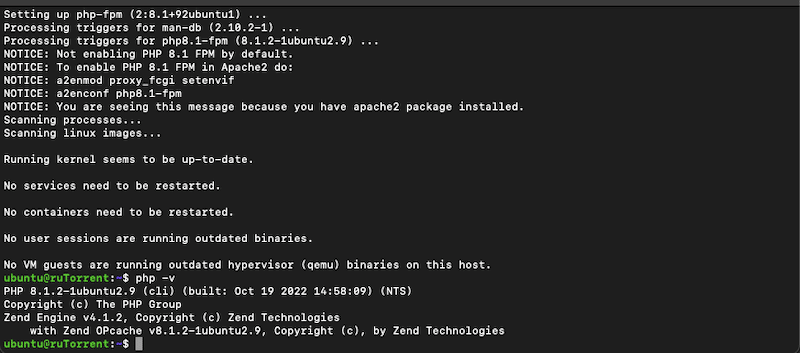
- Let’s check for successful installation:
|
1 |
$ php -v |
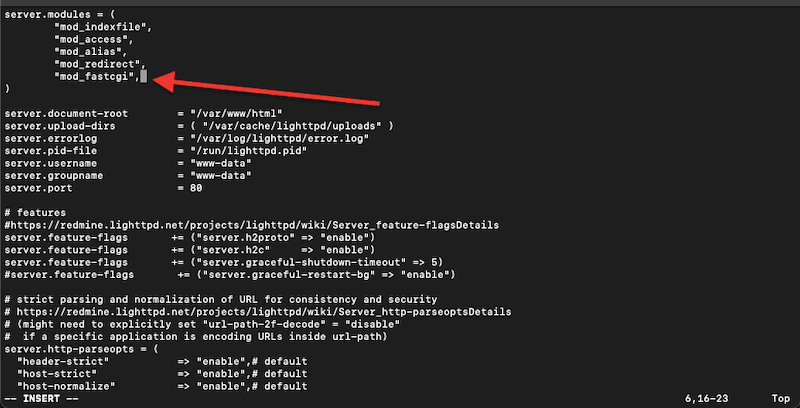
- Let’s configure the RPC Socket. Use your favorite text editor to change a few directives in lighttpd.conf
|
1 |
$ sudo vi /etc/lighttpd/lighttpd.conf |
- Locate server.modules and ensure it contains “mod_fastcgi.” If it does not contain it, add it at the end of the modules.
- Add the entire (following) section to the end of the lighttpd.conf file.
|
1 2 3 4 |
fastcgi.server = ( ".php" => (( "bin-path" => "/usr/bin/php-cgi", "socket" => "/tmp/php.socket" ))) |
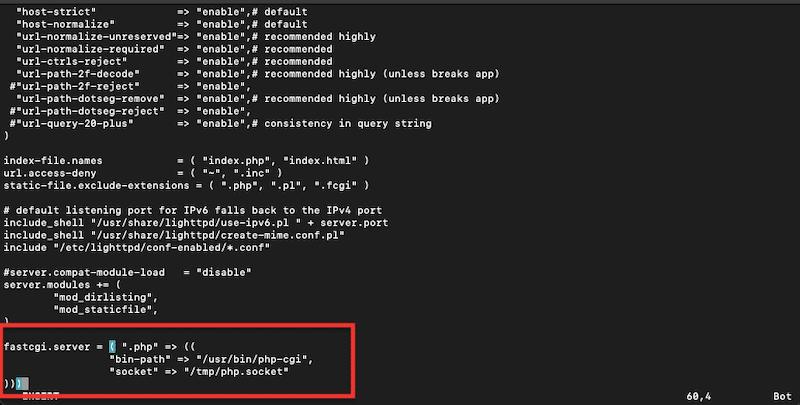
- Don’t forget to save your changes on the lighttpd.conf file.
Note: Keep in mind that you will have to edit the ruTorrent config file to enable the RPC socket.
3. Installing and configuring with ruTorrent.
To install ruTorrent, you don’t need to follow any installation routine or compile it. The software sources are simply cloned into a directory set up as a document root of the web server. Once you have set up the web server, you’ll be able to configure ruTorrent.
3.1 How to install ruTorrent.
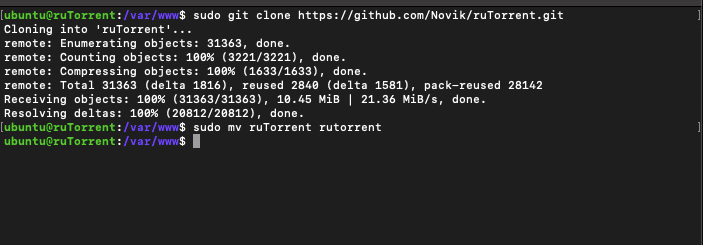
- Go to the /var/www directory (document root of the web server) and clone the ruTorrent directory with the git command. Or move the ruTorrent to the root directory (/var/www/rutorrent)
|
1 2 3 |
$ cd /var/www $ sudo git clone https://github.com/Novik/ruTorrent.git $ sudo mv ruTorrent rutorrent |
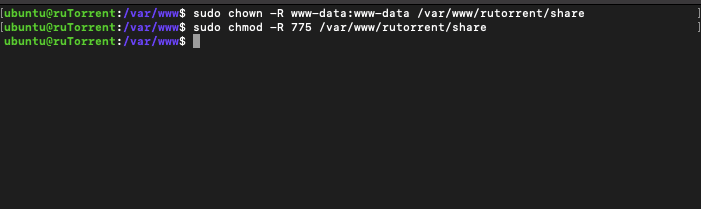
- All the resulting files (from the clone) must be accessible for reading from the web server user, so you must update the ownership and permissions. The directory ruTorrent/share (along with all its contents) must be accessible for reading and writing for both rTorrent and web server users.
|
1 2 |
$ sudo chown -R www-data:www-data /var/www/rutorrent $ sudo chmod -R 775 /var/www/rutorrent |
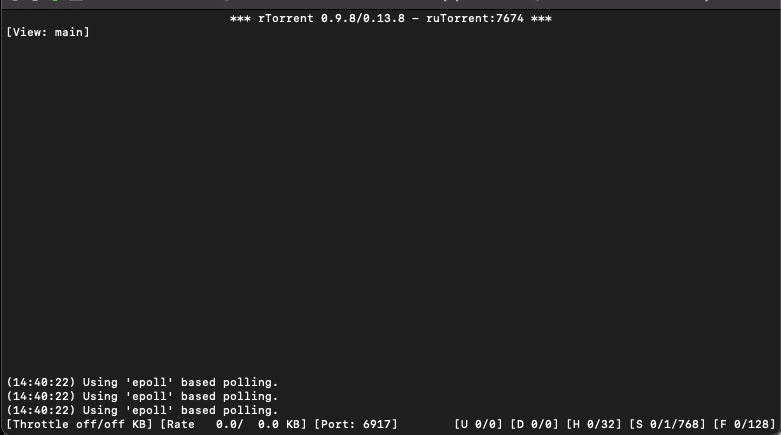
- Let’s run rTorrent. Use the following command to start rTorrent.
|
1 |
$ rtorrent |
- The rTorrent console looks as follows:
3.2 Other ways to install ruTorrent?
a. Installing ruTorrent in Windows.
There is no native support of ruTorrent on Windows, so you cannot manually install it (using a similar approach as shown previously). Although ruTorrent and rTorrent are natively supported by Linux, there are still a few ways to run them on Windows operating systems.
A workaround to install rTorrent on Windows is using Cygwin. This tool provides similar functionality to a Linux Distro on a Windows platform. Another option is to boot Linux in a Virtual Machine (VM) running on Windows, such as VMWare and VirtualBox.
b. Installing ruTorrent in Docker.
To install ruTorrent on Docker, you will need to have Docker installed on your system. Once you have Docker installed and configured, you can pull the ruTorrent image from the Docker Hub by running the following command:
|
1 |
> docker pull linuxserver/rutorrent |
Once you have the ruTorent image, now you can run the ruTorrent container by using the following command:
|
1 2 3 4 5 6 7 8 9 |
> docker run -d \ --name=rutorrent \ -e PUID=1000 \ -e PGID=1000 \ -e TZ=<timezone> \ -p <host_port>:80 \ -v </path/to/config>:/config \ -v </path/to/data>:/data \ linuxserver/rutorrent |
Ensure to replace the parameters PUID, PGID, TZ, host_port, </path/to/config>, </path/to/data> with your own values. Once the container is running, you should be able to access ruTorrent by going to http://your_server_ip:host_port in a web browser.
3.3 Let’s Configure ruTorrent!
Once you have installed ruTorrent successfully, it is time to start configuring it. The base installation comes with three different configuration files: config.php, access.ini, and plugins.ini.
The config.php file is where we will be working the most. It is the most important configuration file from the base install, as it controls many vital options. The config.php looks as follows:

- Let’s change a few parameters from this config.php file. Begin by opening using your favorite text editor.
|
1 |
$ sudo vi /var/www/rutorrent/conf/config.php |
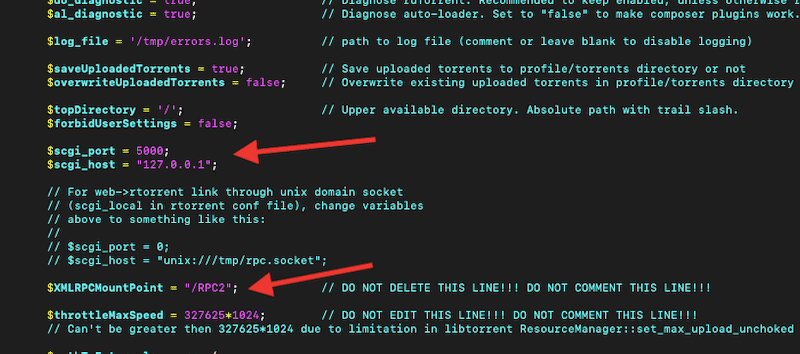
- Let’s link it to rTorrent (as mentioned earlier, rTorrent talks to ruTorrent via the SCGI gateway). Since rTorrent is on the same local machine, let’s enter 127.0.0.1 (loopback address or localhost). In addition, we will also ensure we are using the correct SCGI port.
- If you are using a UNIX-based socket, the SCGI_host will be different. The configuration file comes with two ‘disabled’ lines for configuring the UNIX-based socket.
- And finally, use the last line to mount XMLRPC. Bear in mind that this setting is mandatory, so do not remove it.
|
1 2 3 |
$scgi_host = "127.0.0.1"; $scgi_port = 5000; $XMLRPCMountPoint = "/RPC2"; |
a. Diagnostics configurations.
Configure whether you want diagnostics like permissions checking. (enabled by default). In addition, you may also want to log error messages (or disable them). To disable error logging change the value to $log_file = ”;
|
1 2 |
$do_diagnostic = true; $log_file = '/tmp/errors.log'; |

b. Other advanced configurations.
Complete configuration and customization of ruTorrent is outside the scope of this guide. However, we will give you a brief introduction to some vital settings.
- Configure an IP address to access external HTTP resources (RSS feeds). Change the following directive.
|
1 |
$httpIP = null; |
- The following option allows you to enable or disable the usage of external gzip binary.
|
1 |
@define('PHP_USE_GZIP', false, true); |
- The following option allows you to save .torrent files added via the WebUI or remove them after being added.
|
1 |
$saveUploadedTorrents = true; |
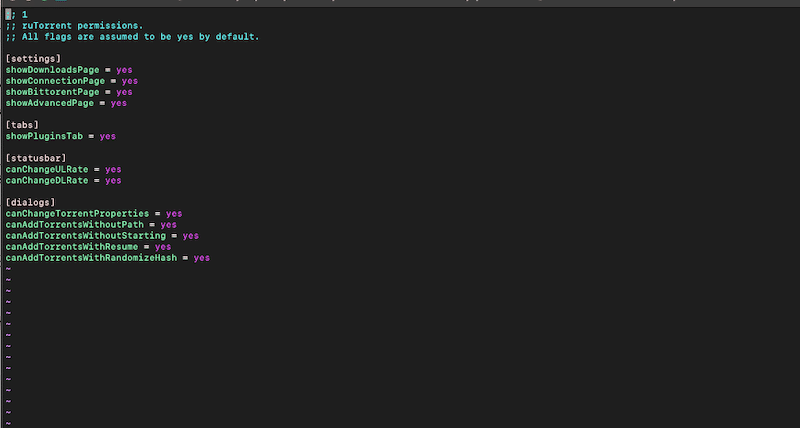
3.4 Configuring access controls
Similarly to changing the config.php file, access controls are set up by opening and changing the access.ini file. The options in this file aim to limit the access to a user to a specific setting in ruTorrent. By default, all flags are set to yes. So the user has access to all displays, tabs, and settings.
|
1 |
$ sudo vi /var/www/rutorrent/conf/access.ini |
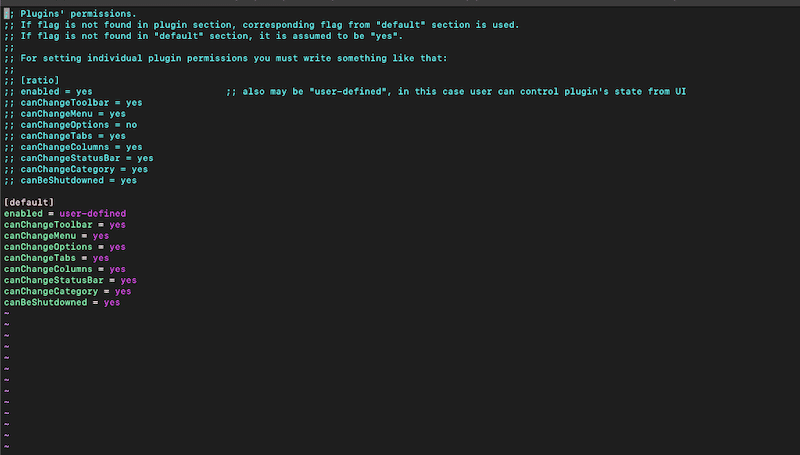
3.5 Configuring ruTorrent plugins.
Similarly to the previous file, plugins.ini is a simple file intended to control and configure plugins. All the sections in this file belong to a specific plugin. The [default] section at the bottom will be used if a plugin is missing. To enable a plugin, simply change the value from no to yes.
|
1 |
$ sudo vi /var/www/rutorrent/conf/plugins.ini |
One of the pros of using ruTorrent is that it can be extended through plugins. To add a plugin, you would simply need to go to this plugin path (/rutorrent/plugins) and download the plugin into this directory.
|
1 2 |
$ sudo vi /var/www/rutorrent/conf/plugins.ini $ cd /var/www/rutorrent/plugins |

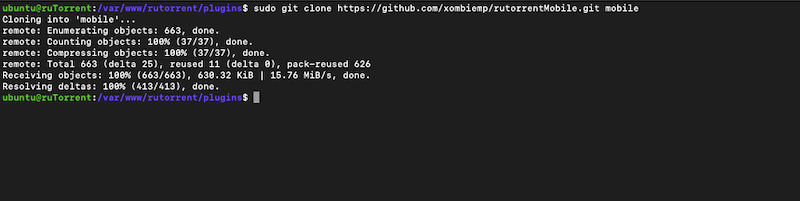
For example, let’s install rutorrentMobile— a plugin for ruTorrent to use with mobile devices (Android, iOS, etc.).
- Let’s place all the plugin files in the plugin’s directory. We will clone it directly from the Git repository with the following command.
|
1 |
$ sudo git clone https://github.com/xombiemp/rutorrentMobile.git mobile |
3.6 Configuring Authentication.
By default, ruTorrent has no authentication controls, so you’ll have to use whatever authentication your web server supports. With correctly set-up authentication, you can let other users connect to the ruTorrent server. If various users use your ruTorrent server, protect the web server’s root directory.
Note: Configuring authentication in your web browser is outside the scope of this guide. But we suggest configuring SSL, digest authentication, and strong passwords.
4. Using ruTorrent via GUI
To start using ruTorrent, go to a web browser (as suggested in the previous section) and enter http://xx.xx.xx.xx/rutorrent/. Replace the xx.xx.xx.xx with the server’s IP address, or use localhost (127.0.0.1) if the web browser is on the same machine as the ruTorrent server.
- In this guide, we will be using a seedbox pre-installed with ruTorrent v3.10 (for demonstration purposes).
- Let’s start by finding all the access information and credentials for our ruTorrent client. You can find that information in “My Services” > Credentials.
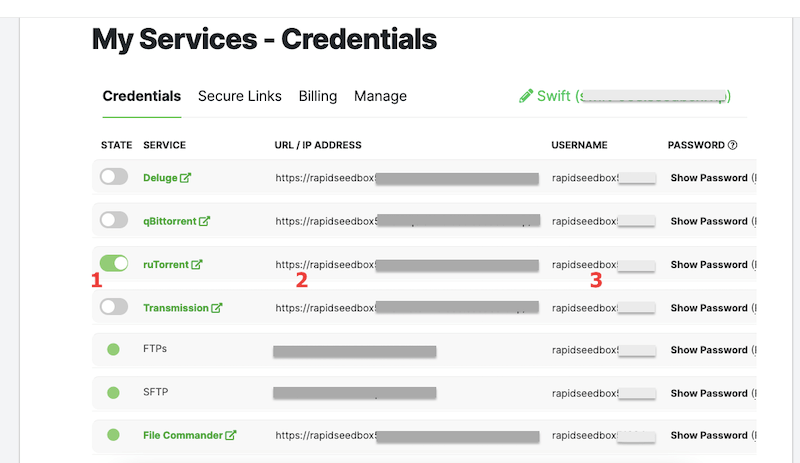
- Locate ruTorrent; If it is pre-installed, its state should be enabled (1).
- Find the URL of your ruTorrent client (2), which should be in a domain name format. But, for other types of seedboxes or VPS, it could also be in the IP format like this: https://111.222.333.444/rutorrent/.
- And finally, find your credentials (3).
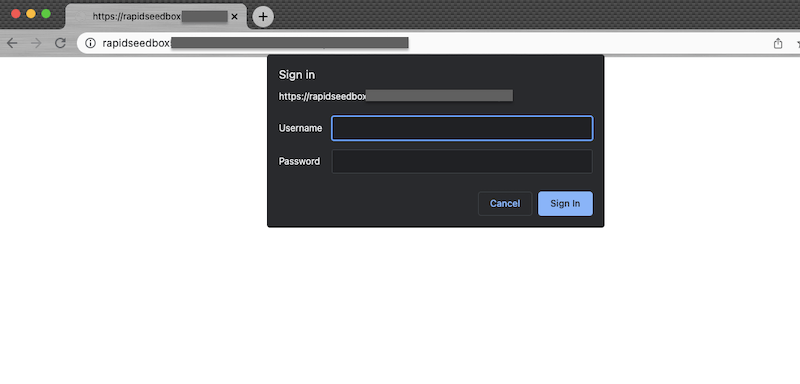
Navigate to the aforementioned link, and you will be prompted for credentials (see screenshot below).
Once you have entered the credentials, ruTorrent’s graphical user interface will open. It looks something like this:
Note: In this article, we use Rapidseedbox’s Lean ruTorrent 3.10 (cut-off version). Lean ruTorrent is a lightweight version of the popular ruTorrent client. The 3.10 cut-off version refers to a specific version of Lean ruTorrent that is no longer actively maintained or updated.
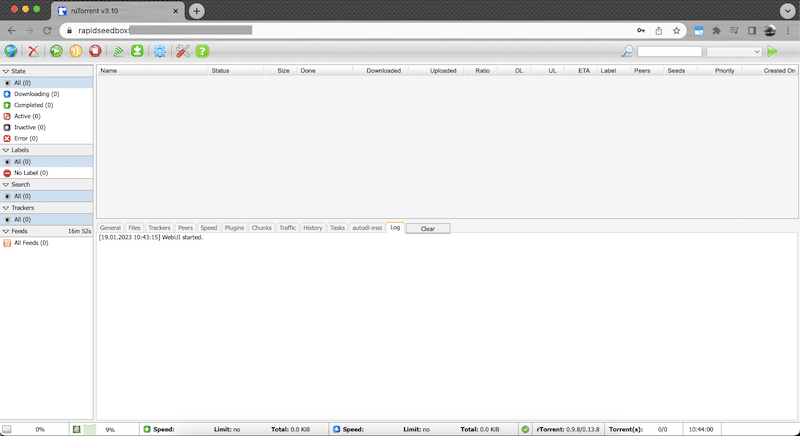
The top menu bar is one of the first things to notice in ruTorrent’s GUI. Lean ruTorrent 3.10 has different icons on the top bar (like in the newer versions). In the next section, we will explain step by step what the purpose of every icon is.
4.1 The top bar menu
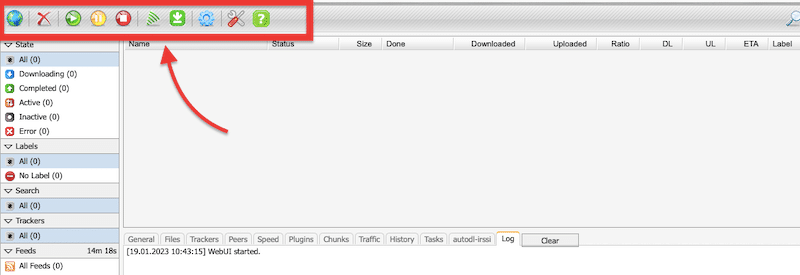
- The “Globe”: This icon is for adding torrents.
- The Start” button role is to start downloading/uploading torrent/torrents.
- The “Pause” button for pausing torrents.
- The “Stop” button stops all activity on a particular torrent.
- The “RSS feed” button for creating RSS feeds.
- The “Autodl-irssi” plugin monitors torrent trackers, announcing channels, and automatically starting downloads for you based on filters.
- The “Settings” button can change all of the ruTorrent settings.
- The “Plugin” button to manage the plugins.
- The “Help” button shows some basic keyboard shortcuts.
4.2 How to load a torrent?
The torrents can be loaded in two ways, via magnet link (torrent URL) or the .torrent file. Click on “Add New Torrent,” and you will get a popup window like in the picture below:
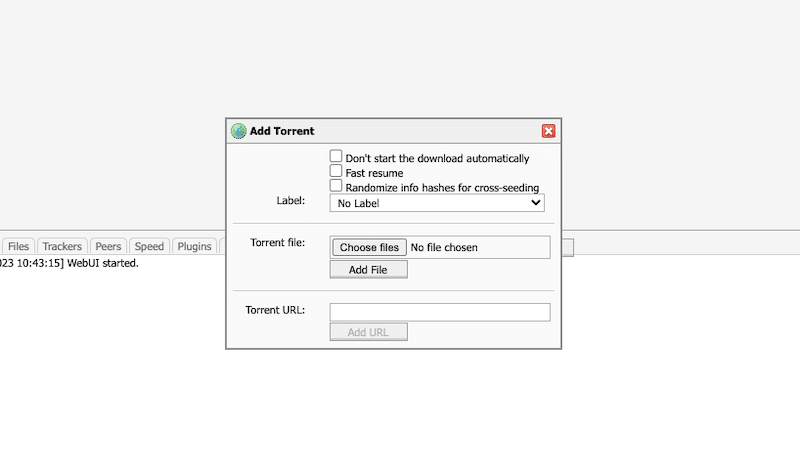
The add Torrent window shows the following options:
- “Label” – Use this option to customize the torrent label.
- “Torrent file” – Use this option to locate the .torrent file and load it.
- “Torrent URL” – The URL of the magnet link.
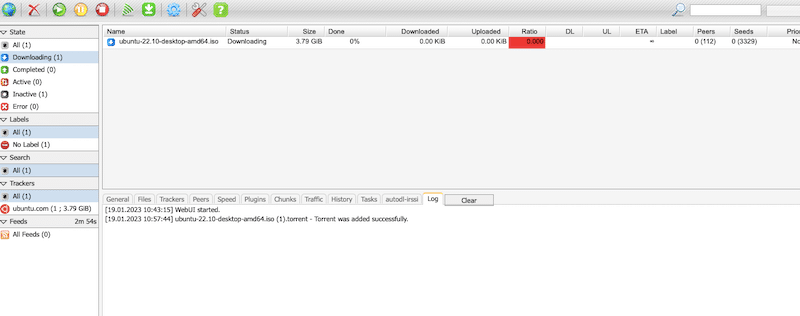
After you select either the ‘Add file’ or ‘Add URL’ options, your torrent will start downloading just like in the picture below:
4.3 How to create a new torrent?
In full versions of ruTorrent, you can see the yellow star icon to “Create New Torrent.” If you are using the full version of ruTorrent, you’ll be able to create a new tracker by clicking the star button.
- “Select Source” – You can determine your file’s destination.
- “Trackers” – A text area to add trackers separated by one blank row. Note: You can only add one tracker when using a private torrent.
- “Comment” – An optional feature that lets you add comments.
- “Piece size” – You can select the following options, depending on your file size.
- Up to 50MiB: 32KiB piece size (-l 15)
- 50MiB to 150MiB: 64KiB piece size (-l 16)
- 150MiB to 350MiB: 128KiB piece size (-l 17)
- 350MiB to 512MiB: 256KiB piece size (-l 18)
- 512MiB to 1.0GiB: 512KiB piece size (-l 19)
- 1.0GiB to 2.0GiB: 1024KiB piece size (-l 20)
- 2.0GiB and up: 2048KiB piece size, and larger at your discretion. (-l 21)
- “Other” – If selected, the “Start seeding” checkbox will make ruTorrent automatically start seeding after the torrent is created. “Create “ creates a new torrent.
5. ruTorrent Main Dashboard.
We will show you ruTorrent’s main dashboard using the Lean ruTorrent 3.10.
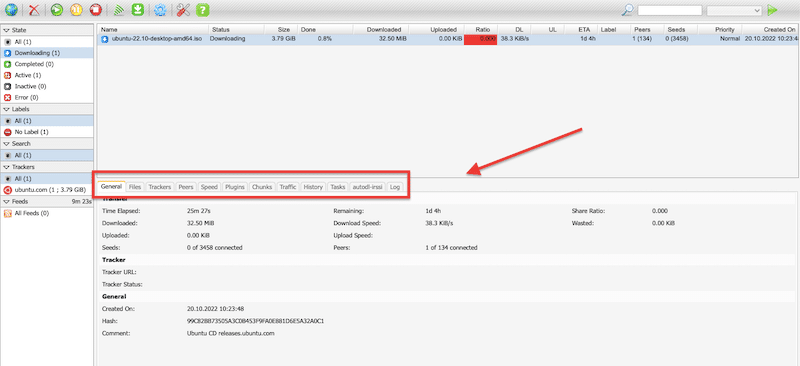
When you select a particular torrent (like the one in the picture below), you’ll notice a window below with information related to that specific torrent. You can see much data being monitored in real-time in tabs, including General, Files, Trackers, Peers, Speed, Plugins, File Manager, History, Tasks, Traffic, Chunks, Autodl-irssi, and Log.
All that information is very useful if you want additional information regarding loaded torrents.
Note: Some valuable tabs like file manager and file share are not shown here but can be added via their plugin.
5.1 General tab.
In the General tab, you can find the following useful information:
- “Time elapsed” – Showing how much time is elapsed from starting a torrent
- “Downloaded” – Showing how much data is currently being downloaded
- “Download Speed” – Real-time speed for downloading current
- “Uploaded” – Showing how much data is uploaded
- “Seeds” -Showing how much seeders are connected currently
- “Peers” – Showing how much peers are connected
- “Tracker” – shows info regarding the tracker URL and its Status
- “Save As” – showing a path where our data is downloaded
- “Free disk space” – remaining free space on our HDD
- “Created On” – If we have created our torrent, its timestamp will be shown here
If you don’t know some of the concepts above, check out the following blog articles: What is seeding? What are leechers?
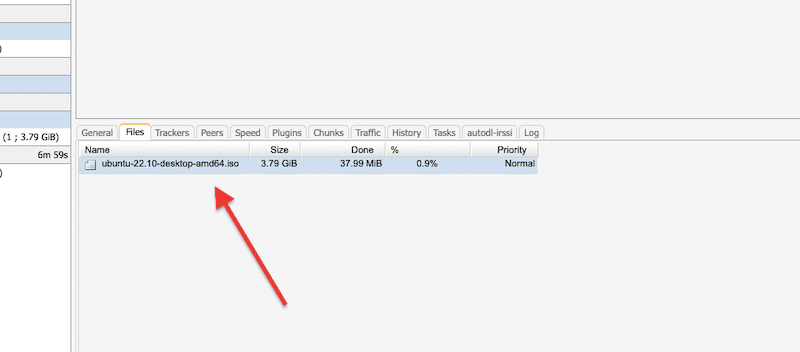
5.2 Files tab
In this tab, you can find information about the files in torrent data (being downloaded). For instance, you can find the size of that particular file and how much data remains to be downloaded. Also, you will see a priority (if there is one for that specific file).
Note: Don’t forget to use a data management tool to keep a record of all the information.
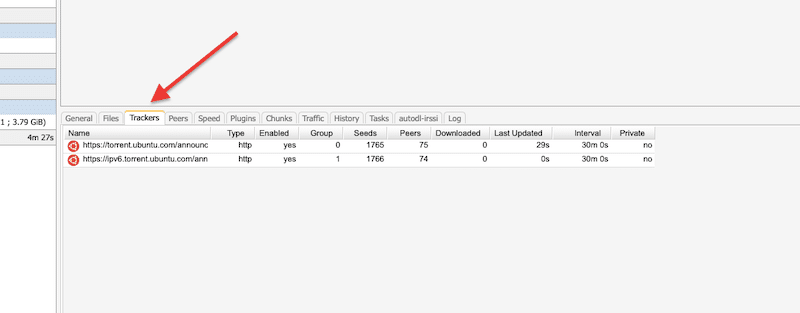
5.3. Trackers tab
The “Trackers” tab will show info regarding currently loaded trackers. It includes their name, protocol, status, group, and number of Seeds/Peers on that particular tracker. It also includes additional information such as download status, the time of the last update, the interval, and whether it is a private or public tracker.
5.4. Peers tab
The “Peers” tab shows real-time info about connected peers, their country, speed, and much more. This information is managed by a plugin called ”show_peers_like_wtorrent.”
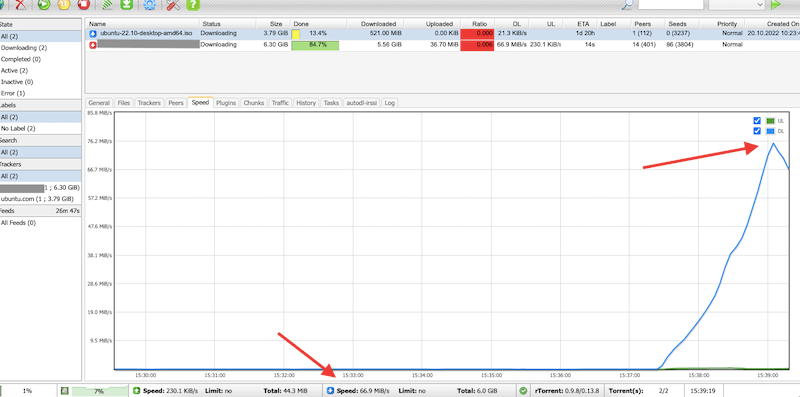
5.5. Speed tab
The “Speed” tab represents the real-time speeds for downloading/uploading torrent data.
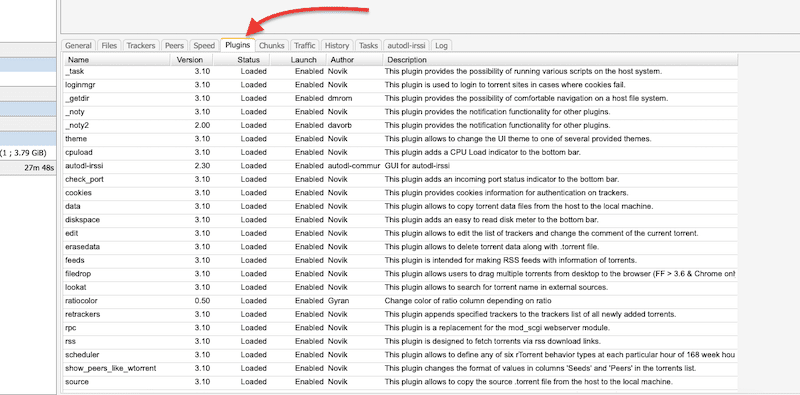
5.6. Plugins tab
The “Plugins” tab is pretty self-explanatory. It shows currently loaded plugins in your specific ruTorrent. You can unload a particular plugin or launch it (enable/disable).
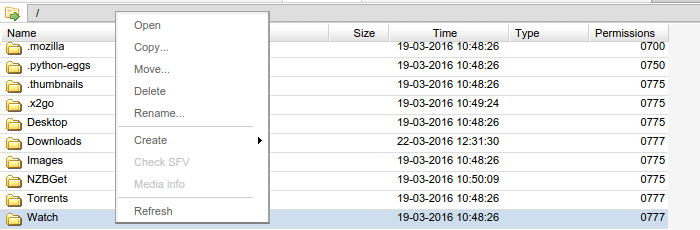
5.7. File manager
The “File manager” tab is only shown if the plugin is loaded. This tab provides the primary navigation for your root directory where torrents are downloaded. Usually, the root is your /home/ dir.
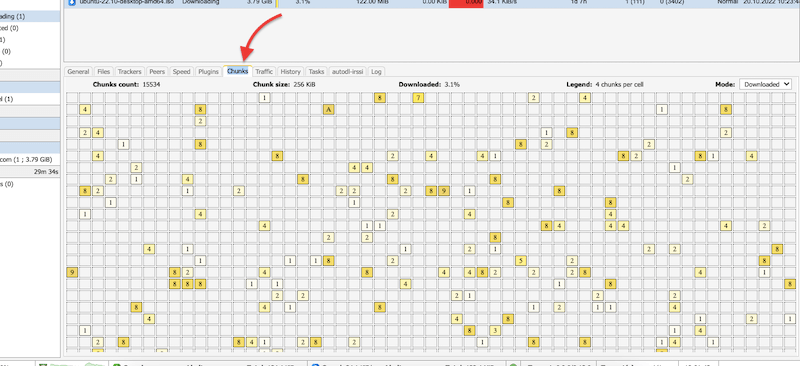
5.8 Chunks.
ruTorrent download client (just as any torrent client) downloads tiny chunks of the torrent’s contents. When ruTorrent has any download data, it will start uploading it to other peers in the torrent swarm. This “Chunks” window shows the portions of successfully downloaded data, including the size of chunks and the total count.
5.9. Traffic
The “Traffic” tab shows real-time statistic info of a specific tracker in the shape of a formatted graphics chart.

5.10. History
The “History” tab keeps track of all torrents downloaded/uploaded for your current session. You can remove the history information if you select all rows (or via CTRL+A) and delete it by right-clicking + Delete. This tab is loaded by a plugin named ‘history.’
5.11. Tasks
“The “Tasks” tab keeps track of your session. It includes the operations done in the File manager.
5.12. Autodl_irssi
The “autodl_irssi” tab will show only if an autodl-irssi plugin is installed and configured. This tab shows log information about autodl-irssi, and provides basic operations regarding this plugin.

Note: To learn more about autodl-irrsi, visit our extensive guide: How to use ruTorrent’s autodl-irssi plugin
5.13. Log
The “Log” tab is the handiest tab for debugging any ruTorrent-related errors. The error output will be displayed in this tab if an error exists, like misconfigured or malfunctioning plugins, or if there is an error in communication between rTorrent and ruTorrent or loaded torrents. You can click on the clear button if we want to clear up those messages.

5.14. The search command.
The “Search” functionality can significantly reduce your searching time in torrent indexers. You can filter your results by clicking on the drop-down menu (“shown in the picture”), and you can choose different functional torrent sites from where you can narrow your search or select all sources for searching.
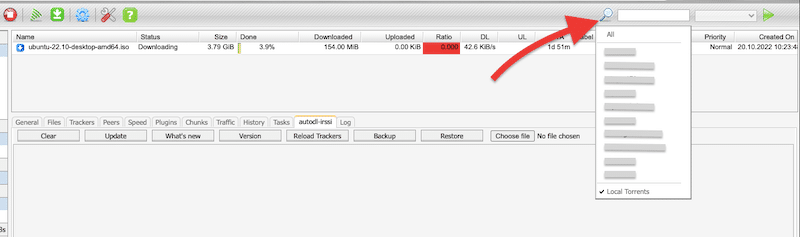
On the other hand, you can also search for torrents that are stored locally by selecting “Local Torrents”.
5.15 The bottom bar.
The bottom menu bar was added in ruTorrent 3.0. It shows the total upload/download speed information along with any limitations. This information can be used to set or adjust the server’s throttle level. The bottom menu shows the remaining space if you have the “Disk Space” plugin installed.

Note: Keeping 5% free space is recommended to prevent your torrent client from freezing. Should you ever see a warning, as shown below, please remove some space by deleting unnecessary torrents. This is why it is useful to enable the plugin “HDD space in %” to monitor your storage.

5.16 Left-side menu
The left side menu is designed to provide quick info about loaded torrents.
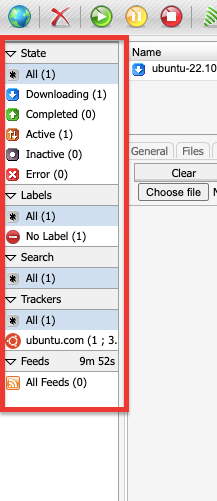
A quick summary of all the elements within the left-side menu.
- “All” – Sum of total loaded torrents
- “Downloading” – Total torrents that are currently downloading
- “Completed” – Total torrents that have been completed.
- “Active” – Sum of torrents that are currently downloading/uploading.
- “Inactive” – Status of torrents that are currently stopped.
- “Error” – If there are torrents with no seeders, it will be marked as an error.
- “Labels” – We can label our torrents with a different name; hence labels will be shown here.
- “Search” – The results from our most recent search will be displayed here.
- “Trackers” – Displays currently loaded trackers.
- “Feeds” – If our RSS feed is set up, feeds will also be displayed here.
6. Optimizing Speed and Anonymity in ruTorrent.
New to ruTorrent?
Get started effortlessly with RapidSeedbox’s high-speed seedbox. Our service offers the perfect environment for beginners. You’ll get seamless torrenting, fast downloads, and exceptional support to guide you every step of the way.
Get started effortlessly with RapidSeedbox’s high-speed seedbox. Our service offers the perfect environment for beginners, providing seamless torrenting, fast downloads, and exceptional support to guide you every step of the way.
Why is your torrenting speed too slow?
Generally, there are a few factors for your torrent being too slow; these include your Internet speed (bandwidth), download/upload speed limitations, and the health of the torrent. Some of these factors might be beyond your hands. But still, you can monitor and analyze it to improve the overall ruTorrent speed.
6.1 Your broadband and net speed.
Ensure that your ISP is giving you what you are paying for, your computer is not limiting the speed, or that an “unwanted application” is not eating up your bandwidth.
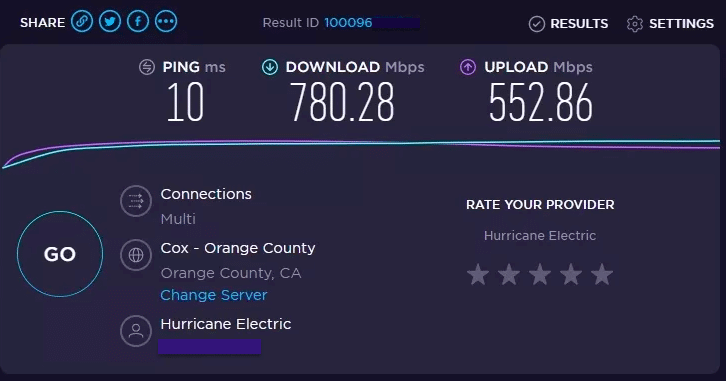
a. Test the maximum upload and download Internet speed.
Go to Speedtest and click “Go” to test the speed between your computer and the Internet. Remember that ISPs might advertise their speed using conventions like Gbps or MBps. Speedtest outputs the results in kilobits (Kb) and megabits (Mb) per second. Make sure you are comparing real values.
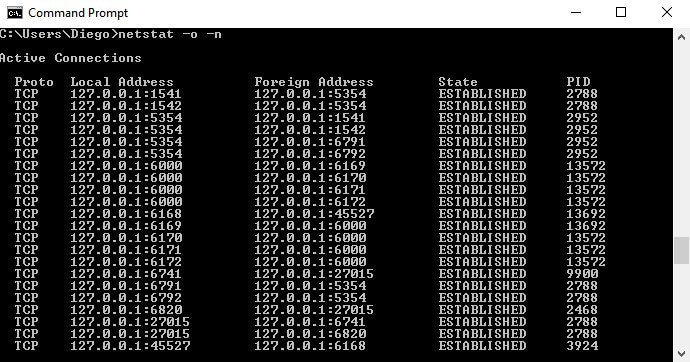
b. Finding bandwidth-hungry apps
Some processes or applications in your computer might be consuming precious bandwidth. Whether it is a background transfer service, daily backup to the cloud, antivirus automatic updates, or Malware, these consume bandwidth, making your torrent transfers slower.
- Before finding bandwidth-hungry apps, look for Malware. Malware will also make your torrents slow. Make sure to keep all Anti-Malware updated and your computer scanned with the latest Virus definition.
- How to find these bandwidth-hungry applications? On Windows, you can use NetStat to see who and what is using your network resources. Go to cmd.exe and type, “netstat –o –n”. Find the Process ID “PID” with the most connections from that list. Record the PID, go back to Windows Task Manager, and find the same number. Shut down the process if you are not using it.
- In Ubuntu, you can use a tool called nethogs. Install it with the following set of commands.
|
1 |
$ sudo apt-get install nethogs |
- and use it like the following line;
|
1 |
$ sudo nethogs |

6.2 Speed Settings:
The other reason your torrent speed is so slow in ruTorrent is likely that you have a speed limitation (at the application level.) In other words, your ruTorrent’s speed configuration might be limited.
- To find these speed settings (in the full version of ruTorrent): Go to Settings > Connection > Bandwidth Limiting. (not available in Lean ruTorrent 3.10).
- Make sure that maximum upload and download rates are set to 0.
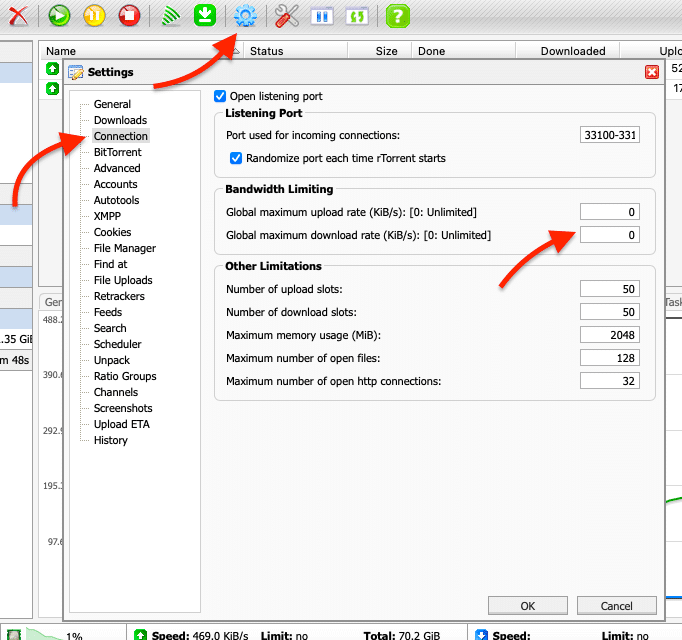
- Some users leave the download rate without limitations while limiting the upload rate. Don’t do this! Do not limit the upload rate. BitTorrent protocol uses an algorithm called “choking” to ensure fair sharing. If you limit the upload speed too much or use a different algorithm that is “unfair,” other peers in the swarm will not cooperate, and you will immediately get “choked” until you stop receiving data.
6.3 Health of torrents and trackers:
The torrent’s health can also influence your download speed. Two factors account for this health: the number of seeders in the swarm and the availability of the torrent trackers. If there are not enough seeders (peers), or if the torrent tracker is too slow or unavailable, your torrent downloads will be slower.
Although there’s not much you can do here, you can still analyze the health of a torrent before downloading it and decide whether to find a healthier torrent alternative. To learn more about these concepts, check out the following blog articles: What is seeding? and What are leechers?
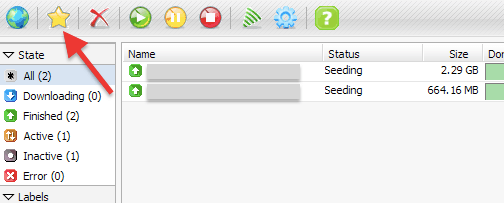
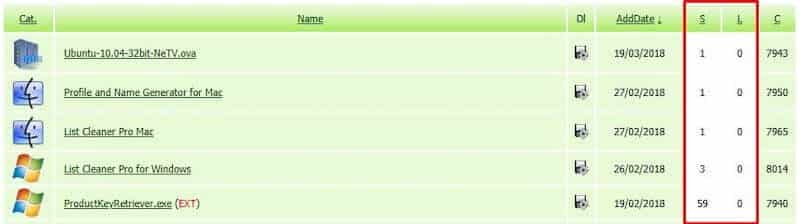
a. Check the seeder/leecher ratio beforehand.
This ratio may vary, so you may have to return later if you see a low ratio or very few seeders. A quick look into the S/L (Seeders/Leechers) columns might give you a lot of information on the health of the torrent. As shown in the picture below, three torrents have only one seeder, while the other has 59. The one with 59 seeders is much healthier. The higher the number on Seeders, the more chances your torrent download is faster.
b. Check whether the torrent trackers are available.
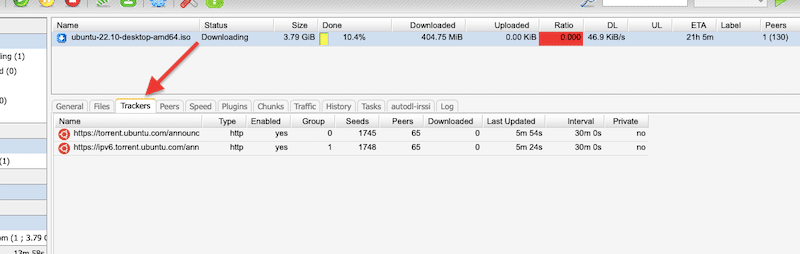
Torrent trackers are the main servers that regulate P2P traffic. They keep information about each client using each torrent so that they can speed up the seed discovery process. Trackers connect peers. Unfortunately, sometimes trackers experience downtime and remove torrents if they are older than a year.
In the example below, two trackers deal with our “Ubuntu image” torrent swarm. By going to the “Tracker” label on the bottom menu, you can see information such as the tracker’s name, type, #seeds, and peers.
c. Update trackers
- To improve your torrent health (and thus speed), update and use multiple tracker torrents. You can find torrent tracker lists online and update your torrent with this information. If the first tracker on the list fails, then the torrent will use the next one, and so on.
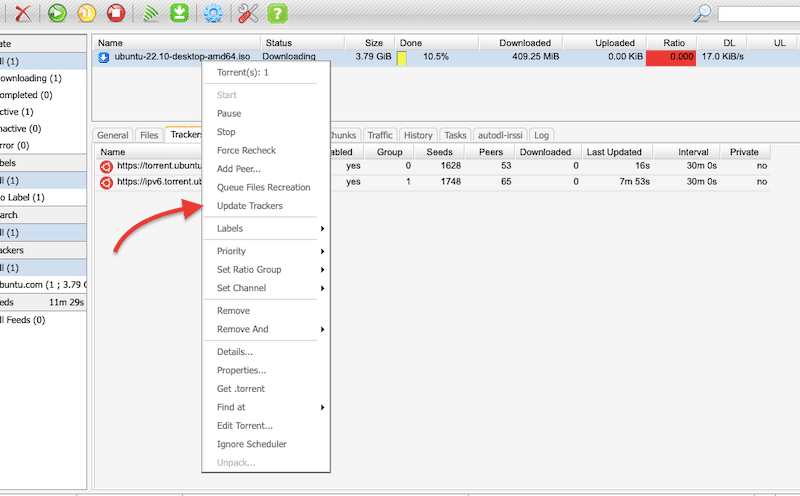
- To improve reliability, torrent files come with a built-in “tracker list” (such as the two shown above). But sometimes, the torrent trackers may have low seeds, are disabled, or haven’t been updated; you can continually update the tracker on the torrent by right-clicking on the torrent > “Update Trackers,” as shown in the picture below.
Note: Keep in mind that some functionalities and features available in the full version of ruTorrent will be disabled in the Lean ruTorrent 3.10 version.
- You can also update the list and add more trackers so that the torrent client has more chances of finding the right peers and downloading the torrent faster. To do this, right-click on the torrent (as shown below) and click “Edit Torrent” or “Torrent Properties.” The following window will appear.

- Find updated torrent tracker lists online and update your torrent. Copy the entire list and paste it right below the last tracker. Do not remove existing trackers and leave a blank space between each line.
d. As an alternative, use Distributed Hash Table “DHT.”
DHT is a tracker-less method. In DHT, the P2P network peers keep all the necessary information for peer discovery to themselves; they don’t need a centralized server, such as a tracker, to search for other peers.
Note: Keep in mind that some functionalities and features available in the full version of ruTorrent will be disabled in the Lean ruTorrent 3.10 version.
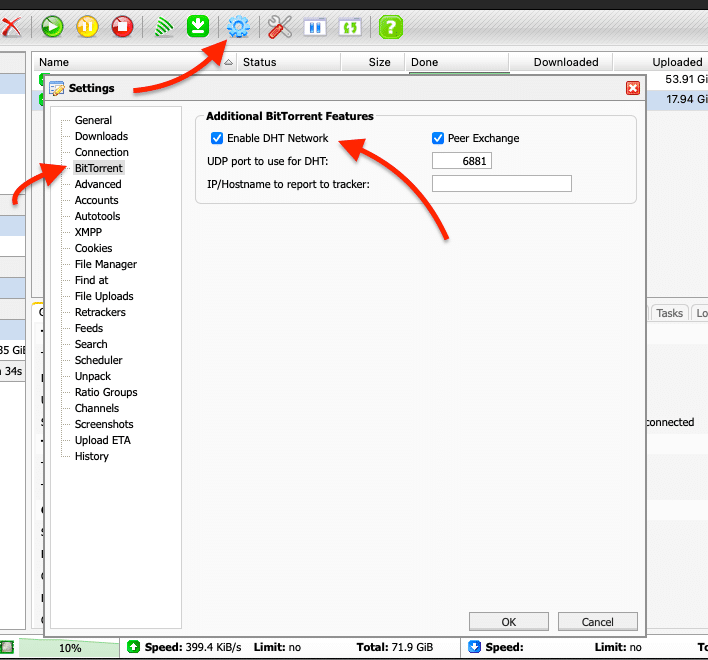
- To enable DHT: Go to settings > BitTorrent (on the right-hand side menu).
- Ensure that “Enable DHT Network” is selected (as shown below).
Note: Before enabling DHT, remember that most private trackers require you to disable DHT and Peer Exchange. DHT causes stats to be recorded differently, and Peer Exchange would allow external peers to access the torrents. But still, private torrents come with the private flag that, by default, disables DHT and PEX.
6.4 Use a seedbox.
A seedbox server is the easiest and best method to improve torrenting speeds. Seedboxes are designed for seeding and improving sharing ratio, so their speeds are already optimized. Seedbox providers are usually located in high-speed data centers where ISPs do not throttle speeds. These servers are built for torrenting, so they come with high performance, speed, and large storage.
Rapidseedbox’s seedboxes are already optimized for crazy fast speeds. Speeds may range from 1Gbps to 10Gbps.
Note: If you are using ruTorrent with a Seedbox…
- Changing the port on the ruTorrent client doesn’t make a difference. This is because all the traffic between ruTorrent and the peer is encrypted.
- For the same reason, you don’t have to worry about ISP throttling or firewall blockage because the connection from your resources to the VPS Seedbox is also encrypted.
- If you want to download content to your on-premises, you can use SFTP, FTPS, Sync, or other safe transferring methods, that are not monitored and limited.
- No need to use a VPN or proxy between yourself and Seedbox. All the “torrent traffic” happens between the Seedbox and the Internet. Your ruTorrent WebUI traffic (port 80) between your computer and the Seedbox is unnoticed by the ISP.
6.5 Improve the speed and anonymity in rTorrent
If you have already dealt with external factors such as your Internet download/upload speed and speed limitations, some parameters can still be optimized internally. The following commands will help you improve speed and anonymity in your rTorrent server. These commands have all been tested in Ubuntu 22.04.
- Log into rTorrent and edit the rTorrent’s config file using nano (or your favorite text editor).
- The rtorrent.rc file is in the following path: “/usr/local/rutorrent/var/.rtorrent.rc” But as mentioned in the earlier sections, the (.) means that it is hidden
|
1 |
nano ~/.rtorrent.rc |
1. Adjust the minimum and the maximum number of peers to connect to (per torrent):
|
1 |
min_peers = 50 max_peers = 80 |
2. Maximum number of uploads
|
1 |
max_uploads = 4 |
3. Global upload and download rate in KBps. Set 0 for unlimited.
|
1 |
download_rate = 0 upload_rate = 0 |
4. Port range to use for listening. Set any number from 60000 to 65000
|
1 |
port_range = 60124-64124 |
5. Let ruTorrent define the port randomly from the port range defined above
|
1 |
port_random = yes |
6. For security, check hash for finished torrents.
|
1 |
check_hash = yes |
7. Define encryption parameters, do not force encryption.
|
1 |
encryption = allow_incoming, try_outgoing, enable_retry |
8. Enable DHT and define the port. Be aware that some private trackers require you to turn DHT off.
|
1 |
dht = auto dht_port = 63425 |
9. Enable Peer Exchange. The same as above, make sure this is a requirement by the private tracker.
|
1 |
peer_exchange = yes |
10. Finally, save the file and make sure to save it in the (/home/User) directory.
7. Bonus ruTorrent tips and tricks!
The following ruTorrent tips and tricks will take your ruTorrent experience to the next level. Whether is to manage RSS via the WebGUI, customize ruTorrent with plugins, directly share files with your friends through the application, or download torrents automatically.
If there is a trick that you think is amazing in ruTorrent, and is not shown here, please don’t forget to mention it in the comments below.
7.1 How to configure RSS in ruTorrent.
One of the highlights of ruTorrent is its ability to manage RSS via a Web GUI. RSS stands for Really Simple Syndication and is a file in XML format used to spread content throughout the web. The following step-by-step guide will show you how to configure ruTorrent to download torrents from RSS feeds.
- Add the RSS feed into ruTorrent. It is recommended to add an RSS feed that has direct downloads and does not require cookies.
- Find the RSS feed online. To add your RSS into ruTorrent, you’ll simply need the RSS URL, which looks something like: https://www.rapidseedbox.com/rss/
- Configure RSS feed. Go back to the ruTorrent client and click on the “RSS downloader” icon, as shown below. The following “Add RSS Feed” window will come out.

- Input the “RSS Feed URL” you found online and give a custom alias name for the RSS Feed.
- An example of a Feed URL would be: https://www.rapidseedbox.com/tag/utorrent/feed and custom alias: Rapidseedbox

- Then proceed to click the Ok button.
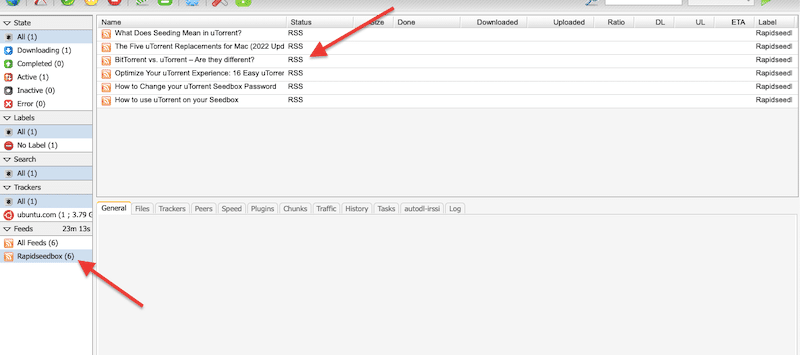
After a while, your new feed will appear in the “Feeds” list in the bottom left corner. And you’ll notice the recommendations starting to appear in your feed.
7.2 Use torrent automation software.
Automated media downloader tools can help you search, find, and download torrents automatically for your favorite movies, TV shows, music, or books. Most of these tools are also capable of updating your entire media library.
Sonarr is a popular TV series collection manager for BitTorrent and Usenet. It keeps track of multiple torrent RSS feeds, finds new TV series, and connects with your ruTorrent client to download all those movies automatically. All of that without your intervention. Sonarr can also be configured to find better-quality content. It replaces it with the old when it finds higher-quality content. There is also other automation software such as Radarr or Readarr.
Check out our step-by-step guide to starting with Sonarr and our guide to starting with Readarr.
7.3 Installing a plugin in ruTorrent.
ruTorrent plugins are add-ons that extend the functionality of the ruTorrent web interface. They can provide additional features and options for managing and configuring torrents
a. Some examples of popular ruTorrent plugins include:
- AutoTools: Allows for automation of tasks such as moving completed downloads to a different directory. Performs automation functions, such as auto-label and auto-move.
- File Manager: Adds a file manager to the ruTorrent interface for managing files on the server.
- Ratio: Allows for setting and enforcing a specific upload-to-download ratio for torrents.
- Throttle: Allows for limiting the upload and download speed of individual torrents.
- Extratorrent: allows search and download torrents from extratorrent
- RPC: a plugin that links rTorrent and a web server.
- Trafic: Includes a subsystem for counting traffic.
- RSS: Performs operations with RSS feeds.
b. How to install a plugin in ruTorrent?
There are many other plugins available, each with its own unique features and capabilities. Some plugins may require additional configurations or setup, while others may be ready to use right after activation.
A quick search in “ruTorrent plugins library” online may point you in the right direction. A good source for ruTorrent plugins is Google Code Archive. Plugins can be added to ruTorrent by adding the plugin directory to ruTorrent’s directory. You need to install plugins via the command line.
c. Here’s a bit more detail about installing a plugin in ruTorrent.
- Check the list from Novik/ruTorrent library.
- Record the name of the desired plugin.
- Go to. the plugins directory:
- $ cd var/www/rutorrent/plugins/
- Download and install a specific plugin with the following command. The command “svn checkout” is used to download and copy a repository from the version control system such as SVN (subversion) or Git.
- $ svn checkout https://github.com/Novik/ruTorrent/plugins/plugin_name
- Log in to the ruTorrent web interface and navigate to the “settings” menu.
- Select the “plugins” option and find the plugin you just uploaded in the list of available plugins (1). Right-click on “Loaded” (2). Click the “enable” (or disable) button to activate (or deactivate) the plugin (3).
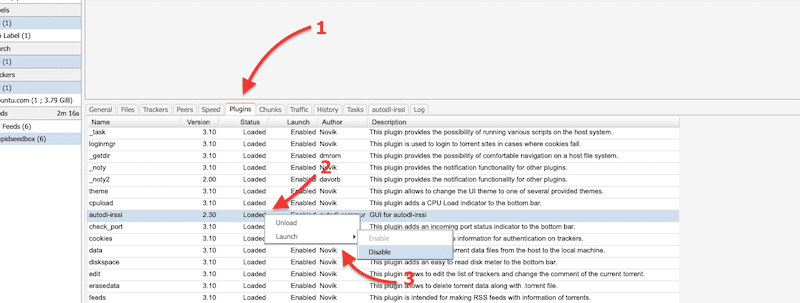
- After the plugin is activated, you may need to configure it by visiting the “settings” menu.
Note 1: Be aware that some plugins may not work with the previous method; you might have to check the instructions on the plugin readme file.
Note 2: Generally, the more plugins you install, the longer the ruTorrent interface will take to load and the slower it will be. We recommend installing only what you require.
7.4 File sharing and manager through ruTorrent
The basis of BitTorrent is to share files in a swarm or among a group of peers. ruTorrent goes beyond that and allows you to share a file directly with a friend or specific peer. To achieve file sharing, however, you’ll need to install the additional File Manager and File Share plugins.
Note: These plugins are not included in the default installation of ruTorrent and may need to be installed separately.
- The File Manager plugin allows users to manage the files on their seedbox, such as viewing, moving, and deleting files.
- The File Share plugin allows users to share the files on their seedbox with other users, either by creating a public link to the file or by setting up a password-protected directory.
How to share files directly to a specific user through ruTorrent?
- Go to your “Completed” torrent downloads, click on the file you want to share, and go to “File Manager” on the bottom bar. There is a Path Finder that allows you to locate your file. Use this to display all your files in the “/Downloads” file or whatever folder you store your content in.
- After you find the file that you want to share, right-click > “Share.”
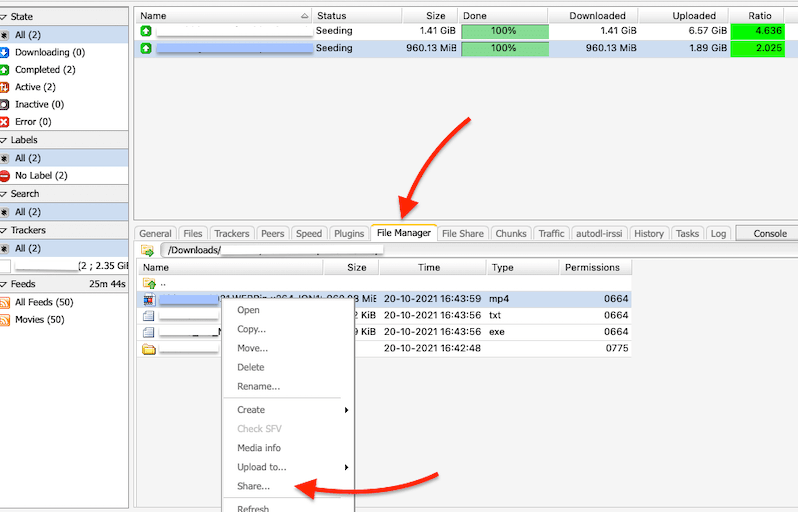
- A new window, “File Share,” will pop up.
- In the field “File,” make sure that the file you intend to share is the correct one. As part of the File share configuration, you must define the duration (in hours) the file will be available for sharing. As an additional option, you can also determine a password to add up security for the file.
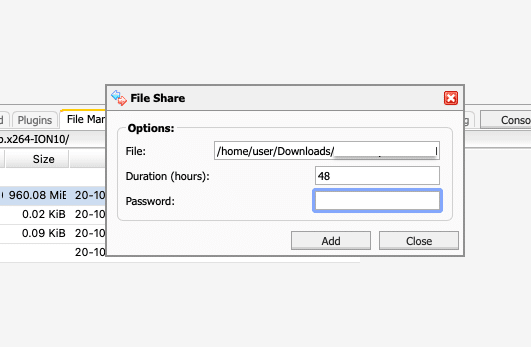
- Finally, click “Add.” A download link will be created.
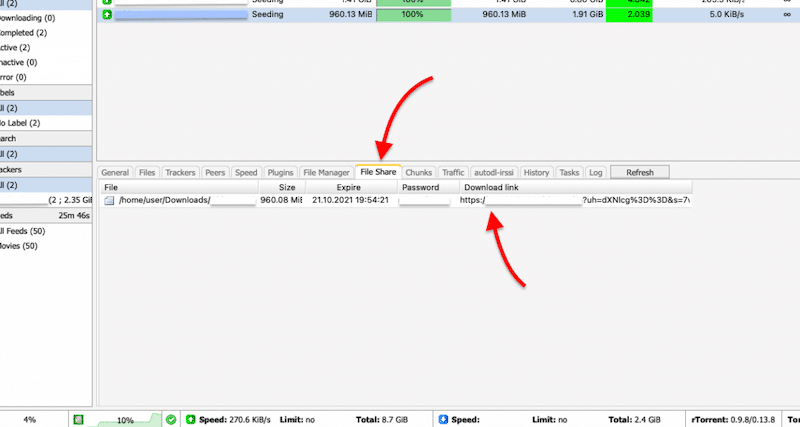
- Go to “File Share” in the bottom-bar menu to learn about your file shares. Locate your file, and record the “Download Link” and the Password information. With this information in hand, your friends can access that specific file for a limited time.
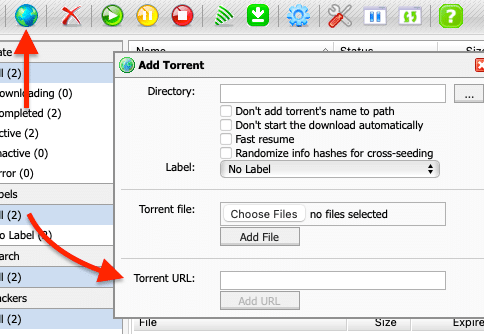
- Accept the download. On your friend’s computer (or if someone is sharing a file with you). Go to “Add Torrent” (the globe icon), and under the “Torrent URL” field, write down the “download link.”
- The file will start to download.
7.5 Auto-download torrents with Autodl-irssi.
Autodl-irssi is a plugin for irssi that monitors IRC torrent announcement channels, automatically downloads torrents based on a pre-defined filter, and sends the torrents to your ruTorrent client. Although “autodl-irssi” is already installed in ruTorrent from Rapidseedbox’s seedboxes, you might want to learn how to install it from scratch.
To download anything automatically with autodl-irssi, you would need to define four basic parameters.
- Configure Tracker RSS Feed.
- Configure the IRC channel.
- Define the filters.
- Define the action to be taken.
If already installed, go to the green download icon on the top bar of the dashboard. There you will find four different options, Filters, IRC Servers, Trackers, and Preferences.
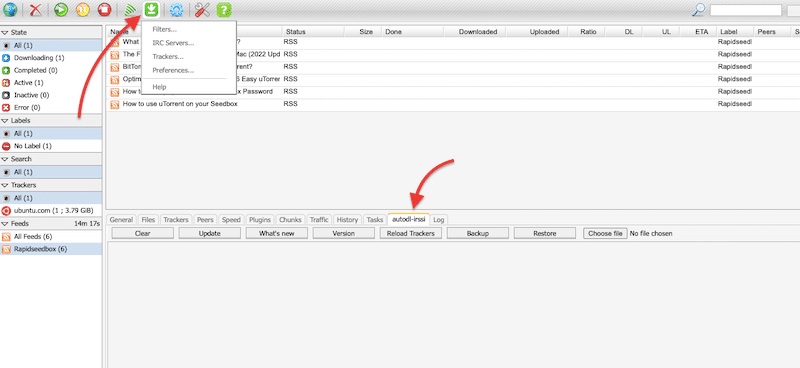
- You can also check the version of the autodl-irssi and update if necessary.
- Go to the bottom information menu and find the label autodl-irssi, then click on Update.
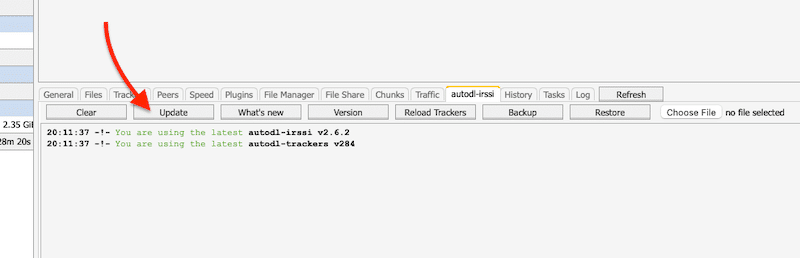
Note: For extra help, check out our complete step-by-step guide on how to configure autodl-irssi from the beginning.
8. ruTorrent FAQ .
8.1. Is rutorrent the same as rtorrent?
They are not the same, but they do have a close relationship. ruTorrent is the PHP frontend (web interface) of rTorrent— the console-based CLI BitTorrent client for Unix-like operating systems. In addition, rTorrent is written in C++ and uses the ncurses library for terminal interactions, making it well-suited for servers or headless systems. It is also worth noting that ruTorrent uses rTorrent’s built-in XML-RPC server for communication.
8.2 Is ruTorrent related to ruTracker?
Because of naming conventions, some people think ruTorrent and ruTracker are the same. However, ruTracker is a famous Russian torrent tracker (torrent search indexer), while ruTorrent, is a torrent client and is not related to Russian trackers.
8.3 What is the recommended OS to install rTorrent and ruTorrent?
Linux distributions are generally the best choices. For instance, Arch Linux comes with fantastic support and documentation for rTorrent. ArchLinux is an independently developed x86-64 general-purpose Linux distribution. For more information, check rTorrent ArchLinux documentation.
8.4 Why do seedboxes prefer ruTorrent?
ruTorrent (or rTorrent) is one of the best torrent clients. For instance, when comparing clients like BitTorrent or uTorrent vs. rTorrent, the former is consistently ranked better. The Slant community recommends rTorrent for most users and ranks rTorrent in 7th place. Two reasons why rTorrent is preferred for seedboxes are because it has a GPL license and comes with either CLI or GUI (via ruTorrent).
8.5 Can ruTorrent be installed in Windows?
ruTorrent is supported by OSX, Linux, BSD, and Solaris. Windows do not support it, but a workaround is to use Cygwin to install it. Another way (as mentioned at the beginning of this post) is using Docker containers or VMs within Windows.
8.6 What are ruTorrent ratio groups?
Ratio groups are commonly used for seeding torrents with a specified sharing ratio, but you can use them for much more. Ratio groups are based on four conditions: UPLD Min %, UPLD Max %, UPLD in MB, and seeding Hrs. When conditions are satisfied (in some way or another), action can be taken.
8.7 how to use ruTorrent “mediashare plugin”?
The MediaShare plugin for ruTorrent is a file-sharing plugin that allows users to share their files with others by generating a public link to the file. To use it, you would need to install the MediaShare plugin on your ruTorrent installation. This can usually be done through the ruTorrent plugin manager. Once the plugin is installed, navigate to the MediaShare tab in ruTorrent. Select the file or files you want to share by clicking the checkboxes next to them.
8.8 How to open a port in ruTorrent?
Opening a port for ruTorrent involves configuring your router to forward incoming connections to your seedbox running ruTorrent. To open a port in ruTorrent, log in to your router’s web interface, locate the port forwarding section, and create a new port forwarding rule. Check your router’s manual to learn how to do this. Finally, check whether the port is open using a port checker tool. You can use online services like “CanYouSeeMe” or “WhatIsMyIP” to check if the port is open and reachable from the internet.
New to ruTorrent?
Get started effortlessly with RapidSeedbox’s high-speed seedbox. Our service offers the perfect environment for beginners. You’ll get seamless torrenting, fast downloads, and exceptional support to guide you every step of the way.
9. Final Words.
rTorrent is not for everybody. It requires extensive Linux expertise to install, maintain, and operate. Plus, not everyone is happy with learning to use its CLI. ruTorrent, on the other hand (although it depends on rTorrent), is easier to use. In addition to its WebGUI, it is also ultra-light, fully featured, supports RSS feeds, is highly stable, can be extended with plugins, and a lot more.
If you want to test ruTorrent and rTorrent (without going through the whole installation process), give a ruTorrent built-in Seedbox a try.
Finally, we hope you found this article handy and have answered all your doubts about ruTorrent.
As always… Happy seeding!
6.1 The bottom bar.
I believe your definitions for the Download and Upload speeds are reversed.
Thanks for your feedback Tray; we are looking forward to building a new ‘revised’ ruTorrent 2023 guide.
Our ruTorrent guide has just been updated! We hope you like it!
my seed-box’ ruTorrent file manager plugin is disabled out of the box, I can’t navigate to a directory within the ruT webUI and as such I cant set an “Action” under my autodl-irssi preferences – this would be a deal breaker if I cant resolve it…
Vic, sorry to hear that! Have you tried contacting technical support? They should be able to enable the file manager for you!
This tutorial is out of date, there is no ‘yelow star’ in vers. 3.10 or rutorrent
Thanks for your observation Brandon; we are looking forward to building a new ‘revised’ ruTorrent 2023 guide. Things change so quickly! 😛
ruTorrent guide was completely overhauled… Brandon, waiting for your feedback!
Thanks Brandon… ruTorrent guide was overhauled. Let us know your thoughts.
Buenos días Diego,
¿Hay alguna forma de ver al tiempo de semilla de un archivo en rtorrent o rutorrent? No veo la opción y tampoco encuentro respuesta buscando por internet. Me parece raro que no se pueda ver.
Muchas gracias por tu completa guía
Hola Juan.
Has probado darle click derecho al torrent para ver los detalles?
Deberia haber algun campo que desplega informacion de “Seeding Time” o “Total Seeding Time.”
HI
When starting rutorrent, I get this message “Bad response from server: (0 [error,setuisettings]). I still can select a file to downlad, but when hitting the add button, nothing happens. I tried this using firefox. I then tried with edge, and got the same problem. Any idea to solve that ?
thanks in advance
Hey Eric,
If you have already tried different browsers, then clearing cookies/history or disabling add-ons wouldn’t help solve your problem.
From the output you provided, it seems that the problem is from the server, but might also be the communication itself. Start by checking the server status and then ensuring it is well-configured. Firewalls (or network filtering devices or software) are typical to blame for these sorts of problems, so check your local firewall (disable/enable) or check its rules. I would also suggest checking your ruTorrent client. Review the rutorrent configuration files, especially the config.php file. Pay attention to the RPC settings.
If possible, check your ruTorrent logs to collect more information and context on the issue.
I hope that helps!
Hola Diego,
No existe campo que informe del tiempo de semilla. Lo más parecido, pero no es lo mismo, es el plugin seeding time, pero a pesar de su nombre no da una información veraz del tiempo de semilla y lo que hace realmente es informar de la fecha de finalización de descarga del torrente que no es lo mismo. Me extraña que rtorrent/rutorrent no ofrezca información exacta del tiempo de semilla como hacen otros clientes.
Un saludo
Hola Juan.
Es una observación interesante que otros clientes ofrezcan esta métrica de una manera más precisa. Puede que sea una característica que rTorrent/rutorrent tenga que considerar en futuras actualizaciones para mejorar la experiencia del usuario.
Espero que sigas disfrutando de tu experiencia con rTorrent/rutorrent a pesar de esta limitación.
Saludos!
Hi Diego,
I think there are a few issues with your instructions. One main issue is the document root path for lighttpd, it is set to /var/www/html, but you install rutorrent into /var/www. When renaming the folder you could move it under html, like this “sudo mv ruTorrent html/rutorrent”
This is a small problem. I like coping and pasting the commands from your page to the ssh console that I have to the server. When installing php, one of the options is php-cg, I think it should be php-cgi.
I am relatively new to linux command lines and configuring linux servers. I mostly work with Windows client and server oses. I have learnt a lot in the last few months about command lines in linux and how to manager linux servers through terminal/ssh and how to change config files, but I still have a long way to go.
Kind Regards
Mark
Where is the Anonymity information?
FYI sock5 provides zero Anonymity
Hi Max,
We’ll update the post soon and expand on the anonymity information.
Thank you for your comment!
ruTorrent is limited to one core by its devs and will max out at 100-120MB. If your box has 32 cores, rutorrent uses one and leaves the other 31 idle. So rUTorrent will bottleneck your 10 Gbps connection to about 10% of its capacity. It’s a horrible client for a 10Gbps box.