Today, you’ll learn about an important aspect of IPv6 – the IPv6 loopback address. Let’s find out what it is, how to use it, its use cases, and much more!

Table of Contents
- What is the IPv6 Loopback Address?
- What is a Loopback Interface?
- Why is the IPv6 Loopback Address Important?
- How to Use the Loopback Address: A Guide for IPv4 and IPv6
- How To Check Your IPv6 Loopback Address
- How to Check if the Loopback Addresses are Working
- What to Do If Loopback Addresses Are Not Working
- How to Configure the Loopback Address
- IPv6 Loopback Address Use Cases and Applications
- Final Words
1. What is the IPv6 Loopback Address?
The IPv6 loopback address plays an important role. It’s a specific address that devices use to send messages back to themselves for testing and diagnostic purposes. Unlike IPv4, which uses 127.0.0.1 as its loopback address, IPv6 simplifies this to a single, succinct notation: ::1.
2. What is a Loopback Interface?
A loopback interface is not a physical interface like the Ethernet or Wi-Fi connections on a device. Instead, it’s a virtual one created within the operating system or networking device software.
This interface is always up and operational as long as the device is on, independent of the status of physical network interfaces.
Key Benefits
- Reliability: Since the loopback interface is not tied to a physical port, it remains active regardless of hardware failures or disconnections, securing a stable endpoint for testing and management.
- Testing and diagnostics: The loopback address is an important tool for inspecting a device’s network stack. You can check the TCP/IP stack’s functionality without using the actual network interfaces by sending traffic to the loopback address.
- Network routing and management: In complex network architectures, the loopback interface is often used as an identifier for routing protocols. Since it doesn’t change, you can use it as a consistent endpoint for network management and routing decisions. The best part is, you can do that even if the physical interfaces go down or change.

- Simplified local communication: For applications and services running on the same device, the loopback interface offers an easy method for inter-process communication without the need to determine the device’s physical IP address.
Network configuration, management, and testing all revolve around the loopback interface. Its importance in guaranteeing dependable communication within a device and over a network cannot be understated.
It supports a variety of networking procedures, from security measures to routing protocols, by offering a reliable, always-up interface. Anyone wishing to learn more about networking concepts and procedures should be able to understand and use the loopback interface.
3. Why is the IPv6 Loopback Address Important?
From my experience, understanding and using the IPv6 loopback address function is important for several reasons:
- Testing network interfaces: It’s an essential tool for verifying that the network interface on your device is operational. By sending a ping request to
::1, you can confirm that your device’s networking stack is functioning correctly without needing to involve external network devices. - Developing applications: For developers, the loopback address is extremely helpful. You can use it to test network applications locally. That way, you’ll know if they operate correctly before deploying them in a live environment.
- Network troubleshooting: When diagnosing network issues, the loopback address is usually the first step to determine if the TCP/IP stack is not the cause of the problem.
4. How to Use the Loopback Address for IPv4 and IPv6
By now, you already know that the loopback address allows devices to send messages to themselves for testing and configuration purposes. This functionality is equally important across both IPv4 and IPv6 protocols.
Let me show you how to use this function.
a. How to use the IPv4 loopback address
The IPv4 loopback address is 127.0.0.1.
It’s often used for network testing and software development. Here’s how you can use it:
- Testing network connectivity: To verify that your computer’s network interface is functioning correctly, you can ping the IPv4 loopback address. Open your command prompt or terminal and type
ping 127.0.0.1. A successful response indicates that your TCP/IP stack is operational.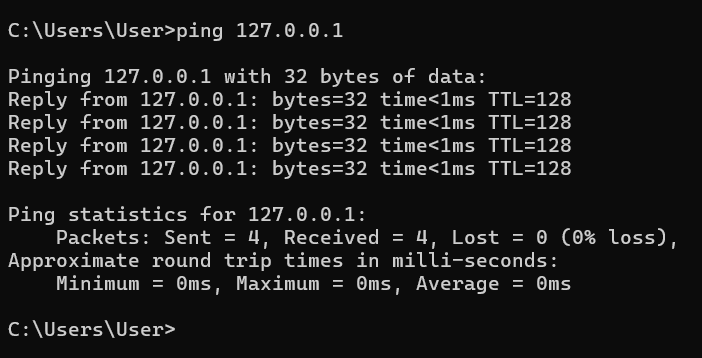
- Local development: Developers often use the IPv4 loopback address to test web applications on their local machines. By directing a web server to listen on
127.0.0.1, you can access your application through a web browser without an active internet connection, which lets you test the app locally. - Configuring network services: Some network services are configured to listen on the loopback address for security reasons, e.g. to guarantee they’re only accessible from the local machine. This setup is common for services that should not be exposed to the external network, such as admin interfaces.
b. How to use the IPv6 loopback address
The IPv6 loopback address is ::1. It serves similar purposes as its IPv4 counterpart but within the IPv6 network framework. Here’s how to use it:
- Verifying IPv6 stack functionality: To check if your device’s IPv6 stack is working, you can ping the IPv6 loopback address. Open a command prompt or terminal and enter
ping ::1. A successful ping indicates that your IPv6 stack is correctly configured and operational.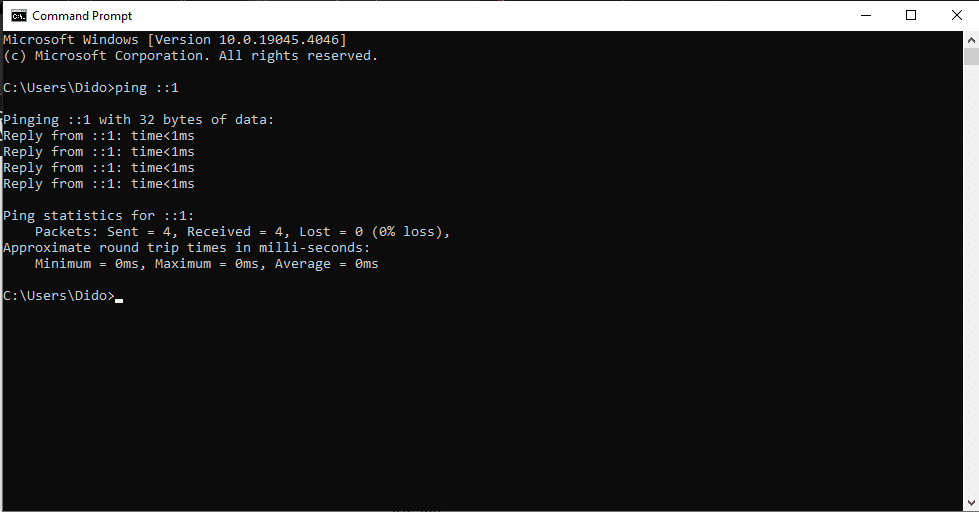
- IPv6 development and testing: Like with IPv4, developers working with IPv6 use the loopback address
::1to test applications locally. This lets them test IPv6-specific apps and services in a controlled environment. This can help with compatibility and functionality before the actual deployment. - Securing services: Like IPv4, binding services to the IPv6 loopback address restricts access to the local host. This method is quite handy for running services that should not be directly accessible from the internet or external networks, which improves security in an IPv6 environment.
Knowing how to use the loopback address in both IPv4 and IPv6 networks is important for network testing, development, and security. No matter, if you’re an experienced network administrator, a developer, or just starting in the field, using the loopback address, will help you run a smooth network.
Struggling with IPv6 loopback address challenges?
Boost your network’s reliability by mastering the IPv6 loopback address with RapidSeedbox. Protect your systems by using our top-tier services.
—————
5. How To Check Your IPv6 Loopback Address
I’ve already touched on this above, but here’s how you can check your IPv6 loopback address on different operating systems:
a. On Windows:
- Open the command prompt: You can do this by searching for “cmd” in the Start menu.
- Enter the command: Type
netsh interface ipv6 show addressand press Enter. If you have an ipv4 address, the command isnetsh interface ipv4 show address. This will show you all your network interfaces and their configurations.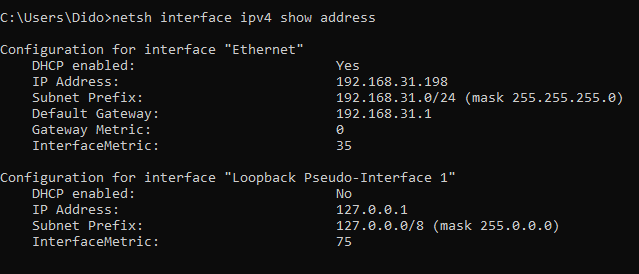
- Find the loopback address: Scroll through the results until you see the “IPv6 Address” section. The loopback address will be listed under “Loopback Pseudo-Interface 1”
b. On Linux:
- Open Terminal: Use the shortcut Ctrl+Alt+T or find it in your applications menu.
- Enter the command: Type
ifconfigorip addrand press Enter. - Find the loopback address: Look for the
lo orinterface. Under this section, you’ll findlo0inet6 ::1/128, which shows your IPv6 loopback address.
c. Why Should You Check Your Loopback Address
If you’re experiencing network issues, verifying that your loopback address responds as expected is arguably the first step you should take. That way, you’ll know if the local host is configured correctly and can process processing IPv6 traffic.
In my experience, a quick check of the loopback address can save hours of troubleshooting ahead. It’s a simple but effective way to check if your device is network-ready and if there are any issues beyond the local configuration.
6. How to Check if the Loopback Addresses are Working
Here’s a handy guide to help you check if both IPv4 and IPv6 loopback addresses are working on your system.
a. IPv4 Loopback Address
The IPv4 loopback address (127.0.0.1) is important for network testing and configuration. Here’s how to verify its functionality. Once you’ve verified the loopback address, ping it via the command prompt.
If the loopback address is functioning correctly, you’ll see replies from 127.0.0.1. Consecutive “Reply from” messages mean that your IPv4 stack is operational.
If you see errors or no response, there’s an issue with your network interface or TCP/IP stack.
b. IPv6 Loopback Address
The IPv6 loopback address (::1) serves the same purpose for IPv6 networks. Use the same method outlined above for IPv4 to open your command line interface and run ping ::1 and hit Enter. This sends ICMPv6 echo requests to the IPv6 loopback address.
A functioning IPv6 stack will result in replies from ::1. Continuous replies mean the IPv6 loopback address is operational. If you don’t receive replies or encounter errors, it indicates a problem with the IPv6 configuration or the network interface.
7. What to Do If Loopback Addresses Are Not Working
If you don’t receive replies from the loopback addresses, try the following steps:
- Check your network interface configuration: Check if your network interface is correctly configured and enabled. Disabled or improperly configured interfaces can prevent the loopback functionality.
- Verify the TCP/IP stack:
- On Windows, you can use the
netsh int ip resetcommand to reset the stack. - On Linux, open the terminal and run
sudo service network-manager restart. - On MacOS, go to System Preferences -> Network -> WiFi/Ethernet (depending on what your connection is) -> Advanced… ->TCP/IP -> Renew DHCP Lease.
- On Windows, you can use the
- Firewall and security software: I’ve noticed that the firewall settings or antimalware solutions can sometimes block the ICMP packets. Check your firewall rules and security software settings and make sure they’re not interfering with loopback address pings. If this is happening, contact the vendor to help you resolve this.
- Check the system logs: System logs can contain specific data to network interface or TCP/IP stack issues. Look for any error messages related to networking components.
8. How to Configure the Loopback Address
Configuring the loopback address correctly is extremely important if you want your network and services to operate smoothly. This guide will walk you through the process of configuring the loopback address for both IPv4 and IPv6.
a. IPv4 Loopback Address Configuration
The IPv4 loopback address (127.0.0.1) is pre-configured on most operating systems, which makes it available for use immediately. However, you might need to configure your applications or services to listen specifically on this address. Here’s how you can set it up correctly:
- Verify the loopback address. You can scroll up, if you have skipped that part of the article.
- Configure the services to use loopback address: When setting up services like web servers or databases for local development, configure them to bind to
127.0.0.1. This will improve the security because they’ll be accessible only from your local machine. - Firewall and security settings: Check if your firewall and/or security software allows traffic to and from
127.0.0.1. Some applications block this traffic by default, so reconfigure them manually in order to permit it.
b. IPv6 Loopback Address Configuration
The IPv6 loopback address (::1) operates similarly to its IPv4 counterpart but within the IPv6 network. Here’s how to configure and verify its setup:
- Verify the IPv6 loopback address: Open your command prompt or terminal and enter
ping ::1. A successful response indicates that the IPv6 loopback interface is functioning correctly. - Binding services: For services that need to support IPv6, configure them to bind to
::1if they must be accessible only locally. This is usually the case for applications in development that shouldn’t be available to the external network. - Adjust your firewall and security settings: Check your firewall and security software to make sure that they allow IPv6 traffic to and from
::1. Reconfigure the settings if needed.
9. IPv6 Loopback Address Use Cases and Applications
The IPv6 loopback address, ::1, has various applications across different scenarios.
Let’s check out some of the practical use cases.
a. Localhost Testing and Development
One of the primary uses of the IPv6 loopback address is related to software development and testing. Devs often use this address to test web applications locally before deploying them to a live server.
This lets them identify and resolve any issues early in the development process.
For example, by setting up a web server to listen on ::1, developers can access their web application through their browser without the need for an active internet connection. This helps them validate if their apps work as expected in a controlled environment.
b. Network Troubleshooting
The loopback address is also an important (and usually first) step in the network troubleshooting process. By pinging ::1, network admins can quickly determine whether the IPv6 stack is correctly configured and operational on a device. Pinging the loopback address is inevitable before trying to diagnose more complex network issues.
c. Service Segmentation and Security
When it comes to more advanced networking setups, the IPv6 loopback address can be used to improve security and service segmentation.
For example, specific services running on a server might be bound exclusively to the loopback address, making them accessible only from the local host. Networking experts usually apply this method to limit exposure to sensitive information like database management systems or admin interfaces. This reduces the potential attack damage from bad actors.
d. API and Microservices Testing
The loopback address is also used in microservices and API development.
Devs can use it to simulate network calls between different services on the same devices. That way, they can test the inter-service communications without a complex network configuration. This helps with rapid development and testing cycles since it allows for quick insulation and resolution of any issues.
e. Education
For students and networking beginners, the loopback address provides a safe and easy method to learn about network communications. By experimenting with ::1, students can get hands-on experience with IP addressing, port numbers, and the basics of network protocols.
Struggling with IPv6 loopback address challenges?
Boost your network’s reliability by mastering the IPv6 loopback address with RapidSeedbox. Protect your systems by using our top-tier services.
—————
10. Final Words
The IPv6 loopback address is a helpful e tool with various applications beyond simple network testing. From software development to security, its uses are important to modern networking practices.
Albeit slowly, the IPv6 adoption is growing, so knowing how to use the IPv6 loopback address will be even more helpful in the long run.
0Comments