Have you ever considered building a proxy server? While this may sound like reinventing the wheel, tools like Node Unblocker can simplify the process. The requirements are relatively low, and the process can be educational and potentially rewarding.
Several sites run this simple proxy tool, but most are temporary since they were built as experiments. This guide will introduce you to Node Unblocker and show how you can use it to create a proxy server with just a few lines of code. Let’s get started!
Disclaimer: This material has been developed strictly for informational purposes. It does not constitute endorsement of any activities (including illegal activities), products or services. You are solely responsible for complying with the applicable laws, including intellectual property laws, when using our services or relying on any information herein. We do not accept any liability for damage arising from the use of our services or information contained herein in any manner whatsoever, except where explicitly required by law.
Table of Contents
- What is Node Unblocker?
- How Node Unblocker Works
- How to Build a Proxy Server With Node Unblocker
- Customizing Your Node Unblocker
- Essential Security for Your Proxy Server
- Why Build a Node Unblocker Proxy?
- Final Thoughts
1. What is Node Unblocker?
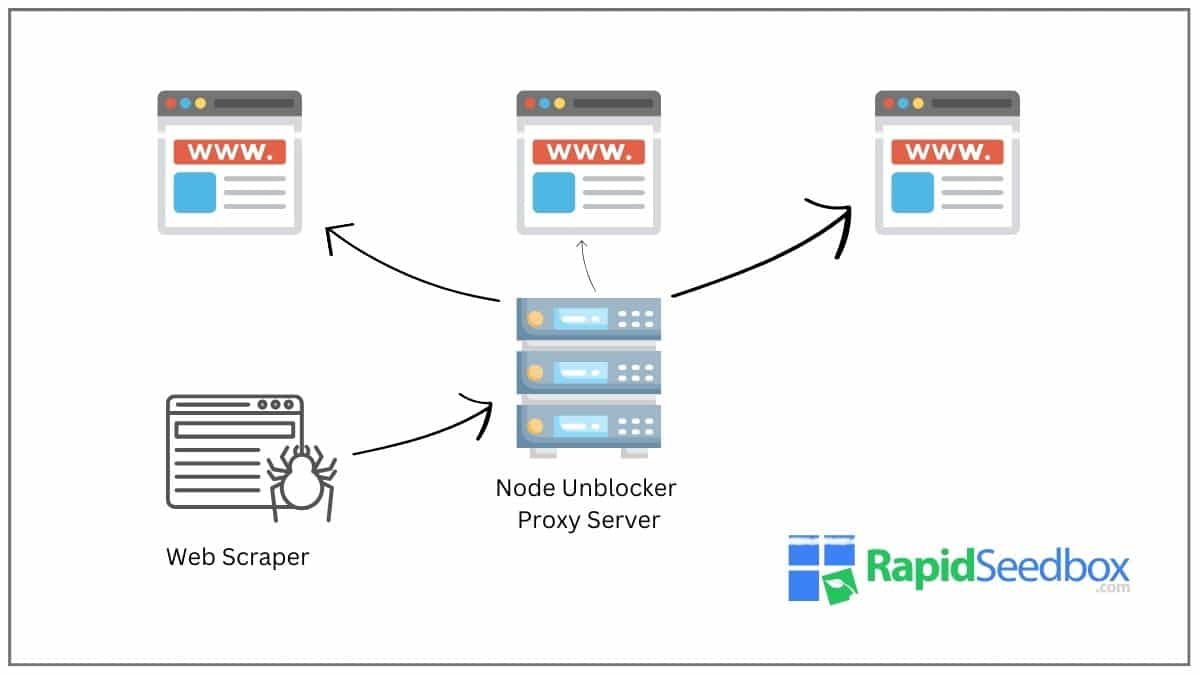
Node Unblocker is a web proxy tool that can help bypass Internet censorship and restrictions. For example, It allows users to access websites blocked by network administrators or geographical limitations.
The tool uses Node.js, a popular JavaScript runtime, and works as a middleman between your web browser and the web. When you request a webpage through Node Unblocker, the tool fetches the page on your behalf and delivers it back to you.
This process enables you to view and interact with content as though there were no restrictions in place. In short, you get to access information online freely.
2. How Node Unblocker Works
Node Unblocker operates through a straightforward yet clever mechanism. It can retrieve information you might be blocked from by placing itself between you and the Internet. Here’s a simplified breakdown of its working process:
- Request: You start by entering the URL of the blocked website you want to access into the Node Unblocker interface, which is like telling it where to go.
- Process: The app receives your request on your server and sends it to the target website on your behalf. Remember that this server is not restricted by the same rules that apply to your network.
- Content is Fetched: The server fetches the webpage, including everything needed to generate it, such as HTML, CSS, and JavaScript.
- Content Processing: It may modify the content slightly before sending the webpage back to you.
This can include rewriting URLs within the fetched page so that subsequent requests for resources (like images or stylesheets) also go through Node Unblocker. This step ensures the website functions correctly and appears as it should in your browser. - Delivery: Finally, the processed content is sent back to your browser. You can view and interact with the website as if you were directly connected, but in reality, all data is passing through the Node Unblocker server.
3. How to Build a Proxy Server With Node Unblocker
Creating your own Node Unblocker isn’t as challenging as you may think. While the process requires some familiarity with programming and networking, the basics can be picked up quite quickly. Here’s how you can get started:
Prerequisites
- Essential Knowledge: Familiarize yourself with JavaScript, Node.js, and web development concepts. You don’t need great depth into these, just the fundamentals.
- Server: You need a server where the proxy service can run. Ideally, this will be a cloud-based server since you want to bypass local network restrictions. Explore some cheap Virtual Private Server (VPS) plans and see what you can find.
- Domain Name (Optional): Consider buying a domain name to make it easier to access your proxy. Some VPS plans will have a temporary subdomain name, but these aren’t generally user-friendly.
With these prerequisites in hand, you’re ready to begin. Here’s a detailed step-by-step guide you can follow:
Step 1: Setting up Your VPS
- Choose a VPS Provider: Select a VPS provider. Since you will be routing requests through it, ensure your VPS plan offers a good amount of bandwidth. You don’t need a managed VPS; those can get pretty expensive.
- Create Your VPS Instance: Follow the provider’s instructions to create a new VPS instance. They will typically have a mechanism for you to install an operating system (OS). Ubuntu is a popular choice.
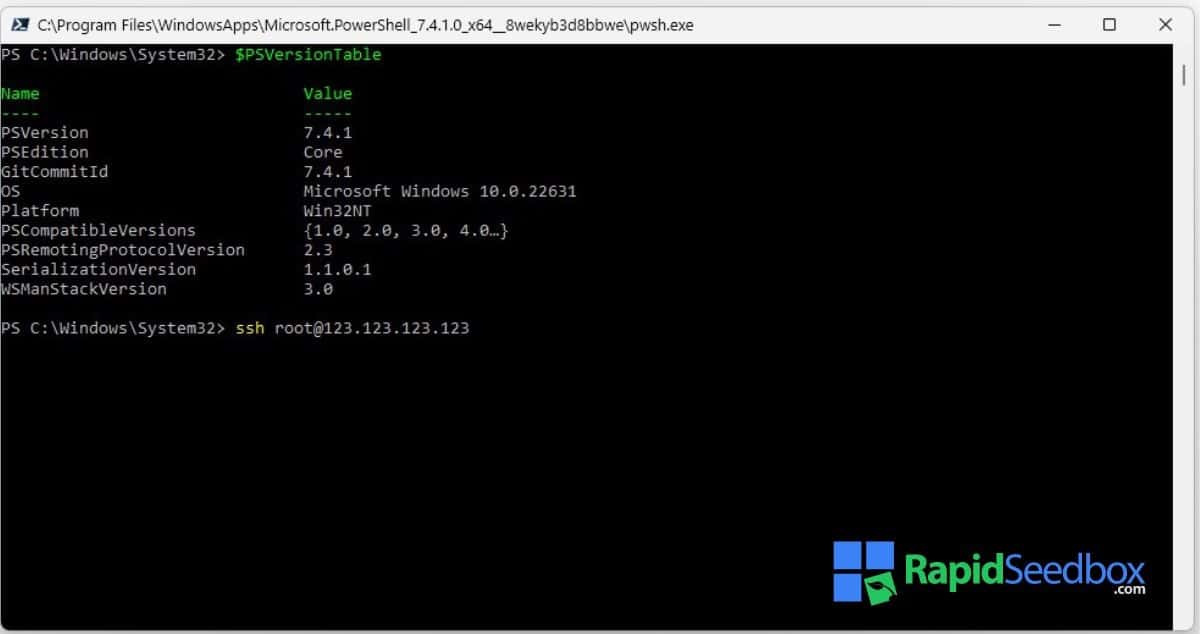
- Access Your VPS: Once your VPS is set up, access it using SSH. You’ll need the IP address, a username (often root by default), and a password or SSH key. The access command usually looks something like ssh root@your_vps_ip_address.
If you’re on a Windows computer, use a tool like Putty to get SSH access to your VPS. Alternatively, Windows 10 onwards also has a built-in SSH client. To use it, open a PowerShell window and run the SSH command.
Looking for a Virtual Server?
RapidSeedbox offers powerful servers with an interface that lets you easily choose an OS to deploy. It can be used for many other things, including running a Node Unblocker proxy.
————
Step 2: Preparing the Environment
You must first prepare the environment to get Node Unblocker running on your VPS. That means ensuring it has everything necessary to install and run the service. The two main things to achieve are updating your packages and performing the installation.
Use the following commands:
- sudo apt update && sudo apt upgrade -y
- sudo apt install nodejs npm -y
The first will ensure that your package list and installed packages are up to date. The second command installs Node.js and the node package manager. If you plan to deploy a React Redux app on your seedbox, our useSelector guide shows how to fetch state correctly.
Step 3: Installing Node Unblocker
Installing the tool on your VPS involves several steps. You must clone the Node Unblocker code from its Git repository, install the necessary dependencies, and start the Node Unblocker server.
Use the following commands:
- git clone https://github.com/nfriedly/node-unblocker.git
- cd node-unblocker
- npm install
- node app.js
Step 4: Accessing Your Node Unblocker Server
With the Node Unblocker server running, you can now access it using a web browser on your device. By default, the service listens on port 8080, so launch your browser and visit http://your_vps_ip_address:8080
Step 5: Configure Your Domain (Optional)
Access the service provider’s management interface if you have a domain name. Configure the DNS settings for your domain name to point to your VPS’s IP address. Once done, you can access your Node Unblocker using the domain name and port number.
For example http://yourdomainname.com:8080
While optional, using a domain name makes accessing your Node Unblocker easier. If you’re sharing the Node unblocker with others, it will also look more professional.
For other lightweight, open‑source proxy scripts, see our list of Mini Proxy alternatives.
4. Customizing Your Node Unblocker
Node Unblocker is a powerful tool, but customization allows you to tailor its behavior and features to suit your needs. You can customize Node Unblocker either via environment variables or a configuration file.
a. Key Customization Options
- Port Number: You can change this to any other port by setting the environment variable before starting Node Unblocker.
- Base URL: If you’re deploying Node Unblocker behind a reverse proxy, you can customize its base URL.
- Content Modification: You can tweak settings to control how it modifies the content of proxied websites. This could include removing scripts or rewriting URLs.
- HTTPS/SSL Configuration: You may need to configure it to use HTTPS for secure deployments. This typically involves setting up an SSL certificate.
- Access Controls: You can limit who uses Node Unblocker by running it behind a web server like Nginx or Apache and using their auth modules.
b. How to Modify Environment Variables
Environment variables offer a straightforward way to customize Node Unblocker’s behavior without altering its code. Before starting the tool, you can set these variables in your shell or incorporate them into a startup script.
For example, Node Unblocker listens on port 8080 by default. To change this to port 3000, you can set the PORT environment variable using PORT=3000 node app.js.
c. Tweaking the Configuration File
While environment variable tweaks are convenient for testing, modifying the Node Unblocker configuration file is a more reliable long-term solution. Here’s an example of what to add to the configuration file to enable HTTPS access:
const https = require(‘https’);const fs = require(‘fs’);
const options = { key: fs.readFileSync(‘path-to-your/private.key’), cert: fs.readFileSync(‘path-to-your/certificate.crt’)};
https.createServer(options, app).listen(3000, function () { console.log(‘Node Unblocker running on https://localhost:3000’);});
5. Essential Security for Your Proxy Server
Although running this tool on your VPS can be fun, it can also be risky. Many cyber criminals love to seek out and take advantage of less secure servers. Securing your proxy server is vital.
Here are some essential security measures you should implement:
- System Updates: Regularly update your VPS operating system and software packages to patch security vulnerabilities. Use commands like sudo apt update and sudo apt upgrade. The commands will vary depending on your chosen operating system.
- Node.js Security Updates: Keep Node.js and npm up-to-date to protect against vulnerabilities in the runtime environment. Use npm update to update your Node.js project dependencies.
- SSL/TLS Encryption: Implement SSL/TLS encryption to secure the data transmission between the client and your Node Unblocker server. Check with your VPS provider if they have automation tools for certificate issuance and management.
- Restrict Access: Configure the firewall on your VPS to allow only necessary traffic. Use ufw (Uncomplicated Firewall) on Ubuntu to manage firewall rules. Ensure that only ports like 80 (HTTP) and 443 (HTTPS) are open to the public.
- Validate Input: Sanitize and validate all user inputs to prevent common web vulnerabilities such as SQL injection, Cross-Site Scripting (XSS), and Cross-Site Request Forgery (CSRF).
- Rate Limiting: Implement rate limiting to prevent abuse and reduce the risk of DDoS attacks. This can be done within your Node.js application or using a reverse proxy like Nginx.
- Implement Authentication: If your Node Unblocker is not intended for public use, implement authentication mechanisms to control access. Basic HTTP authentication or OAuth are viable options.
- Secure SSH Access: To reduce the risk of brute-force attacks, use key-based authentication instead of passwords, disable root login, and change the default SSH port for SSH access to your VPS.
6. Why Build a Node Unblocker Proxy?
The primary purpose of using this handy tool is to help you freely access web content. However, building one has multiple benefits. Even if you fail, you can learn a lot during the process.
Consider some of these advantages:
- Bypass Censorship: Since the primary purpose of this tool is free access to information, the most apparent advantage is the ability to bypass geo-blocks and censorship. A Node Unblocker can provide access to blocked news websites and other information sources.
- Privacy Control: Using a third-party proxy service can raise privacy concerns. A self-built Node Unblocker allows for greater control over data handling, potentially increasing your levels of privacy and security.
- Learn Networking Skills: Building a proxy with this tool is a relatively simple project. You’ll understand network protocols, web requests, and responses during the process.
- Web Scraping: Many websites block bots that collect data quickly. Using a proxy will help you better control your data scraping activities. Combine it with several IP addresses to avoid blocks more reliably.
- Service Customization: By building your proxy server, you can tailor the service to meet specific needs. For example, you can tweak it to handle certain types of content more efficiently or implement unique security features.
- Testing Web Applications: Developers can use it to test their web applications’ performance under different network conditions. It’s a helpful tool for simulating access from restricted environments.
- SEO and Marketing Analysis: Marketing professionals and SEO experts can use it to view their websites as they appear in different regions. This can be helpful when tailoring strategies for specific markets.
7. Final Thoughts
Building a Node Blocker can be an exciting small project. If you have the fundamentals, it may only take a few moments. Don’t rush through the project if you don’t have the prerequisites. Take it as a learning experience.
Once you’re done, there’s even more fun ahead. This is merely a tool you’ve set up. Think of the various things you can do with it, like web scraping, accessing previously blocked content, testing your website, and more.
Go ahead and explore; along the way, you may find new and exciting ways to use it.
0Comments