Note: Plex Meta Manager has been rebranded as Kometa. This article serves as a guide to Plex Meta Manager, and the steps below will work only if you are using the older version.
Plex is one of the most advanced closed-source media server software available today. Unlike the generic and standard media server software, Plex has a twist by being an OTT platform and offering users access to movies, web series, and TV shows. It’s even supported by most seedbox providers.
Even though most exclusive features are provided access through a paywall, the free features make it an excellent choice for all media needs.
Plex works on the principle of client and server, where the server-side manages libraries and their metadata. On the other hand, the client can access accurate and organized libraries and metadata.
However, there are a lot of limitations while managing the metadata on Plex Media Server, and the lack of overall customization results in the need for Plex Meta Manager (PMM).

Disclaimer: This material has been developed strictly for informational purposes. It does not constitute endorsement of any activities (including illegal activities), products or services. You are solely responsible for complying with the applicable laws, including intellectual property laws, when using our services or relying on any information herein. We do not accept any liability for damage arising from the use of our services or information contained herein in any manner whatsoever, except where explicitly required by law.
Table of Contents
- What is Plex Meta Manager (PMM)?
- How to install Plex Meta Manager (PMM)?
- Plex Meta Manager – Getting Started
- Local Approach – Complete Walkthrough
- Docker Approach – Complete Walkthrough
- Plex Meta Manager – Working
- Local Approach Vs. Docker Approach
- Wrapping up
1. What is Plex Meta Manager (PMM)?
Even though Plex does a great job at adding media to the libraries, it does poorly manage the metadata associated with the files. In addition, the probability of providing the perfect metadata for a given media file through plugins is very low, resulting in reduced usability.
For beginners, Plex Meta Manager (PMM) is an open-source project built on Python 3 and above. With PMM, the user can create and manage the metadata most effectively and efficiently. The user is also provided with support to handle the collections and playlists associated with Plex Media Server.
The PMM features an advanced Python script built to run consistently and continuously outside the Plex environment. As a result, the metadata is accurately updated whenever a change is required without user intervention.
Unlike Plex Media Server, installing and using Plex Meta Manager is not easy and requires time and learning. To make things easier, we have gone through all steps associated with the installation. Here is a detailed guide on how to install PMM on your device.
2. How to install Plex Meta Manager (PMM)?
Plex Meta Manager can be installed on several platforms, such as Windows, macOS, and Linux. Even though PMM is compatible with multiple platforms, a similar installation approach varies according to the operating system.
PMM can be installed on all platforms through Local, Docker, and unRaid approaches. Here’s a quick summary of each approach to better understand the installation steps listed further.
- Local Approach (Hard) – Requires basic knowledge of Python and installing scripts through the terminal of your preferred platform.
- Docker Approach (Medium) – Requires knowledge of using terminals, and a basic level of expertise in Docker would make PMM installation easier.
- unRaid Approach (Extremely Hard) – unRaid OS is based on Linux and requires knowledge of USB flashing. In addition, knowledge of Docker is a must.
Considering the unRaid Approach is extremely difficult to implement, we have made a detailed installation walkthrough for the Local and Docker approach. Without further ado, let’s get PMM installed.
Note: The platform selected for installation is Windows, and all steps listed for both approaches works only on Windows. Consider this a reference if you can understand and write commands on Linux or macOS.
3. Plex Meta Manager – Getting started.
Here are the steps to install and use Plex Meta Manager on Windows. We advise readers to pay attention to a detailed walkthrough of each step listed further in the article, considering the complexity is very high.
- Install Plex Meta Manager through a Local or Docker approach.
- Create and modify the Configuration file to achieve Plex and TMDb (The Movie Database) service connectivity.
- Metadata file creation – To enhance libraries by updating metadata and automating collections.
- Create interactive and unique collections through Collection builders (Optional).
Also, read Jellyfin Vs. Plex – Battle of the Media Managers
4. Local Approach – Complete Walkthrough
This walkthrough explains the installation of PMM and creating a configuration metadata file in detail. In case of any issue or confusion, we advise starting from the beginning to prevent an unsuccessful PMM setup.
4.1. Install Python 3.7 or above.
Verify if Python is installed on your Windows device by typing the command on the terminal.
python3 --version
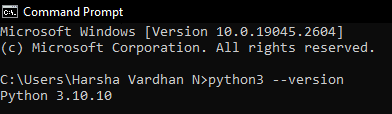
If the Python version is below 3.7 or something is returned, it is advised to install Python. There are two ways to install Python; however, the easiest approach is through Microsoft Store.
4.2. Install git on your Windows device.
Verify if git is installed on your Windows device by running the below command on the terminal.
git --version
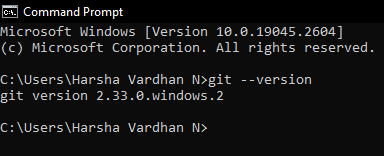
If the command doesn’t return the git version or displays any error, download and install git from the official website.
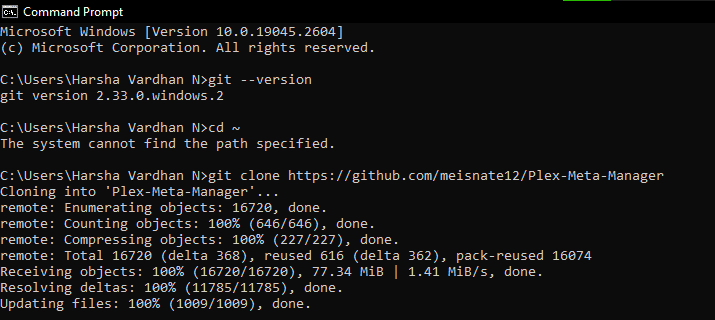
4.3. Clone Plex-Meta-Manager code using git.
On successful installation of git, clone the repo to your desired location using the following command.
git clone https://github.com/meisnate12/Plex-Meta-Manager
4.4. Creating and Activating Virtual Environment – Sandbox
We advise users to continue the walkthrough using a virtual environment for easier recovery and better control over PMM.
python -m venv pmm-venv
.\pmm-venv\Scripts\activate
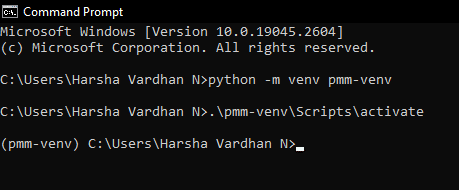
If there are any issues with creating a virtual environment after typing the first command, it is advised to repair or reinstall Python.
Now activate the scripts using the second command, which should return the name of the virtual environment. If any error persists, start from step 1.
4.5. Installing Requirements for PMM
Support libraries are required for working with Plex Meta Manager (PMM). The support libraries of PMM are available through the “requirements.txt” file.
This requirements file is responsible for connecting to Plex, TMDb, or accessing information from the internet. Here is how to install the requirements file using the terminal.
cd Plex-Meta-Manager
python -m pip install -r requirements.txt
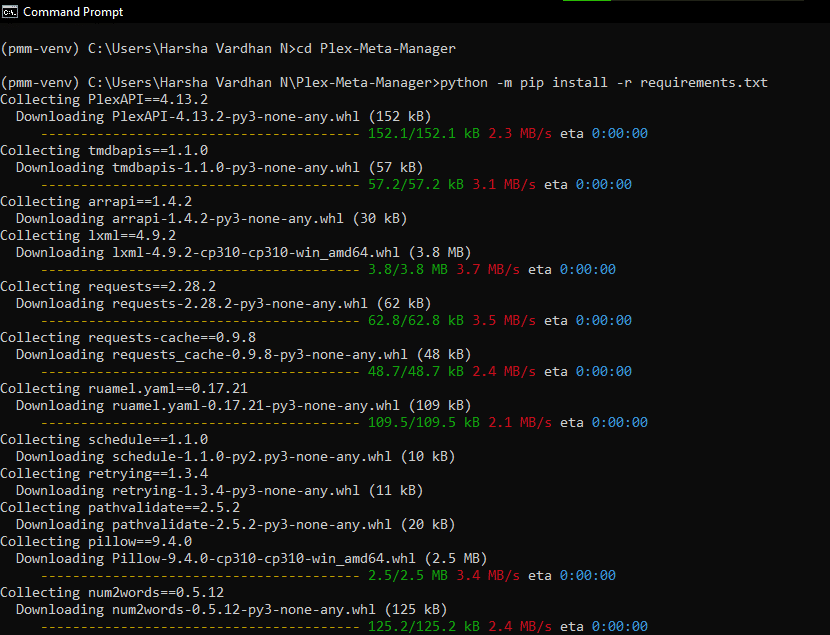

If any issue is returned, it is because of an outdated pip, and this issue can be quickly resolved using the following command.
python -m pip install --upgrade pip
If the problem persists, repair Python using the .exe downloaded from Python’s official download site.
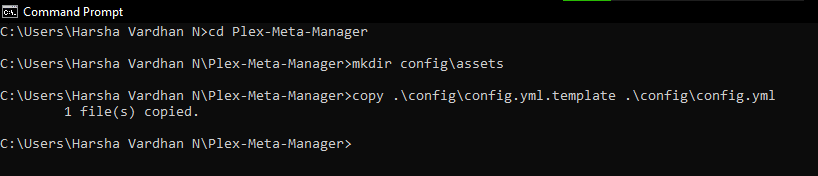
4.6. Creating a sub-directory
We are creating a new directory to prevent confusion from the potential errors that might happen in the future. This action helps clarify things and is ideal for the default config directory.
cd Plex-Meta-Manager
mkdir config\assets

4.7. Generating TMDb API key
The TMDb API key is one of the most critical aspects in the config file as it is responsible for connecting to TMDb servers.
Here is how to get a TMDb key if you don’t have one;
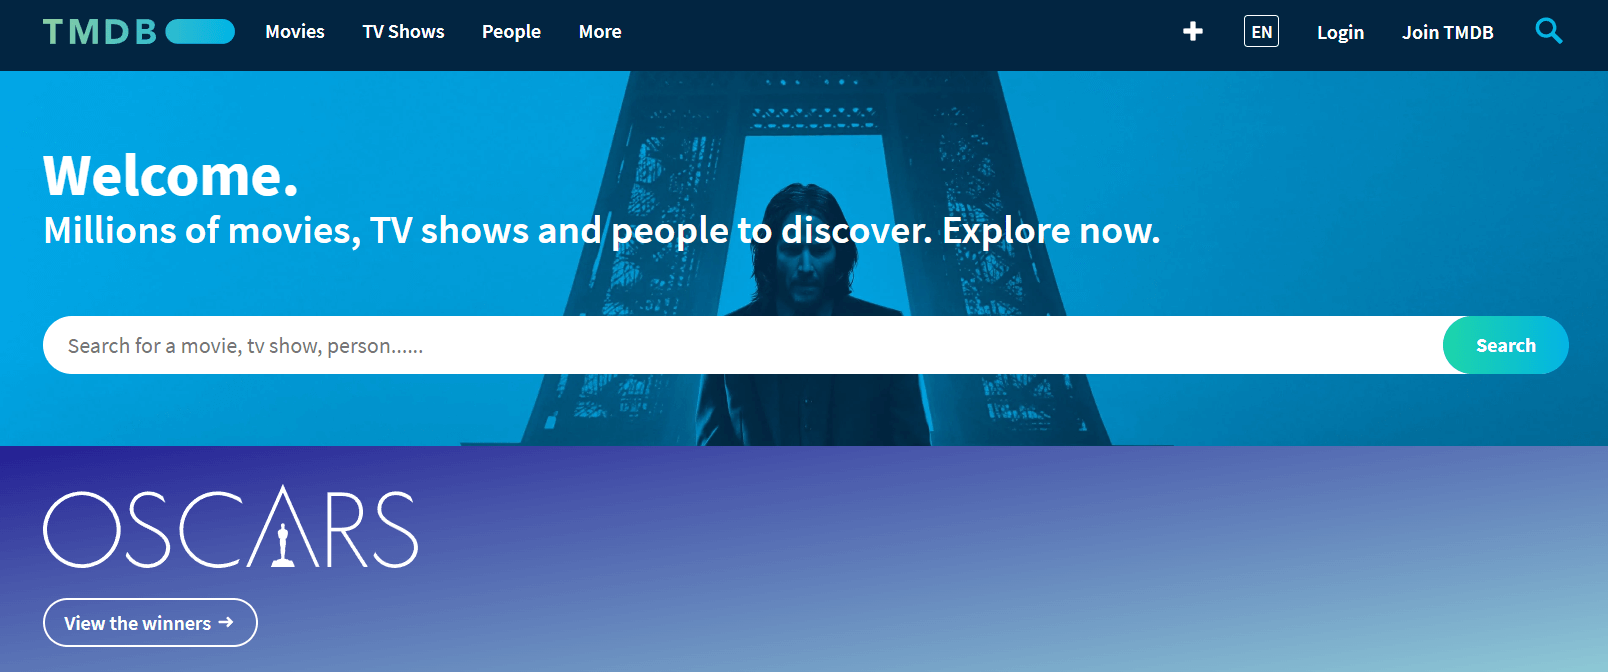
- Open your browser, visit TMDb’s official website, and create a new account.
- On successful creation of an account. Head to settings present on the right top of the webpage under the account menu.
- Look for the option named “API” from the sidebar menu.
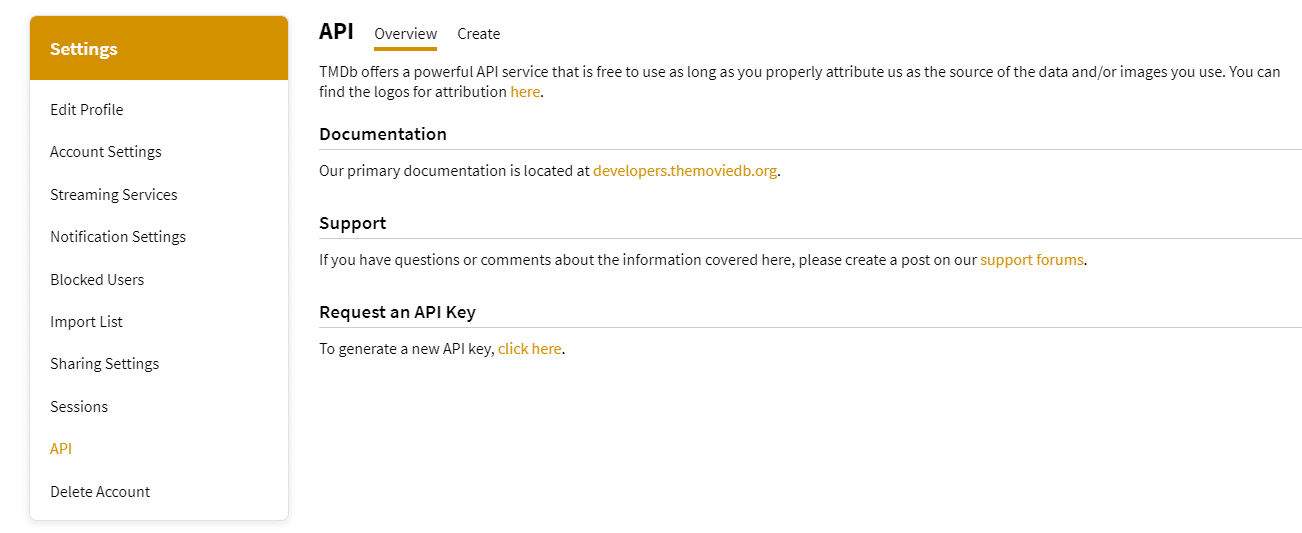
- From the “Request an API key” section, generate an API that asks for a form to fill out (Enter a random website name in the URL section).
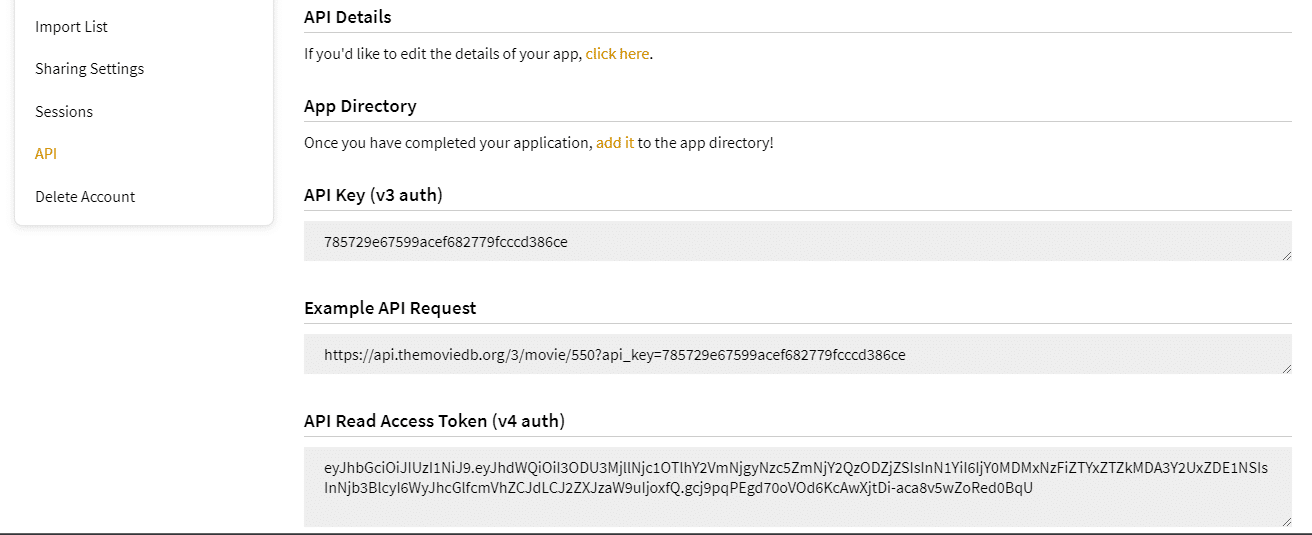
- On filling out the form completely, the API Key (v3 auth) is generated along with the API request and API Read Access Token. Now copy and paste it into a notepad for future use.
4.8. Generating Plex URL and Token
Like the TMDb API key, the Plex URL and Token also play a significant role in the config file. These are responsible for connecting to Plex servers, and here are steps to generate Plex URL and Token.
- Don’t worry about the Plex URL and leave the defaults as it is.
- However, the Token value must be carefully gathered from the Plex Media Server.
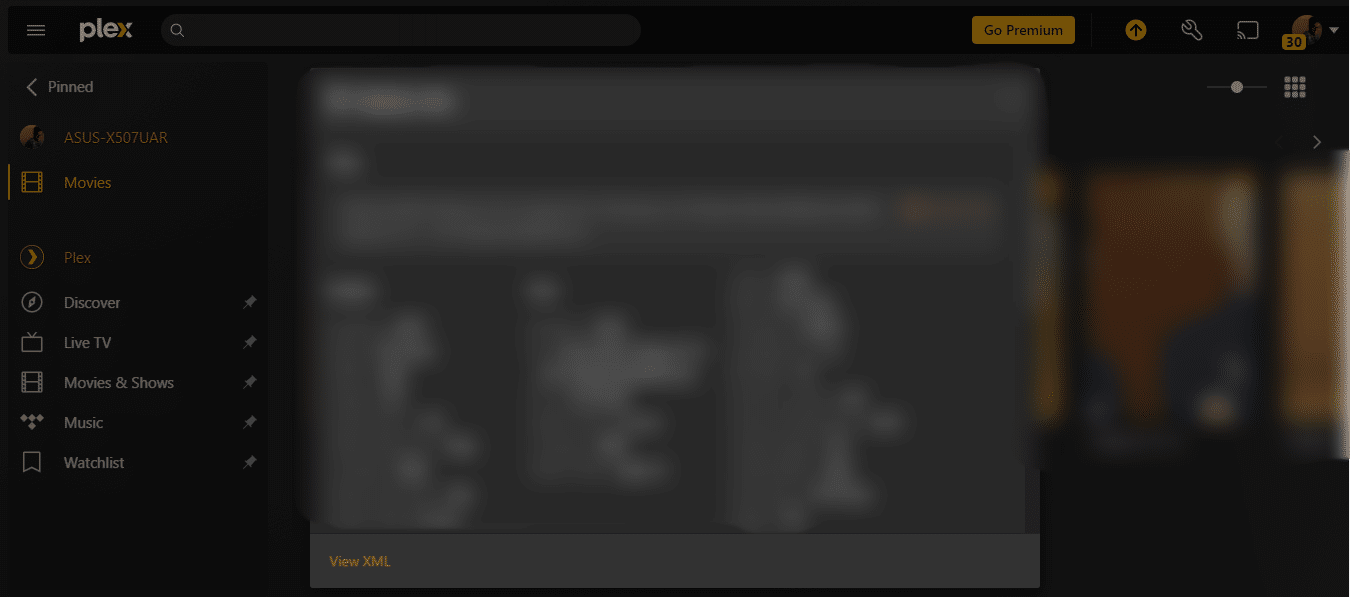
- From the Plex Media Server, head to the library, select any item, check its Media info, and click on “View XML” present at the bottom.
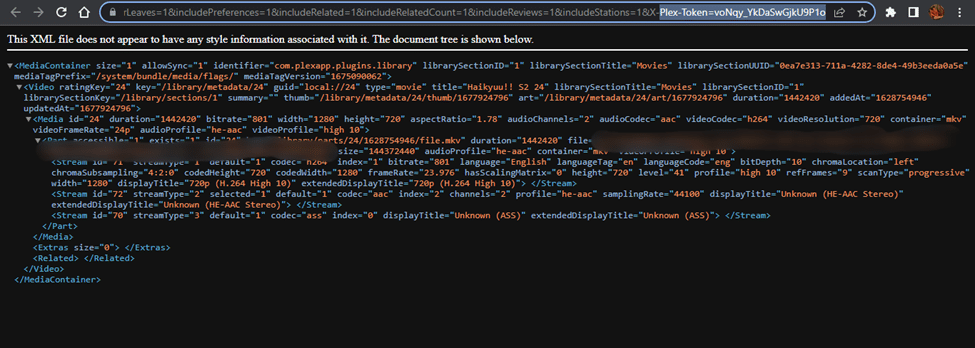
- On clicking on View XML opens, a new tab featuring XML values. Check the URL to note the X-Plex-Token value.
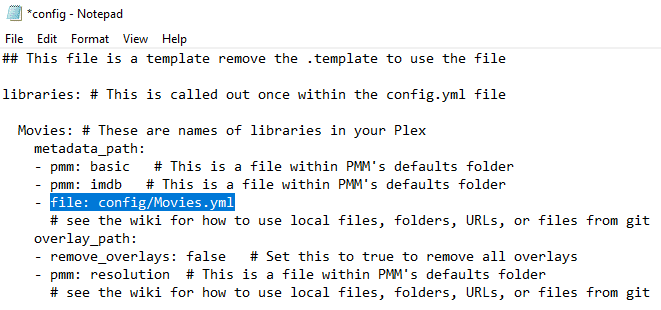
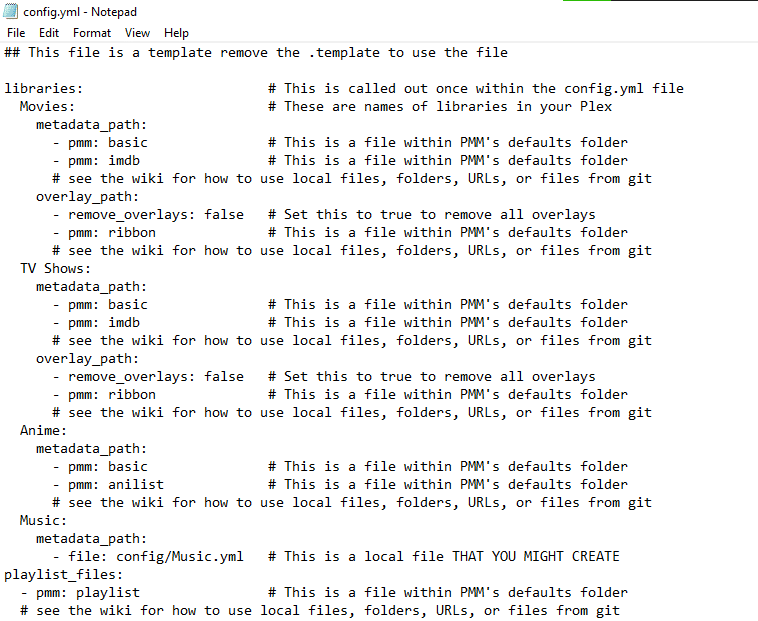
4.9. Copying and Editing the Config file
You need to update the gathered and generated TMDb API key, Plex URL, and Token in the Config. On updating and saving the values result in connecting to Plex and TMDb servers.
Here is how to copy the config file using the below command on the terminal;
cd Plex-Meta-Manager
[mkdir config\assets]
cp config/config.yml.template config/config.yml
Here is how to edit the config file using the below command on the terminal;
cd Plex-Meta-Manager
notepad .\config\config.yml
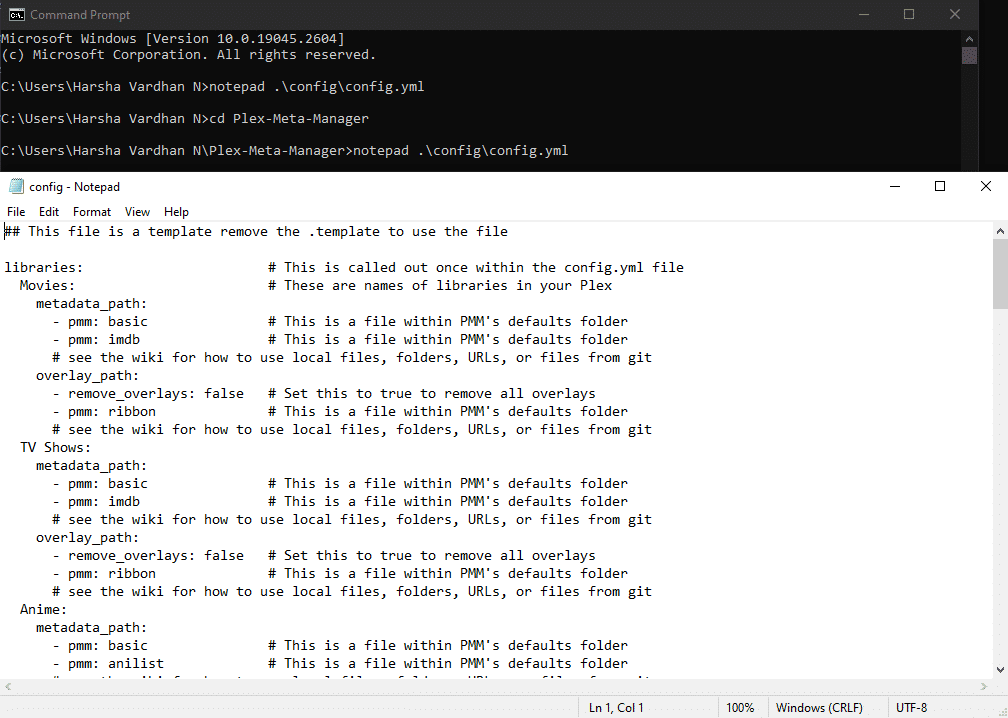
Make sure to save the config file after updating the TMDb API key, Plex URL, and Token values.
4.10. Setting up a Metadata file and Creating a Sample collection
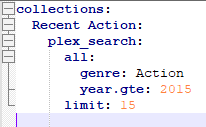
Now create another .yml featuring custom metadata files. Let us create a sample collection with its associated metadata where 15 action movies since 2015 have been generated.
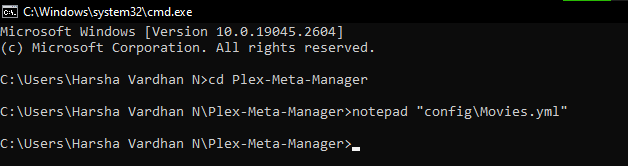
cd Plex-Meta-Manager
notepad "config\Movies.yml"
After creating the “Movies.yml” file through the notepad, type the text below.
collections:
Recent Action:
plex_search:
all:
genre: Action
year.gte: 2015
limit: 15
4.11. Adding Movies.yml reference to the Config file
On successful creation of Movies.yml file, provide reference to Config by following the below commands.
cd Plex-Meta-Manager
notepad "config\config.yml"
Upon entering these two commands, open the “config.yml” file. Now add the below line to create a reference.
"file: config/Movies.yml"
4.12. Run the script
This is the final step in implementing Plex Meta Manager locally, where we make all the changes to the Config. In this step, the metadata file loads successfully, and the script runs successfully.
Here are steps on how to run the config file;
cd Plex-Meta-Manager
python plex_meta_manager.py –r

With this step, the local walkthrough is finished as the script ran without any issues, and we have successfully achieved connection to Plex and TMDb servers. In addition, we were able to create custom metadata and collections, which are reflected in the Plex Media Server.
Also, read The Step-by-Step Guide to Plex 4K Streaming.
Want to optimize your Plex library with Plex Meta Manager?
Improve your media management with RapidSeedbox’s high-speed seedboxes. Enjoy seamless integration, faster downloads, and exceptional support to make your Plex experience smooth and efficient.
5. Setting up Plex Meta Manager in Docker
This walkthrough explains the installation of PMM and creating a configuration metadata file in detail through Docker.
While comparing the Docker approach with Local Approach, Docker is easier to implement. However, in case of any issue or confusion, we advise starting from the beginning to prevent an unsuccessful PMM setup.
5.1 Install Docker
Unlike Python, Docker isn’t available by default on macOS or Linux. Like Python, it should be installed on Windows on all platforms. Here’s the command to check if you have a Docker installation on your Windows device through the terminal;
docker run --rm hello-world
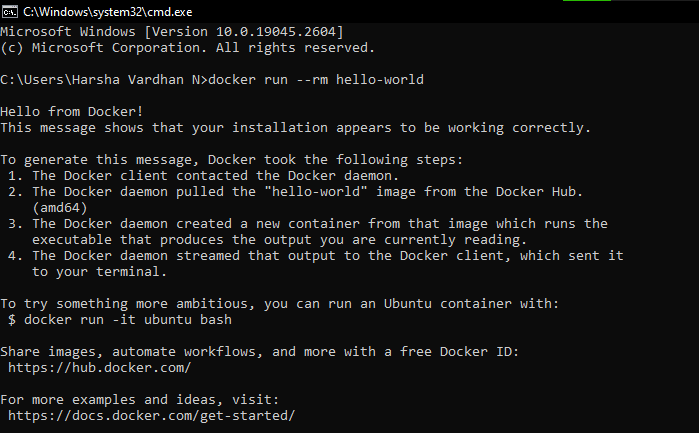
If you don’t see the message “Hello from Docker!”, it is a sign that the Docker installation isn’t successful. Hence, repair or reinstall from Docker’s official website.
5.2. Pull Plex Meta Manager Docker image.
Unlike the local approach, Docker requires no additional tools or software like git. With Docker, the following commands on the terminal can pull the PMM Docker image successfully.
docker run --rm meisnate12/plex-meta-manager --run
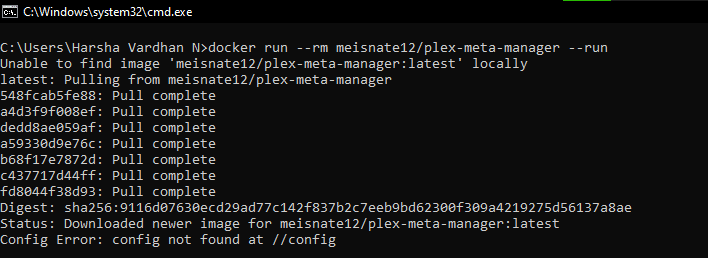
If any issue arises upon typing the command, look for internet connection issues or start from step 1 again.
5.3. Create a new Volume Map.
Volume Map creates custom files for config and metadata outside the container. By creating the Volume map, the PMM can look for information such as metadata and Config files without bothering the containers.
Here are the commands on how to create a volume map on the terminal;
mkdir plex-meta-manager
mkdir config
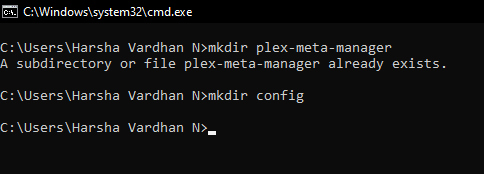
You will see the message “A subdirectory or file plex-meta-manager already exists” because we have created the same directory while on the Local approach. However, if you’re performing the Docker approach first, it isn’t a matter of concern, and the error doesn’t return.
A new directory is created to eliminate confusion that might occur from future errors. By creating the new directory, the user can create a reference to the Config, which is ideal for Sandboxing purposes.
5.4. Creating a new directory
cd Plex-Meta-Manager
mkdir config\assets
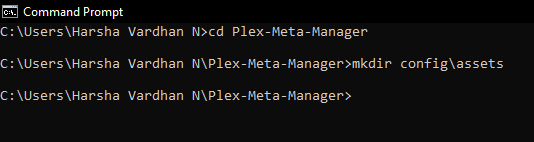
If you went with the Local approach first, the above commands will return an error as the directories are already there. However, there won’t be any issues if you’re using the Docker approach.
5.5. Creating the Config file
To address the error generated in step 2, which states “Config Error: config not found at //config,” you must develop a Config file. You’ll require the TMDb API key, Plex URL, and Token to create a working Config file.
5.6. Generating TMDb API key
TMDb stands for “The Movie Database” and contains every possible movie’s minor details. The API key of TMDb plays a crucial role in the config file as it leads to the TMDb server connection.
Here is how to generate a TMDb API key if you don’t have access to one;
- Firstly, visit TMDb’s official website, and create a new account.
- After creating an account at TMDb, log in and look for the account menu present on the top right of the webpage.
- Click on settings from the account menu and navigate to “API” from the sidebar menu.
- On clicking API, check for the “Request an API key” section. Now generate the API key. (Enter any website name of your liking in the URL section while filling out the form).
- After successfully filling out the form, the API Key (v3 auth) is generated along with the API request and API Read Access Token.
5.7. Generating Plex URL and Token
Compared with the TMDb API key, the Plex URL and Token take equal responsibility for configuring the Config file. The reason behind gathering and generating Plex URL and Token is to connect to Plex servers.
- Do not worry about Plex URL, and modifications are not suggested.
- Open Plex Media Server and head to the library by logging in. Now select any item from the library and check its Media info.
- Click “View XML” at the bottom of the Media Info to generate an XML file in the new tab.
- After the new tab featuring XML values opens, note down the X-Plex-Token value from the URL.
5.8. Copying the Config Template
Here is how to copy the config template by manually copying the content from this link to the config.yml file:
C:\Users\YOURUSERNAME\plex-meta-manager\config\config.yml
Note: The config template and config file are two different files.
5.9. Updating the Config Template
To make the config files work, update the TMDb API key, the Plex URL, and the Token in the config.yml. Here is how to update the config file using the terminal;
cd Plex-Meta-Manager
notepad .\config\config.yml
Notice that the TMDb API key and Token values are updated with the generated values. However, the Plex URL isn’t modified, and it is always advised to save the updated config file before running the script.
5.10. Setting up a Metadata file and Creating Sample collection
Create a new “.yml” named Movies to generate the custom metadata files. In “Movies.yml,” let us create a sample collection of Action movies and metadata as 15 action movies since 2015.
cd Plex-Meta-Manager
notepad "config\Movies.yml"
To create a sample collection of Action Movies and their metadata in “Movies.yml,” type the text below in notepad by opening it.
collections:
Recent Action:
plex_search:
all:
genre: Action
year.gte: 2015
limit: 15
5.11. Adding Movies.yml reference to the Config file
Once the “Movies.yml” file is listed with collections and its metadata, it is ready to reference Config. Here is how to use commands on the terminal to make the “Movies.yml” as a reference.
cd Plex-Meta-Manager
notepad "config\config.yml"
The two commands return by opening the “config.yml” file. Now add the reference in the movies collection by adding the below line.
"file: config/Movies.yml"
5.12. Run the script
However, most steps are similar to the Local approach, and running the script is entirely different on Docker. Here is the command on how to run the script on the terminal after successfully modifying the config file;
docker run --rm -it -v "PMM_PATH_GOES_HERE:/config:rw" meisnate12/plex-meta-manager—run
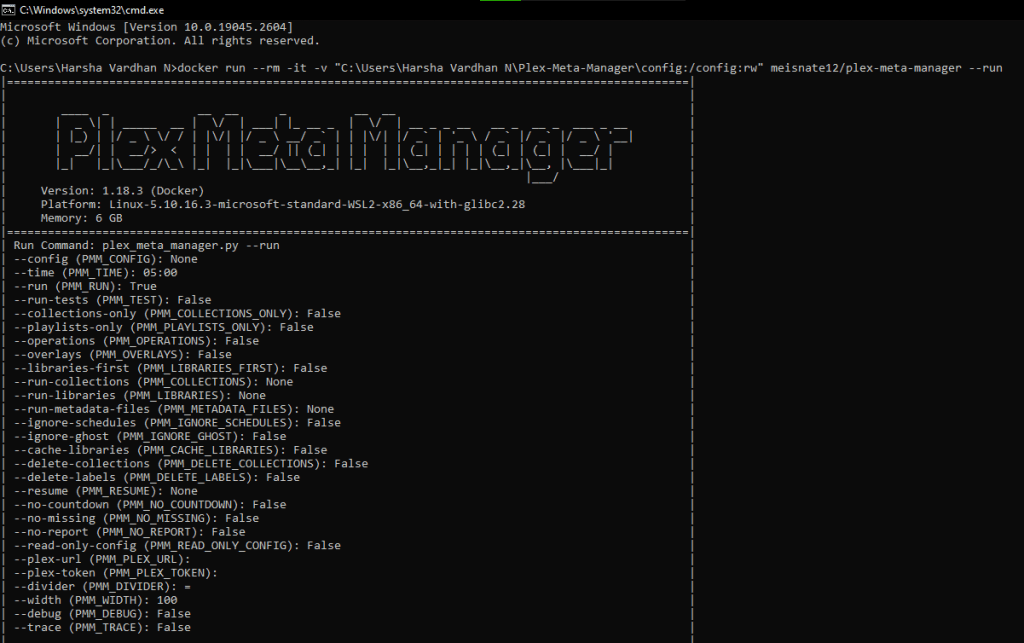
After completing all the steps, the docker walkthrough is successfully implemented. We can consider it a success, as the script ran without issues and established a connection to Plex and TMDb servers.
Additionally, the custom metadata and collections created are reflected in the Plex Media Server.
Also read: Plex Plugins for Your Seedbox (That Still Actually Work in 2026)
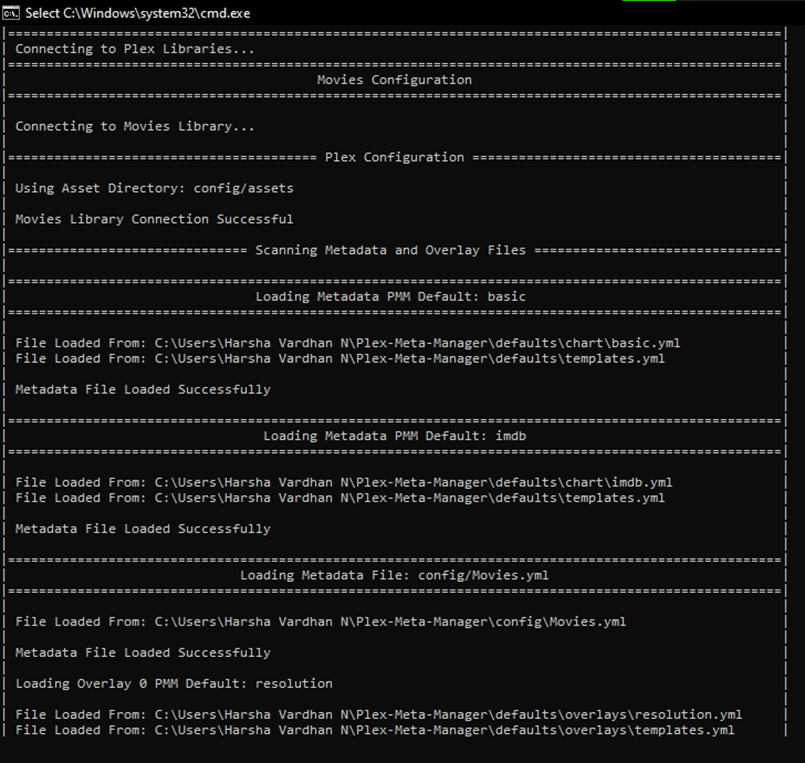
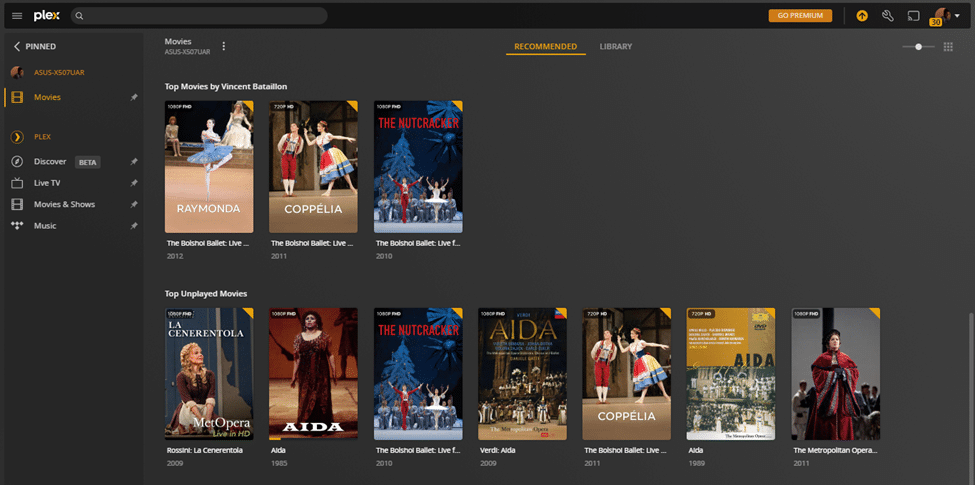
6. Plex Meta Manager – Working
Once the script execution is successful, you’ll see the changes on the library in the Plex Media Server. The PMM scans for the content available in the provided folder and maps it with the available metadata from the TMDb.
Here are the images portraying the working of the PMM on the “Movies” folder and how it has organized the contents accordingly, resulting in enhanced usability along with a rich and clean look.
7. Plex Meta Manager – Local Approach Vs. Docker Approach
Even though both approaches have a lot of similarities, the Docker Approach is comparatively more manageable when compared to Local Approach. The Docker Approach is easy to implement because of the Docker software.
With the Docker software, most steps are simplified, and the initiation process is sped up. However, if you know some level of Python and managing commands on the terminal, we suggest you go with the Local Approach.
With the Local Approach, there is more control over each step, and you can bring more out of PMM with this approach. To conclude, both approaches are equally reliable. However, choose the best approach depending on your skills and level of understanding.
Want to optimize your Plex library with Plex Meta Manager?
Improve your media management with RapidSeedbox’s high-speed seedboxes. Enjoy seamless integration, faster downloads, and exceptional support to make your Plex experience smooth and efficient.
8. Wrapping Up
In an era of OTT platforms, the media server software is heaven to people with access to exclusive and extensive content on a local device. However, due to the lack of collection and metadata support, it wouldn’t create a fantastic experience compared to prominent OTT platforms.
The Plex Meta Manager (PMM) greatly enhances the generic Plex and Plex Media Server, resulting in improved reliability and usability. Speaking of the interface of Plex, after proper installation and setup of PMM, it is no less than any well-designed OTT platform.
To conclude, Plex Meta Manager (PMM) is arguably the best approach to boost the overall experience with Plex and Plex Media Server.
To know more about PMM, visit mesinate12’s impressive Github page to donate or learn more about other approaches.
Can you please make a guide on how to use Plex Meta Manager with Portainer on Linux?
Hi, Lee… thanks for the suggestion. We’ll note that down!
unraid is very hard? its more easy to install on unraid as the docker config is using a gui… Lots of guides out there.
thanks Nassenoff…. we’ll take a look into Unraid
Hi, I feel like I followed all the steps properly for a local install. Up until the very final step of entering “python plex_meta_manager.py -r” I get this error:
“Requirements Error: Requirements are not installed”
Any idea how to fix this?
Hi there Aaron: The error message “Requirements Error: Requirements are not installed” that you’re encountering indicates that the Python dependencies required by the program are not properly installed. This can happen for a few reasons. You can try the following:
– Ensure that you have Python 3.7 or higher installed on your system.
– Inside the Plex Meta Manager folder, there should be a file named requirements.txt. This file contains all the Python dependencies needed. Make sure you are in the directory containing this file and run python -m pip install -r requirements.txt to install them.
I hope that helps!
Hello,
Thank you for creating this install guide, it looks very useful. I am a long time Plex user and interested in possibly utilizing PMM to assist with my collections.
One critical question I have as I evaluate working with PMM is around PMM functionality; Can PMM be configured to allow the user to create nested collections?
If so, this would be a huge advantage to me over using the standard functionality found in Plex for their collections and would be a definite driver for me to adopting PMM for organizing my Plex media.
Please let me know when convenient.
Many thanks,
Robert
Hey Robert,
Great question—and thanks for the kind words!
Plex doesn’t support true nested collections, so PMM can’t create them either (at least not like folders inside folders). But! You could try faking it a bit with naming tricks—like grouping “Marvel: Phase One,” “Phase Two,” etc.—and PMM makes that super easy to manage.
I hope that helps!
Diego
Hello,
I carefully followed both local and docker on my Macintosh Plex Server, making adjustments for the platform as I went along. I’m already successfully using docker for tablo-for-chanels and thredfin. I’m running 3.12.3. All I get when executing the script is:
tony@Server Plex-Meta-Manager % docker run –rm -it -v “/Users/tony/plex-meta-manager/config:/config:rw” meisnate12/plex-meta-manager -—run
| Current Time: 15:26 | 13 Hours and 34 Minutes until the next run at 05:00 | Runs: 05:00
Hi Anthony, thanks for sharing your setup and for following the guide so carefully! 🙌
From the log you posted, it looks like PMM actually started up successfully—it’s just telling you that the next scheduled run will happen at 05:00. By default, PMM runs on a schedule rather than executing immediately.
If you want it to run right away and process your config/collections, you can try adding the (–run flag) at the end (double-check the dashes too—sometimes copy/paste changes them into “smart quotes”)…. something like: docker run –rm -it -v “/Users/tony/plex-meta-manager/config:/config:rw” meisnate12/plex-meta-manager –run
That should force it to execute immediately instead of waiting until the scheduled run time.
Let me know if that helps… or if you’re still stuck, happy to dig in further with you! 👍
Cheers, Diego
Thank you for your very prompt response! Apparently the version of docker I’m using doesn’t properly recognize ‘–run’ the same as its equivalent ‘-r’. Using ‘-r’ got it to run the script. It seemed to run, but no container was created, so it’s a one time run. It did. report one critical error, ‘Config Error: No Paths Found for playlist_files’. I’m not sure what that means.
Hi Anthony,
Nice! Glad -r did the trick! That “No Paths Found for playlist_files” just means PMM is looking for playlist YAMLs but can’t find any. If you’re not using playlists yet, just comment out/remove the playlist_files line in your config and the error will likely go away. If you do want them, make sure the path points to a folder with those .yml files.
All good otherwise 👍
Cheers,
Diego
After I try to run the config file I get this error.
(pmm-venv) C:\Users\jeffb\Plex-Meta-Manager>python plex_meta_manager.py –r
python: can’t open file ‘C:\\Users\\jeffb\\Plex-Meta-Manager\\plex_meta_manager.py’: [Errno 2] No such file or directory
Can you supply some guidance?
Thank you!
Hi Jeff,
That error means that Windows can’t find the script in the folder you’re running from. Python can’t open plex_meta_manager.py because you are either not in the PMM directory, or possibly, the file doesn’t exist there. The latter could be because of a wrong folder, extracted incorrectly, or named differently.
First off, make sure you’re in the correct folder -> open the folder where you extracted Plex Meta Manager and run the command there.
Next up, check if the file is there. Youy should see plex_meta_manager.py. If not, you probably downloaded the wrong zip or extracted it to a different location.
Once you’re in the correct directory with the file present, the script should run normally.
Hope this helps!
Kind regards,
Deyan
It took me a while to realize that PMM is no longer the name of the project, so a lot of this guide isn’t going to work unless you’re working with older versions. I’m posting this because it’s barely mid-February and the git repository is already pointing to Kometa (the new name of PMM), which has a UI for installation in Windows. I think it would be really helpful if you added this to the beginning of this article to save other users the same headache I experienced. I found this article with the “help” of Brave AI… which is apparently working with slightly outdated information. Amazing how fast everything is moving.
Hi sinrise, thank you. I’ve updated the blog post.