Preboot Execution Environment (PXE) is a protocol that allows computers to boot up using a network interface independently of available data storage devices or installed operating systems. With the evolution of network protocols, there’s a growing need to understand how to start PXE over IPv6. That’s why I’ve created this guide, to help you understand the process.

Table of Contents.
- PXE in a nutshell
- IPv6
- How to start PXE Over IPv6
- Potential problems when implementing PXE over IPv6
- Best Practices for Implementing PXE over IPv6
- PXE Over IPv6 Use Cases
- IPv4 vs. IPv6: What are the differences?
- Final Words
1. PXE in a nutshell
Understanding PXE is crucial in order to understand how to start it over IPv6.
- PXE components: PXE comprises a DHCP server, a TFTP server, and the boot image. The DHCP server assigns IP addresses, the TFTP server hosts the boot files, and the boot image is what the client machine loads.
- PXE Boot process: The process starts with the client machine sending a request. The DHCP server responds with an IP address and the location of the boot file. The client then contacts the TFTP server to fetch the boot file.
2. IPv6
IPv6 is not just an upgrade from IPv4; it’s a significant shift in how addressing is done on the internet.
- Why is IPv6 needed? IPv4’s address space limitations became evident with the internet’s growth. IPv6, with its vast address space, was introduced to address this limitation.
- Benefits of IPv6: Apart from a larger address space, IPv6 offers better routing, improved security, and enhanced performance.
3. How to start PXE Over IPv6
a. Prepare the environment:
- Ensure that both your client machine and server support IPv6.
- Update your BIOS/UEFI firmware to the latest version to ensure IPv6 support.
b. Access BIOS/UEFI:
- Restart your computer.
- As the computer boots, press the designated key (often F2, F10, or Del) to enter the BIOS or UEFI settings.
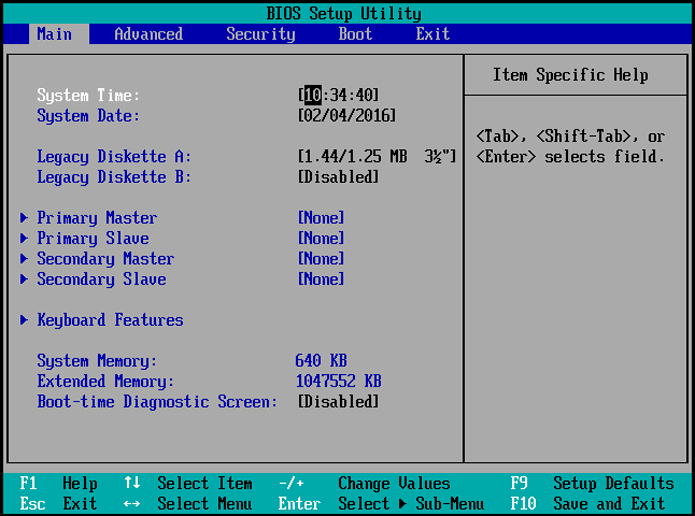
c. Go to Boot options:
- Once inside the BIOS/UEFI, use the arrow keys to navigate to the “Boot” tab or section.
- Look for an option related to “Boot Order” or “Boot Priority.”
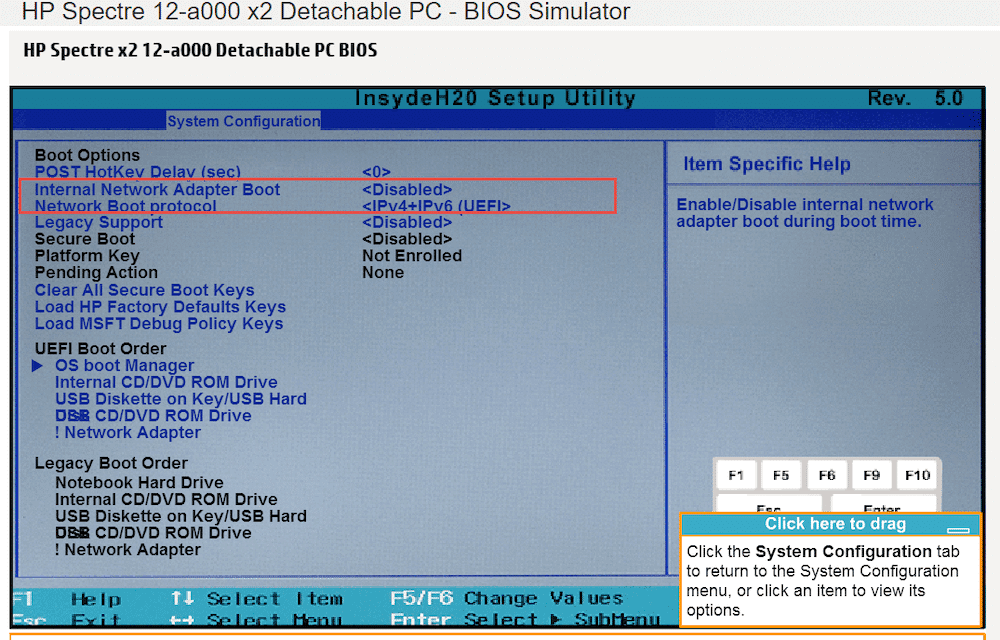
d. Enable Network Boot:
- In the “Boot Order” section, find an entry related to “Network Boot” or “PXE Boot.”
- If there’s a dropdown or submenu, select the “IPv6” option.
- Ensure that “Network Boot” or “PXE Boot” is moved to the top of the boot priority list. If you experience any challenges, you can consult Microsoft’s guide on PXE boot.
e. Save and Exit:
- After making the necessary changes, navigate to the “Exit” tab.
- Choose “Save Changes and Exit.” Your computer will restart.
f. Set up the PXE Server:
- Ensure your PXE server software supports IPv6.
- Access the server’s configuration or settings menu.
- Navigate to the network settings and ensure that IPv6 is enabled.
- Specify the boot files or images that should be used for IPv6 clients.
g. Configure DHCP for IPv6:
- Access your DHCP server settings.
- Ensure that it’s set up to assign IPv6 addresses.
- Specify the PXE server’s IPv6 address as the boot server.
- Define the path to the boot file or image for IPv6 clients.
h. Test the PXE boot over IPv6:
- Restart the client machine.
- As it boots, it should display a message indicating it’s attempting to boot over the network using IPv6.
- If successful, the client machine will contact the PXE server and begin loading the specified boot image.
i. Troubleshooting (if needed):
- If the client machine fails to boot over the network, check the server logs for any error messages.
- Ensure that the DHCP server is correctly assigning IPv6 addresses.
- Verify that the boot files or images specified for IPv6 clients are accessible and not corrupted.
j. Final steps:
- Once you’ve successfully tested PXE boot over IPv6, document the configuration for future reference.
- If you have multiple client machines, repeat the BIOS/UEFI configuration steps for each machine.
4. Potential problems when implementing PXE over IPv6
While PXE over IPv6 offers several benefits, it doesn’t come without its own set of challenges.
- Infrastructure readiness: Not all existing infrastructures are IPv6 ready. Upgrades might be required, which could be costly.
- Knowledge gap: IPv6 is still new for many network administrators. There’s a learning curve involved, which can lead to implementation challenges.
- Compatibility issues: All devices in the network need to be IPv6 compatible. Older devices might pose challenges.
5. Best Practices for Implementing PXE over IPv6
To ensure a smooth implementation, certain best practices should be followed.
Implementing PXE over IPv6 is a significant step in modernizing network boot processes. To ensure a smooth transition and efficient operation, adhering to the following best practices is crucial:
a. Comprehensive Network Assessment
- Inventory check: Begin by taking an inventory of all network devices. This will help identify which devices are IPv6 compatible and which ones might need upgrades or replacements. If you are in need of an IPv6 address, you can use Rapidseedbox’s services.
- Bandwidth analysis: Ensure that your network can handle the increased traffic that might result from simultaneous PXE boot requests, especially in large environments.
b. Training and Skill Enhancement
- Workshops and seminars: Organize training sessions for your IT team. This will ensure they’re well-equipped to handle the nuances of IPv6.
- Certification programs: Encourage team members to undertake certification programs related to IPv6. This will not only enhance their skills but also boost their confidence in handling potential challenges.
c. Phased Implementation
- Pilot testing: Before a full-scale rollout, select a small segment of your network for pilot testing. This will allow you to identify potential issues in a controlled environment.
- Feedback loop: After the pilot test, gather feedback from all stakeholders. This will provide insights into areas of improvement.
d. Robust Testing Mechanisms
- Environment simulation: Create a test environment that closely simulates your actual network. This will ensure that the tests are as realistic as possible.
- Scenario testing: Test different scenarios, especially edge cases. For instance, how does the system respond to multiple boot requests at the same time?
e. Security Considerations
- Firewall configurations: Ensure that your firewalls are correctly configured to allow PXE boot traffic over IPv6 while blocking potential threats.
- Secure Boot: If your devices support it, enable Secure Boot. This ensures that only signed boot images are loaded, adding an extra layer of security.
f. Documentation
- Keep detailed records: Document every step of the implementation process. This not only serves as a reference for future setups but also helps in troubleshooting.
- Update network diagrams: As you implement PXE over IPv6, update your network diagrams to reflect the changes. This provides a visual representation of the network’s current state.
g. Continuous Monitoring
- Network monitoring tools: Use network monitoring tools to keep an eye on PXE boot traffic. This will help in identifying potential bottlenecks or failures.
- Alert mechanisms: Set up alerts for any anomalies. Quick notifications can lead to faster issue resolution.
h. Backup and Recovery Plans
- Backup configurations: Regularly back up configurations of servers and network devices. In case of failures, this ensures a quick recovery.
- Disaster recovery plan: Have a disaster recovery plan in place. If something goes wrong, having a plan ensures that operations can be restored quickly with minimal disruption.
i. Keep an Eye on the Community
- Stay updated: The world of networking is ever-evolving. Engage with online communities, forums, and expert groups to stay updated with the latest in PXE and IPv6.
- Share experiences: Sharing your implementation experiences can help others in the community and also provide you with insights into areas of improvement.
6. PXE Over IPv6 Use Cases
Several industries can benefit from implementing PXE over IPv6. So, if you are here just to educate yourself, here’s where starting PXE over IPv6 can come in handy.
- Data centers: For data centers, PXE over IPv6 means faster deployments and better scalability.
- Large enterprises: For enterprises with a vast network of systems, PXE over IPv6 offers efficient system setups.
- Educational institutions: Universities and schools with large computer labs can benefit from faster system setups.
7. IPv4 vs. IPv6: What are the differences?
The Internet Protocol (IP) is the backbone of the Internet, facilitating communication between devices across the globe.
IPv4 (Internet Protocol version 4) has been the standard for decades, but as the internet continues to expand, IPv6 (Internet Protocol version 6) has emerged to address the limitations of IPv4.
Let’s compare these two protocols to understand the need for the transition to IPv6.
a. Address Space
- IPv4: IPv4 uses a 32-bit address format, which provides approximately 4.3 billion unique addresses. This seemed vast in the early days but has since become insufficient due to the internet’s exponential growth.
- IPv6: IPv6, on the other hand, employs a 128-bit address format, offering an astronomical number of unique addresses (approximately 340 undecillion). This abundance is essential to accommodate the ever-increasing number of devices connected to the internet.
b. Address Configuration
- IPv4: IPv4 addresses are typically configured manually or assigned dynamically by a DHCP (Dynamic Host Configuration Protocol) server. This manual configuration can be time-consuming, and DHCP can sometimes lead to address conflicts.
- IPv6: IPv6 supports automatic address configuration through Stateless Address Autoconfiguration (SLAAC). Devices can generate their unique IPv6 addresses based on the network prefix, simplifying address management.
c. NAT (Network Address Translation)
- IPv4: Due to address exhaustion, IPv4 often relies on NAT to allow multiple devices in a private network to share a single public IPv4 address. NAT can complicate network setups and hinder certain applications.
- IPv6: With its vast address space, IPv6 eliminates the need for NAT in most cases. Each device can have a unique public IPv6 address, simplifying network design and enhancing end-to-end connectivity.
d. Security
- IPv4: IPv4 security relies on additional protocols and tools like IPsec to ensure data integrity and confidentiality. These security features are optional and often require extra configuration.
- IPv6: IPv6 includes built-in security features through IPsec, making it more secure by default. This ensures data integrity and confidentiality without the need for additional configurations.
e. Internet Transition
- IPv4: IPv4 has been the predominant protocol for decades, resulting in a limited pool of available IPv4 addresses. This has led to the adoption of technologies like NAT and the need for transitioning to IPv6.
- IPv6: IPv6 is the future of the internet. To accommodate the growing number of connected devices, the transition to IPv6 is essential. Many organizations and service providers have already adopted IPv6 alongside IPv4 to ensure a smooth transition.
Hungry to know more about the differences between the IPv4 vs IPv6 internet address protocols? Check our comprehensive blog post about the 11 differences between IPv4 and IPv6.
8. Final Words
To start PXE over IPv6 is a significant step, but with the right best practices in place, it can be a smooth and efficient process. Regular training, robust testing, continuous monitoring, and community engagement are the cornerstones of a successful implementation.
0Comments