Teredo is a “tunneling protocol” that allows IPv6 devices to connect to the IPv6 internet through an IPv4 NAT. It doesn’t require any changes to the network infrastructure.
In Layman’s terms? Teredo helps devices using the new IPv6 communicate with devices still using the “old but most widely used language: (IPv4).” Teredo is especially useful when there are roadblocks (like NAT) that make direct communication hard. It’s a temporary solution, helping us during this transition period until the new IPv6 becomes universally spoken.

In this ultimate guide to Teredo (simplify your transition to IPv6), we will provide an in-depth exploration of the protocol. This guide will teach you all about it, from how it works to its benefits and limitations. It will also cover the architecture and setup procedures, so you’ll have a comprehensive understanding of this evolving Internet protocol.
Table of Contents
- Introduction to Teredo
- Teredo’s Architecture
- Teredo Address Structure
- Setting up Teredo
- Comparing Teredo with Other Technologies
- Frequently Asked Questions.
- Conclusion
1. Introduction to Teredo
Teredo is an automatic tunneling technology that allows IPv6 devices (or dual-stack hosts) to communicate over IPv4 networks. It’s especially useful for devices that are behind NAT devices which may block IPv6 traffic. The protocol encapsulates IPv6 packets in IPv4 UDP packets, which allows them to pass through NAT devices (a process known as NAT Traversal).
Teredo is a temporary solution until native IPv6 is more widely adopted (see benefits and techniques of IPv6 migration). This tunneling technology assigns unique IPv6 addresses to each device, and it can figure out if you have a working UDP v4 connection and what kind of NAT you have.
What are the benefits of using Teredo?
Teredo is a good way to connect to IPv6 networks over IPv4 networks (see, IPv6 vs IPv4), especially if you don’t have native IPv6 infrastructure (or the underlying network only supports IPv4). It facilitates IPv6 connectivity for devices behind IPv4 NAT. The protocol simplifies setup through automatic tunneling, traversing various NAT types to enhance IPv6 access in diverse network environments. It is a key transitional tool, but its use will likely decrease as native IPv6 adoption grows.
What are Teredo’s limitations?
Teredo is a critical part of the IPv6 transition, but it has some limitations. For instance, it doesn’t work well with some NAT devices, and it can also pose some security risks. The security concerns with it can be alarming. These include the potential for spoofing, man-in-the-middle attacks, and denial-of-service (DoS) attacks. In addition, due to the wide variety of NAT types, Teredo can get complex, which is also worth considering. All these limitations make this protocol less than ideal for all environments.
Is Teredo dying? or still alive and increasing in popularity?
It is strongly believed that Teredo is (not dead) but slowly dying. Users deploying Teredo are facing more technical difficulties every time while deploying it. The public Teredo relays, which are essential for enabling IPv6 connectivity over IPv4 networks, are most of the time unavailable. There is uncertainty about whether Microsoft has deactivated its relays. Plus, according to Google IPv6 statistics, the Teredo (along with the 6to4) protocol has been slightly implemented (%0.04) as compared to native IPv6 implementations (17%).
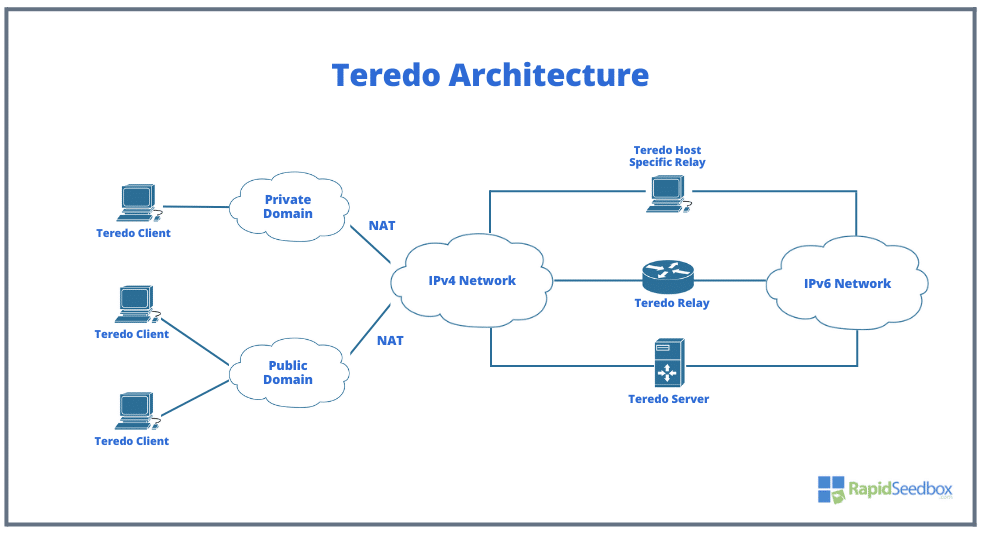
2. Teredo’s Architecture and how it works.
Teredo is composed of clients, servers, relays, and host-specific relays that work together to route traffic.
- A Teredo Client: It runs on an IPv6-enabled computer and allows it to connect to the IPv6 internet using an IPv4 network. It tunnels IPv6 packets via IPv4 networks, interacting with servers for address configuration and initial communication facilitation.
- A Teredo Server: It is the first point of contact for a Teredo client. It responds to the client’s initial qualification request and provides the client with an IPv6 address. The server helps the client set up their tunnels, find what NAT device it’s behind, and set up NAT traversal. The server listens on UDP port 3544. The server does not forward traffic between the client and the IPv6 network.
- Teredo Relays. It acts as a bridge between IPv4 and IPv6 networks. It forwards IPv6 packets between the clients and IPv6 hosts on the Internet. The relay receives IPv6 packets from the clients, decapsulates them, and routes them to the IPv6 Internet (and vice-versa). The relays are essential for communication between the clients and native IPv6 hosts that are not behind a service themselves.
- A Host-Specific Teredo Relay. It sends encapsulated IPv6 packets directly to the clients without the need for a general Teredo relay. It forwards traffic only for the host it’s on, not for any client on the internet. Host-specific relays improve efficiency by eliminating the need for a general relay between a client and a host with native IPv6 connectivity. They are especially useful when the IPv6 host is on the same local network as the client, or when there’s a need for reduced latency or increased security.
Zooming into the Teredo Tunneling Process
Teredo tunneling works by encapsulating IPv6 packets within IPv4 UDP packets and sending them through a NAT device to a relay. Most NAT devices allow outgoing UDP traffic without inspecting the packet contents. To maintain the ability to receive incoming packets, the clients use “Teredo bubble” packets (or signal packets) to keep the NAT binding active. These bubble packets consist only of IPv4 UDP and IPv6 headers, with no IPv6 payload.
The following image illustrates the process of Teredo tunneling. It shows the sequence of communication between a client behind a restricted NAT, a server, a relay, and an IPv6 host.
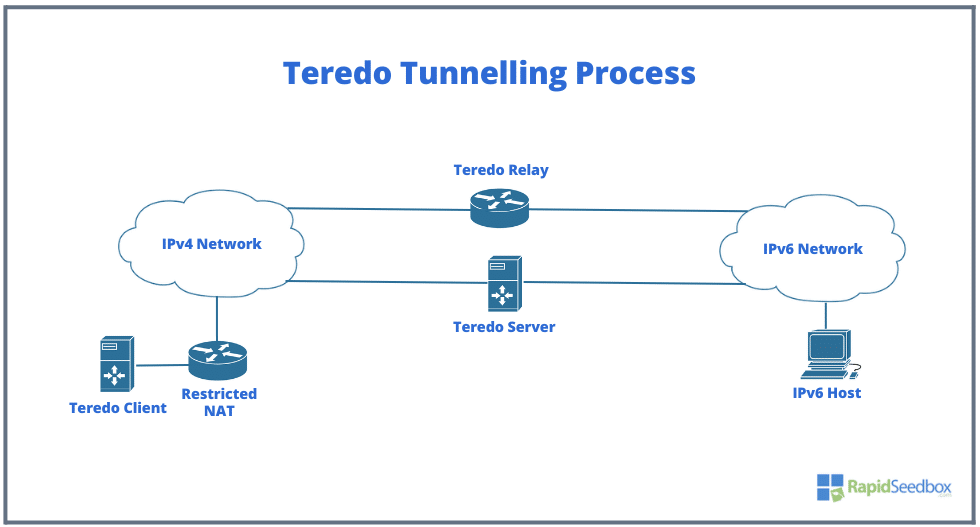
The message flow is as follows:
- Teredo client sends an ICMPv6 Echo Request to the server.
- The server forwards the request to the IPv6 host.
- The IPv6 host replies to the relay.
- The relay sends a Teredo bubble packet to the server.
- The Server sends the bubble back to the Teredo client.
- Client sends a bubble to the relay.
- Relay forwards the ICMPv6 Echo Reply to the client.
- Client sends an initial packet tunneled to the relay.
- Relay forwards this packet to the IPv6 host.
The messaging sequence shown here shows how Teredo facilitates communication between IPv6 and IPv4 networks by using servers and relays to navigate through NAT restrictions.
What’s next? Act Now!
Explore other IPv6 transition technologies.
Use native IPv6 technologies
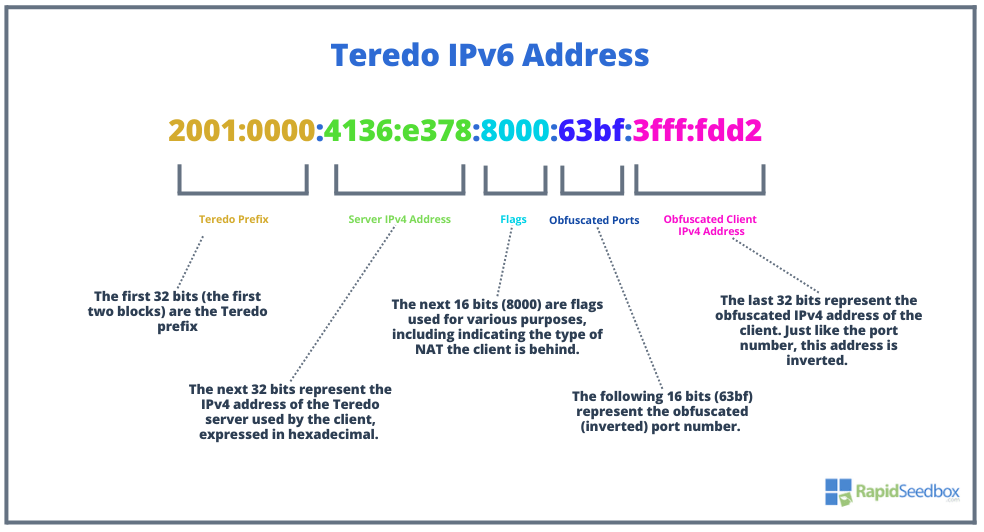
3. Teredo Address Structure
The address structure is a core part of the tunneling protocol. The address format is specific to Teredo and ensures that IPv4 and IPv6 networks can communicate with each other.
This section will look at the different parts of an address and how they work together to support NAT traversal and IPv6 communication over IPv4 networks.
A Teredo address is composed of six parts:
It includes a Teredo prefix, the server’s IPv4 address, flags, an obscured external UDP port, and an obscured external IPv4 address.
- Prefix: 2001:0: The Teredo prefix is standardized as 2001::/32 in RFC 4380. The first 32 bits (the first two blocks) are the Teredo prefix. For all addresses, this is 2001:0000.
- Server IPv4 Address: 4136:e378: The next 32 bits represent the IPv4 address of the server used by the client, expressed in hexadecimal. In this case, 4136:e378 could represent an IPv4 address like 65.54.227.120.
- Flags: The next 16 bits (8000) are flags used for various purposes, including indicating the type of NAT the client is behind. Flags include a Cone bit for clients behind a cone NAT and random bits for protection against scanning attacks.
- Obfuscated Port: The following 16 bits (63bf) represent the obfuscated (inverted) port number. If you invert these bits back, you get the actual port number used by the NAT.
- Obfuscated Client IPv4 Address: 3fff:fdd2. The last 32 bits represent the obfuscated IPv4 address of the client. Just like the port number, this address is inverted. Inverting 3fff:fdd2 back to its original form gives you the actual IPv4 address of the client.
Note: The obscured external UDP port and IPv4 address are XORed for privacy and NAT translation prevention. This structure enables Teredo clients to communicate over IPv4 networks using IPv6 addresses.
4. Setting up Teredo
Teredo is enabled by default on Windows versions released after Windows Vista, but it is disabled on Windows Server editions. For such Clients and Host-specific relays, the software is also included in some of these Windows versions.
Note: Setting up Teredo is different for domain-connected and standalone computers. There are also unique challenges for home networks that typically use IPv4.
a. Setting up Teredo Client (on Windows).
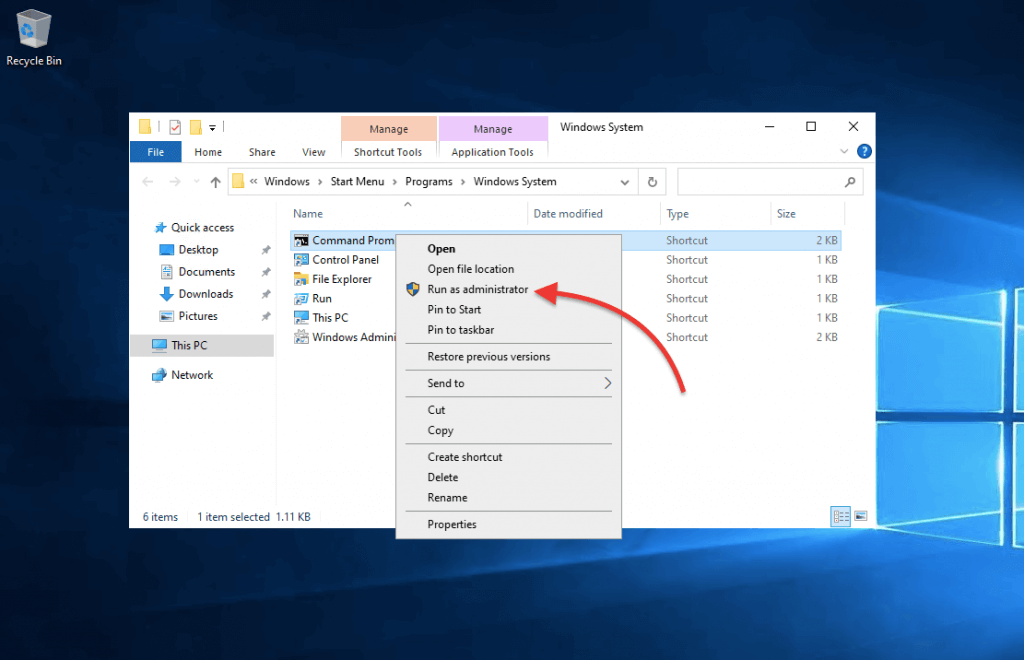
To set it up on Windows, you’ll need to access the command line interface as an administrator and execute a set of commands to enable it, configure the firewall, and verify connectivity.
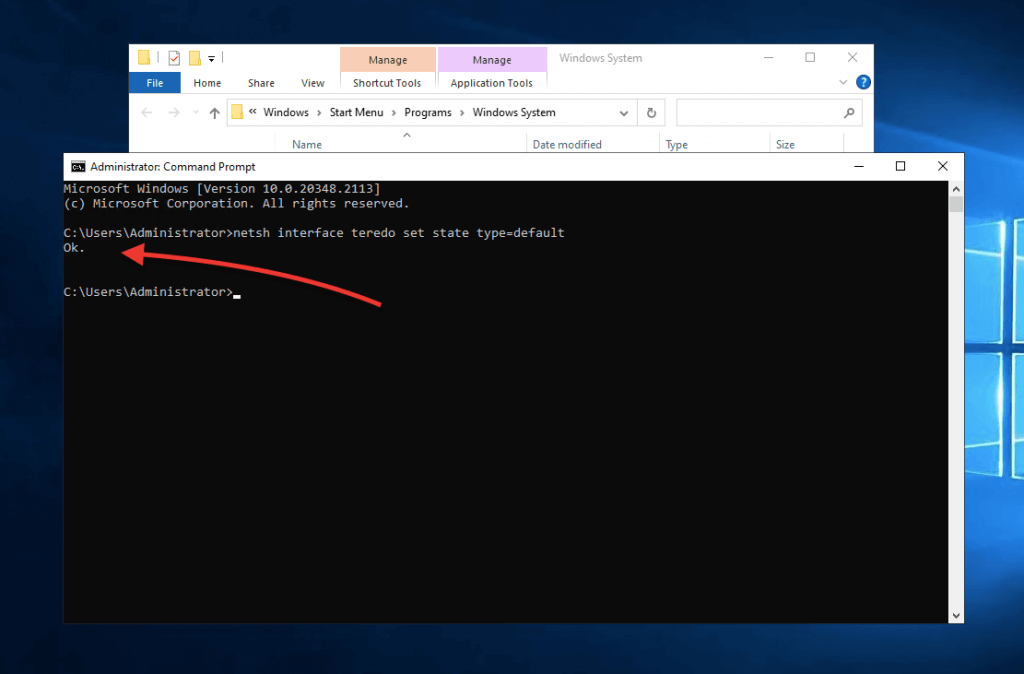
- Open Command Prompt as an administrator. Select “Windows Terminal (Admin)” or “Command Prompt (Admin)” from the context menu. Right-click “Run as administrator”
Enable Teredo.
- In the command prompt, type the following command and press Enter:
| netsh interface teredo set state type=default |
- This command sets the Teredo state to its default setting, which is typically sufficient for most environments. If the command is successful, you’ll see the output: “Ok” (as shown in the picture below).
- Set the Teredo Server (optional): If you want to use a specific server other than the default Microsoft servers, you can set it with the following command:
| netsh interface teredo set state servername=your.teredo.server |
- Replace “your.teredo.server” with the server address you wish to use.
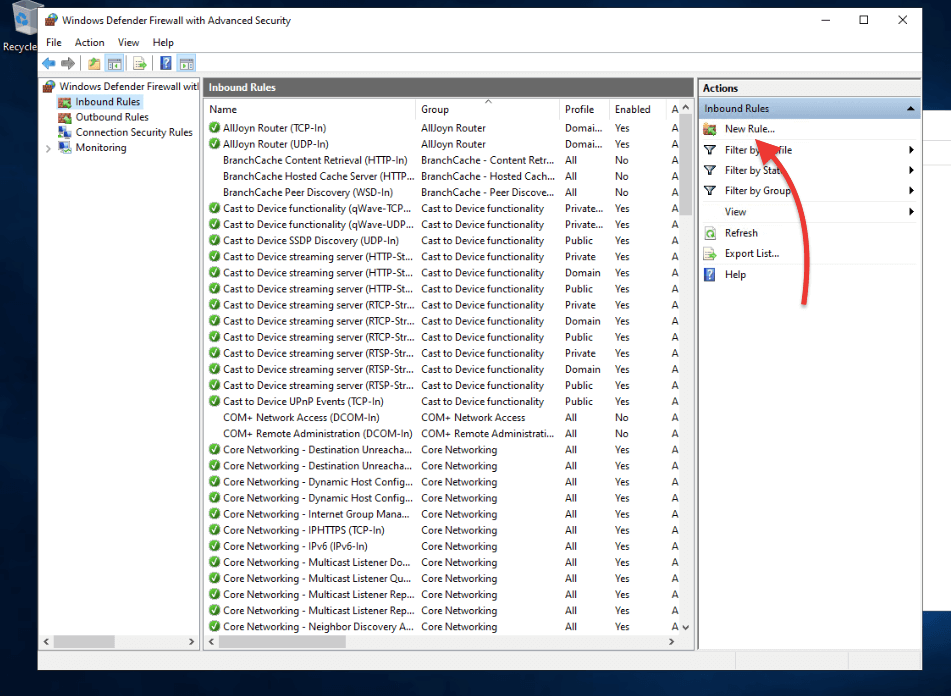
Configure the firewall to allow Teredo traffic.
- Open “Windows Defender Firewall” by searching for it in the Start menu or via the Control Panel.
- Click on “Advanced settings”. In the left pane, click on “Inbound Rules”. Click on “New Rule” in the right pane.
- Select “Custom” and click “Next”. Choose “All programs” and click “Next”.
- Under Protocol and Ports (1), select “UDP” (2) and specify the local port as 3544 (3) (the Teredo default port).
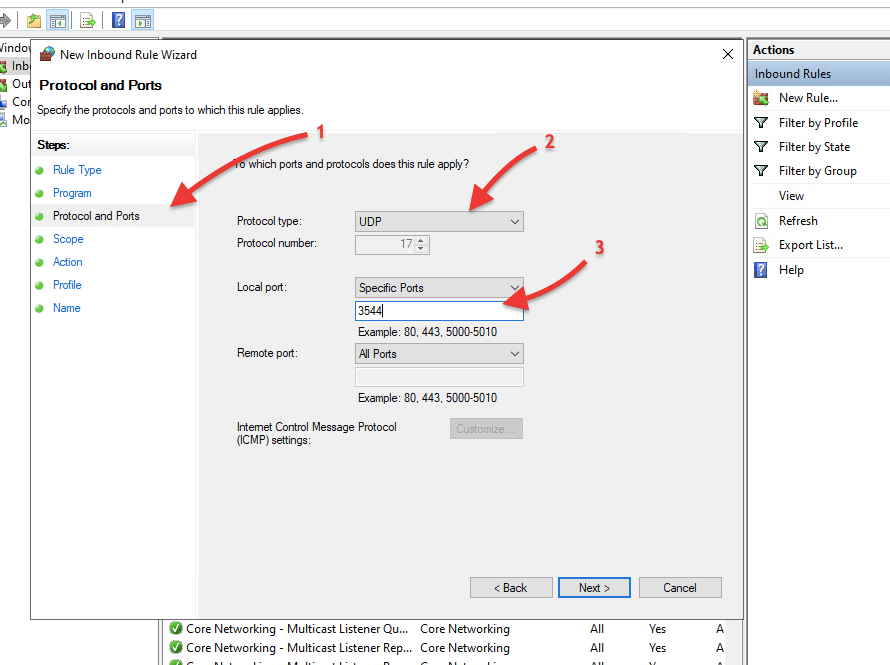
- Click “Next” and select “Allow the connection”.
- Click “Next”, choose the profile this rule applies to (Domain, Private, Public), and click “Next”. Give the rule a name, for example, “Teredo Inbound” and click “Finish”.
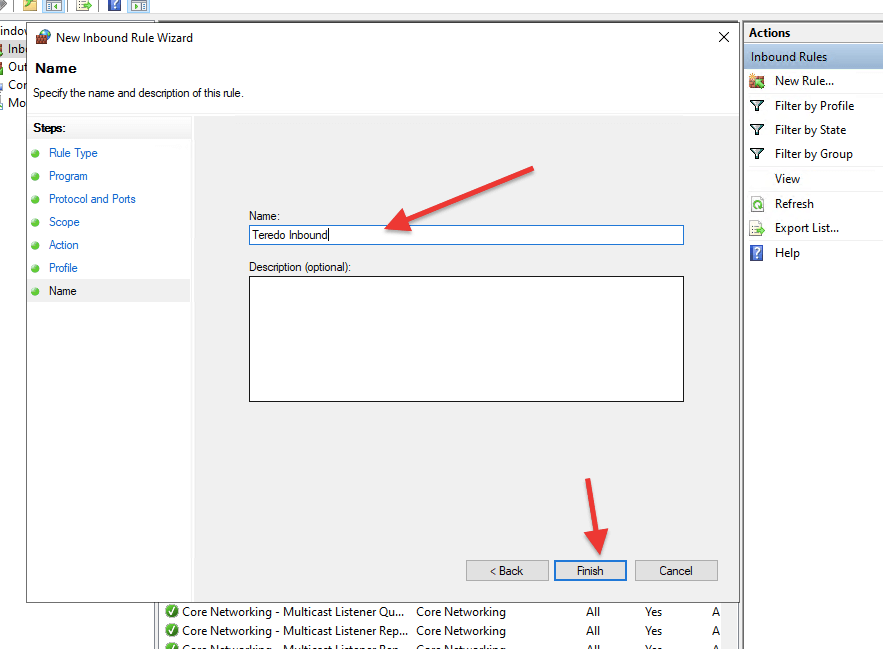
- Repeat the process for “Outbound Rules”.
Test the connectivity
- Back in the command prompt, type the following command to show the Teredo state. This command displays the current status, including the type of NAT it has detected and the server it is using.
| netsh interface teredo show state |
- You can also test IPv6 connectivity by pinging an IPv6 address, such as Google’s public DNS:
| ping -6 ipv6.google.com |
Note: Remember, Teredo should be used when native IPv6 connectivity is not available, and it is a temporary measure. As networks upgrade to native IPv6, the reliance on Teredo and other transition technologies should reduce.
b. Setting up Teredo Server and Relay.
Teredo servers are deployed by companies or ISPs to help people transition to IPv6. They are usually set up on a public IPv4 address. The servers need specific software. Microsoft has a Teredo server implementation for Windows Server, but third-party solutions or open-source alternatives like Miredo for Linux systems can also be used.
Teredo Relay, on the other hand, needs to be set up on a server that has both IPv4 and IPv6 connectivity. You can also use open-source software like Miredo to set up a relay on a Linux server. Setting up a relay requires network-level changes, including routing configurations.
Note: The full setup of a Teredo Server and Relay is outside the scope of this guide. The process requires a good understanding of both IPv4 and IPv6 networking and NAT traversal techniques. In addition, network policy considerations may also be a factor (which adds to complexities), especially for use in larger organizations or public deployments. However below is a short guide on how to begin with this process.
Steps for Setting Up Teredo Server and Relay:
- Choose appropriate software: As mentioned before, for a server or relay, you might use Miredo or other similar software capable of performing these functions.
- Prepare the server: Ensure the server (and relays) you are using have a static public IPv4 address and IPv6 connectivity as well.
- Install the software: On a Linux server, you can typically install Miredo via the package manager. For example, on Ubuntu, you might use: “sudo apt-get install miredo”
- Configure the software: After you install it, you can configure the server or relay by editing the configuration files. This typically involves setting the public IPv4 address for the server and specifying the types of NAT devices it should support.
- Set up routing and firewall rules: Ensure that the necessary ports are open on your firewall and that routing is properly configured to handle the traffic.
- Test the setup: After configuration, test the server or relay to ensure it’s operational. For a server, you can use a client to try and obtain a Teredo IP address. For a relay, you can test the routing of IPv6 traffic.
- Maintain and monitor: Regularly check the performance and logs of your server or relay to ensure it’s functioning correctly and to troubleshoot any issues.
5. Comparing Teredo with Other Technologies.
Teredo is just one of many transition mechanisms that can be used to transition from IPv4 to IPv6. It’s important to understand the alternatives to Teredo so you can make the best decision for your specific network requirements and environment.
This section will explore its alternatives, comparing their features, use cases, and suitability in different network scenarios. The table below summarizes key aspects of these technologies, to give you a clear overview of their capabilities and limitations. This information will help evaluate the best transition strategy for your move to IPv6.
Comparison Table
| Feature | Teredo | 6to4 | ISATAP | DS-Lite | NAT64/DNS64 |
| Basic Function | IPv6 over IPv4 NAT | IPv6 over public IPv4 | IPv6 in IPv4 intranet | IPv6/IPv4 dual-stack | IPv6-IPv4 translation |
| IPv4 Requirement | Private/public IPv4 | Public IPv4 | Any IPv4 network | IPv6 with IPv4 encapsulation | IPv6 network |
| Use Case | Hosts behind NAT | Small networks/public IPv4 | Enterprise networks | ISPs | IPv6 networks to IPv4 |
| Address Format | Unique format | 2002::/16 + IPv4 | IPv6 + IPv4 address | Dual-stack | Synthetic IPv6 for IPv4 |
| NAT Traversal | Yes | No | Limited | N/A | N/A |
| Deployment | Individual/small networks | End-users/small networks | Enterprises | ISPs | IPv6 networks |
| Complexity | Moderate | Low | Moderate | High | Moderate/High |
| Popularity/Usage | Common in homes – But declining. | Declining | Common in enterprises | Growing among ISPs | Increasing in IPv6 networks |
6. Frequently Asked Questions.
a. What does Teredo use for name resolution?
First off, Teredo uses both DNS and PNRP for name resolution. DNS can be inefficient for home networks, mainly because of dynamic IP allocations. So, PNRP steps in. It allows Windows users to join a PNRP cloud and advertise their IPv6 addresses. This method distributes addresses quicker than DNS, which is helpful for addresses that frequently change. PNRP names, which end with “.pnrp.net”, depend on unique system properties.
b. What is Dual-stack IP?
Dual-stack IP is a network setup where devices have both IPv4 and IPv6 addresses. This allows them to work in both types of networks without any issues. In a dual-stack environment, Teredo can provide IPv6 connectivity when direct IPv6 is unavailable, ensuring that IPv4 devices can still communicate with IPv6 networks.
c. What is ISATAP and what is the difference between Teredo?
ISATAP (Intra-Site Automatic Tunnel Addressing Protocol) is another IPv6 transition tool. However, ISATAP primarily enables IPv6 over IPv4 within a single site or domain. While Teredo often targets internet-facing situations, ISATAP is more internal network-centric.
d. What is SLAAC and is it relevant to Teredo?
SLAAC (Stateless Address Autoconfiguration) enables IPv6 devices to self-configure their addresses using local network details, usually from IPv6 routers. SLAAC is the opposite of the dynamic method provided by a third-party server known as DHCPv6. The protocol offers an alternative for this solution in scenarios where native IPv6 support is absent, making SLAAC nonviable.
e. How is Teredo used with Xbox?
Teredo is a crucial component for Xbox consoles, especially when it comes to gaming. It provides the necessary IPv6 connectivity for multiplayer gaming and party chat, even when native IPv6 is unavailable. Xbox uses it to get around NAT barriers that are common in home networks, which results in smoother online gaming.
f. What is a Teredo tunneling pseudo-interface?
The Teredo tunneling pseudo-interface in Windows plays a crucial role. It’s a virtual interface that wraps IPv6 packets in IPv4 UDP packets for transit over IPv4 networks. This interface is key for the client to interact with the IPv6 network via an IPv4-only route.
g. What does a Teredo IP address look like?
A Teredo IP address typically begins with 2001:, followed by the server’s IPv4 address and the client’s disguised IPv4 address and port number. This unique format allows it to facilitate IPv6 connectivity while navigating IPv4 NAT environments.
h. What does “Teredo is unable to qualify” mean?
The error “Teredo is unable to qualify” signals connection issues. These issues often stem from network limits, firewall setups, or server problems. Addressing this issue usually involves tweaking firewall settings or checking the server’s status.
7. Conclusion
As we gradually transition from IPv4 to IPv6, understanding and utilizing technologies like Teredo is key. This guide not only teaches you how to implement it, but it also helps you prepare for the future of internet protocols.
Still, although protocols like Teredo are key for transitioning, using native IPv6 is usually preferred over transitioning mechanisms. Bear in mind that transition mechanisms are “transitional” and it is quite likely that it is on the decline.
What’s next? Act Now!
Explore other IPv6 transition technologies.
Use native IPv6 technologies
Have thoughts or questions?
Comment below and contribute to the ongoing conversation about IPv6 transitions. Your input is valuable!
0Comments