React Redux is a library that facilitates the connection between the React framework and the Redux state management library. Within this ecosystem lies a small and often overlooked component: useSelector.
However, missing it would be a mistake since it can significantly benefit your web application development. This article will lay the background and provide a clear and practical example of using useSelector to build a web scraping tool.

Table of Contents
- What is useSelector?
- Practical Use Cases
- How to Use React and useSelector
- Why Use a Seedbox for React Development?
- Example: Building a Web Scraping Tool With useSelector
- How to Deploy Your Web Scraper on a Seedbox
- Final Thoughts and Resources
1. What is useSelector?
useSelector is a hook from the React-Redux library. It allows you to extract data from the Redux store state. With this hook, you can subscribe to the Redux store and update your component whenever your selected data changes.
It simplifies accessing the state without wrapping your components in connect(), leading to cleaner and more readable code. That makes it advantageous in large applications where state management can become complex.
How useSelector Works
useSelector takes a function as its argument. This function is known as the selector function. It specifies which part of the state you want to access. It runs when the component renders and an action changes the Redux store state.
If the specific state you select changes, it ensures your component re-renders with the updated state.
Note: It is essential to understand that useSelector is a component of React Redux. It will not work in other environments.
2. Practical Use Cases
The useSelector hook allows components to select data from the Redux store. The overall effect is modular and easier-to-read code. Here are several use cases where you may find this hook helpful:
- Fetching Current User Information: Can retrieve the current user’s information stored in the Redux store. This is useful for displaying personalized greetings, profile information, or rendering admin-specific components.
- Filtering List Items: In this context, you can use useSelector to apply filters based on the application’s state. For example, users might filter products by category, price, or rating.
- Accessing Form States: Within complex forms, you can use the hook to access specific form data or validate form fields.
- Real-time Data and Notifications: The hook can fetch the state updates from the Redux store where instant data is required. This is useful in chat applications and social media feeds.
- Theme and Preferences: You can access the current theme or preferences settings from the Redux store. This allows for dynamic changes to the application’s appearance or behavior.
- Authorization and Access Control: Easily determine a user’s authentication status or role. This can manage access to specific routes or components within the application.
- Data Aggregation: Computing aggregations like totals, averages, or other summaries are also possible. This is useful in dashboards, reporting tools, or other applications.
As you can see, the crux lies in the ability to read from the Redux store. That means greater interactivity, responsiveness, and a user-friendly application.
Now that we’re done with the basics comes something more practical: using useSelector and React Redux within a Seedbox. Remember, to use this hook, your Seedbox must be React-ready.
3. How to Use React and useSelector With a Seedbox
React Redux needs a Node.js environment. Depending on the provider and plan, a seedbox can allow you to install Node.js and other necessary development tools. Here’s how to make it work:
- Install Node.js and NPM: Ensure your seedbox has Node.js installed. This is vital for running React and Redux. You must have SSH access to your seedbox to install Node.js directly.
- Set Up Your Development Environment: After you access the Seedbox, you can install text editors like Vim or Nano for coding on the server. Alternatively, develop locally and transfer files with SFTP.
- Develop Your React Redux Application: Once your environment is set up, you can develop your React Redux application. You can install React, Redux, and other dependencies using NPM or Yarn.
- Run and Test Your Application: With Node.js and all necessary packages installed, you can run your application on your seedbox. This allows you to test your app in a live server environment.
- Use Version Control: We highly recommend using Git for version control. Most seedboxes support Git, so you can quickly push and pull changes between your local environment and your seedbox.
4. Why Use a Seedbox for React Redux Development?
Most of the time, we associate seedboxes with torrenting. That makes it easy to forget how powerful and versatile they can be. They are, after all, fully functional virtual machines. For Redux development and apps, Seedboxes offer:
- High Bandwidth: Seedboxes provide high-speed internet connections. These speeds are beneficial when uploading or downloading large amounts of data.
- Always-On Environment: Seedboxes allow you to run processes or tests continuously without much downtime.
- Remote Development: You can develop from anywhere with an internet connection and access to your seedbox.
However, there are also considerations to keep in mind. There might be a learning curve for those unfamiliar with command-line tools or remote development environments. A factor of cost must also be considered.
Are you ready to build your first app on a Seedbox?
Aside from running torrents, Seedboxes are inherently powerful machines. You can efficiently multitask to make full use of it. The flexibility is unparalleled, and you’ll have loads of fun.
———
5. Example: Building a Web Scraping Tool With useSelector
When thinking up an example for React and useSelector on a Seedbox, one near-perfect use case comes to mind: a web scraping tool. Thanks to its features, React Redux is nearly perfect for developing the front-end interface.
Developing this scraper will involve several layers:
- The User Interface (UI) layer to manage and display data
- The back-end layer to handle the scraping.
The useSelector hook can be effectively used in the UI layer. We can use it to access and display data stored in the Redux store. For example, scraping tasks, results, and status. Here’s an overview of how the process flows:
Step 1: Define the Redux State Shape
First, define how your Redux store will structure the data for your scraping tasks. The state might look something like this:

Step 2: Create a React Component to Display Tasks

Next, create a React component that uses useSelector to access and display the scraping tasks and their results.
The ScrapingResults component uses useSelector to access the Redux store and map over the allIds array to retrieve each task’s details from byId. This creates an array of task objects.
It then renders a list of tasks, displaying the URL and status for each task. If a task’s status is ‘completed,’ it also lists the results.
Step 3: Integration with the Back-End
The back-end part handles the web scraping. That means it will be separate and likely involve server-side technologies like Node.js and Python with libraries like BeautifulSoup.
Logic flow: When a user submits a URL to scrape through the UI, an action is dispatched to the Redux store to add the task. An API request is sent to the server to start the scraping process.
Once the scraping is complete, the server sends the results back to the client, where another action is dispatched to update the task with its results.
6. How to Deploy Your Web Scraper on a Seedbox
If you aren’t developing the web scraper on the Seedbox, you must prepare for a deployment. By default, Seedboxes are primarily used for downloading and uploading files at high speeds.
Having them serve web applications means you must have the necessary software installed. Here’s a general guide:
Prepare Your Seedbox
To begin, check the following on your Seedbox:
- Access: Ensure you have SSH access to your Seedbox.
- Environment: Confirm that Node.js is installed since it’s required to run and build React applications. If not, you’ll need to install it.
- Web Server: Ensure you have a web server like Nginx or Apache installed on your seedbox. This will be used to serve your React application.
Prepare a Production Version of Your App
Before deploying, you must build your application to create a production-ready version of your React app. To do this, navigate to your project directory and run:
bash
Copy code
npm run build
These commands create a build directory with a production build of your app.
Transfer Your Build to the Seedbox
Use SFTP to transfer your built application (build directory) to your seedbox. The exact command depends on your setup.
Configure Your Web Server
Your server configuration primarily depends on the web server engine you run. For example, if using Nginx, you’ll need to configure a server block (similar to a virtual host in Apache) to serve your React application.
To do so, edit your Nginx configuration file. This is generally found at /etc/nginx/sites-available/default. Next, add a server block like this:
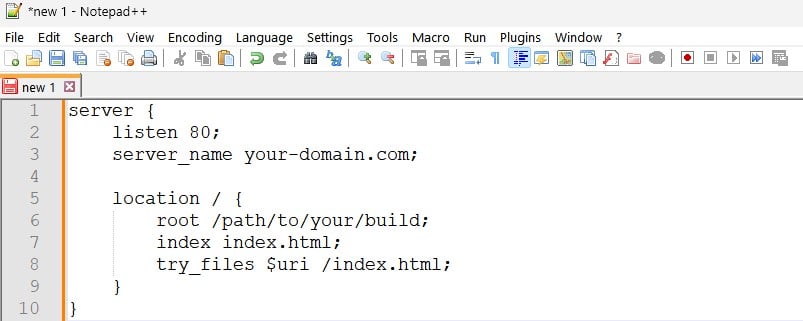
Important: Replace /path/to/your/build with the actual path to your build directory and your-domain.com with your domain or public IP address.
For Apache, ensure that the .htaccess file in your React app’s build directory is correctly configured to handle routing. The Create React App build script usually takes care of this.
Enable and Restart the Web Server
After configuring your web server, enable and restart it to apply the changes.
7. Final Thoughts
The useSelector hook is an excellent part of the React Redux ecosystem. It offers a streamlined and efficient way to access the state within React components. The simplification of reading from the store can lead to more readable, maintainable, and performant React applications.
By replacing the need for “connect,” useSelector makes integrating Redux into functional components easier. It perfectly aligns with the modern React hooks and functional programming paradigm.
Resources:
- Qiu, Juntao. “Introduction to State Management.” Test-Driven Development with React and TypeScript: Building Maintainable React Applications. Berkeley, CA: Apress.
- Kudiabor, Dominic Travis. “State management with React-Redux.”
- ARDITO, Luca. “User Interface Development of a Modern Web Application.”
- Fejfar, Petr. “Interactive web crawling and data extraction.”
- Duldulao, Devlin Basilan, and Ruby Jane Leyva Cabagnot. “Setting Up Redux Toolkit and Dispatching an Asynchronous Action.” Practical Enterprise React: Become an Effective React Developer in Your Team. Berkeley, CA: Apress.
0Comments