VLC isn’t just a media player—it’s a powerhouse of hidden tools. This guide reveals 12 advanced VLC hacks that most users never tap into, from rotating and trimming videos to casting, converting formats, and even ripping DVDs. You’ll also learn how to stream from a seedbox, download videos (from popular streaming sites), and even customize your player with skins and extensions. By the end, you’ll know how to use VLC like a pro and make the most of every video, local or streamed.

🎥 Think VLC is just for playing videos?
Think again. Unlock 50+ powerful features you never knew existed — free PDF download: 50 VLC Hacks You’ll Wish You Knew SoonerTable of Contents.
- How to Rotate a Video in VLC.
- How to Trim Video in VLC.
- How to Play VLC Videos Frame-by-Frame
- Cast VLC Video to Chromecast.
- Use VLC to Watch and Download Online Videos
- Convert Videos to Any Format With VLC.
- How to Rip DVDs in VLC.
- Use VLC as a Screen Recorder.
- Customize VLC with Skins.
- Use Extensions to Add New Features to VLC.
- AI-powered subtitles & translation (2026 feature)
- Stream large libraries to VLC (NAS / seedbox)
1. How to Rotate a Video in VLC.
With VLC, you can rotate video, which can come in handy when you need to adjust the orientation of a video that was recorded incorrectly or the video is being displayed in the wrong direction.
To rotate a video, follow these steps:
- Open the VLC media player.
- Go to “File” > “Open File” to locate the video you want to rotate.
- Once the video has been loaded, click on “Window” (1) from the menu bar and select “Video Effects” or press the keyboard shortcut “Ctrl+E” or “Cmd+E” to open the “Video Effects” (2) window.
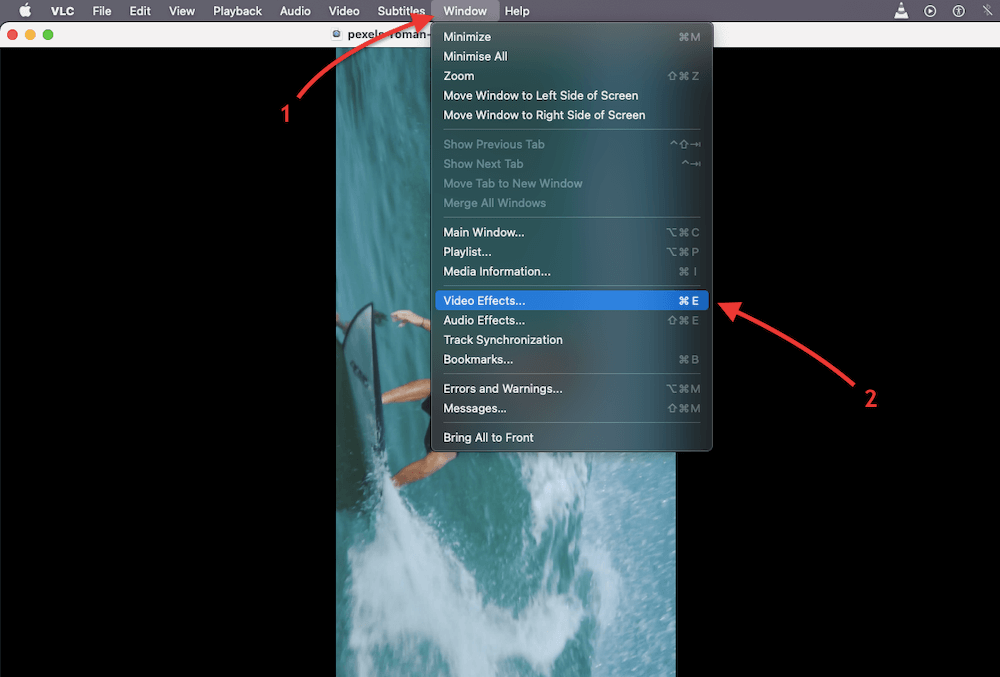
- In the “Video Effects” tab, click on the “Geometry” tab (3), check the box next to “Transform” (4), and select the degree of how you want to rotate the video in VLC.
- You’ll have to play with the degrees to find the exact orientation and side (left or right) you want to rotate the video.
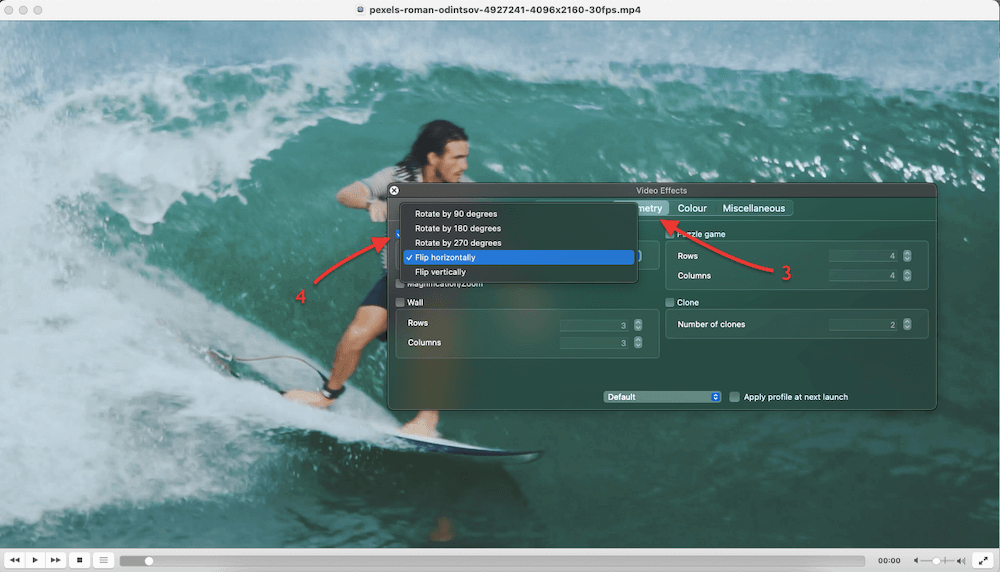
- Click “Close” to apply the changes.
- This is how you rotate a video in VLC. However, the video will return to its original rotation form if you do not save your changes.
For Windows. Go to Tools > Effects and Filters > Video Effects > Geometry > Click on Transform > and rotate your video to the specific degree you are looking for.
2. How to Trim (Cut) Video in VLC.
Although this media player provides rotation trimming, splitting, or cutting entire videos, the video edition capabilities are limited.
Splitting a video in VLC is unlike your ordinary video editing tool, where you can move a slider and cut the video easily. With this media player, you’ll have to use the recording to extract a part of a video from a long-form video. This method only records parts of the video and saves it as a new file. In a way, it trims the video without modifying the original video file.
To split a video, you can follow these steps.
- Open the VLC media player and click “Open File” to find the video you want to trim. You can also drag and drop the video to VLC to open it.
- Load the video and find the exact position (in time) where you want to split the video.
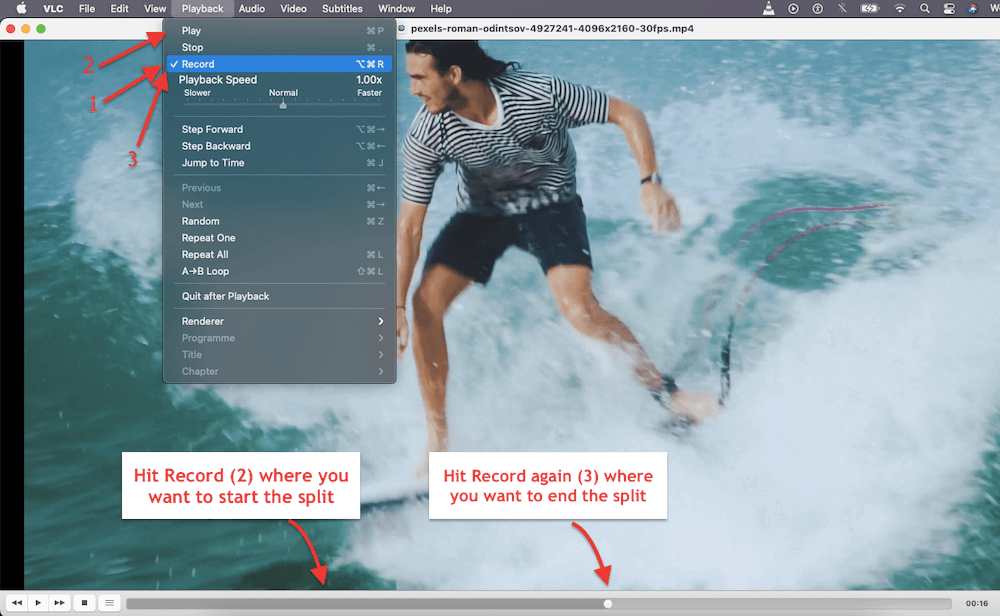
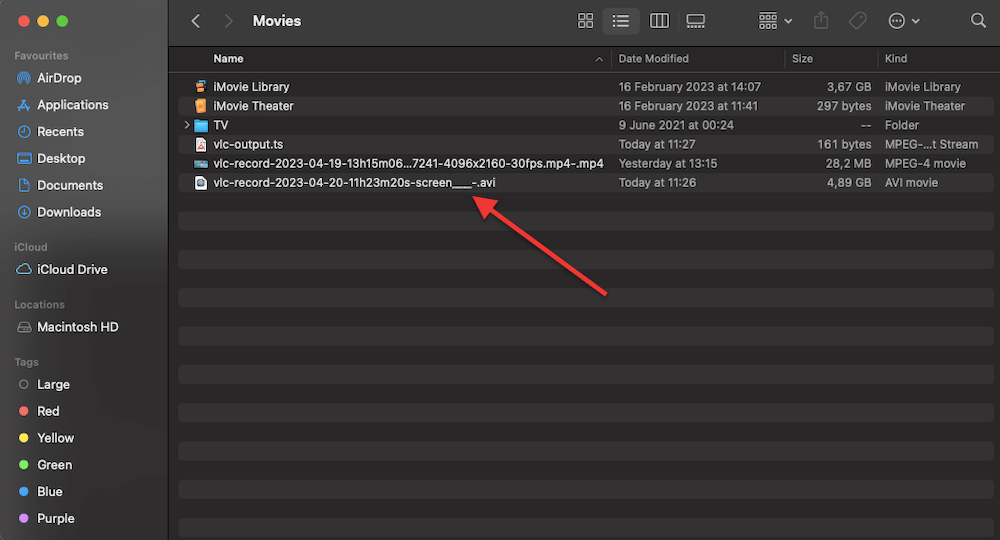
- Go to “Playback” > and hit on “Record” (1) at the exact time when you want to start the split. Hit “Play” (2) and wait for the video pointer to get to the part where you want to end the split. Hit “Record” (3) for a second time when you want to end the split.
- The trimmed video will be automatically saved in your Mac’s “Movies” folder (usually the default location). Go to Home > Users > YOURUSER > Movies.
For Windows: The recording process is the same. To find these commands, go to “View” from the menu bar and select “Advanced Controls.” A new set of controls will appear below the playback controls. Click on the “Record” button (red dot) to start recording the video at the point where you want to begin the trimmed video. When you reach the point where you want to end the trimmed video, click on the “Record” button again to stop recording. The parts of the video will be saved in the “Videos” folder on your computer.
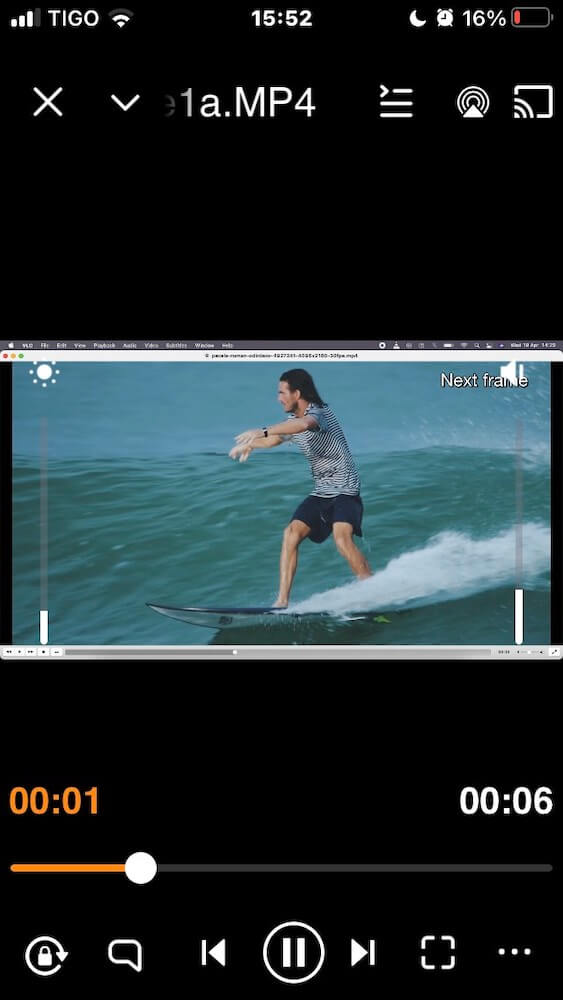
3. How to Play Videos Frame-by-Frame with VLC
Playing videos frame by frame in VLC helps if you are a video editor or analyzer. For example, you may need to review and analyze individual frames to make precise adjustments when editing a video. Also, if you want to analyze a video detail or watch it in slow motion with complete control, you can play it frame-by-frame.
To play videos frame by frame, follow these steps:
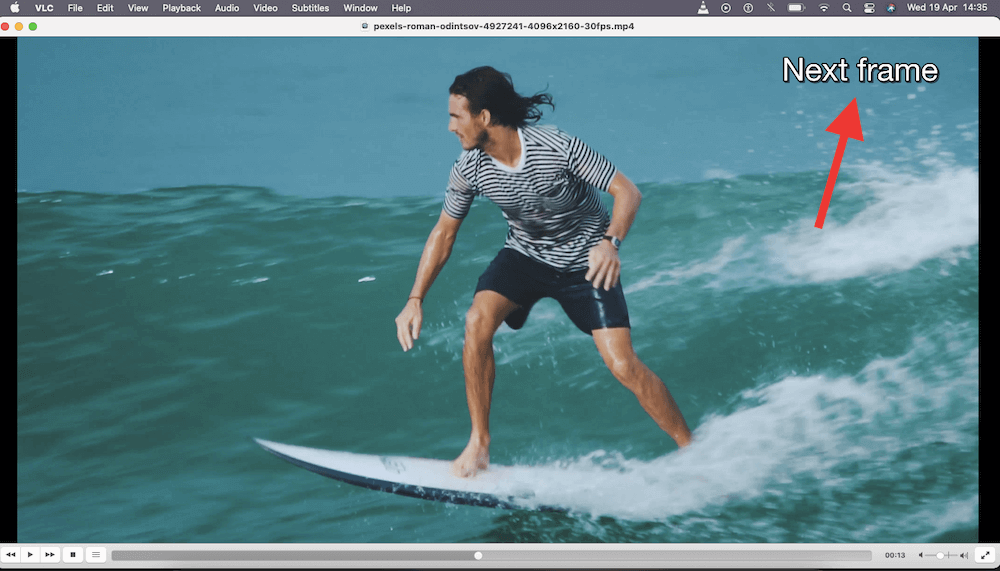
- Open VLC media player > and open the file you want to play frame by frame.
- Load the video and press the “E” hotkey on your keyboard to play the video frame by frame (in the forward direction). Pressing the “E” key once moves one frame; pressing the “E” key continuously moves the video in slow motion.
- Press on the spacebar when you are ready to watch the video continuously. Unfortunately, VLC does not support playing the video frame by frame in the backward direction.
- You may also want to change this hotkey to another of your preference. To change the hotkey “E” that moves VLC frame by frame (next frame), go to Preferences > Hotkey > Next Frame > and select the “Next Frame” action to change it. Click on “Save” to finish.
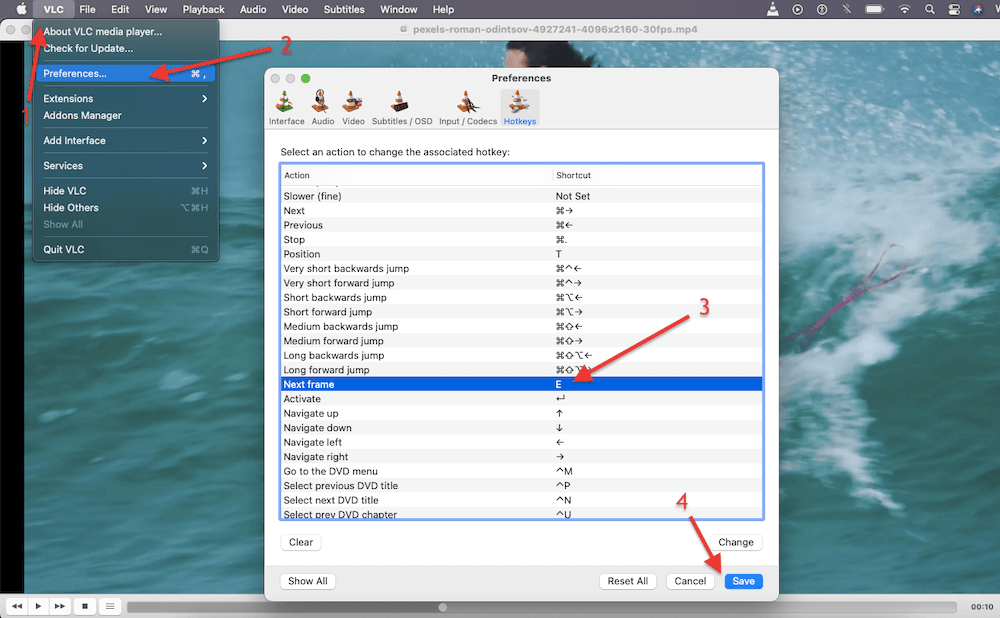
For Windows: To play a video frame by frame on VLC Windows, play the video and press the “E” key repeatedly for each frame. You can change this hotkey by visiting VLC > Tools > Preferences > Hotkeys. In the Hotkey menu, change the “Next Frame” option to any other key you want aside from “E.”
4. How to Cast VLC Video to Chromecast / DLNA /Apple TV
VLC media player has casting capabilities to stream video and audio from your computer to various cast receptors like Chromecast, Roku, and Apple TV.
To cast media to Chromecast, follow these steps:
- You must first ensure that both the computer running the VLC media player and the Chromecast device are connected to the same Wi-Fi network. Also, ensure that the Chromecast device is plugged in and turned on.
- Open the VLC media player and go to “Playback” > “Renderer.”
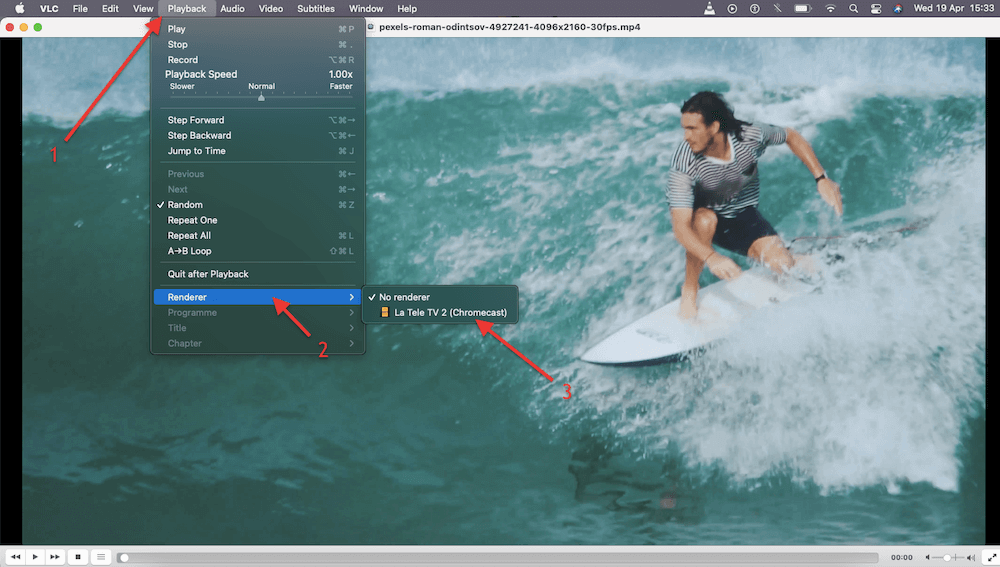
- If you have more than one casting (renderer) device, find it in this list and select it. If your Chromecast is not listed under Renderers, ensure it is turned on and connected to your computer’s Wi-Fi network.
Cast to Chromecast from a mobile.
One of the advantages of using VLC’s “Renderer” feature is that when you use it from VLC’s mobile application, you can literally turn your smartphone into a smart remote control.
- Before you cast video from your VLC mobile app to your Chromecast, ensure both are on the same WiFi network and the Chromecast device is connected and turned on.
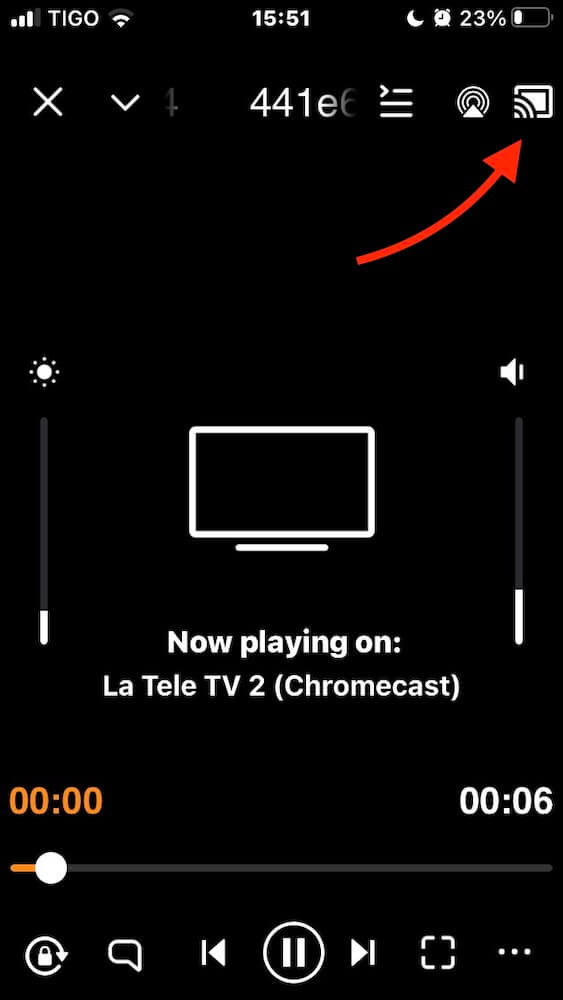
- Open the VLC mobile application on your smartphone.
- Load the video or audio file in VLC that you want to cast and click on the Cast icon in the upper right corner. The VLC app will find your Chromecast device and cast the selected media.
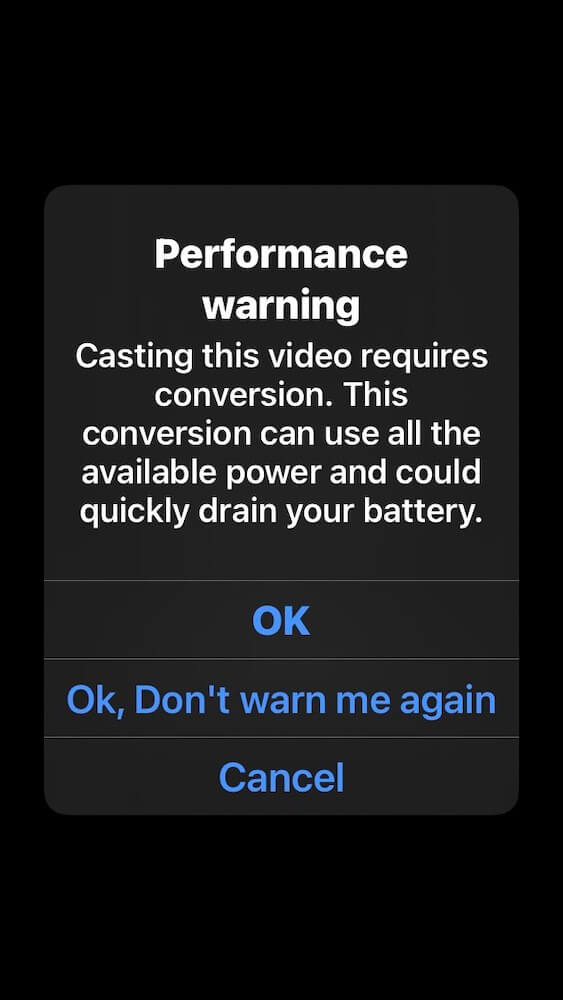
- Before casting the video onto Chromecast, you’ll likely receive the following “Performance Warning” message: “Casting this video requires conversion. This conversion can use all the available power and could quickly drain your battery,”
Note: We recommend pre-transcoding files you would be casting from your mobile to Chromecast. Check our complete Handbrake guide to learn how to pre-transcode media like a pro. Pre-transcoding will ensure that streaming is easier for the mobile and TV.
- Click “OK” on this warning message. The video or audio will start playing on your television, with the audio coming from your TV’s speakers (and not the mobile device).
- You will be able to control playback from your computer or mobile device. The controls will appear on your computer or mobile device, allowing you to pause, play, skip, or adjust the volume.
Following these steps, you can easily cast VLC to Chromecast from your computer or mobile. You can enjoy your favorite videos and music on your television.
🎬 Don’t Miss Out on Pro-Level Streaming
These VLC hacks work best with a seedbox. Don’t miss out—secure your RapidSeedbox today.
👉 Start Now5. How to Watch and Download Online Videos in VLC
One of the most remarkable hacks we have discovered is making VLC play youtube videos right from the interface. VLC offers better playback capabilities than most web browsers and online video platforms. So you can adjust playback speed, change aspect ratio, and apply filters or effects. Additionally, having the video played directly on VLC allows you to download the video for later offline viewing. And that is not all; what many people love about this is that it lets you watch videos without ads.
Disclaimer: Downloading YouTube videos from VLC may infringe upon the terms of service and copyrights of the content creators. It is essential to respect intellectual property rights and comply with applicable laws and regulations in your jurisdiction before downloading or distributing any copyrighted material. This note does not provide legal advice and should not be considered as such.
How to use VLC to watch and download videos from YouTube?
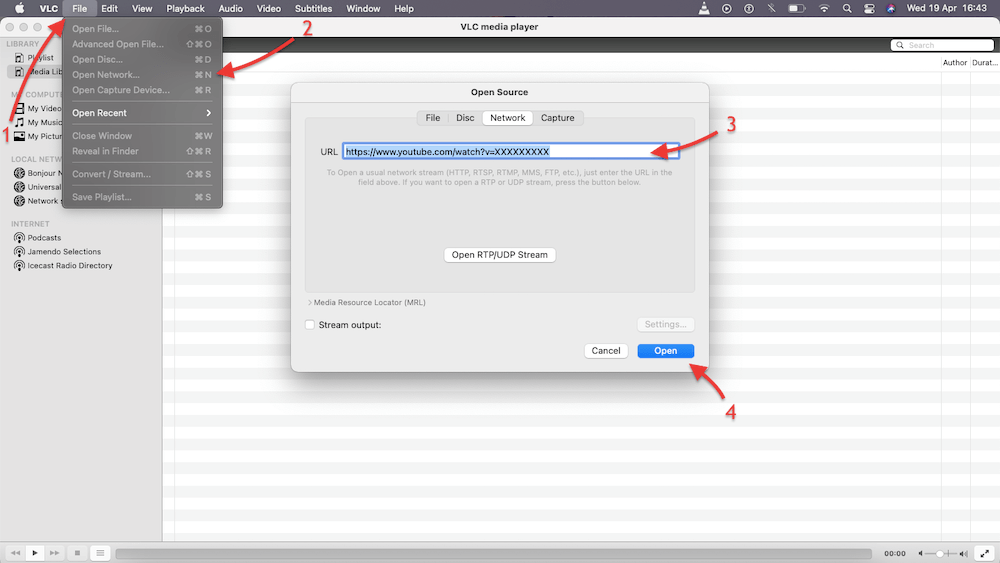
- On a macOS, open the VLC media player.
- Go to “File” (1) > Open Network (2) > Enter the Youtube video URL (3) > Click on “Open.”
- This should open the YouTube video stream on VLC, but this is unlikely to happen for the first time. You will need to include a .lua file in your VLC scripts. Due to changes in YouTube’s video streaming protocol, you might need a Lua script to help VLC parse and play the video stream correctly.
- Download an updated lua file from VLC’s VideoLAN official site. For example (https://forum.videolan.org/viewtopic.php?f=14&t=161198)
- Get the lua file and save it in the lua/playlist folder on the VLC installation path:
- Windows > C:\Program Files\VideoLAN\VLC\lua\playlist\
- macOS/Mac OSX > VLC. app/Contents/MacOS/share/lua/playlist/
- Linux > /usr/share/vlc/lua/playlist/
- You will see that there is already a youtube.lua, but, likely, its date is not current.
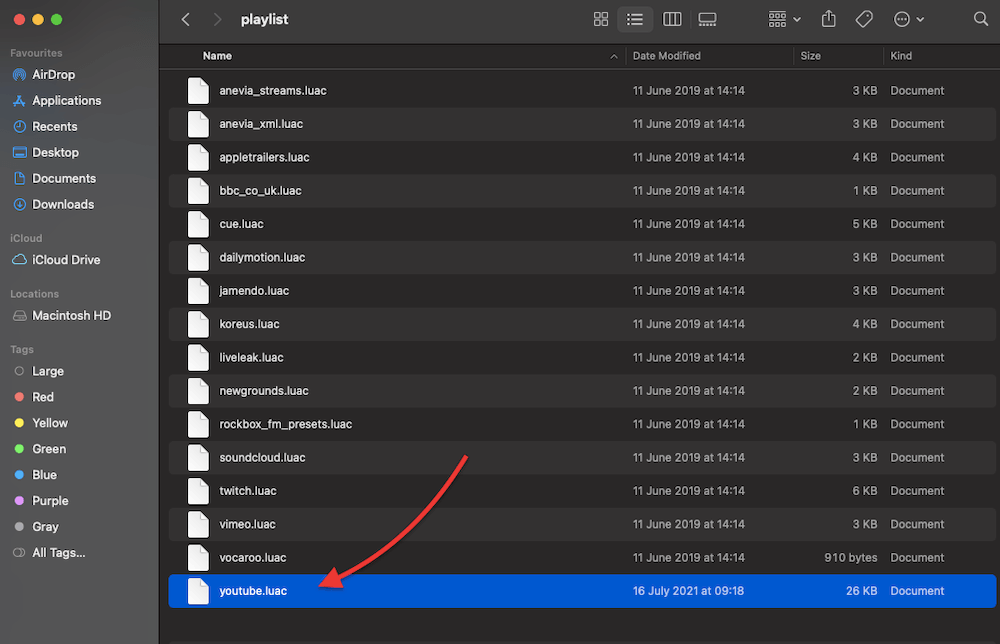
- Rename the old one as youtube.lua.OLD or youtube.lua.BKP and move the new lua into the same folder.
- Close VLC and open it again.
- Go back to YouTube and grab the video’s URL. On VLC > Go to “File” > Open Network > Enter the Youtube video URL > Click on “Open.”
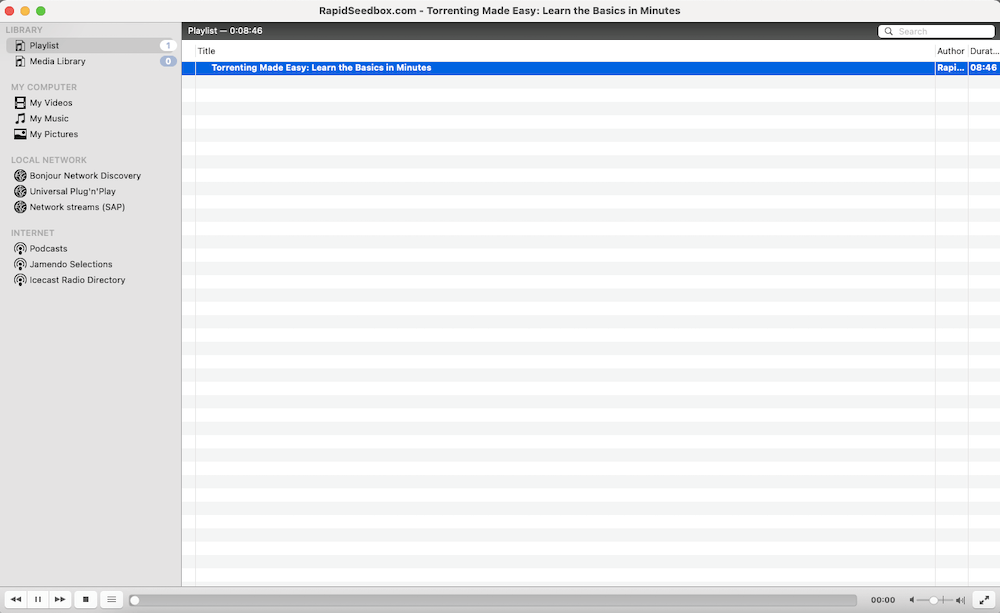
- VLC will start loading, and the Youtube video will be added to the playlist (as shown below).
- The video will take some time to load but will eventually begin playing.

Download the Youtube video from VLC.
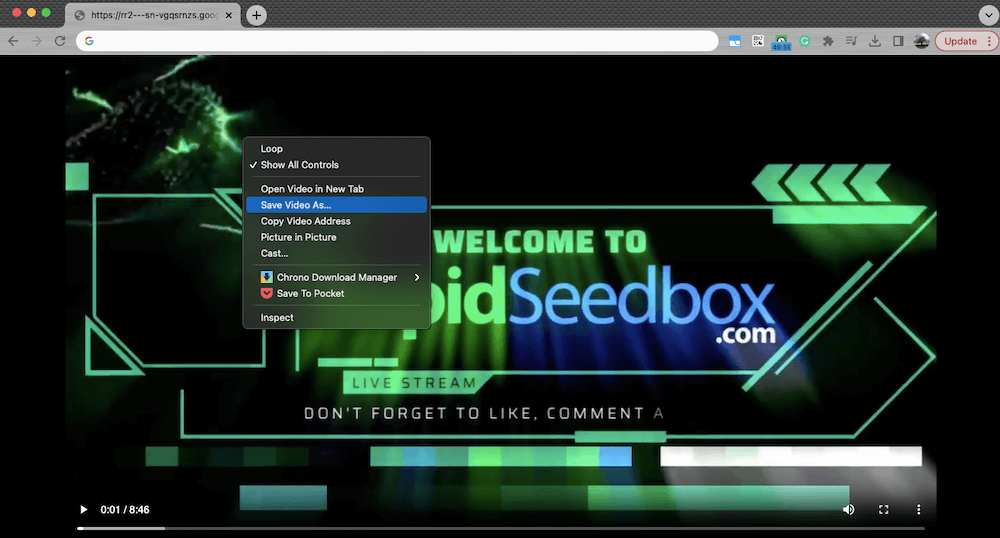
- Once the video is playing in VLC, you can download the YouTube video. Go to Window > Media Information. Look at the bottom of the media information window to find “Location.” Copy this location into your clipboard.
- Note that this “location” URL expires.

- Open any web browser and paste the video location on its address bar. The video will start playing on the web browser. Right click on it > “Save Video As…”
For Windows. The process for Windows VLC is similar. Simply click on Media > “Open Network Stream” > “Network” tab. In this Network tab, paste the YouTube video URL you want to watch or download. The process to update the lua script is similar to the process above. To download the video, click the “Tools” tab and select “Codec Information” from the drop-down menu. In the “Codec” tab, copy the URL from the “Location” field. Open a web browser and paste the copied URL into the address bar. Right-click on the video and select “Save Video As” to download it to your computer.
⚙️ 2026 Update: It’s still possible to use Lua scripts in VLC to stream or download YouTube videos, but the built-in youtube.lua is broken due to recent YouTube updates. VLC’s Lua API still supports extensions, playlist parsers, and service discovery scripts that access modules like vlc.player, vlc.playlist, and vlc.stream (docs). For YouTube, though, you’ll need a community fix that integrates yt-dlp to fetch valid stream URLs. The most reliable option is this working script: https://github.com/FalloNero/yt-dlp4vlc. In short, Lua scripting remains functional — but YouTube support now depends on yt-dlp. |
6. How to Convert Videos to Any Format With VLC.
Many video editors and streamers use VLC to transcode media. They can change the resolution, bit rate, codec, and format. VLC comes with a Convert/Stream feature that allows you to upload media (video/audio), select a profile (with popular containers) or customize it to your choosing.
How to convert videos in VLC to any format?
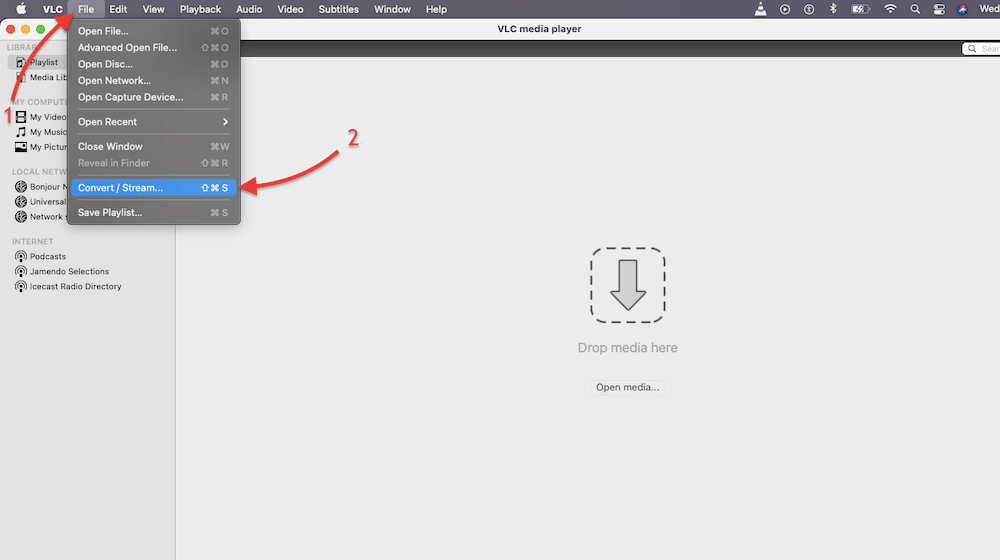
- Open VLC. Go to the “File” (1) menu and select “Convert/Stream” (2).
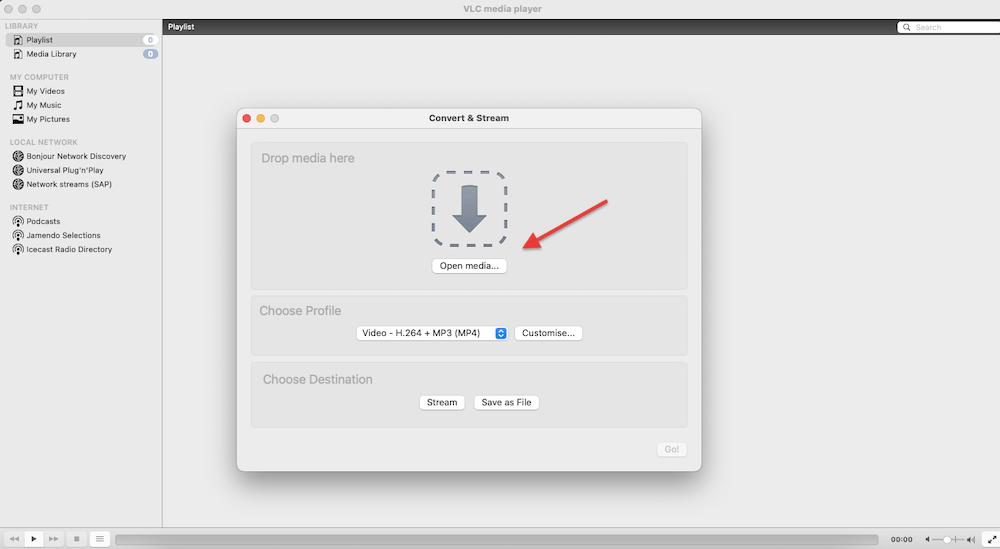
- On the “Convert & Stream” menu, click the “Open Media” button to add the video you want to transcode.
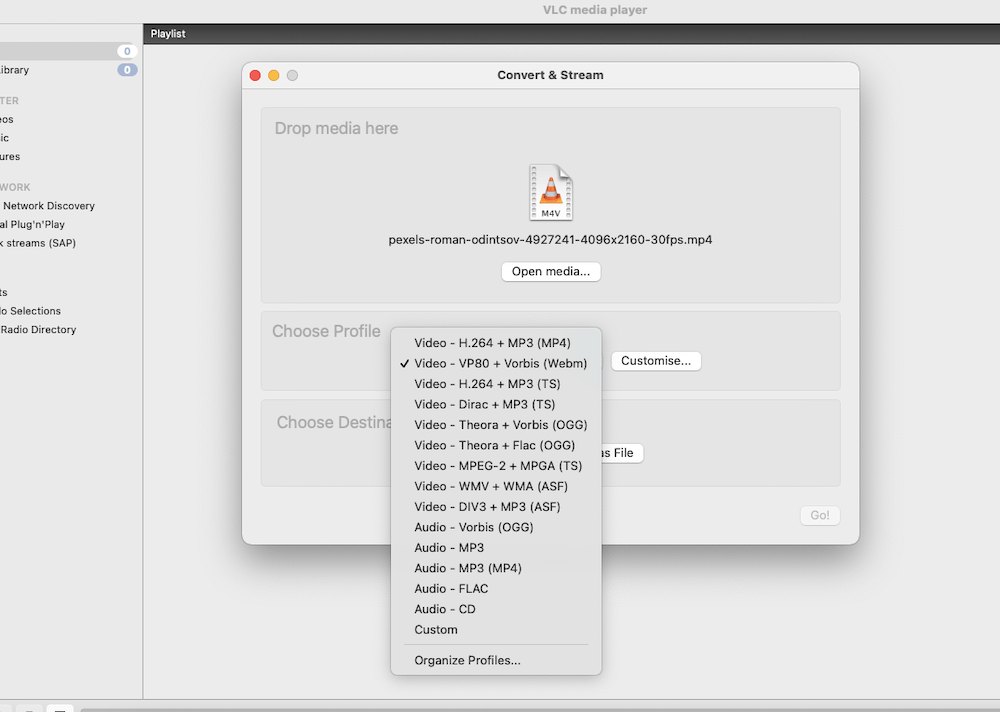
- Choose the output format from the dropdown menu in the “Profile” section. VLC comes with a few transcoding video/audio profiles that allow you to change the video/audio to different formats (along with codecs), including H.264 + MP3 (MP4), VP80 + Vorbis (Webm), MPEG-2 + MPGA (TS), and more.
- For example, you can use vlc to convert any video to mp4. Select your video, and choose the video profile > H2.64 + MP3 (MP4).
- On Choose Destination”, select either Stream or Save as File.
- Click on the “Go!” button to start the transcoding process. And “save” if you choose the “Save as File” option.
- And just like that, VLC will start converting your media format.
On Windows.
On VLC, go to “Media” and select “Convert/Save.” In “Open Media,” click on “Add” to add the media file you want to convert. Next, click on “Convert/Save,” and in the “Convert” window, select the format you want to convert the media file to from the “Profile” dropdown menu. Choose the destination folder where you want to save the converted file and click on “Start” to begin converting your media.
Alternative to VLC for converting media?
We recommend using Handbrake— a free and open-source media conversion software. Handbrake is everything you need to convert media from one format to another. It supports conversion on MP4, MKV, AVI, and WMV formats, as well as DVD and Blu-ray discs.
7. How to Rip DVDs in VLC (With Caveats).
Ripping DVDs in VLC is similar to the above process (Converting Media) but involves an additional step. To play the content of a DVD on your computer or any other device, its data must first be copied from the DVD to the computer’s hard drive. And only then is this data converted into a compatible format, such as MP4 or AVI.
Disclaimer: Ripping DVDs using VLC or any other software may violate copyright laws and the terms of service of the DVD. It is crucial to understand and comply with applicable laws and regulations regarding the copying and distribution of copyrighted material in your jurisdiction. This note does not provide legal advice and should not be considered as such.
How to rip a DVD?
- Insert the DVD into your computer’s DVD drive. For macOS, you are likely using an external drive to insert the DVD into the computer.
- Open VLC, go to the “File” menu, and select the “Open Disc” option.
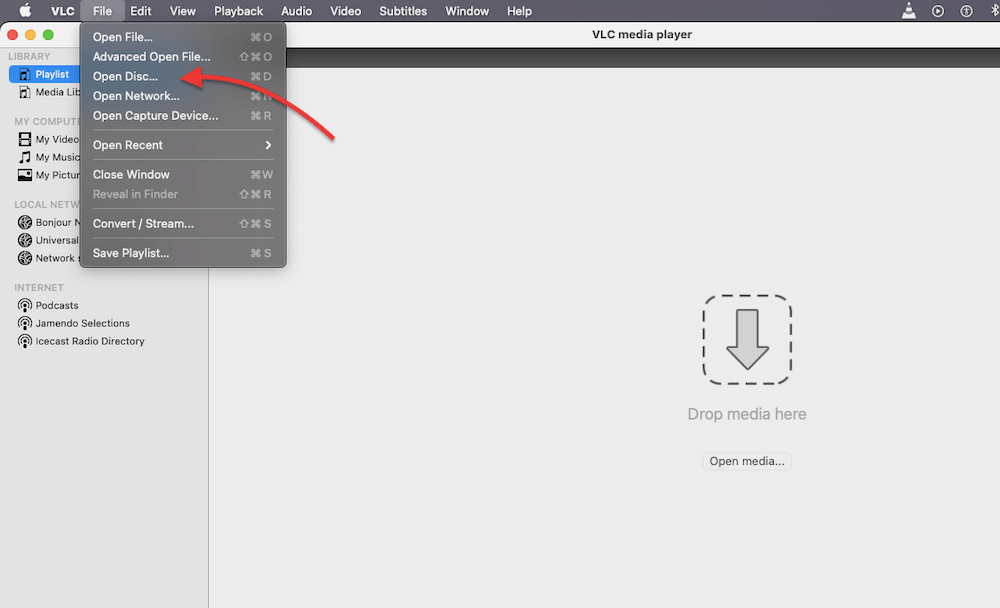
- Once the “Open Source” window appears, the “Disc” tab will also show up. If the DVD was inserted successfully, VLC would automatically detect and show it here. If you see the DVD, tick the “Disable DVD Menus” and “Stream Output.”
- Click on “Settings”
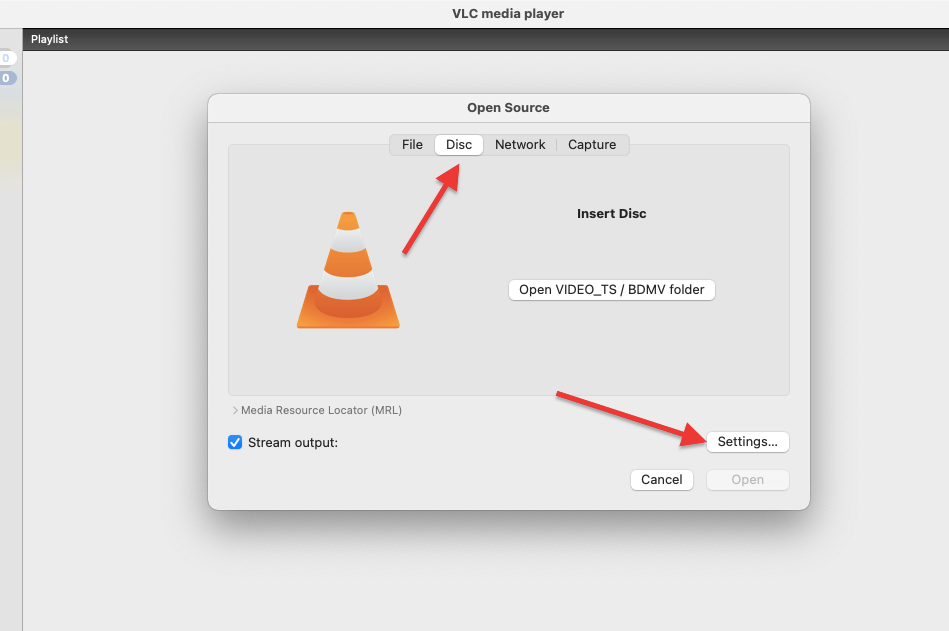
- In this “Streaming and Transcoding Options” for the Disc, change file and encapsulation. In the “Encapsulation Method,” choose the output format. MPEG 4 is usually your best option, as most playback devices support this format.
- On the “File” part, you can also select the output folder on your device to save the ripped DVD video.
- (Optional): Select your best “Transcoding Options.” Tick on video and audio and select your preferred transcoding options.
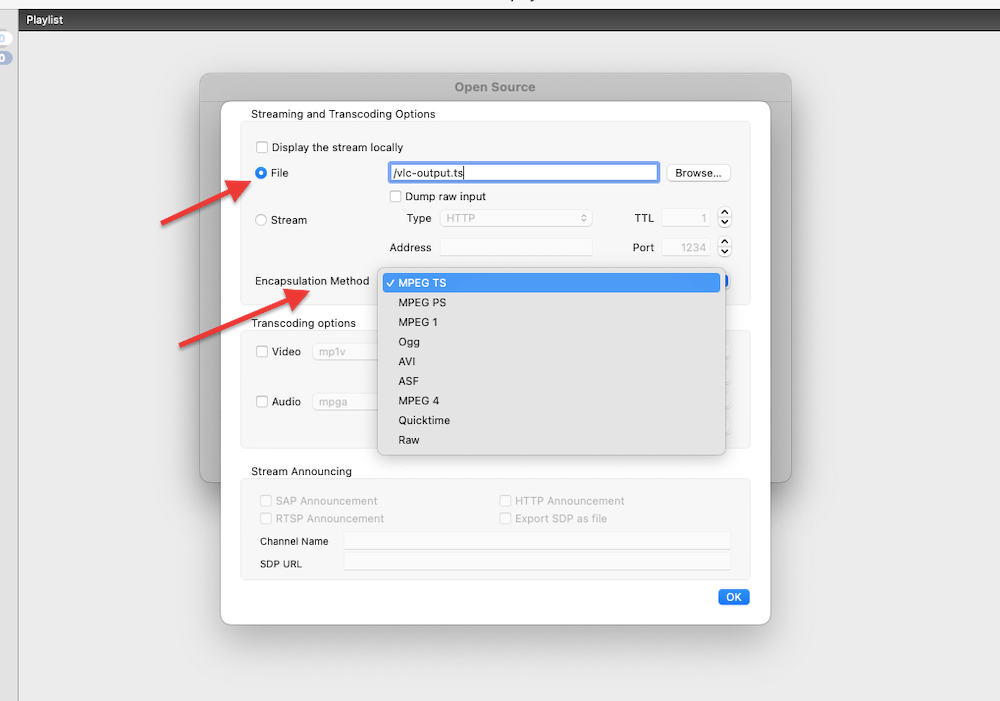
- When these settings are set up and you click on the “Open” button, VLC will immediately begin to rip the DVD.
- Be patient, as it may take some time to complete.
- The ripped video output will all be saved to the folder you selected.
Rip DVD on Windows?
The process is similar to the one shown above; it only varies in navigating the settings. In Windows, insert the DVD. On VLC, go to “Media” and then choose the “Open Disc” option. Navigate to the “Disc” tab and click the “Browse…” button to import the DVD content to VLC. Make sure to select the “No disc menus” option. Select the DVD you want to rip and click the “Convert / Save” button, which will take you to the “Convert” window. Choose an output format for the ripped DVD contents under “Profile” and set the output folder by clicking the “Browse” button in “Destination.” Finally, click the “Start” button to begin the DVD-ripping process.
Troubleshooting.
If VLC’s incapable of ripping the DVD, is only ripping portions of the DVD, or misses audio, ensure you have the latest VLC version; if you don’t, update VLC to the latest version and try ripping the DVD again. Also, if VLC is not ripping the DVD, then it is also likely that you are trying to rip a DVD with copy protection.
Alternatives to VLC for ripping DVDs?
If you are facing any issues and can’t seem to rip your DVD successfully, we recommend using Handbrake (also mentioned in the previous section). Handbrake is an open-source and free professional media conversion software that allows you to rip DVDs and Blu-ray discs like a pro.
🚨 You’ve probably been using VLC wrong this whole time.
Discover what everyone else missed — grab this free PDF: 50 VLC Hacks You’ll Wish You Knew Sooner8. How to Use VLC as a Screen Recorder.
VLC has the “Open Capture Device” feature that lets you capture video/audio from input devices like a webcam, microphone, or desktop screen. This feature essentially turns VLC into a basic capture tool, so you can use it for screen recording, video captures, or live streams.
In this section, we will show you how to use it to capture video//audio streams and record them in different formats.
How to record your screen?
- Open VLC Media Player, go to “File” in the top menu, and select “Open Capture Device” from the dropdown menu.
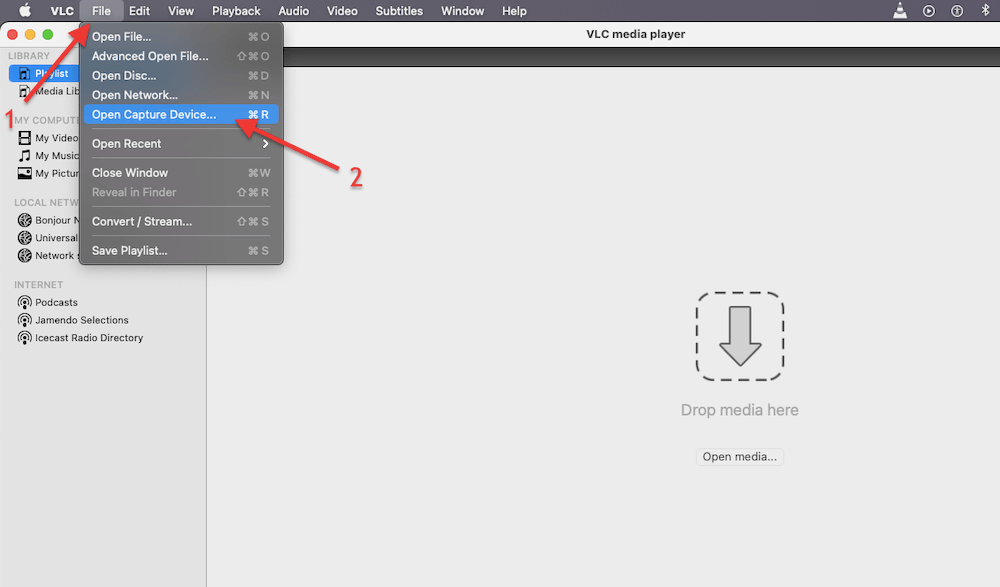
- The “Open Source” window will show up. Here, click on the “Capture” tab (1).
- On the Capture tab, you will see a few options. Choose “Screen” (2) from the drop-down list as capture mode.
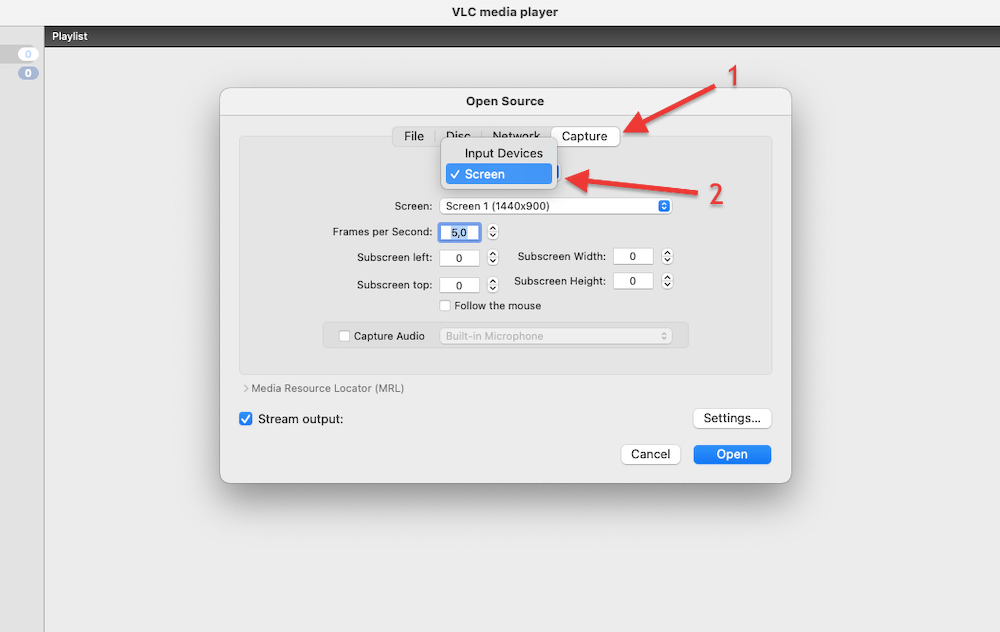
- On the Capture tab, you will also see other options, such as screen resolution, frames per second (or frame rate), subscreen (cropping), and options to “follow the mouse” and “capture audio” via “built-in microphone.”
- Set the desired frame rate for the recording under “Frames per Second.”
*Note
Not sure which frame rate to choose? A frame rate of 30 fps (frames per second) is usually considered enough. It provides a smooth playback while keeping the file size manageable. But if you are recording video that includes fast moves, such as sports or video games, we recommend a higher fps, such as 60 fps.
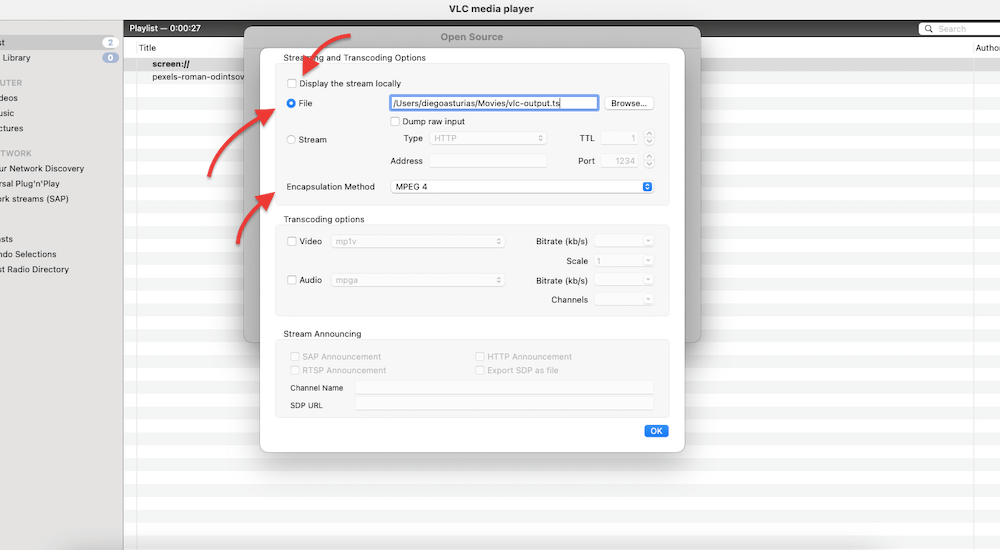
- Now, click the “Settings” button (right above the Open button) to configure the video and audio settings, such as codec, resolution, and audio device.
- Note that in the “Streaming and Transcoding Options” menu, you can save the recording into a file or stream it right away. We will save the screen record into a specific path (on the macOS movie’s default folder). Let’s also select the encapsulation method, for example, MPEG TS or MPEG-4.
- Once you are ready with settings, click on “Ok.”
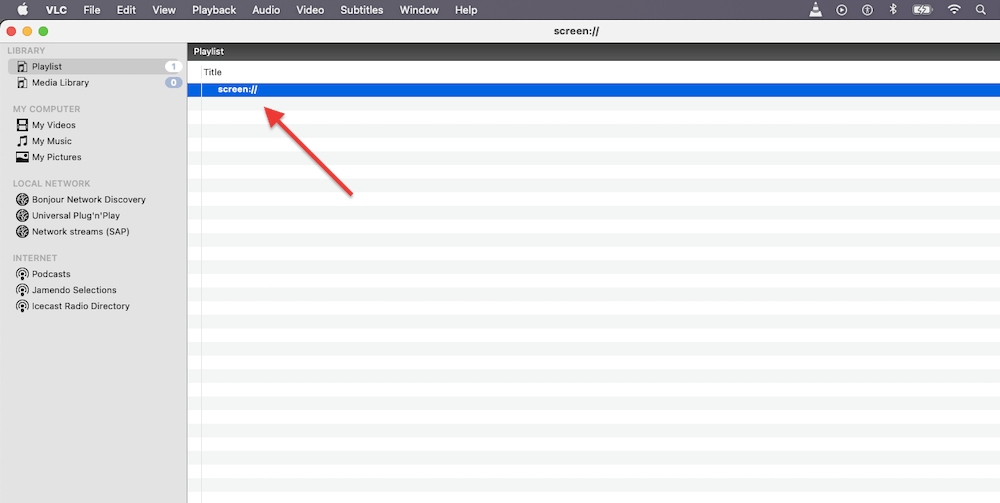
- Back on the “Open Source” window, click on “Open.” A new screen:// track will appear on the Playlist section.
- To start the screen capture, click on Playback > Record. Ensure the “Record” option has a tick.
- The screen capture will begin at this time. To stop the screen recording, click the “Record” button again in the interface.
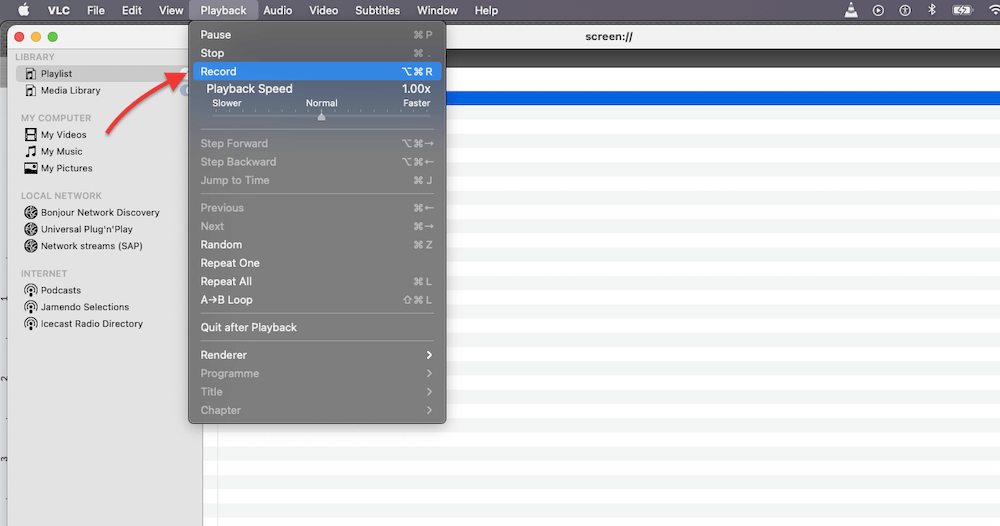
- After you have stopped the recording, you can find the recorded file in the location you specified earlier.
On Windows.
To use VLC as a screen recorder, follow these steps: On VLC Media Player, go to “Media” and select “Open Capture Device” > In the “Open Media” window, click on the “Capture Device” tab. Under “Capture Mode,” select “Desktop.” Set your desired Frame rate. Next, click on the Convert/Save at the bottom of the window. Give your screen recording a name, and choose its destination. Click the Save and the “Record” buttons to start the screen recording.
🧠 Bet You Didn’t Know VLC Could Do This
Think VLC can’t stream from anywhere? These VLC hacks prove otherwise—try it with RapidSeedbox.
👉 Try It Now9. How to Customize VLC with Skins (Windows/Linux Only)
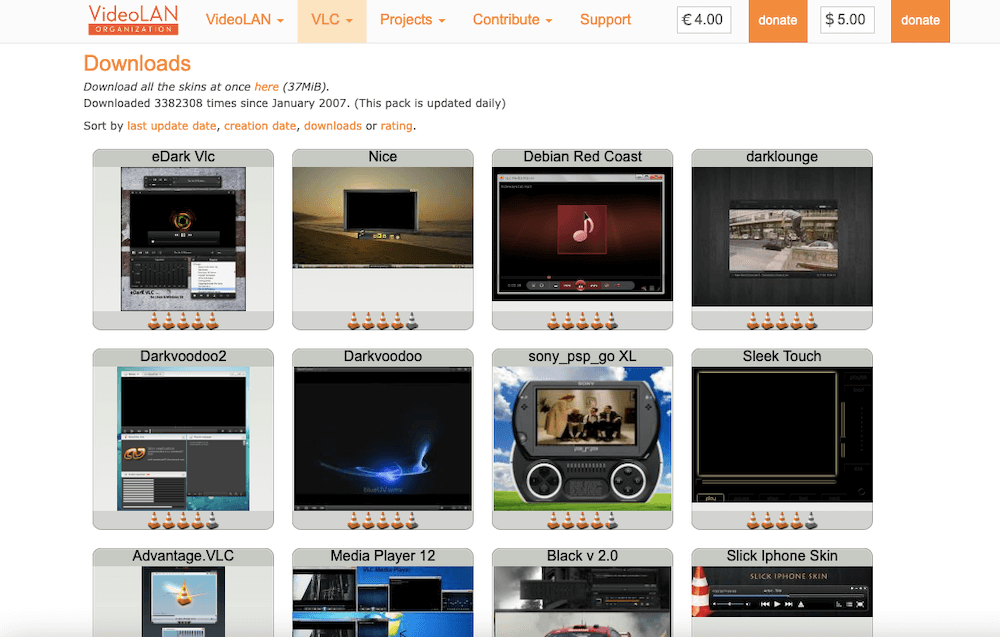
You can use VLC skins to customize it and make it cooler. Maybe you want to give this media player a new look and feel; perhaps you want to make it more sleek, modern, retro, or nostalgic. With these skins, you can customize the media player and make it your own!
Note: You can only use VLC skins in Windows and Linux VLC. You cannot use these skins on Mac OS X.
To use these skins on Windows VLC, follow these steps:
- Download the skin file: A variety of VLC skins are available on the official site of VideoLAN (https://www.videolan.org/vlc/skins.html).
- Put the downloaded VLT files in the skins folder within the VLC installation directory. For Windows (e.g., C:\Program Files\VideoLAN\VLC\skins) and Linux/Unix go to ~/.local/share/vlc/skins2.
- VLC’s skin file type is .vlt. The .vlt file extension contains information about the design and layout of the skin that can be applied to the VLC media player.
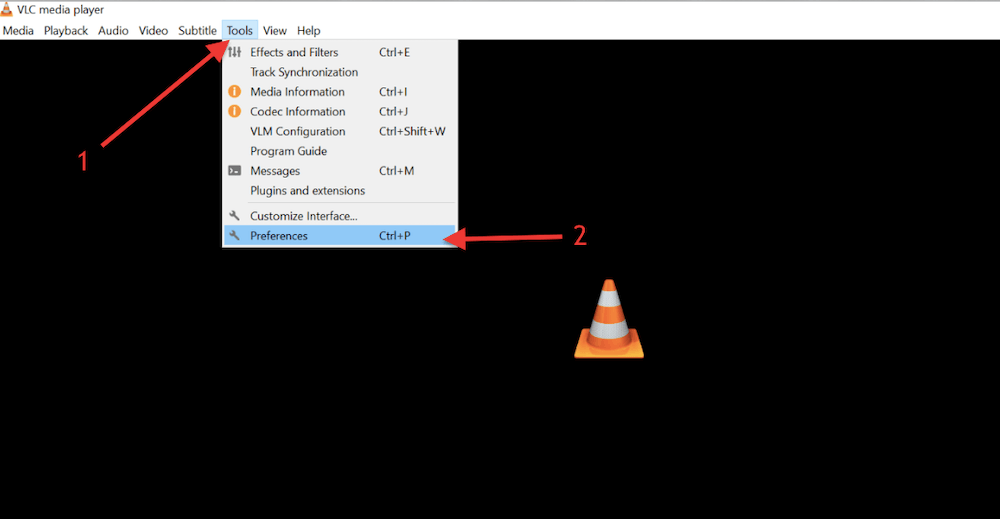
- Next, go to “Tools” (1) > open your Preferences, or Ctrl+P (2).
- Under “Simple Preferences,” go to “Interface” then “Look and Feel” tab, and switch your interface from native style to skins > Use custom skin (1).
- Select the skin file: Click the “Choose…” button (2) and navigate to the location where you saved the .vlt skin file. Select the skin file and click on “Open.”
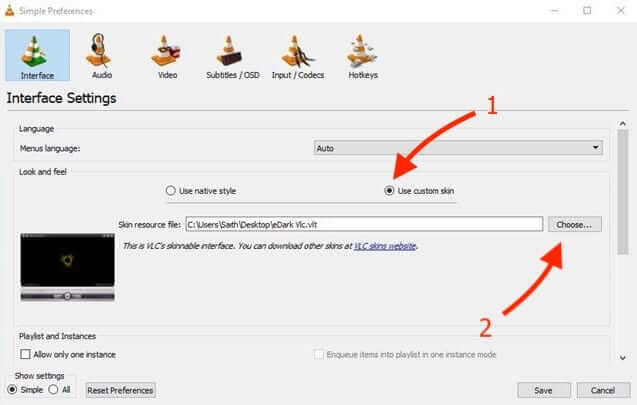
- Apply the skin: Once you have selected the skin file, click the “Save” button to apply the new skin to VLC.
- Quit VLC and then reopen it to make the switch from native style to skins mode take effect.
10. How to Add Extensions to VLC (Subtitles, IPTV, GIFs, and more).
How to Add Extensions to VLC (Subtitles, IPTV, GIFs, More)
VLC supports adding add-ons and extensions so that you can add “extra” features and functionality. For example, you can add an extension to make VLC generate GIFs, search and download subtitles, video effects, import Youtube playlists, watch IPTV, online radio, podcasts, and more.
Note: Although the process of installing and adding extensions is the same, there might be variations in how extensions and add-ons are set up and used.
Here are the steps to use add-ons and extensions on VLC.
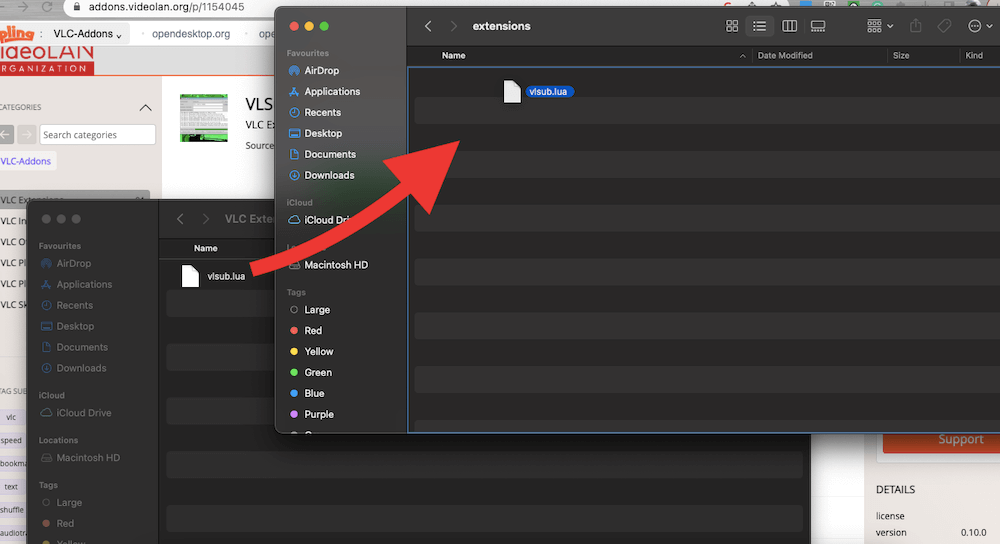
- You can find a list of available add-ons and extensions on the VLC website (https://addons.videolan.org/browse) or any third-party websites.
- Download the desired add-on or extension. If you found the extension on the official site, you can either download the extension from the “Download” or “Files” sections. The downloaded file is a .lua script.

- Start by looking for the “extensions” directory at the following location. If there is no “extensions directory, you can create one. These are the directory paths for the extensions:
- Windows (all users): %ProgramFiles%VideoLANVLCluaextensions
- Windows (current user): %APPDATA%vlcluaextensions
- Linux (all users): /usr/lib/vlc/lua/extensions/
- Linux (current user): ~/.local/share/vlc/lua/extensions/
- Mac OS X (all users): /Applications/VLC.app/Contents/MacOS/share/lua/extensions/
- Mac OS X (current user): /Users/%your_name%/Library/Application Support/org.videolan.vlc/lua/extensions/
- Go ahead and put the “EXTENSION.lua” file inside this directory. “vlsub.lua” in our example.
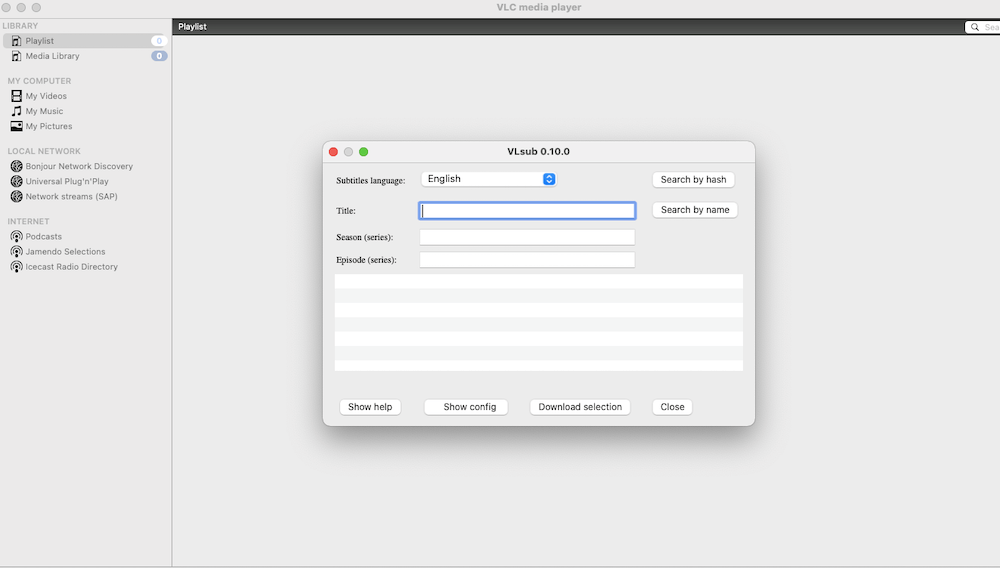
- Open VLC on your computer, or close/open it if it was open during the extension installation. Click on the VLC menu (for macOS and Windows) > Extensions.
- You should see your new extension available.

- Click on your Extension to open it.
11. How to Use AI-powered subtitles & translation (2026 feature)
Reality check: VideoLAN demoed offline AI subtitles + real-time translation at CES 2025, but they haven’t shipped it in a stable public build yet. For now, you can’t “turn it on” in current stable VLC; it’s an exciting preview/“coming soon” feature.
a. When VLC releases it (here is the expected flow)
- Update VLC to the newest build (Help ▸ Check for Updates).
- Open your video, then go Subtitle ▸ AI Subtitles (beta) (wording may vary).
- Pick source language (e.g., Spanish).
- Toggle Translate to and choose target (e.g., English).
- Choose On-device/Offline models if asked (privacy-friendly).
- Click Start — subtitles appear live; optionally Save as .srt to keep them.
(These steps mirror what was shown/detailed by VideoLAN at CES; exact menu names may differ at release.) Source: The Verge
b. Practical workaround right now
If you need this today, generate subtitles externally, then use them in VLC:
- Transcribe+translate with a local tool (e.g., OpenAI’s Whisper-based apps) → export .srt. The expected VLC AI feature isn’t out yet, but experts are recommending Whisper-style workflows meanwhile.
- Name the .srt like the video (e.g.,
movie.en.srt) and place it next to the file. - In VLC: Subtitle ▸ Add Subtitle File… and select your .srt.
12. How to Stream large libraries to VLC (NAS / seedbox)
Below are reliable ways you can use to stream large libraries from a NAS or Seedbox to your VLC. Use whichever matches your setup.
a. SMB (Windows share / most NAS)
Desktop (Windows/macOS/Linux)
- VLC ▸ View ▸ Playlist → Local Network ▸ Network Shares (SMB).
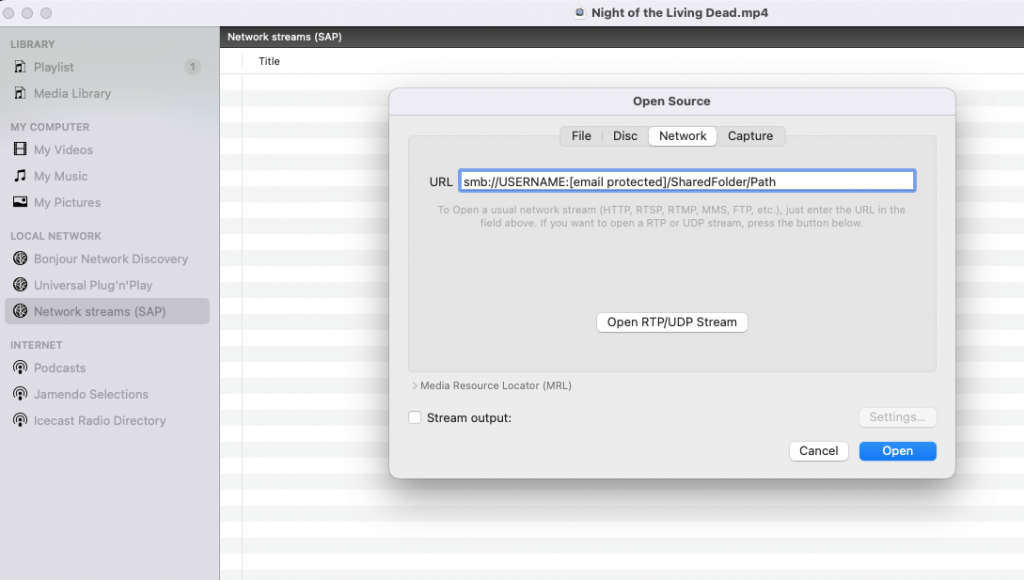
- If it doesn’t auto-discover, use Media ▸ Open Network Stream… (Or File ▸ Open Network ▸ Network) and enter
smb://USERNAME:[email protected]/SharedFolder/Path then Play.
Android / iOS VLC
- Browse tab → ••• (top-right) → Add a server favorite.
- Type: SMB; Server: smb://USERNAME:[email protected] (leave port blank).
- Save, open it, and browse your folders.
| Tip: If SMB browsing shows empty folders, re-add the server manually via Add server favorite (don’t rely on auto-discovered entries). |
b. SFTP (great for seedboxes)
Why: Seedboxes are encrypted and stable. This method works well over the internet. Learn more about what is and how a seedbox works.
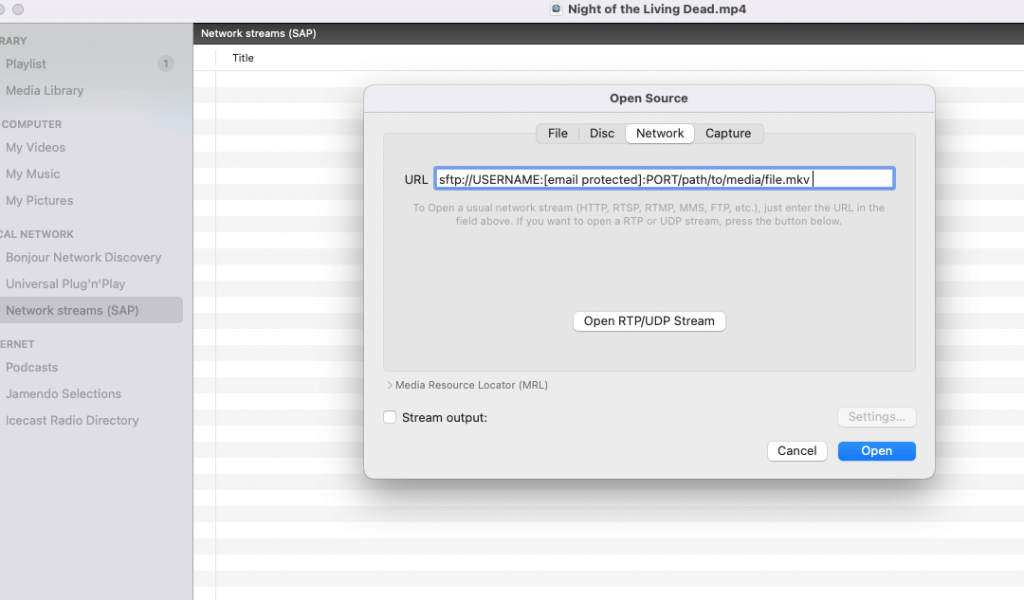
- In VLC: Media ▸ Open Network Stream…
- If it doesn’t auto-discover, use Media ▸ Open Network Stream… (Or File ▸ Open Network ▸ Network) and enter
smb://USERNAME:[email protected]/SharedFolder/Path then Play. - URL format:
sftp://USERNAME:[email protected]:PORT/path/to/media/file.mkv
(Default SFTP port is 22; include if your provider uses a custom port.)
- Play. You can also paste a direct sftp://… file link from your seedbox panel.
c. WebDAV (common on NAS/seedbox panels)
- Media ▸ Open Network Stream…
- Use your WebDAV URL (https://server/dav/path/file.mkv).
- Enter credentials when prompted, then Play.
(General method; many seedbox/NAS dashboards expose WebDAV alongside FTP.) - Learn more about how to mount a seedbox with SSHFS or WebDAV
📺 Thousands Stream Smarter with VLC + Seedbox
Thousands use VLC hacks with a RapidSeedbox to stream 24/7. Why not you?
👉 Join Them NowFinal Words.
And there you have it! The ten awesome VLC hacks will elevate your video-watching experience to a whole new level. Who knew that VLC had so many secret features up its sleeve?
Now that you’re armed with these handy tricks, it’s time to implement them. Try them out and see for yourself just how powerful VLC can be.
And don’t forget to share your newfound knowledge with your friends and family. Spread the word about VLC and its incredible features. It also comes as a one-click installer with your seedbox, and it’s very easy to stream from your seedbox using VLC.
Also, don’t forget to leave your feedback or comments below!
FAQ: VLC Power-User Questions
Partially. VLC can “Open Folder” and build playlists, but it’s not a full media server with rich metadata. For libraries with posters, seasons, multi-device sync, use a server (e.g., seedbox + Jellyfin/Plex) and play via VLC when you need local control.
Real-time transcoding is CPU-intensive, especially for high-bitrate or 4K files. Pre-transcode heavy files (HandBrake) or stream “direct play” formats. If the source is remote (seedbox/NAS), ensure wired uplink on the server side and 5 GHz Wi-Fi or Ethernet on the TV side.
Start with H.264 + AAC (MP4) at Constant Quality (CQ/CRF) ~22–24 and 720p. Keep keyframe interval ~2s and enable deblocking. For efficiency at the cost of longer encodes, try H.265/HEVC with similar CRF.
Yes via extensions (e.g., VLSub), but only install from trusted sources. Disable auto-execution of downloaded files, keep VLC updated, and prefer UTF-8 subtitles. For accuracy, pair with AI subtitles/translation when available in your build.
Mount the seedbox as a drive/share (WebDAV, SFTP via SSHFS, or SMB). Then open paths directly in VLC (File → Open File/Folder or Open Network Stream). This gives you “local-like” browsing, better caching, and avoids moving large files around.
Now, let’s have some fun!
Are you a torrenting God or a total noob?
Take the following fun quiz and learn about your torrenting personality
Disclaimer: This material has been developed strictly for informational purposes. It does not constitute endorsement of any activities (including illegal activities), products or services. You are solely responsible for complying with the applicable laws, including intellectual property laws, when using our services or relying on any information herein. We do not accept any liability for damage arising from the use of our services or information contained herein in any manner whatsoever, except where explicitly required by law.
Video by ROMAN ODINTSOV: https://www.pexels.com/video/close-up-of-a-men-surfing-4927241/
0Comments