Welcome to this ultimate guide to Ombi, where we will walk you through everything you need to know about this fantastic software. It is a powerful media request and management tool for popular media servers like Plex, Emby, and Jellyfin. All in all, it simplifies and streamlines the process of requesting and accessing your favorite media content.
This guide will cover everything you need to know, from installation to configuration, request management, and integration with other tools.
So, get ready to make the most out of it and enhance your media streaming experience.

Disclaimer: This material has been developed strictly for informational purposes. It does not constitute endorsement of any activities (including illegal activities), products or services. You are solely responsible for complying with the applicable laws, including intellectual property laws, when using our services or relying on any information herein. We do not accept any liability for damage arising from the use of our services or information contained herein in any manner whatsoever, except where explicitly required by law.
Table of Contents.
- What is Ombi?
- Ombi Key Features.
- How to Install Ombi (Docker, Windows, and Linux).
- Setting Up Ombi.
- Logging In and Navigating the Interface.
- Managing Requests
- Integrating Ombi with Other Tools (Sonarr + Plex)
- Final words.
1. What is Ombi?
Ombi is a self-hosted media request, user management, and media discovery web app. It is designed for both media consumers and media server admins. In short, it simplifies requesting movies, TV shows, and music for your Plex, Emby, or Jellyfin media servers. If you are a media server owner, you will find it streamlines administrative work. Furthermore, the application automatically and centrally allows your shared media server users to request content.
Another of its strengths is that it can integrate with different and multiple TV Show and Movie DVR tools such as Radarr, Sonarr, Readarr, and Couch Potato to automate content requests further. Furthermore, with its seamless integration (to Plex, Radarr, etc.), Ombi becomes the go-to solution for users seeking to enhance their media experience.
Software details:
- Latest release: The latest stable release is v4.47.1.
- License and price: A free and open-source project licensed under GNU General Public License v3.0.
- Deployment: Self-hosted web app.
- Download: You can get Ombi from its official site.
However, before we move on, if you want to consider an alternative, then Overseerr is one of the best alternatives to Ombi. The former is an open-source media discovery and requests management tool. Like Ombi, Overseerr integrates perfectly with your Plex ecosystem (including Radarr/Sonarr).
2. Ombi Key Features.
The tool is built to enhance the overall media consumption journey, making it an indispensable tool for media enthusiasts. As a result, all of its features are designed to revolutionize media request management for Plex, Emby, and Jellyfin environments.
Below is a short description of some of the key features:
- Request Management: You can effortlessly submit your desired movies, TV shows, or music, saving you time and effort on manual searches. Furthermore, Ombi is a centralized hub, ensuring all requests are organized and accessible.
- Personalized User Experience: Additionally, the tool allows you to specify users who will have their requests automatically approved and added to the relevant media service, such as Sonarr, Radarr, Lidarr, or Couchpotato. This feature allows media consumers to customize their experience and receive the desired content promptly.
- User Management System: If you manage multiple media server users, you’ll be happy to know that Ombi simplifies user management. It supports plex.tv, Emby, and local accounts. Additionally, with this feature media server admins can handle user access and permissions effortlessly.
- Status Updates: The app automatically updates the status of requests when they become available on Plex, Emby, or Jellyfin. As a result, this feature eliminates the need for your users to track their requested media manually. It provides your users with real-time information on the availability of their requested media.
- Enhanced Notifications: Ombi allows your media consumer to receive custom notifications, informing them about the status of their requested media installation. Whether it’s a notification for a request approval, availability on the media server, or any other relevant update.
- Robust Security: It follows the secure authentication best practices to protect user information. This ensures a safe and reliable experience for both administrators and users.
3. How to Install and Set Up Ombi.
Now, let’s install Ombi and set it up on Docker, Windows, or Linux. But before this step-by-step installation guide, we will review the details you need to know about it on Seedbox.
Pro Tip! Ombi is often used in conjunction with a seedbox for managing and automating media requests. A seedbox is a dedicated server for downloading and seeding torrents at high speeds. Ombi enhances the user experience and simplifies the management of media requests in a seedbox environment.
Note: If you have a VPS seedbox, you can leverage one-click apps and skip installation. If you are starting from zero to install Ombi on your premises, we recommend using Linux or Windows. Please remember that we do not provide support (except for what is covered in this guide) when you install and run it on your premises.
a. Running Ombi on your Seedbox.
Starting with Ombi on your Seedbox is more manageable than deploying it from zero. Therefore, if you have a seedbox from Rapidseedbox, we strongly recommend you run it using the one-click apps. RapidSeedbox offers “One-Click Apps.” Thankfully, these pre-configured applications can be easily installed on your seedbox with just one click.
To run Ombi on your seedbox
- First off, go to Rapidseedbox’s Client Area. Ensure your VPS Seedbox is up to date. After that, check the following tutorial to learn how to start with and use One-Click apps.
- Then, open OCI installers on the left-hand menu and find Ombi.
- You’ll need to click on the gear icon on the right-hand side to install it. Go to “Installed apps,” and you should see the app installed. Click on the key icon to see the credentials and URL.
- Copy the credentials and URL (IP_ADRESS:5000) and paste them on a URL. This will open the app’s web user interface.
a. Installation of Ombi via Docker:
Next, we will install Ombi on Docker (through the linuxserver.io, which is the most up-to-date image.)
- Installing Docker is outside the scope of this article. We’ll assume Docker is installed on your system. However, if it’s not, visit the Docker website and follow the installation instructions specific to your operating system.
- Firstly, ensure you have a designated location for the app to store its configuration files. On Linux-based systems, we recommend “/opt/ombi/config/”. Afterward, we’ll set up the folder.
$ sudo mkdir -p /opt/ombi/config/
- Use the “docker run” command to execute the Docker container. Use the following commands in the terminal:
$ docker run -d –name=ombi -p 5000:5000 –restart=unless-stopped -v /opt/ombi/config:/config linuxserver/ombi:latest

Here’s a breakdown of the above command:
- -d: Detaches the container and runs it in the background.
- –name=ombi: Specifies the container’s name as “ombi”.
- -p 5000:5000: Maps port 5000 on the host machine to port 5000 inside the container. This allows accessing Ombi’s web interface on port 5000 of the host.
- –restart=unless-stopped: Sets the container to restart unless explicitly stopped automatically.
- -v /opt/ombi/config:/config: Mounts the directory /opt/ombi/config on the host to the /config directory inside the container. This ensures that the container uses the host’s configuration files located in /opt/ombi/config.
- linuxserver/ombi:latest: Specifies the Docker image to be used, in this case, “linuxserver/ombi:latest”.
The command’s output is the unique identifier or container ID assigned to the container. This ID is used to manage and interact with the container, such as stopping or inspecting it.
- Use the following command to see the running active Docker containers.
$ sudo docker ps

If you get an output such as the previous one, you’ll see the ports used and mapped by the container. To PORTS output indicates that the Ombi container is using port 3579 internally, and the container’s port 5000 is mapped to both the host machine’s port 5000 and the IPv6 port 5000.
Access Ombi by accessing http://localhost:5000 or http://[::1]:5000 in your web browser.
b. Configuring Ombi’s database.
Given that ombi uses a database to store and manage various data related to user requests, media availability, user settings, and other relevant information, it supports SQLite, MySQL, and MariaDB.
Before using MySQL as Ombi’s database, you must create a “database.json” file in the already config folder.
To configure the tool to use the database, you must provide a database.json file in the installation directory or the designated storage path. If you don’t provide a database.json file, Ombi will utilize the specified database configuration. Otherwise, it will use the default SQLite databases in its directory.
Here’s an example of how the database.json file should be structured.
The example below, specifies the database type and connection string for each database that the tool uses. The OmbiDatabase section specifies the configuration for the main Ombi database, while the SettingsDatabase and ExternalDatabase sections represent additional databases used for specific purposes.
{
“OmbiDatabase”: {
“Type”: “MySQL”,
“ConnectionString”: “Server=192.168.1.7;Port=3306;Database=Ombi;User=ombi;Password=ombi”
},
“SettingsDatabase”: {
“Type”: “sqlite”,
“ConnectionString”: “Data Source=C:/tmp/Settings.db”
},
“ExternalDatabase”: {
“Type”: “sqlite”,
“ConnectionString”: “Data Source=C:/tmp/External.db”
}
}
c. Installation on Windows:
- Firstly, visit the GitHub releases page and download the latest (win10-xxx.zip) stable version for Windows. Accordingly, we will download the release v4.39.1 for our x64 Windows Server.
- Once the download is complete, extract all (or run) the file. While choosing an extract destination folder, avoid placing the contents in the “Program Files” or “ProgramData” folders. Otherwise, the database will be locked.
- Thirdly, open the application.
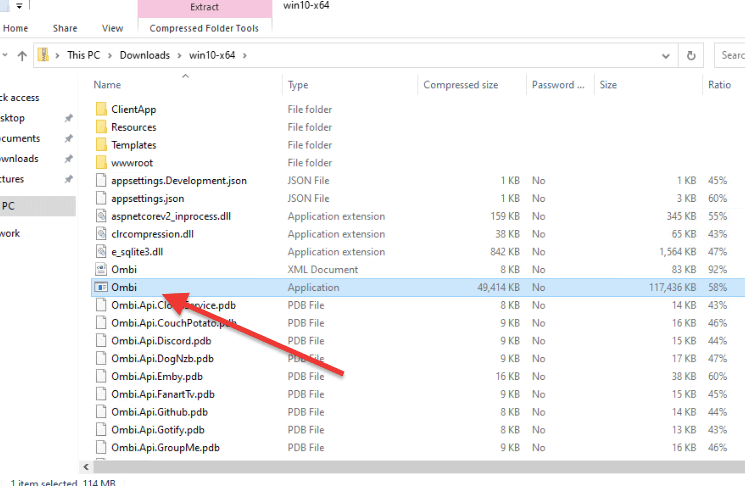
- You’ll notice the script running and opening a command prompt. This will begin the Windows Ombi service and provide essential information, including path, URL, and basic commands.
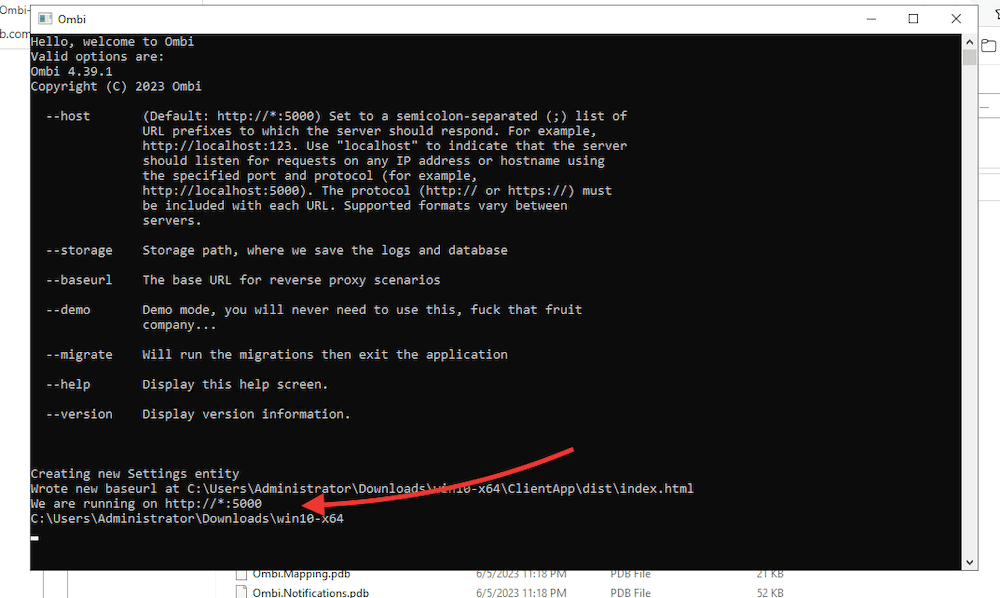
- Ombi will auto-configure. It will also show you where (Ombi’s port) it is running (We are running on http://*:5000).
- Finally, open a web browser and type http://localhost:5000. In the event that the installation was successful, the web browser interface would lead you to the setup wizard (more on this in the next chapter).
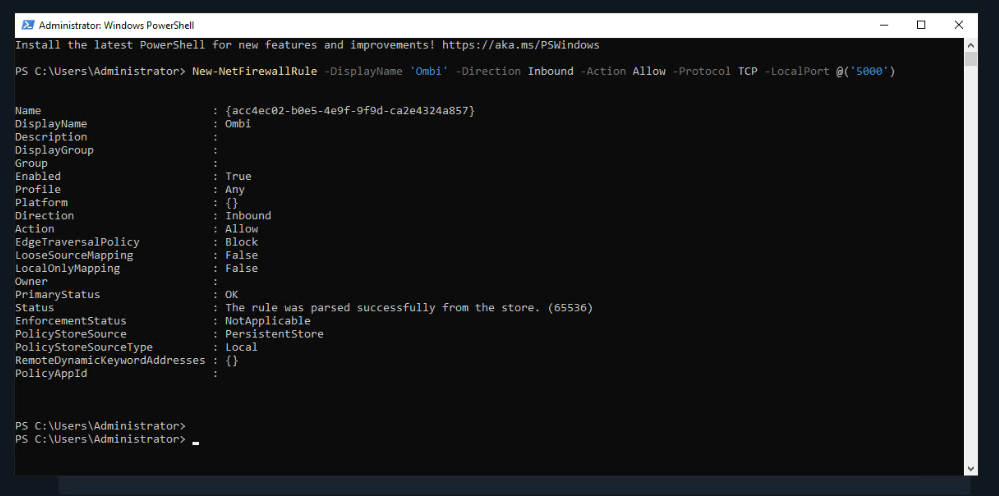
Configure the Windows Firewall.
In general, setting up Ombi on Windows Firewall is critical for allowing network traffic through specific ports. This will ensure that the app communicates with your media server (Plex, Emby, Jellyfin) and other external services without interruptions.
It typically runs on a specific port (e.g., default port 5000) to receive user requests and communicate with your media server’s API. When you allow this port through the Windows Firewall, you grant Ombi permission to accept incoming requests and establish the necessary connections with the media server.
Note: While allowing ports through the Windows Firewall enables connectivity, it’s recommended to utilize a reverse proxy when accessing Ombi externally. E.g. a reverse proxy allows you to expose Ombi securely without directly opening ports in the firewall.
- To configure Windows Firewall through PowerShell, you can issue the following command:
> New-NetFirewallRule -DisplayName ‘Ombi’ -Direction Inbound -Action Allow -Protocol TCP -LocalPort @(‘5000’)
d. Installation on Linux
Please note that the following instructions are specifically for Linux Systems – Debian-based distribution (/ APT Repository distributions). Also, remember that only systems based on “systemd” are supported. Please follow the steps below to add the Ombi repository to your Linux system:
*By the time of this setup, Ombi is actively changing repo providers.
- Firstly, open a terminal on your Linux system. Secondly, ensure you have the necessary dependencies installed. For example, on Ubuntu, run the following commands:
$ sudo apt update
$ sudo apt install curl
- Add the software (apt) repository to the sources list on your Debian-based Linux system. The following repository is signed, meaning all packages are validated before installation. Use this command.
$ echo “deb https://apt.ombi.app/master jessie main” | sudo tee /etc/apt/sources.list.d/ombi.list
- Additionally, for safe download and installation, you’ll need to install the Ombi key. Import the GPG key for the repository into the keyring of the APT package manager on a Debian-based Linux system. Use this command:
$ curl -sSL https://apt.ombi.app/pub.key | sudo apt-key add –
- Use the following command to update the package lists and install the application:
$ sudo apt update && sudo apt install ombi
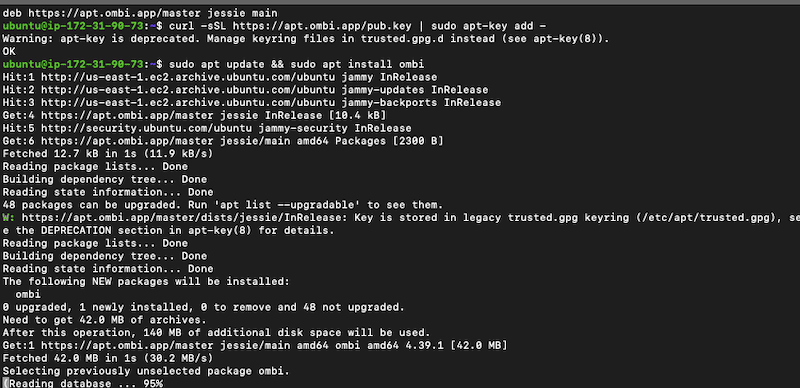
- Once the installation is complete, open a web browser and navigate to “http://localhost:5000” to access the application.
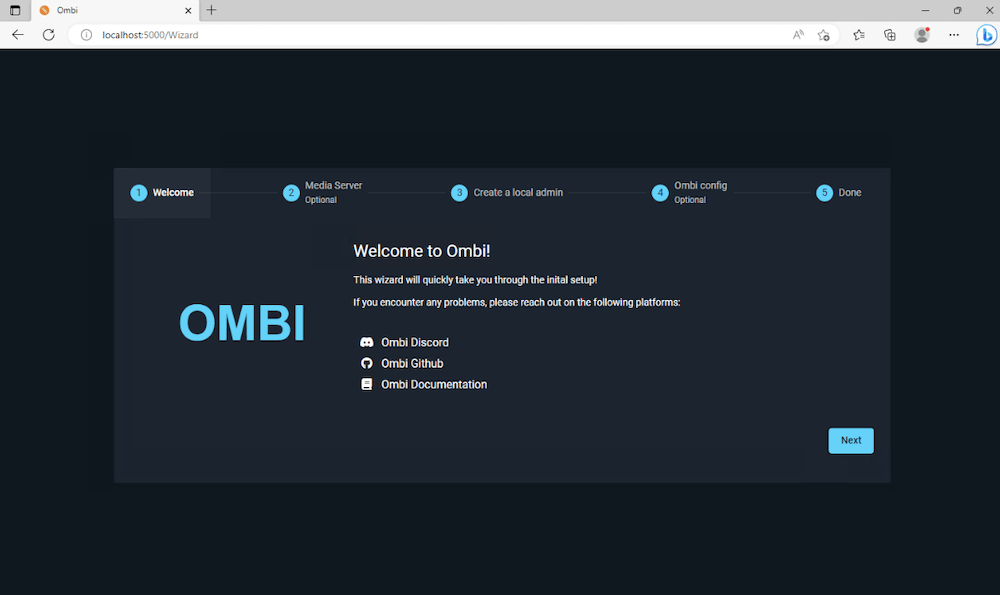
4. Setting Up Ombi.
When you access it for the first time, you will immediately see the setup wizard. As long as you follow the instructions, you’ll be able to get started with it in no time.
a. Configuration.
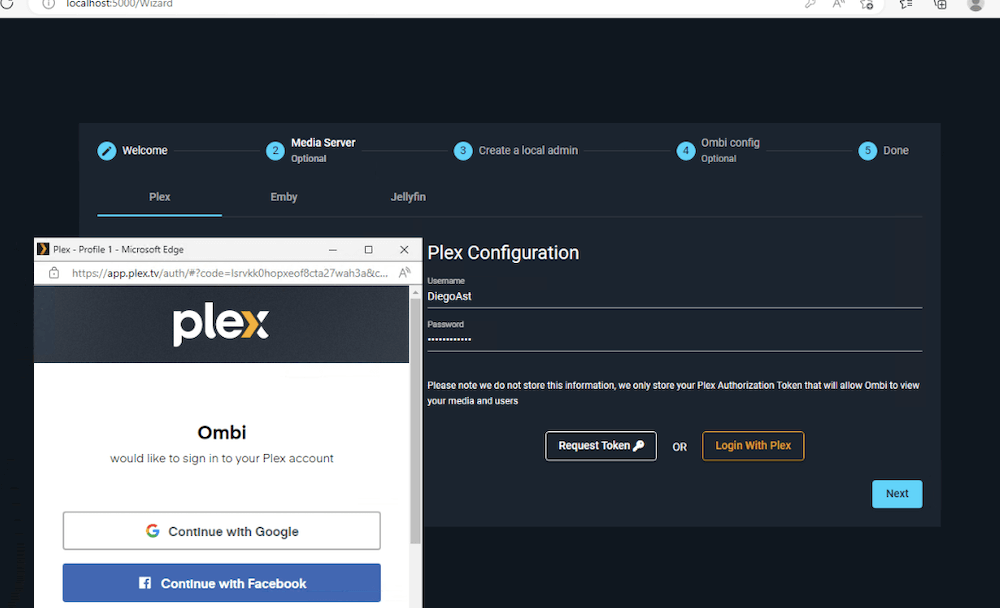
- Firstly, provide the necessary details for your media server (Plex, Emby, or Jellyfin). This includes the server address, authentication method, or API key.
- After that, the first (optional) step in the Ombi installation wizard is to link your media server (Plex, Jellyfin, or Emby) with Ombi. Once you see the login screen, enter your credentials. You may also attempt to log in to your media server using the “Request Token” service.
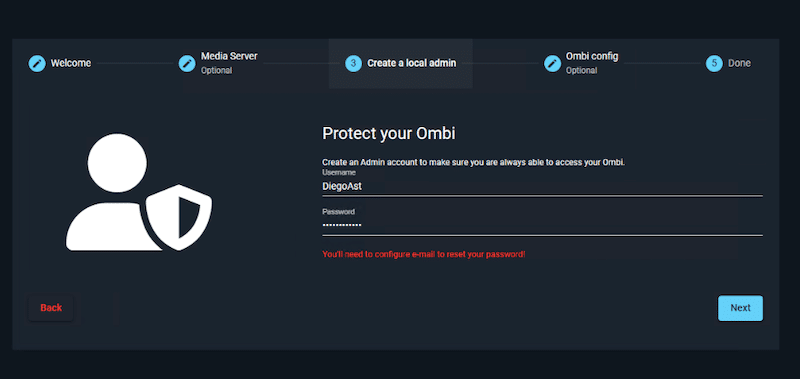
b. The next step is to create a local admin.
Creating a local admin account is essential for protecting your Ombi instance. Obviously, this admin account will have elevated privileges, allowing you to manage and configure Ombi effectively. This account ensures only authorized individuals can access and modify Ombi’s settings.
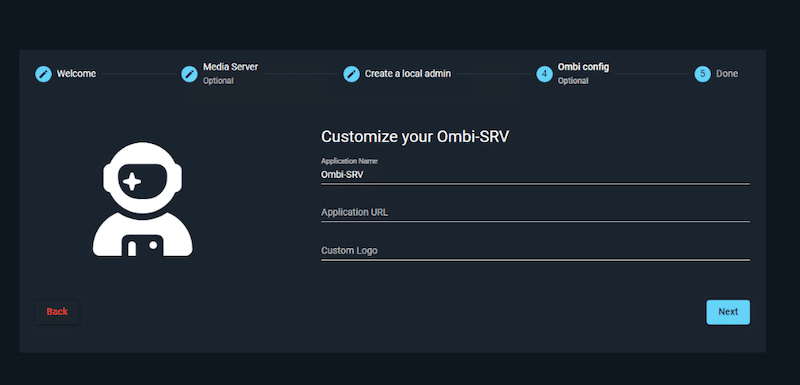
c. Customize it.
Ombi also allows you to customize the application name, URL, and logo. With this option, you can create a more personalized and visually appealing Ombi interface that aligns with your preferences and integrates with your media server setup. This is your chance to customize Ombi’s appearance and include branding.
d. Done!
Finally, check all your setup and preferences and click on “Done.”
5. Logging In and Navigating the Interface.
Now we’ll take a look at the Ombi login, dashboard, and main features.
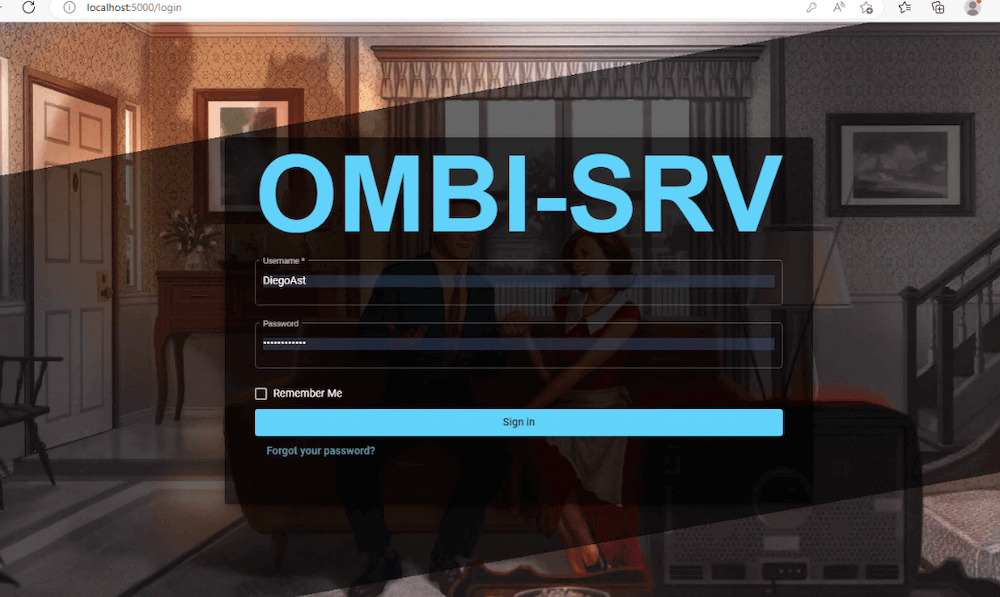
a. Accessing the Ombi login page.
If you completed the previous “wizard setup steps,” then the web interface will ask you for credentials. If you already created the local admin user, you can access your Ombi instance with that user. You can add more users or change your current admin password later.
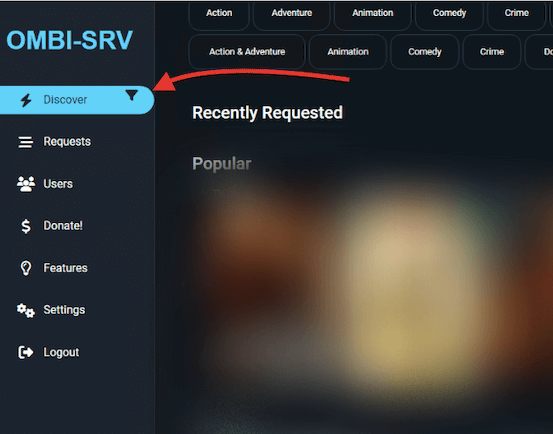
All in all, the Ombi’s interface is clean, easy to use, and visually appealing. In the left-hand menu, you’ll see all the important items to navigate Ombi like an expert.
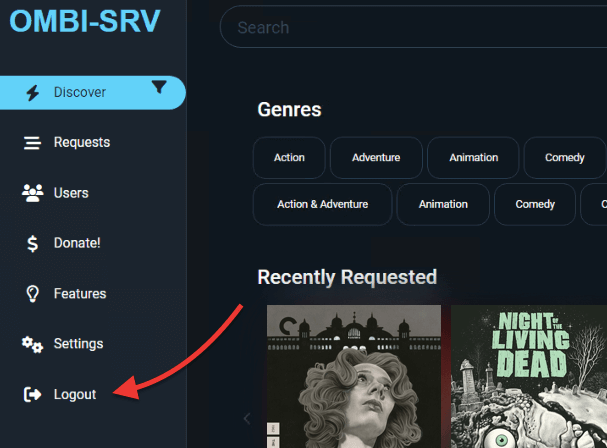
These menu items include: Discover, Requests, Users, Donate!, Features, Settings, and Logout!
Looking to streamline media requests with Ombi?
Upgrade your setup with RapidSeedbox’s high-speed seedboxes. Enjoy faster downloads, seamless integration, and exceptional support for an optimized media experience.
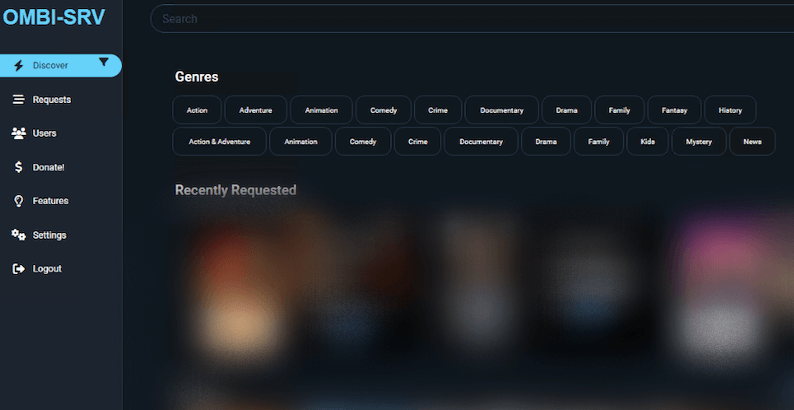
a. Discover
Firstly, this tab allows your media server end-users to explore and discover new movies, TV shows, and music. It provides them with an excellent browsing experience where they can search for popular or trending content, view recommendations, and explore different genres. From there, you can also find information about media items, such as their synopsis, ratings, and available trailers.
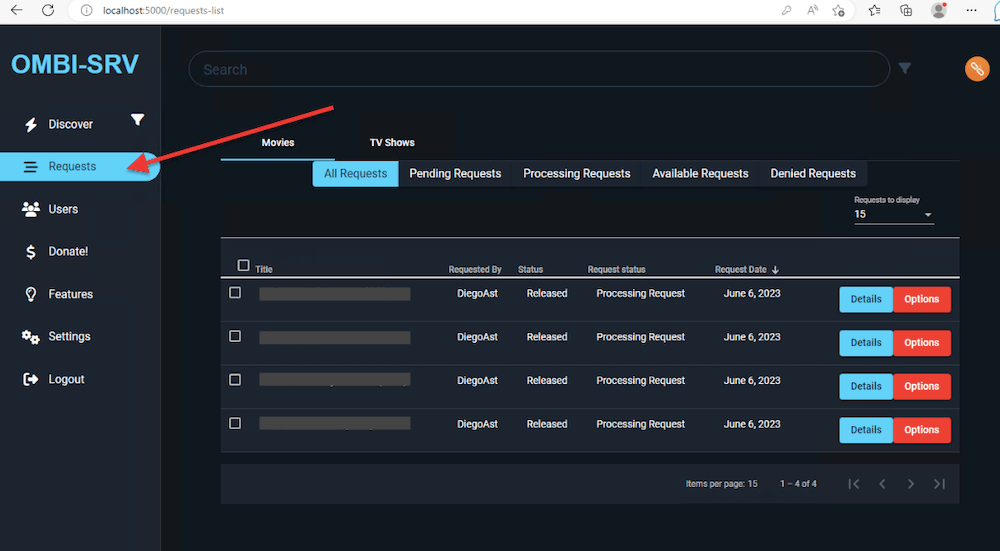
b. Requests.
This is a vital feature of Ombi. It is where users submit their media requests. Basically, they can search for specific movies, TV shows, or music albums and submit a request for them to be added to the media library. You can find it in “Requests,” where users can track the status of their requests. Here, users can also receive notifications when their requested content becomes available.
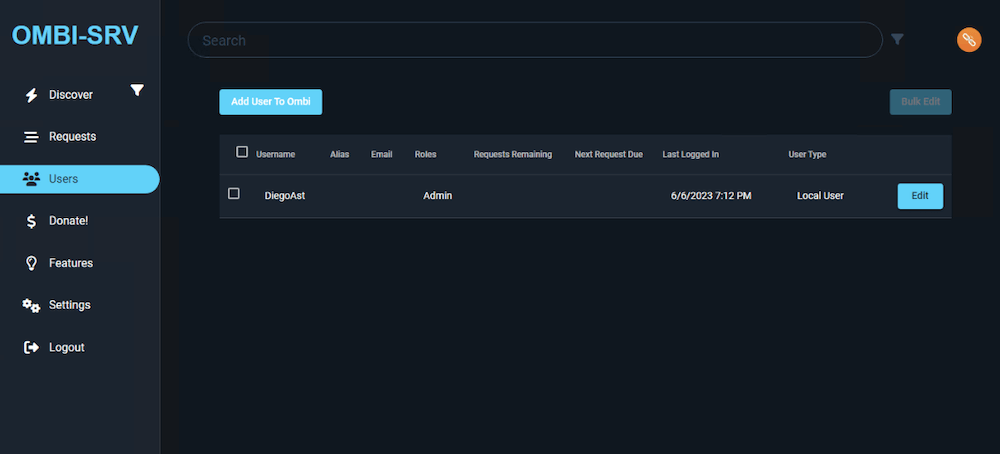
c. Users.
This tab provides you (as a media server admin) with a fantastic way to manage user accounts. In short, it allows administrators to control the user base and their interactions with Ombi. Overall, that’s where admins can view and manage the registered Ombi users, including granting or revoking permissions, managing user settings, setting roles, setting notification types, and limiting user requests.
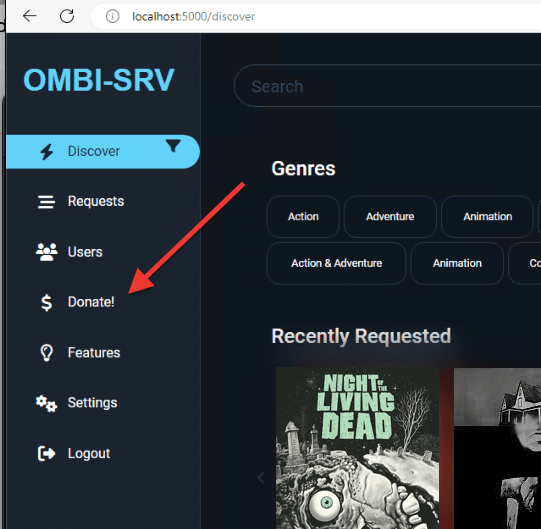
d. Donate:
The Donate tab (link to Paypal) allows users to contribute (voluntarily) to Ombi’s development and maintenance. Unfortunately, it includes only PayPal as the payment gateway. If you like and appreciate the Ombi service, we encourage you to contribute to this fantastic project.
Keep it up, Ombi!
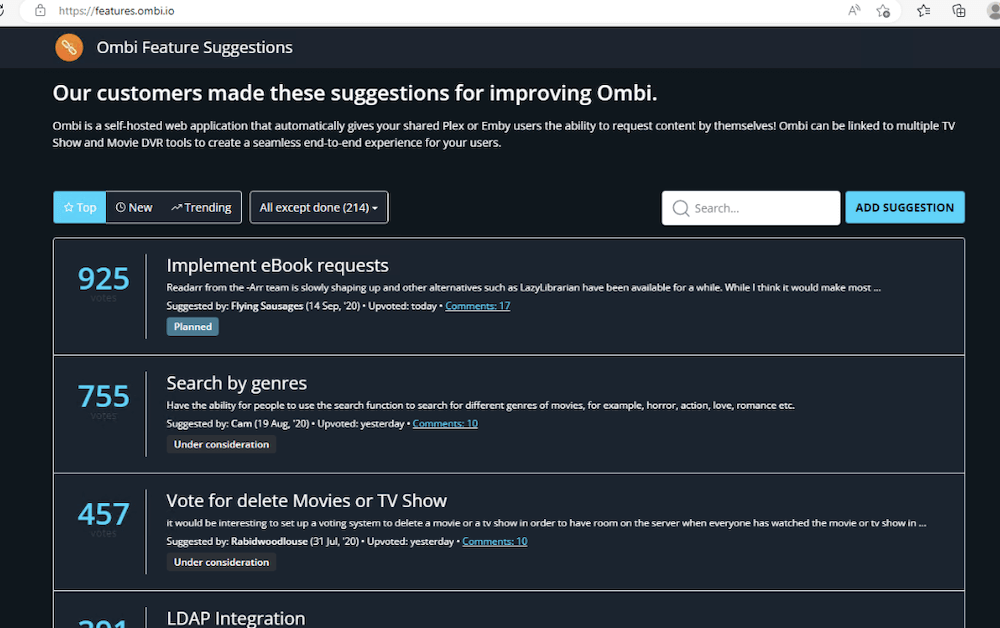
e. Features:
This is where Ombi showcases user-suggested additional functionalities and capabilities for improving the service. It provides information about integrating with other media servers, support for different platforms or devices, and any special features or enhancements users want to see. The “Features” item on the left-hand menu will take you to Ombi’s official features site.
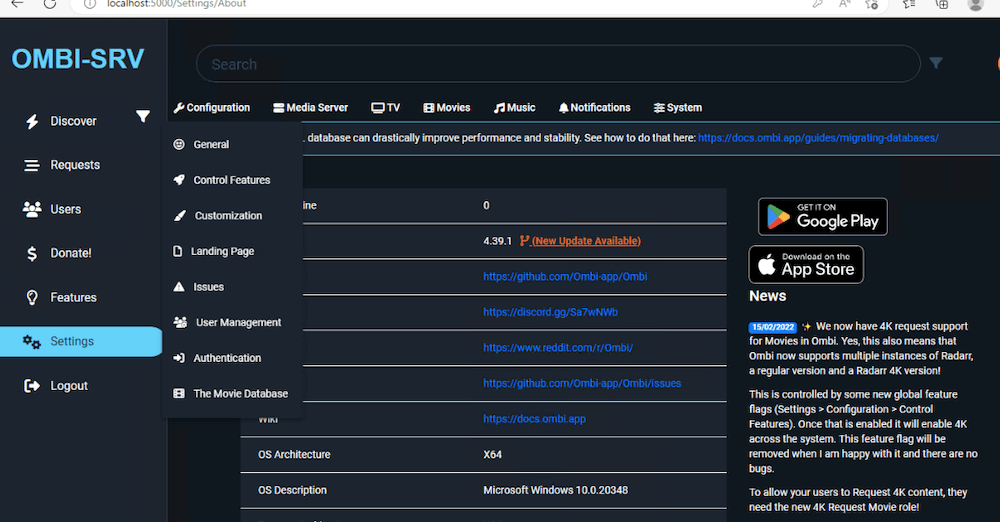
f. Settings.
In the Settings tab, you’ll see quite a comprehensive configuration interface. It is divided into Configuration, Media Server, TV, Movies, Music, Notifications, and System.
- The “Configuration” tab allows you to manage and change various basic Ombi settings. In summary, you can check the General configuration, set control features, customize it, see the landing page, check issues, manage users, configure authentication, or check the Movie Database settings. You can, for instance, change the base URL, check the API key (or refresh it), auto-delete available requests, configure notifications, and hide requests.
- The Media Server section provides all relevant settings to integrate your media server (Plex, Jellyfin, or Emby) with Ombi. In the Media Server settings, you must enter information like credentials, enable watchlist requests (for Plex), set sync settings, and more.
- The TV, Movies, and Music tabs provide the necessary settings to integrate your Ombi instance with torrent automation software, including Sonarr, Radarr, DogNzb, SickChill, CouchPotato, and Lidarr.
- The Notifications section allows admins to set up notifications for the end-users. These notifications range from mobile, email, newsletter, Discord, Slack, Pushbullet, Pushover, Mattermost, Telegram, Gotify, Webhook, and Twilio.
- System: Here, you can get general system (server or software) information, including the software version (About), failed requests, scheduled tasks, and logs.
Configuring Ombi to work for you is an essential step. Once the setup is complete, you can use Ombi to request movies, TV shows, and music for your media server.
Later on, we’ll show you how to manage and make requests and integrate Ombi with Plex and Sonarr.
g. Logout.
Lastly, this option allows users to log out of their Ombi account securely. That way, you can make sure that your session is ended, protecting your account and data from unauthorized access. Keep in mind that logging out is essential, especially when accessing Ombi from shared or public devices.
6. Managing Requests.
As I have noted above, Ombi is perfect for handling and overseeing user-submitted requests for movies, TV shows, or music. It provides a comprehensive set of tools to streamline requests and user management.
Request management with Ombi can be sorted into three different categories.
- Users (media consumers) can submit their media requests through the Ombi interface. They can also track the status of their requests and receive notifications with updates on the status of their requests.
- Media server admins can easily review and approve/reject user requests. With Ombi, the entire approval workflow is streamlined, so admins don’t have to spend much time managing. Another option is to enable auto-approval for specific users or request types. In addition, Ombi also provides a comprehensive user management tool. Admins can manage user accounts, permissions, and access levels.
- Automation: Once a media request gets approved, Ombi facilitates its fulfillment by automatically adding the requested media to the designated DVR (Couchpotato, Radarr, Sonarr). Once downloaded, it will be updated on your media server, such as Plex, Emby, or Jellyfin. This integration ensures that users can access their requested content conveniently.
a. Submitting New Requests and Tracking Them.
As an end-user (media consumer), you can use the following steps to submit new media requests and track them via Ombi.
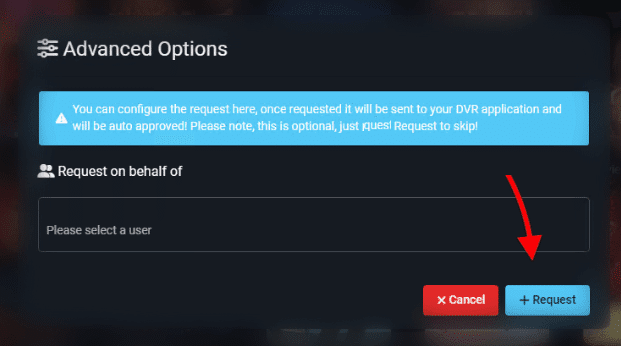
- Firstly, use the search function (2) to find your desired media content.
- Secondly, under each media poster, there is a “Request” button (2). Click on it.

- Then, you’ll see the following Request (Advanced Options) window appear. Select the user who is making the request and click on + Request.
- When you click on “request” (and your request is approved, whether automatically or manually), the request will be sent to the preferred DVR application (Sonarr, Radarr, CouchPotato, etc.)
Tracking the request status.
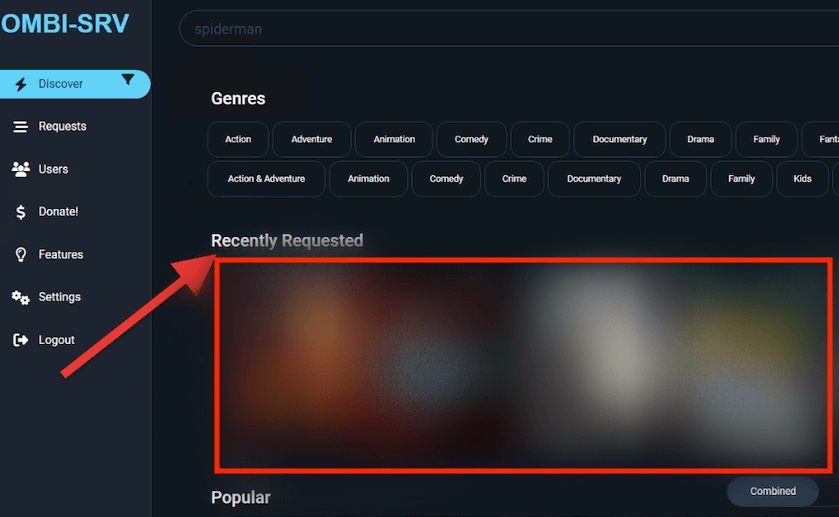
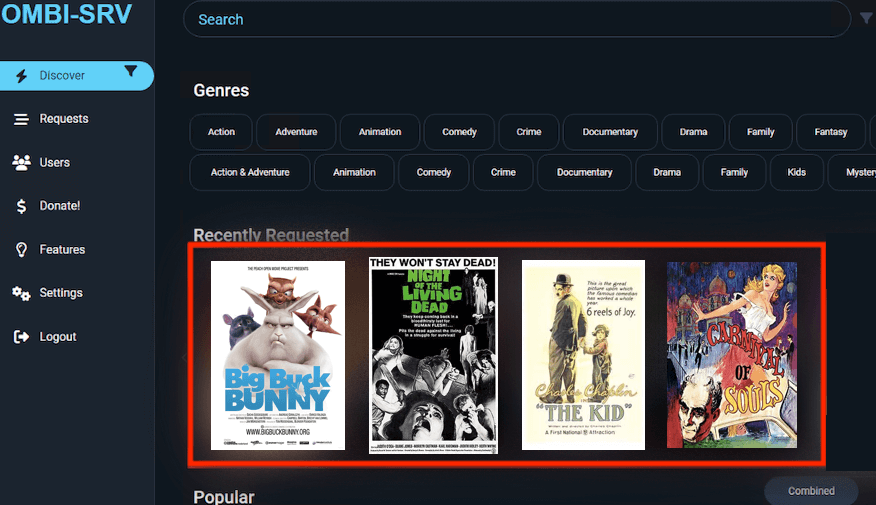
As a user, you can easily keep track of your requests in Ombi via the main Dashboard (Recently Requested section), Request List, Notifications, or Request History.
b. Reviewing and Responding to Requests
As I have noted at the beginning of this section, media server admins can use Ombi to review and approve/reject user requests easily. For example, they can quickly go through all requests and approve or reject each request. From there, they can also enable auto-approval for specific users or request types.
Viewing submitted requests and their details.
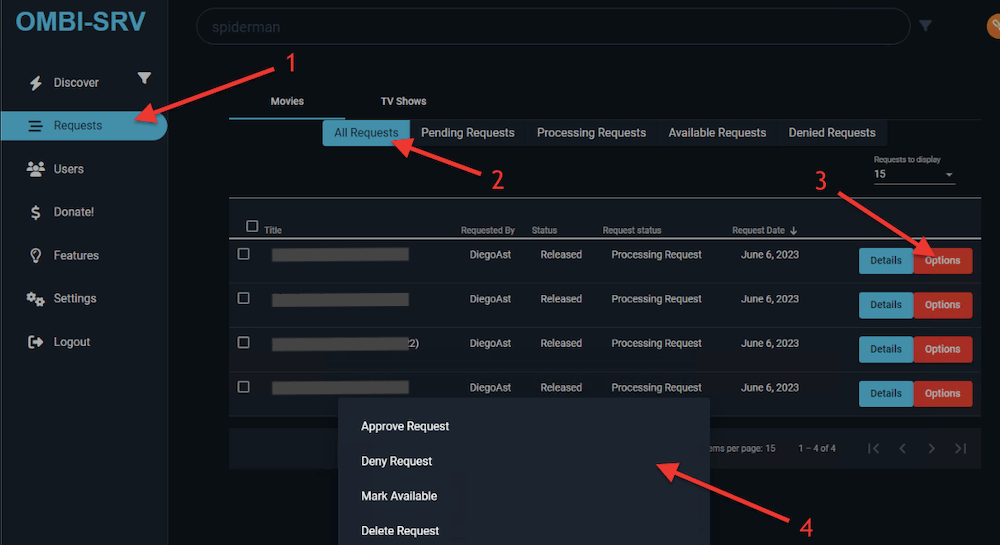
- Firstly, as a media server admin, go to “Requests (1)” > All Requests (2) > Go through each request, and check the media title, requester, status, and date.
- Click on “Options” > and decide whether to “Approve, Deny, Make Available, or Delete Request.”
- You can also look at all the “Recently requested” on the main dashboard. But going through and managing all media requests from the main dashboard can be a bit slower (and tedious) than using the “Requests” menu.
7. Integrating Ombi with other Tools (Sonarr + Plex)
Moving on, it’s time to Integrate Ombi with Sonarr for automated media acquisition. Generally, automating content requests with Sonarr, Radarr (and other tools) through Ombi allows better media acquisition and enhanced user experience. Equally important, in the second section of this chapter, we will integrate Ombi with Plex. For example, using Ombi with Plex Media Server improves the content request (for users) and management (for admins).
a. Automating Content Requests with Sonarr and Radarr.
- Go to Sonarr (or Radarr) to collect the following information.
- Hostname and IP
- Port
- API Key
- Base URL (for reverse proxy support).
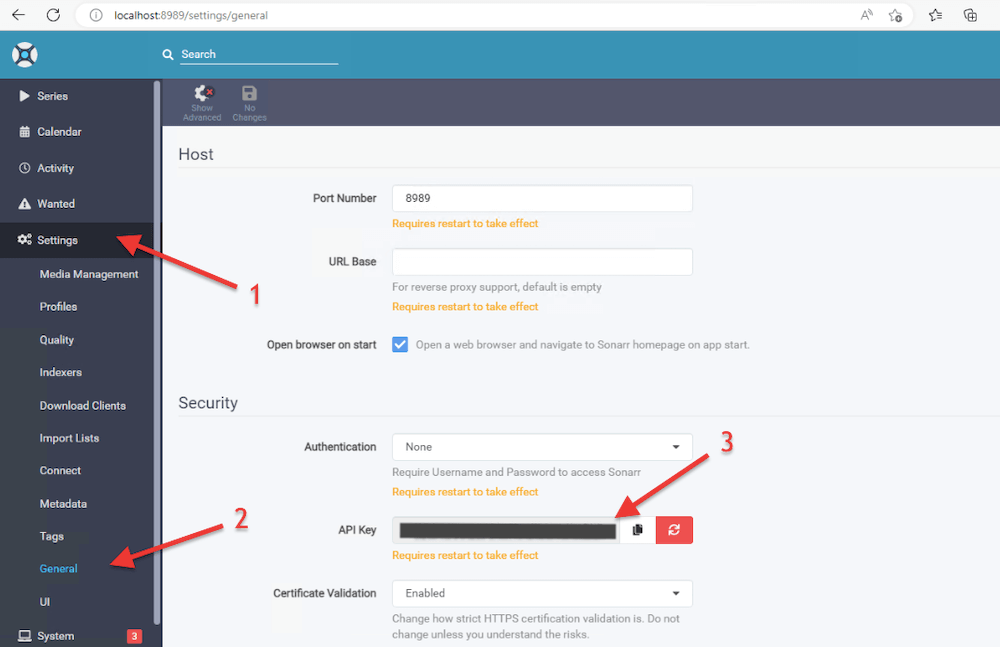
- You can find most of this information in Sonarr > Settings (1) > General (2). There you’ll find the default port number, URL Base (if configured), authentication (if configured), and most important, API Key (3). Record this information and go back to Ombi.
- Go to Ombi > Settings (1) > TV (2) > Sonarr (3).
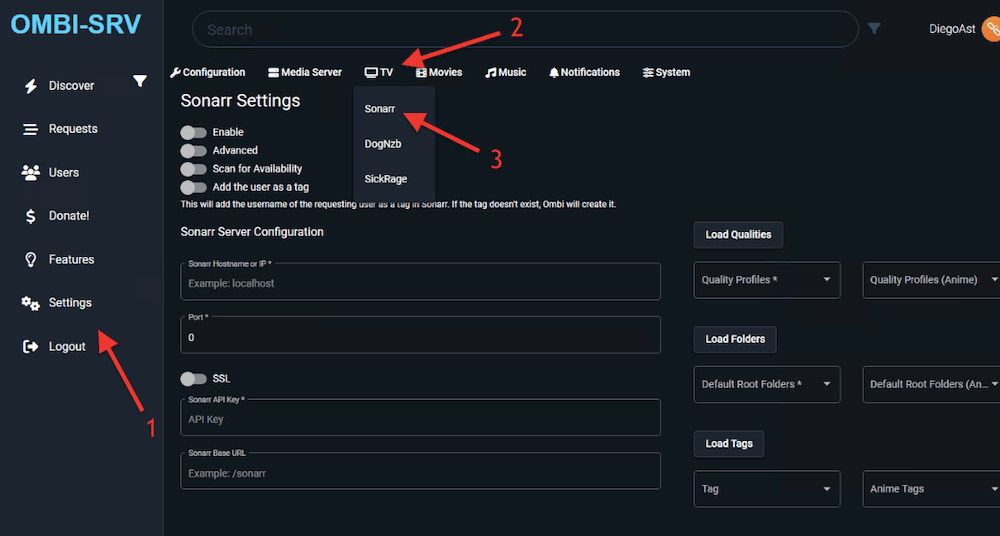
- On Ombi’s Sonarr Settings (1):
- Enable Sonarr
- Scan for availability.
- (Optional) You can also add the requesting user as a tag.
- Sonarr Server Configuration (2) > Add the server configuration you collected, including IP (or hostname), port, and API Key.
- Next, test the connectivity (3) > Ensure the Ombi is successfully connected to Sonarr (4).
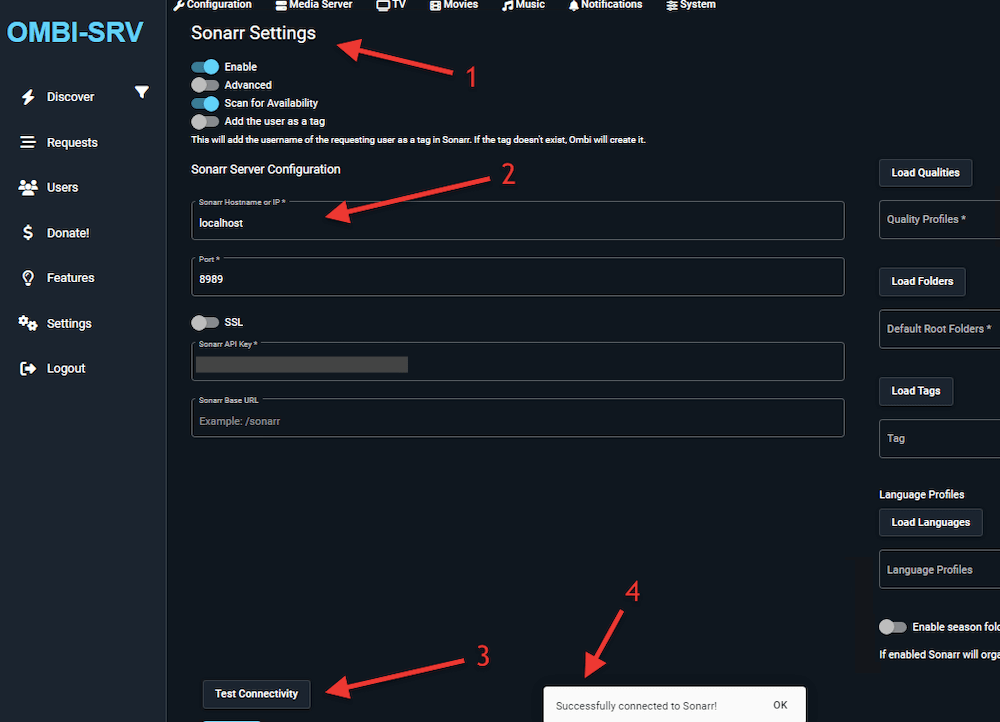
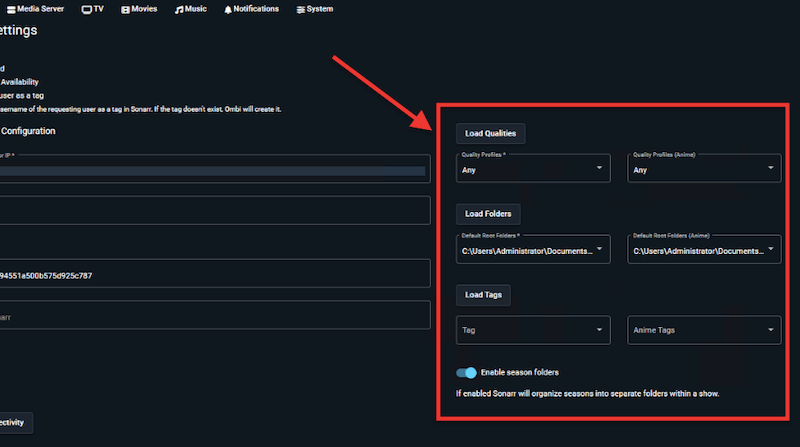
- Now that the connection is successful let’s load the qualities, folders, and tags configured over Sonarr. If everything is properly configured in Sonarr, then you can load your current preferred settings on Sonarr.
What happens next?
- Once the integration is enabled, Ombi will communicate with Sonarr and/or Radarr. Only then, when a user submits a request in Ombi, it is sent to Sonarr and/or Radarr for processing. These applications will search for the requested content and initiate the download process.
- When the download is complete, Sonarr and/or Radarr will automatically organize the media file and add it to your (Plex/Jellyfin/Emby) library. The media will be properly renamed, sorted into appropriate folders, and made available for streaming.
- Once all is done, Ombi will update the request’s status accordingly, marking it as available in your library once the content has been successfully added.
b. Ombi with Plex integration
Lastly, integrating Ombi with your favorite media server is the biggest piece of the puzzle. As mentioned previously, media consumers need a way to streamline their requests, and media server managers need some centralization for all the requests.
- Firstly, to integrate Ombi with Plex, go to Settings > Media Server (choose Plex).
- Secondly, enable the Plex Configuration (1)
- After that, enable User Watchlist Requests (2). In essence, Plex’s watchlist allows users to create a personalized list of movies and TV shows they want to watch from Plex. Ombi integrates perfectly because it can keep track of Plex’s Watchlist. So when a Plex user adds something to their watchlist, the same request will go to Ombi.
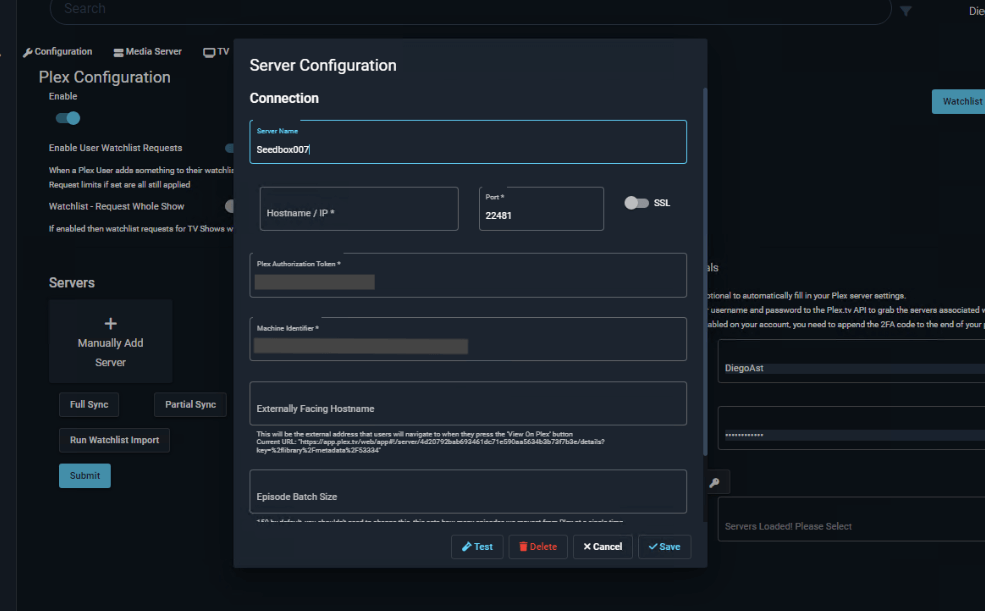
- Fourthly, enter your Plex credentials (3) to fill in all your Plex media server information automatically. Subsequently, this will scan your account and find your available servers. You should choose the appropriate one and click on Submit.
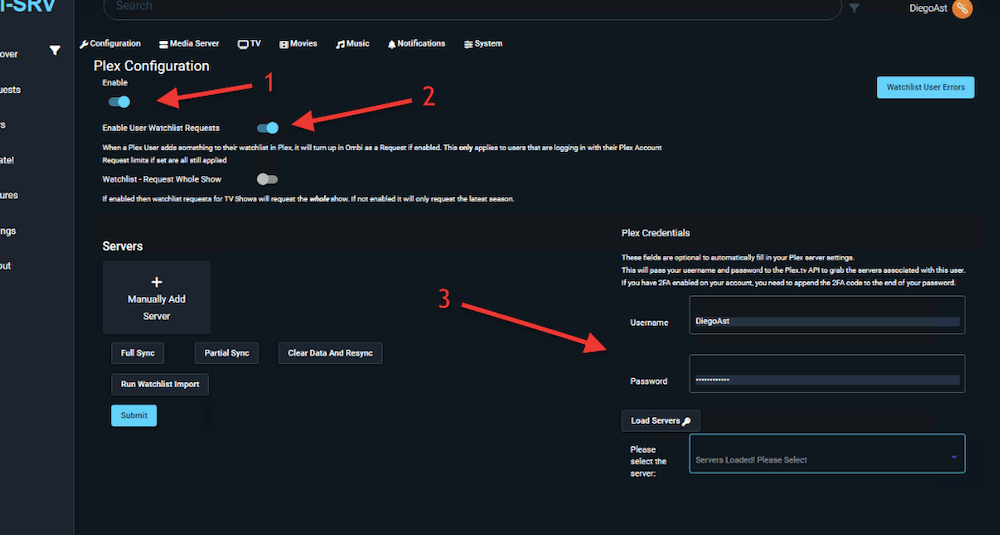
- Finally, verify all the server configurations are correct. Then, Test and Save the server configuration.
Looking to streamline media requests with Ombi?
Upgrade your setup with RapidSeedbox’s high-speed seedboxes. Enjoy faster downloads, seamless integration, and exceptional support for an optimized media experience.
8. Final Words.
Congratulations! You have now reached the end of “The Ultimate Guide to Ombi.”
Now that you’ve read everything, we hope this guide has equipped you with the necessary information and step-by-step instructions to successfully install, configure, and utilize Ombi to its fullest potential.
Overall, Ombi is amazing! Thanks to it, you can effortlessly manage media requests, integrate with other tools, and create a personalized media streaming experience. Remember to regularly explore new features and updates as the tool continues to evolve.
Finally, enjoy the convenience, automation, and control that Ombi brings to your media collection and happy streaming!
Do you have a definitive guide on setting up Ombi email to users? I can never get the current Ombi screens to work.