Lights, camera, Radarr!
If you’re tired of manually searching for and downloading movies, this guide is for you.
In this complete step-by-step handbook to Radarr, we will go through everything you need to start with Radarr. You’ll learn the basics of what Radarr is, how it works, and how to set it up and integrate it with other apps. The following table of contents shows in detail what we will cover.
Disclaimer: This material has been developed strictly for informational purposes. It does not constitute endorsement of any activities (including illegal activities), products or services. You are solely responsible for complying with the applicable laws, including intellectual property laws, when using our services or relying on any information herein. We do not accept any liability for damage arising from the use of our services or information contained herein in any manner whatsoever, except where explicitly required by law.
Table of Contents.
- What is Radarr?
- How does Radarr work?
- Downloading, installing, and opening Radarr.
- Running Radarr Docker Container.
- How to setup Radarr.
- How to set up Radarr with any download Client?
- How to Use Radarr After Setup
- Radarr’s FAQ.
1. What is Radarr?
Well, imagine you’re a movie buff who can’t get enough of the latest flicks. But instead of searching for movies one by one and downloading them manually, you have your own personal movie butler – Radarr!
Radarr is like a trusty sidekick that scours the internet for the newest and coolest movies for you, and then grabs them all in one place. It even makes sure that the quality is top-notch, upgrading your collection whenever a better version comes out. So you can sit back, relax, and enjoy the show – without lifting a finger!
And the best part?
Radarr integrates with all your favorite apps like uTorrent, qBittorrent, SABnzbd, NZBGet, Kodi, and Plex, so you can easily download and stream your movie collection from anywhere. Think of Radarr as your very own movie superhero – saving you time and hassle, so you can focus on the important things in life, like enjoying the popcorn!
a. Lets get technical.
Radarr is a free and open-source movie collection manager. It is actually a fork of Sonarr, but for movies. Radarr automatically monitors multiple RSS feeds for new movies and interfaces with Usenet and BitTorrent clients to grab, sort, and rename them. It supports automatic upgrading of the quality of existing files and features full integration with popular download clients and media servers. It is important to keep in mind that Radarr is not a download client.
b. Radarr Features.
Radarr has the following core features:
- Movie management: Radarr allows users to add movies to their collection. They can also include information such as the title, release date, genre, rating, and more.
- Automated downloads: Radarr can monitor multiple RSS feeds for new movies and connects with BitTorrent or Usenet clients to automatically download.
- Quality upgrades: Radarr can automatically upgrade existing movie files in your library to a better quality format (when it becomes available).
- Failed download handling: If a download fails, Radarr can automatically search for another release. It also allows users to manually search for and select a different release.
- Integration with download clients: Radarr can integrate with popular download clients such as SABnzbd, NZBGet, Deluge, qBittorrent and others.
- Metadata management: Radarr can import metadata such as trailers and subtitles. It can also add metadata such as posters and information for use with media servers like Kodi and Plex.
- Customization: Radarr offers advanced customization options for profiles. This customization allows you to specify the preferred video and audio quality and format for each movie in your library.
- User interface: Radarr has a modern and intuitive user interface (UI) that makes it easy to manage your movie collection and automate your downloads. Below is a screenshot of Radarr’s UI.
2. How does Radarr Work?
To learn how Radarr works, refer to the diagram below and basic flow.
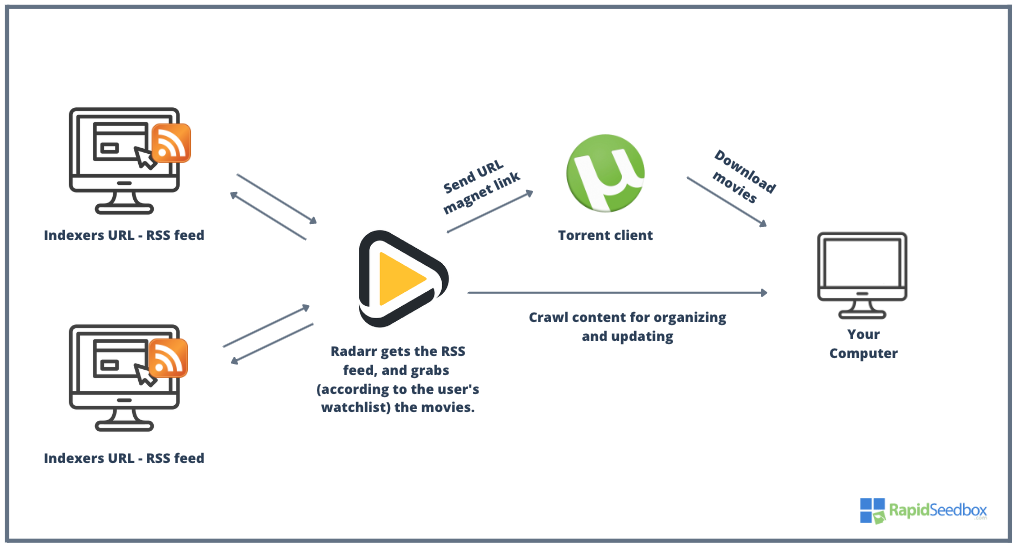
- Radarr monitors RSS feeds and indexers (URLs) to track new movie releases.
- When a new movie is found, Radarr evaluates whether it meets the quality criteria set in the user’s profile. You can configure watchlists to keep an eye out for specific movies that are not yet available or to add movies to its collection automatically when they become available.
- If the movie meets the criteria, Radarr sends the download request to the configured download Usenet or torrent client (such as SABnzbd or uTorrent).
- The download client then downloads the movie file and saves it to your computer’s hard disk.
- Radarr then renames the movie file according to the user’s preferences and moves it to the appropriate location on the hard disk.
- Radarr can also monitor (crawl) the hard disk for changes, allowing it to automatically upgrade existing movie files to higher-quality versions as they become available.
How does Radarr’s integration with other tools work?
It is also important to note that Radarr can also integrate with media servers such as Plex and Kodi. Integrating these streaming services can give you a seamless experience for accessing and streaming all your movie collections.
You can also complement Radarr with applications like Jackett, which translates queries from Radarr into a tracker site via HTTP query. Radarr can be configured to use Jackett as an indexer, which then enables Radarr to search for content on a large number of torrent sites. When Radarr requests a search from Jackett, Jackett will parse the “HTML response” and then send the result back to Radarr. Jackett and Radarr complement each other because Radarr tells Jackett what to look for, and it keeps track of Jackett’s RSS feeds. This allows Radarr to automatically grab new movies and episodes as soon as they become available on the tracker sites indexed by Jackett.
Note: Before downloading torrents using Radarr, it is always a good practice to understand the risks of torrenting.
🕶️ Want your Radarr setup running like it’s managed by a dev on caffeine?
Unlock tweaks only the nerdiest automation junkies know: Access the Private Optimization Guide
3. Downloading, Installing, and Opening Radarr.
Radar is a multi-platform application natively supported by Windows (as Windows service or system tray app) but also by Linux, BSD, macOS, NAS appliances, and Docker containers.
For demonstration purposes, we will be downloading, installing, and opening Radarr using a Windows Server. In the next section, we will run Radarr (Hotio) Docker container.
a. Downloading Radarr.
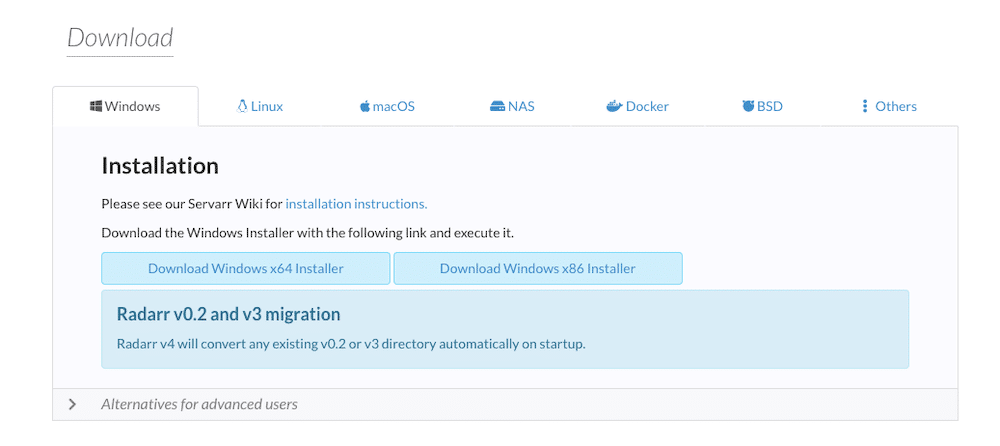
- Radarr download. The latest version of Radarr is v5. The best place to download Radarr is from its official site. Since Radarr is an open-source application released under the GPL v3 license, you can also get the code and all files in its Github repository.
- While you download Radarr, ensure you have admin privileges and approve it as a safe download (as long as you download it from the official site).

- Radarr installation. The installation process for Radarr is pretty straightforward (detailed below). For Windows, download the installer and run the .exe file. NAS and Radarr Docker installations are quite different (we’ll cover this in an upcoming blog post).
Still on Radarr v4? Time to upgrade to v5.
Radarr v5 is a more stable, performant, and future-ready version. Whether you’re managing a huge library or fine-tuning automation, v5 brings:
- Smarter parsing
- Automatic tagging
- Better metadata
- Smoother UI
- Stronger API & Docker documentation
| Feature | v4 | v5 |
|---|---|---|
| Performance | Slower UI and loading | ⚡ Faster UI and movie details loading |
| Auto-Tagging | Manual only | ✅ Auto-tag by studio and status |
| Release Parsing | Limited | ✅ Better parsing (4K, languages, studios) |
| Movie File Handling | Some bugs when editing or deleting | ✅ More reliable editing & filtering |
| Metadata | Basic info | ✅ HDR, Blu-ray links, better Kodi support |
| UI Improvements | Some flickering, smaller fields | ✅ Smoother dropdowns, improved modals |
| Trakt Integration | Basic lists only | ✅ Filters, sorting, better error handling |
| Notifications | Basic Discord/Telegram | ✅ Richer, with metadata and images |
| Docker Updates | Risky if done inside container | ⚠ Still needs manual image updates |
b. Installing Radarr.
In this section, we’ll show you how to set up Radarr on a Windows (Server) machine.
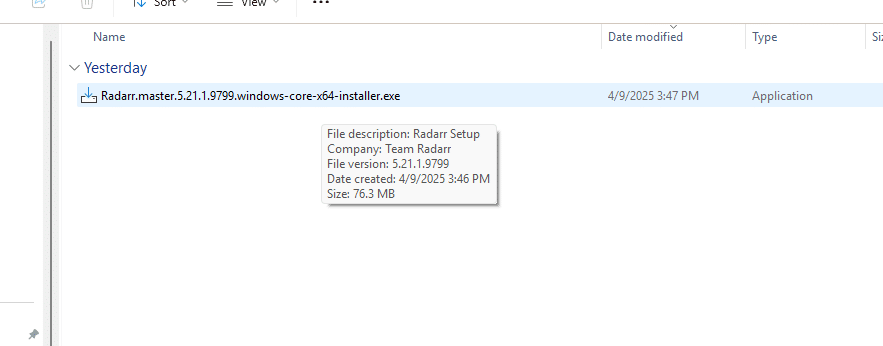
- After downloading Radarr from the official site, run the executable file with admin privilege. Ensure you are installing the right file, Radarr’s file should be from the company “Team Radarr” and about 70 MB in size. We will install the latest Radarr release 5.21
- If you agree with the additional tasks installed while installing Radarr, click on “Next.” By default Radarr, creates a desktop shortcut and installs it as a Windows Service. By default, Radarr will not start automatically. Change any additional tasks to suit your preferences.
- Radarr will start installing on your computer.
- Once the Radarr installation is finished, you’ll be able to open Radarr’s web UI.
- Click on “Finish” and Radarr’s web UI will open.
c. Opening Radarr.
In the previous section, we installed the Radarr application. If you have successfully installed it, you’ll be able to open its interface using a web browser. Open Radarr with your web browser. Type “localhost:7878” or 127.0.01:7878.
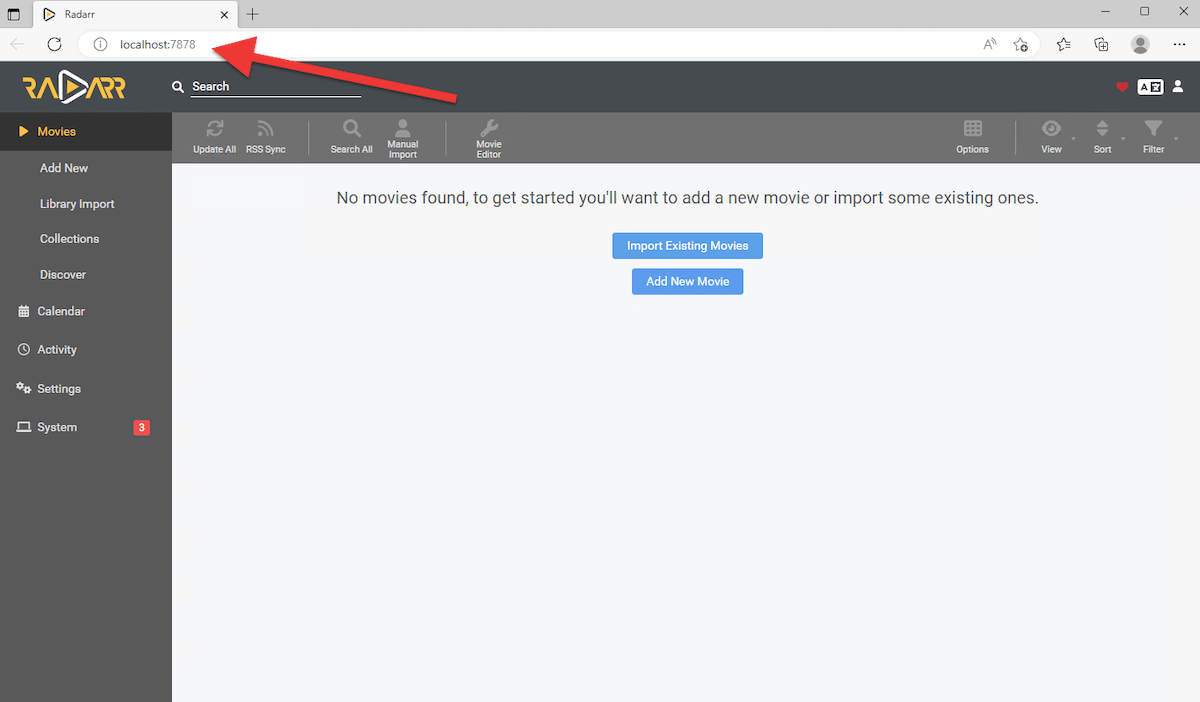
Radarr port. By default, Radarr uses port 7878. So, once you install it, you can go to http://localhost:7878 using your favorite browser to start using Radarr.
Accessing Radarr in a remote machine.
To access the Radarr web interface (if the Radarr is deployed on a remote machine), you will need to enter the IP address or hostname, followed by the port number. For example, if Radarr is installed on a computer with the IP address 192.168.1.100, you can access the web interface by going to http://192.168.1.100:7878 in your web browser.
d. Can’t open Radarr? Try the following.
If you can’t open Radarr via the web interface, try the following:
- Check firewall rules and Radarr port. If you want to have access to Radarr from another computer in a remote network, ensure Radarr port (7878) is open on your local firewall or router. You may also want to check for firewall rules— look for rules blocking the application, port, or IP. Also always ensure that no other application is using Radarr’s default port:7878. To find out what’s listening on that port use the “netstat” utility.
- Check connectivity. Ensure that the Radarr server is reachable from your local machine. A simple ping or traceroute can give you an idea. Also, keep in mind that if you are using any VPN or proxy to tunnel your Internet connection, turn it off and try to access Radarr again. VPNs and proxies will interfere with your local connections.
- Close the application and execute with admin rights. If you can’t access Radarr or get a “The application Radarr can’t be opened” error message while trying to access its web interface, close the application from the windows task. Go back to the folder and open the executable again with admin rights. Then try to open the web application again using the “localhost:7878” URL. This problem can also happen to Linux and macOS users. To solve this, simply open the terminal and type “chmod +x …(Radarr directory/radarr).”
4. Running Radarr Docker Container.
Docker containers provide an efficient and lightweight way to deploy applications, as they can be run on any machine that supports Docker, regardless of the underlying operating system.
The Hotio/Radarr Docker container is a pre-built, portable software package that includes the Radarr application and all its dependencies, packaged in a Docker container. The Hotio/Radarr Docker container simplifies the process of installing and running Radarr, as all the required dependencies are included in the container. This makes it easy to deploy Radarr to a wide range of environments, including local machines, servers, and cloud platforms.
For a practical example of setting up media applications using Docker, check out this guide on Plex in Docker. This guide walks through container setup, persistent storage, and network configuration.
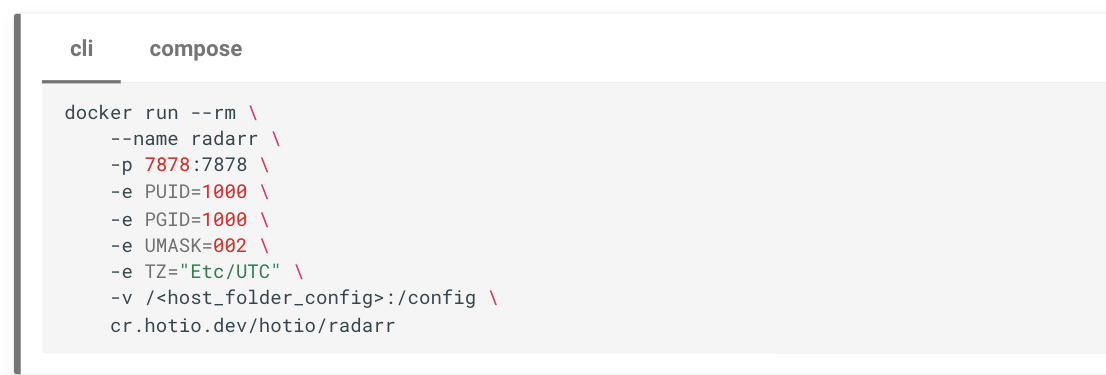
Below is a screenshot of Radarr Hotio’s official .dev along with instructions on how to start the Docker container.

This Docker Radarr container can be customized by setting environment variables and mounting volumes to store configuration files and other data.
a. How to start the Hotio/Radarr Docker container?
- Open a terminal or command prompt on your host machine.
- According to Radarr Hotio official documentation, you should follow these commands to start the Docker container. We will use CLI but you could also use Docker Compose to start the container.
- Since we are using an Ubuntu 22.04 with Docker 3.3.2 we will be using /home/ubuntu/Radarr_folder_config

- Start by replacing <host_folder_config> in the command with the path to the folder on your host machine where you want to store the Radarr configuration files. For example, you could use /home/user/radarr_config or C:\Users\user\Documents\radarr_config.
- Copy and paste the modified command into your terminal or command prompt and press Enter. For example:
|
1 2 3 4 5 6 7 8 9 |
docker run --rm \ --name radarr \ -p 7878:7878 \ -e PUID=1000 \ -e PGID=1000 \ -e UMASK=002 \ -e TZ="Etc/UTC" \ -v /home/ubuntu/Radarr_folder_config\ cr.hotio.dev/hotio/radarr |
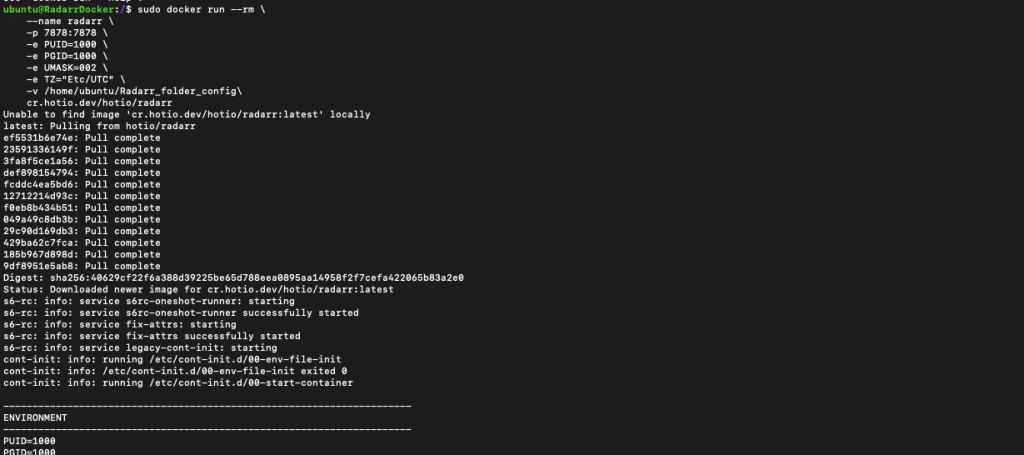
- Docker will download the Hotio/Radarr container image and create a new container based on that image.
According to the configuration values, the Radarr Docker container will:
- The container will be named “radarr” and will expose port 7878 to your host machine.
- The container will use the user ID and group ID of the host user with a value of 1000.
- The container will use a umask (user file-creation mode mask) of 002 to set permissions on files and folders created within the container.
- The container will use the UTC time zone.
- The container’s configuration files will be stored in the folder you specified on the host machine. In our case (/home/ubuntu/Radarr_folder_config\)
To list your current Docker containers, use the following command:
$ sudo docker images

Once the Radarr Docker container is up and running, you can access the Radarr web interface by opening a web browser and navigating to http://localhost:7878. From there, you can configure Radarr to manage your media collection.
Let Radarr Work While You Sleep
Free your PC and let your downloads run 24/7 on a high-speed, private server. No throttling. No interruptions. Just pure automation.
5. How to set up Radarr?
When you open Radarr for the first time, you’ll notice that it has a simple menu that includes the following options: “Movie” “Calendar,” “Activity,” “Settings,” and “System.”

a. Radarr Quality Settings and Media Management
Start with Radarr by first telling it how you want your data to be saved and managed.
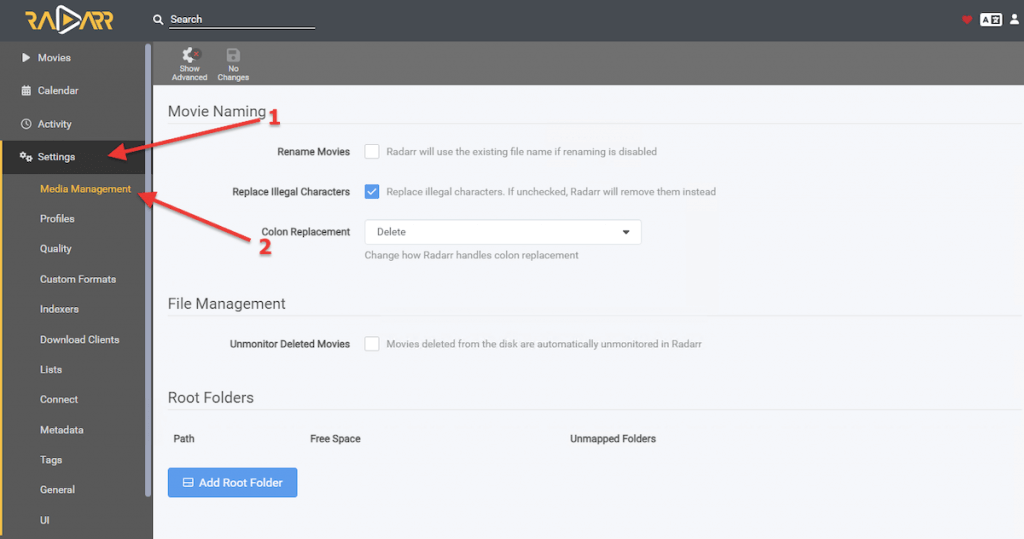
- Go to Settings > Media Management.
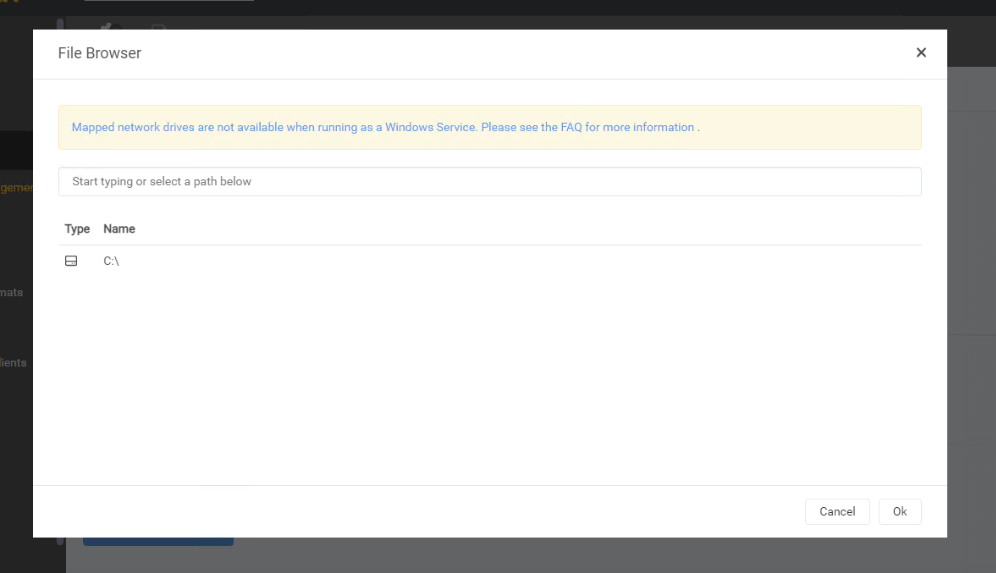
- At the bottom, on “Root Folders” click on “Add Root Folder”.
- The “File Browser” window will open. Here you’ll be able to select the path to where Radarr will download and crawl the content.
- From the same media management window, you can also personalize your Movie Naming. If you want to rename movies with your specific format, click on the checkbox (Rename Movies) (1).
- You may want to adjust the built-in standard movie format. Click on the blue “?” question mark (2) and choose your favorite format.
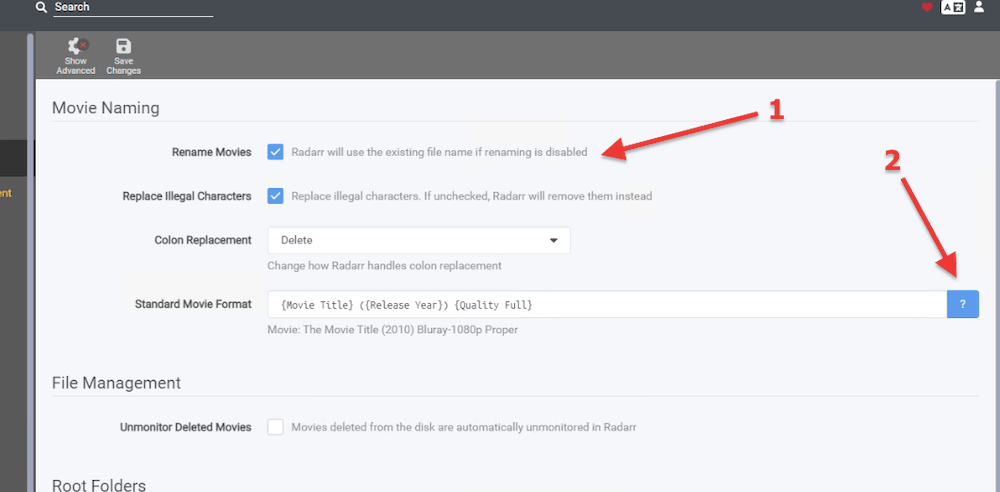
- You’ll also be able to define the quality of the movies that you’d want Radaarr to download.
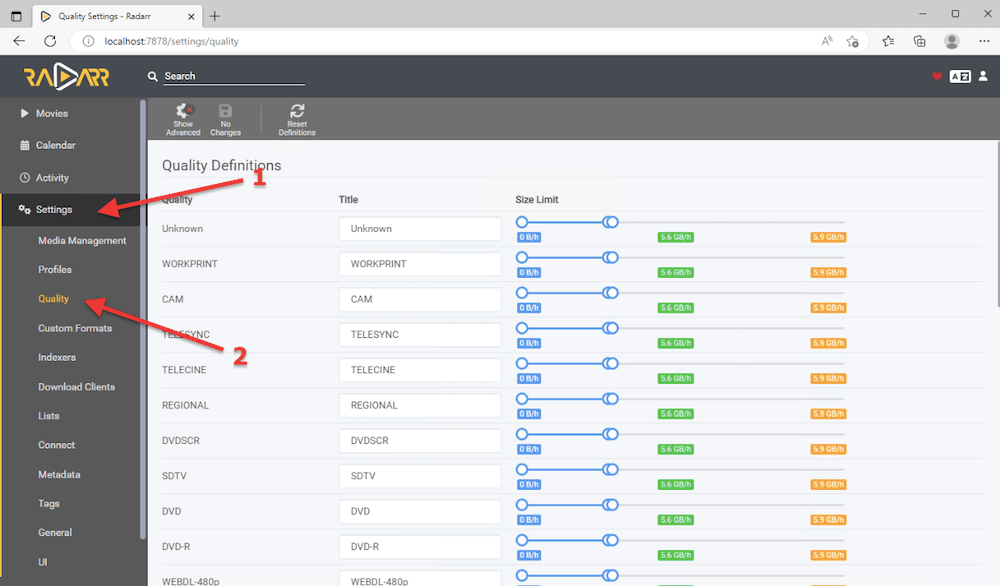
- Go to Settings > Quality.
- Here you’ll be to limit the size of your downloads, quality (hardcoded), or Megabytes/minute.
- With this option, you will be able to set the quality for SDTV, WEBDL-480p, WEBRip-480p, DVD, Bluray-480p, HDTV-720p, HDTV-1080p, WEBRip-720p, WEBDL-1080p, WEBRip-1080p, Bluray-1080p, Remux-1080p, HDTV-2160p, WEBDL-2160p, WEBRip-2160p, Bluray-2160p, and Remux-2160p
b. Define Indexers.
- Next, you’ll need to define the indexers (URLs to search and fetch content from).
- To add a new indexer go to Settings (1) > Indexers (2) > click on the “+” (3).
- Enter the URL, its RSS, and give it a priority.
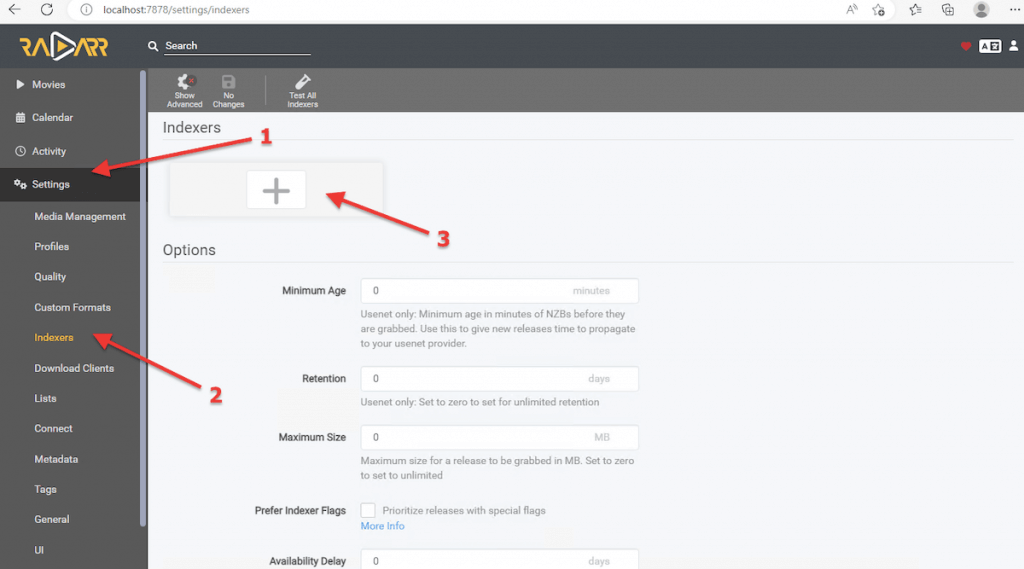
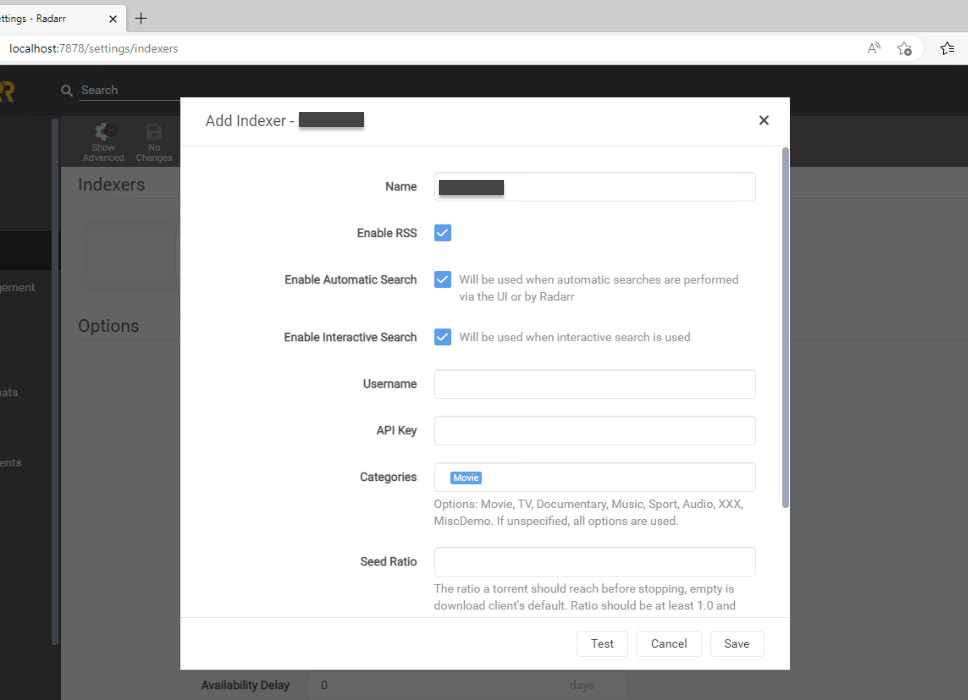
- A list of supported indexers will appear. Once you hit the + button, you will be presented with some options for Usenet and torrent tracker indexers. This is a predefined list with public/private torrent trackers (based on popularity) and indexers that support the Newznab standard.
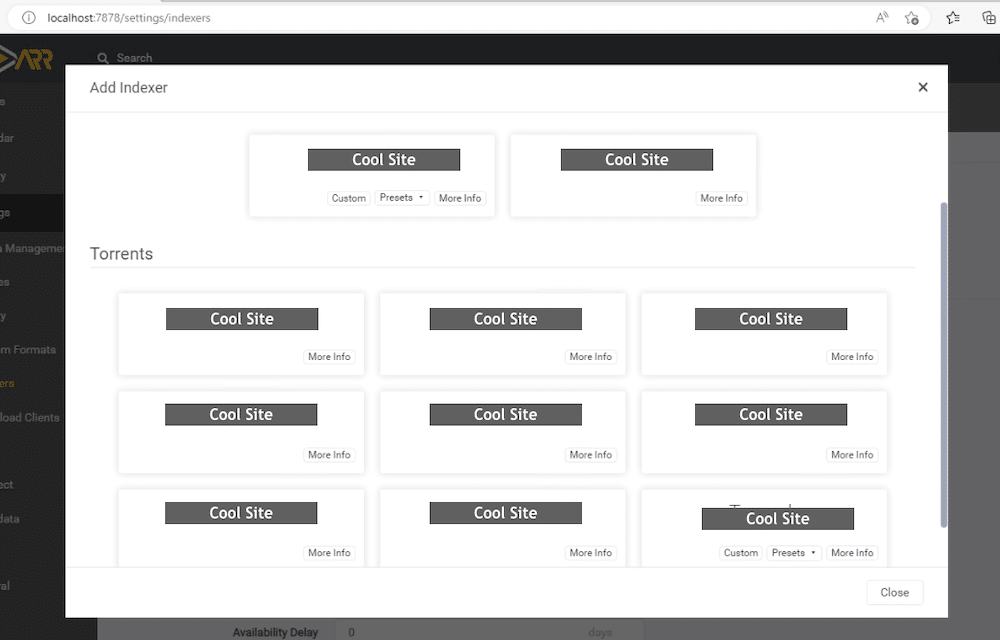
- When adding an indexer (i.e a private torrent tracker), you’ll be asked for key information such as username, password, passkey, API key, seed ratio, tags, and more.
c. Configuring download clients.
- Now, let’s tell Radarr which download clients you will be using to download your movies. Radarr sends download requests to the configured (and with priority) download client (such as SABnzbd or uTorrent).
- To configure up a download client, go to “Settings (1)” > “Download Clients (2)” and click on the “+” symbol (3).
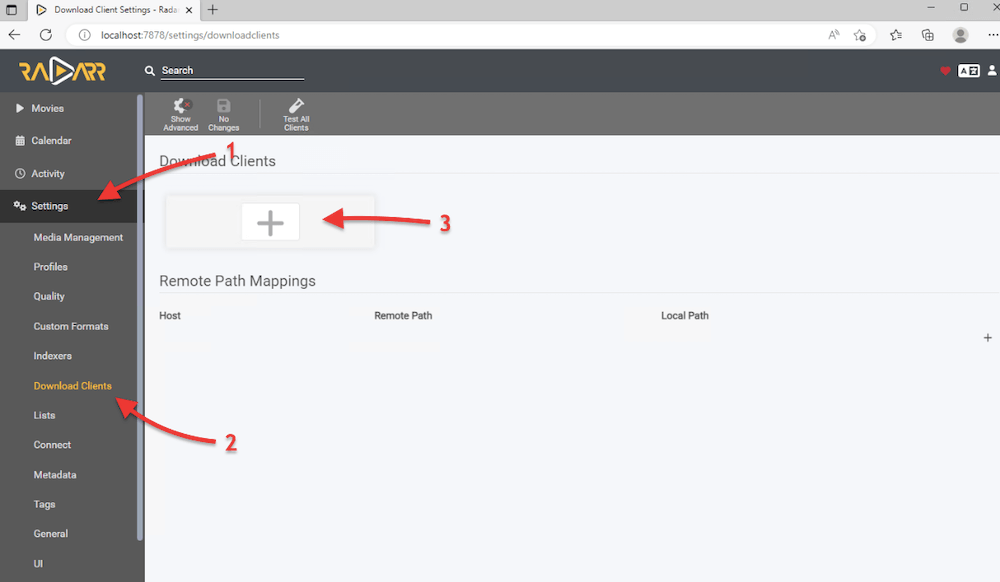
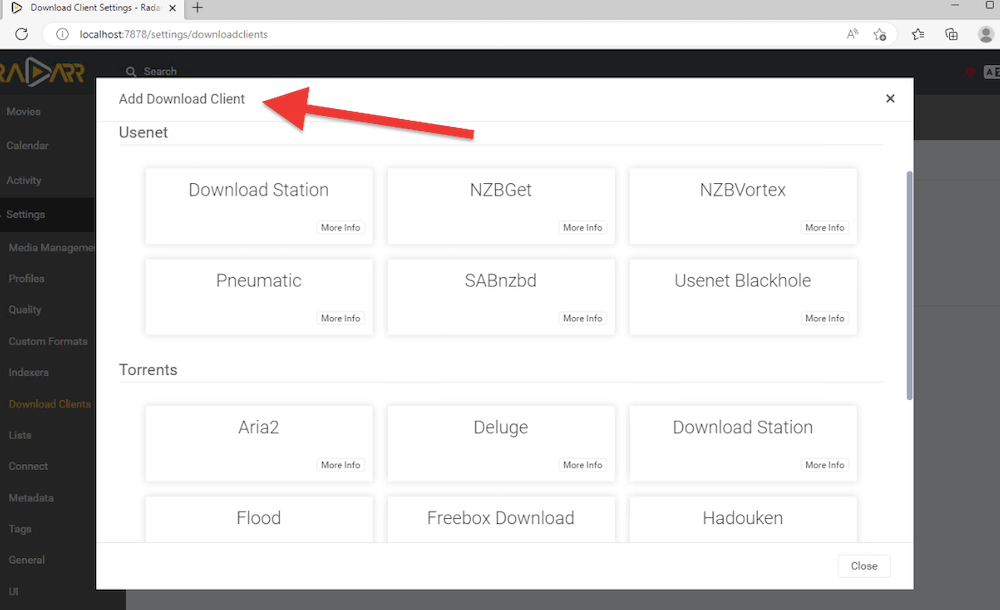
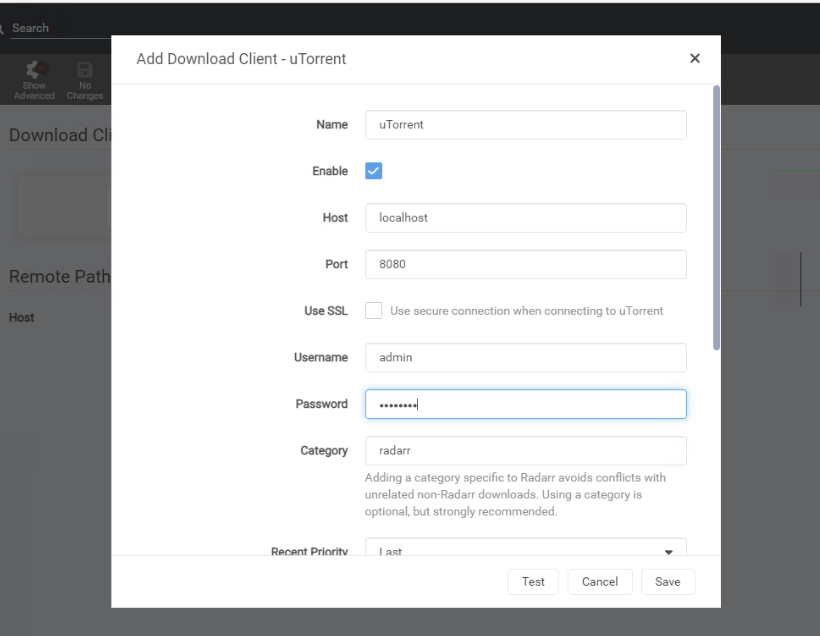
- A new window “Add Download Client” will open. Here, you will see a list of supported Usenet and Torrent clients. Choose the supported client from the list and configure its details.
- For instance, let’s add our uTorrent already installed on the same “local” machine to serve as the default torrent downloader for Radarr.
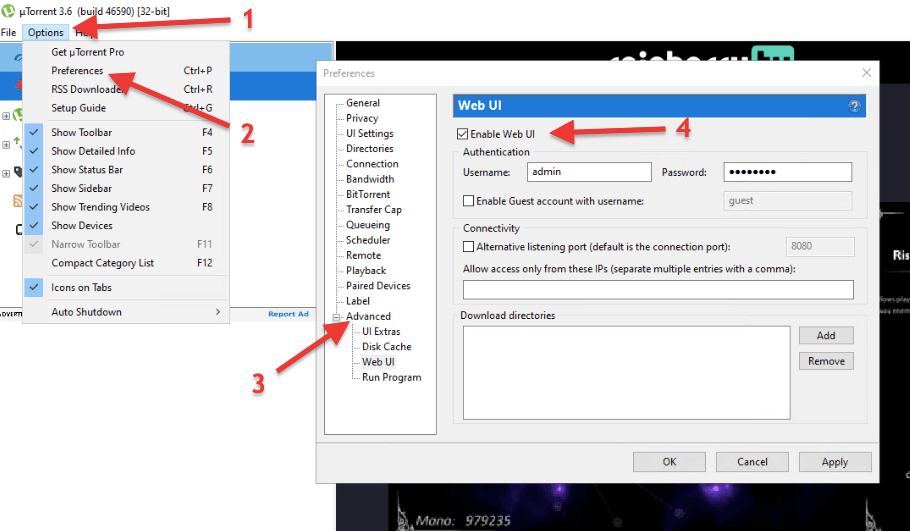
- First, if you don’t know the download client details, go to your client and check for details. For instance, for uTorrent Web (uTorrent 3.6), go to Options > Preferences > Advanced > Web UI. Ensure the “Web UI” option is enabled and check Authentication (user/password). Also, note that uTorrent’s Web UI uses default port 8080.
- Record the credentials (username/password) configured on the download client and the hostname (or IP) of the machine running the client.
- Now, go back to Radarr and enter the configuration. Test your configuration and click on Save.
- If Radarr is unable to reach the download client try the following:
- Ensure the hostname or IP address for the client’s computer, server, or NAS is correct. Use localhost (or 127.0.0.1) if both applications are on the same computer.
- Ensure credentials are correct. To make Radarr reach and access the download client, ensure the credentials are right.
- Check firewall and router settings. The local firewall may be blocking the application from connecting. Check the firewall rules, remove any rule, or add an exception.
d. Setting Quality Profiles.
Radarr allows you to set quality profiles to suit your personal preferences. Perhaps you would prefer only high-quality audio (HD Audio), or only high-quality video (HD – 720p -1080p) or perhaps you are only looking to download ultra-high qualities like HDTV- 2160p. Check our guide to learn how to successfully stream 4k in Plex.
How to configure Quality Profiles in Radarr:
- Go to
Settingsfrom the sidebar. - Click on
Profiles. - Edit an existing profile or click
+to create a new one.
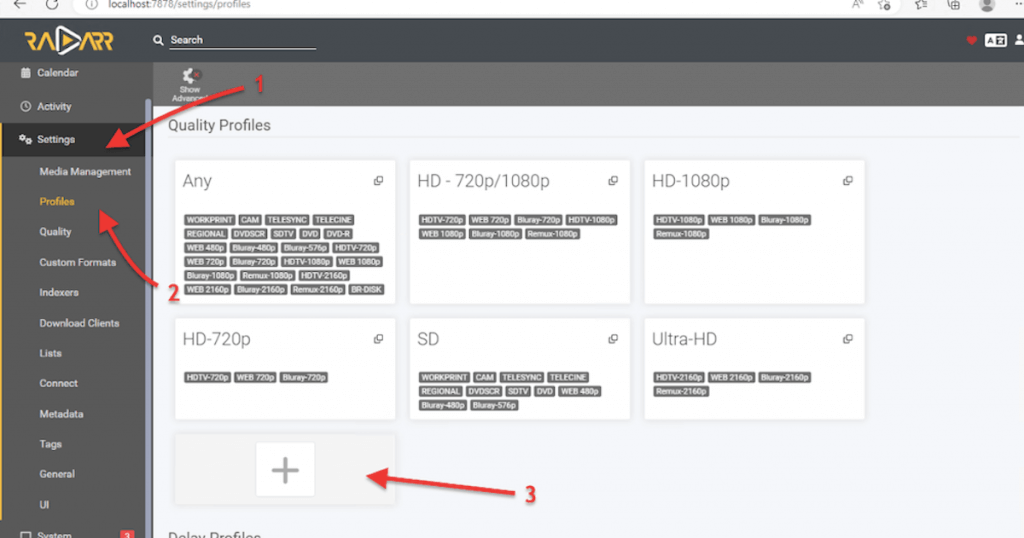
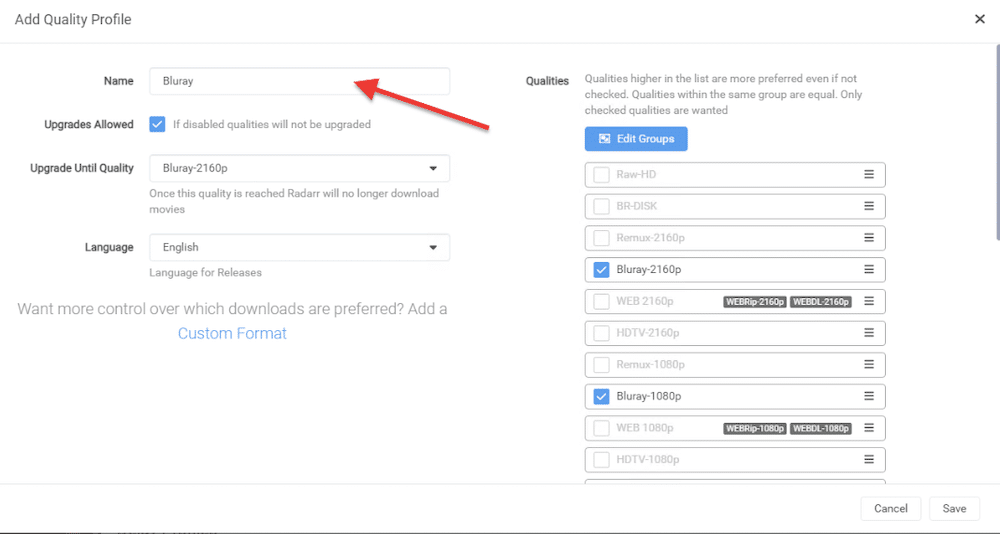
- Add Quality Profile. Give it a name (for instance, Bluray). Check whether you want “Upgrades Allowed” and the target quality upgrade. Then from the list on the right, select all the desired qualities.
- Each profile contains: Preferred Qualities (ordered): This list determines which resolutions and formats Radarr should prioritize.
- Examples include:
HD-1080pWEBRip-1080pBluray-1080pRemux-1080pWEBDL-2160pBluray-2160p
- Examples include:
- Cutoff: This is your target quality — once a movie is downloaded at or above this quality, Radarr stops searching for upgrades.
- Upgrade Allowed: If enabled, Radarr will keep looking for better quality until the cutoff is met.
| 📌 Order matters — the higher a quality appears in the list, the more Radarr will favor it before hitting the cutoff. |
🤔 Choosing Between HD-1080p, Remux, WEBRip, etc?
| Qality | Description | File Size | Best For |
|---|---|---|---|
| WEBRip | Ripped from streaming platforms, compressed. | Low/Med | Fast downloads, casual watching |
| WEBDL | Higher quality than WEBRip, often direct source files. | Medium | Better quality streams |
| HD-1080p | General high-definition standard. Can include various sources/formats. | Medium | Good all-around quality |
| Bluray-1080p | Ripped from Blu-ray discs, usually better video than web versions. | Medium/High | Archive-worthy, great visuals |
| Remux-1080p | Untouched Blu-ray streams without compression (no quality loss). | High | Enthusiasts, Plex 4K setups |
| Bluray-2160p / Remux-2160p | Ultra-high resolution, massive files, true 4K fidelity. | Very High | 4K TVs, media servers |
Example Setup: If you want 1080p Blu-ray but will settle for WEBRip:
- List:
Remux-1080p,Bluray-1080p,WEBDL-1080p,WEBRip-1080p - Cutoff:
Bluray-1080p - Result: Radarr grabs
WEBRipif nothing else is available, but keeps searching until it getsBluray-1080p.
🧩 Why reinvent the wheel when Radarr can run smoother right now? Get the config secrets most users never see:
6. How to set up Radarr with any Download Client?
This section provides a step-by-step guide for setting up Radarr with torrent clients such as Deluge, qBittorrent, rTorrent, uTorrent, and SABnzbd.
a. Deluge.
Before setting up Radarr with Deluge, it is important to verify the settings in Deluge. Once you have checked the settings, you can proceed to configuring Radarr to connect with Deluge.
- Ensure WebUi plugin is enabled. In Deluge, go to “Edit” > “Preferences” > “Plugins.” Ensure that the WebUi plugin is enabled.
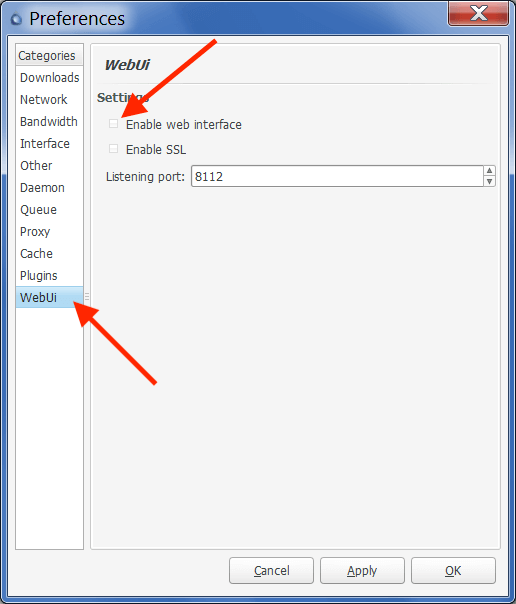
- Now, go ahead in the Preferences menu, in the left pane and find “WebUi.”
- On the WebUi menu, tick the “Enable Web Interface” box and take note of the listening port. The default listening port for the Deluge WebUi is 8112. Don’t forget to record or write down this information.
- For credentials, Deluge uses a default password (deluge).
Open Radarr
- Now that you have configured Deluge and know the default password, go to Radarr’s web interface at http://localhost:7878 or (127.0.0.1:7878).
- Go to “Settings” > “Download Clients” > and click on the “+” symbol. From the “Add download client” menu, scroll down to “ Torrents” and find “Deluge”.
- As you can see from the following screenshot, it comes with pre-defined Deluge settings. You’ll notice, for example, that this pre-defined template already contains the Deluge WebUi default port (8112) and the “deluge” password.
- If you have different (non-default) Deluge settings, like port or password you’ll need to change them here.
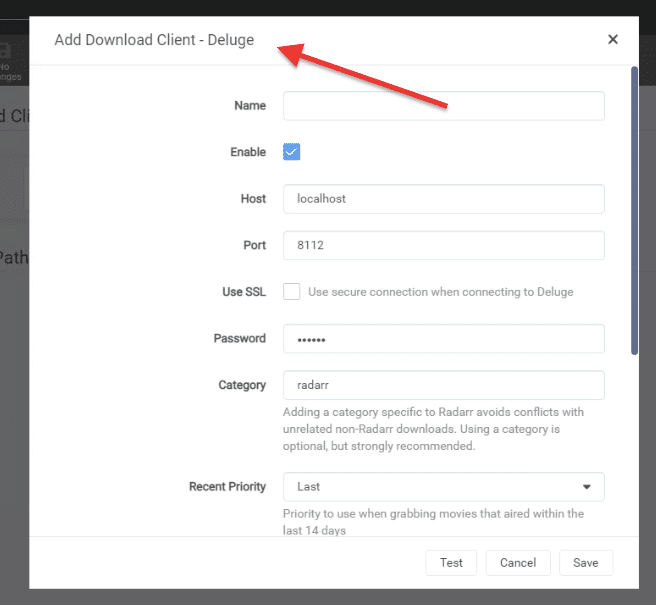
- Give your download client a name and enter its information.
- Name: Give your download client any name that identifies > Deluge
- Host: Whether it is localhost (127.0.0.1) or the target IP address.
- Port: The default Deluge port for WebUI is 8112
- Password: Enter the default (deluge) password or any that you have assigned.
- Category: Leave as default.
- Test the connection and Click on Save. If you get a “Connection completed,” go ahead and click on “Save” and “Add.” But if you can’t connect, check any Deluge configuration or network issue that could be blocking your connection. To help you find a solution, check our unofficial guide to Deluge.
b. qBittorrent.
To add qBittorrent you have to follow a similar approach as the previous download client. First check qBittorrent’s settings, record these settings, then configure Radarr to link to the qBitorrent download client. Learn more about qBittorrent: Is qBittorrent safe and reliable?
Open qBittorrent.
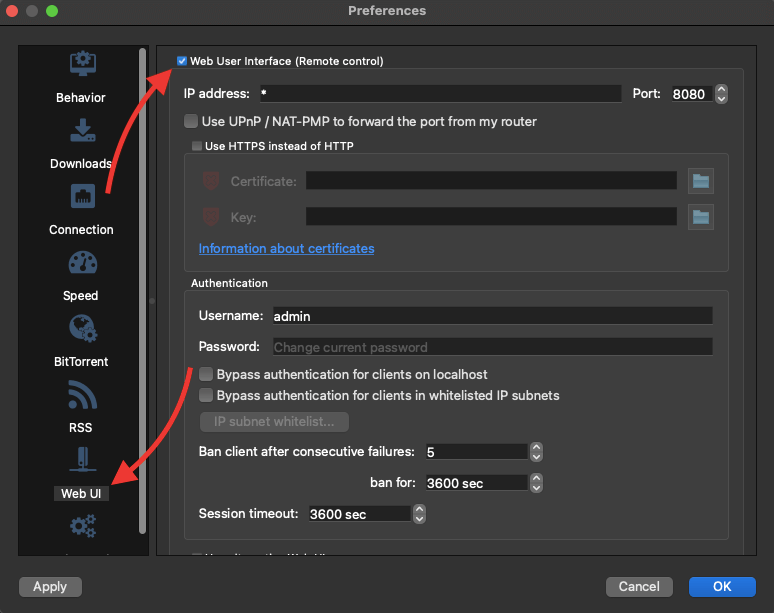
- Open qBittorrent and go to “Preferences” > “WebUI.” Make sure that “Web User Interface (Remote Control),” checkbox is enabled.
- IP Address: Check or enter the IP or host that the qBittorrent WebUI is bound to. This is the IP address of the qBittorrent server which allows remote control.
- qBittorrent port: qBittorrent’s web Ui works on port 8080 — which is a commonly used port number for web servers. It is often used as an alternate port for HTTP traffic, which is the protocol used to transfer data over the internet. Additionally, port 8080 can be used for other types of network traffic or applications (such as torrent clients), depending on how it is configured. If there is another application or service using port 8080, you’ll need to change the port for qBittorrent.
- Accessing qBittorrent WebUI remotely? Enable the UPnP/NAT-PMP to forward the port from your router. If your router supports it, you can forward the 8080 port from external connections into your internal qBittorrent server. To learn how to optimize your connectivity, check out our guide with the best settings for qBittorrent.
- Authentication: Record the username, change it, and create a new password.
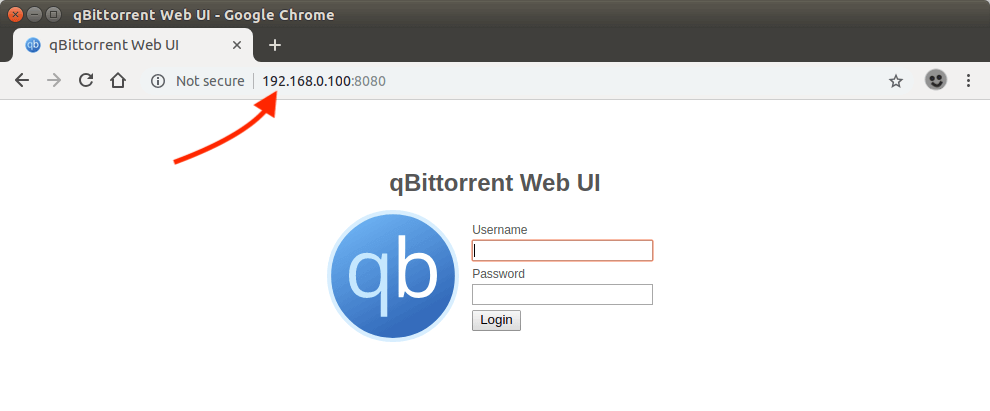
- Test qBittorrent Web UI connection. Open your web browser, enter the IP address (or host) followed by the port, and then your credentials. For instance, if qBittorrent WebUI is on the same network, enter the IP and port, like 192.168.0.100:8080, or if qBittorrent WebUI is on the same machine use the following URL > localhost:8080
Open Radarr
Now that you configured qBittorrent WebUI record its information, and have tested it, let’s handle the configuration. Open Radarr’s web interface by going to your web browser and typing > http://localhost:7878 (127.0.0.1:7878) or its IP address (7878)
- Go to “Settings,” > “Download Clients,” > click on “+” symbol. Scroll down to “Torrents and find “qBittorrent.”
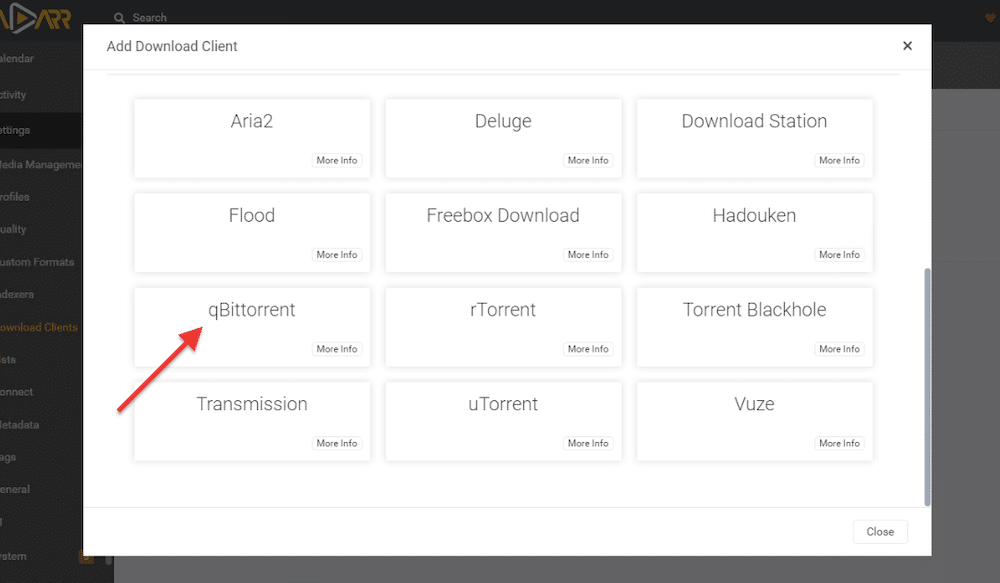
- As you will notice, it comes with pre-defined qBittorrent settings. This template helps you to easily connect Radarr with qBittorrent. This predefined configuration comes with qBitorrent’s WebUI default port > 8080. Update information such as host (or IP) username and password.
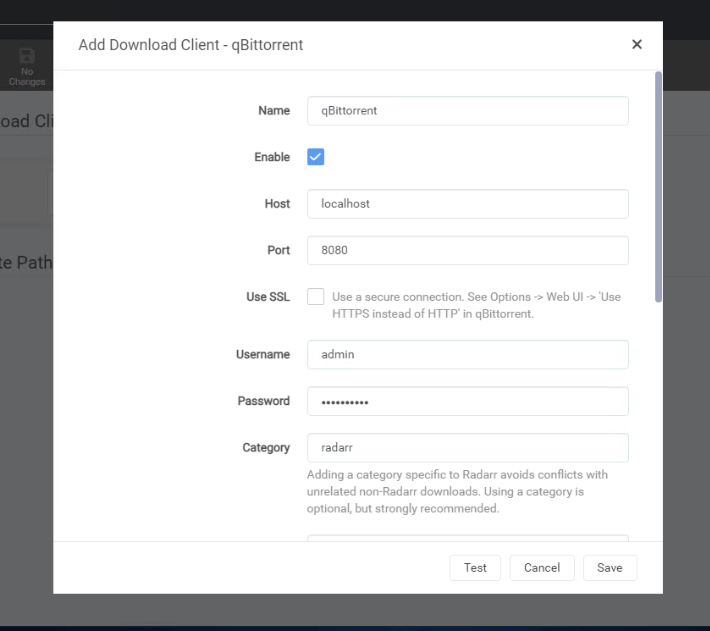
- Leave the rest with default values and test your connection.
c. rTorrent
To add rTorrent, let’s first check the rTorrent’s current settings. With the information at hand, we will then configure it to connect with the rTorrent client. For more information on how to configure and use ruTorrent (and install and use rTorrent) check our Unofficial guide to ruTorrent.
Open Radarr
- To determine what information you would need, open Radarr’s web interface http://localhost:7878 (127.0.0.1:87878) or its IP address.
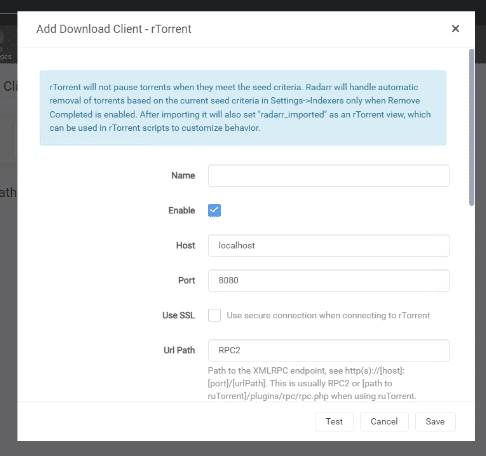
- In Radarr, go to > “Settings,” > “Download Clients,” > click on the “+” symbol. Scroll down to “Torrents Clients” and find “rTorrent.”
- As you might notice, it comes with a pre-defined rTorrent “template.” In this template, you’ll notice rTorrent’s default port (8080) and fields to fill out, including name, host, and URL path. If you scroll down, you will also notice the username and password.
- Name: The preferred name (i.e rTorrent)
- Check the Enable box
- Host: Enter the IP address of the rTorrent server. Leave it as default (localhost), if rTorrent is on the same machine.
- Port: Leave as default 8080, unless it has been changed on rTorrent.
- URL Path. The format for the XMLRPC endpoint should be HTTP(s)://[host]:[port]/URLPath. Locate this on rTorrent client and enter the URL path (i.e 127.0.0.1:5000)
- Username and Password. These are your rTorrent credentials.
How to find some of this information on rTorrent.
- By default, rTorrent utilizes port 8080 for web communication, which is also used by other similar services like qBittorrent. Before using it, make sure that no other service or application is currently using this port, or you can modify it to avoid any conflicts.
- It is also crucial to verify the path to the XMLRPC endpoint. To locate the XMLRPC path, you can review rTorrent’s configuration file and look for the SCGI URL (Host + port), which is typically set as localhost:3000, but it can also be changed to localhost:5000, as demonstrated in the following configuration.
| 123 | sudo nano rutorrent/conf/config.php scgi_port = 5000; scgi_host = “127.0.0.1”; |
- Check rTorrent’s credentials (username and password.)
d. SABnzbd
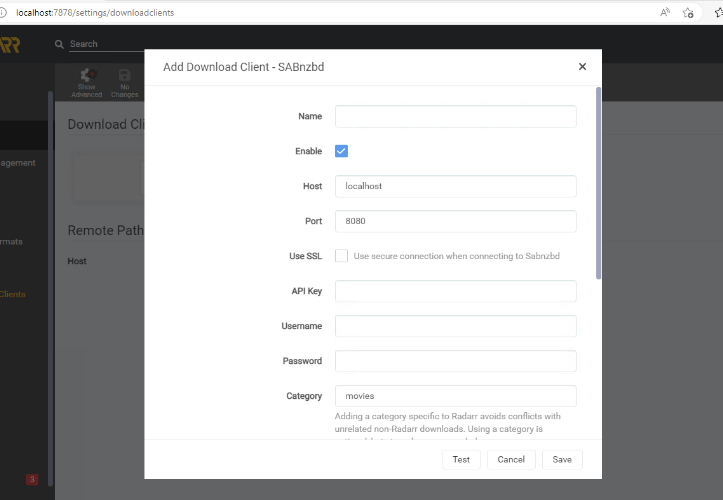
To add SABnzbd (Usenet download client) with Radarr, let’s first check what details Radarr asks for configuration. Go to Settings > Download Clients > and click on the + button. Find SABnzbd under the Usenet clients and click on it. You will see the following window “Add Download Client – SABnzbd”
To add this download client with Usenet, you will need the following details from SABnzbd: Name, Host, Port, SSL, API Key, Username, and Password.
- Open SABnzbd (usually, localhost:8080)
- Click on the SABnzbd config (cog wheel on the top right-hand).
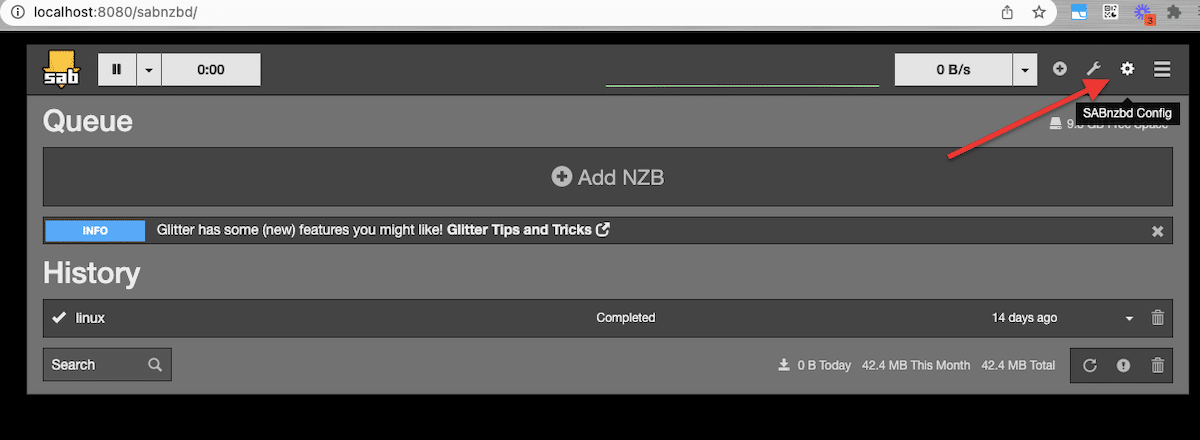
- The SABnzbd config will open. Go to General > SABnzbd Web Server and Security.
- In this window, you’ll be able to find the SABnzbd host, SABnzbd port, username/password, and API Key.
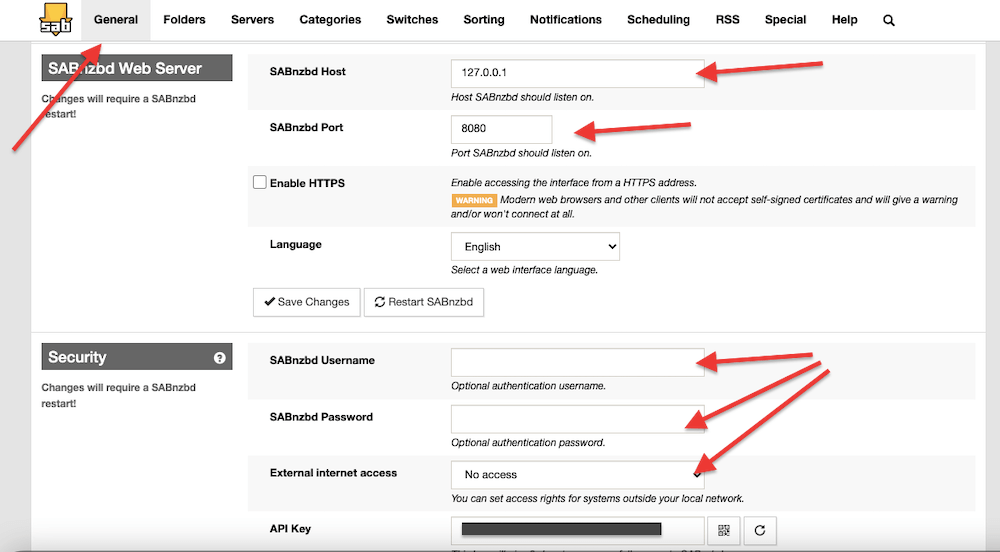
- Record the information found on SABnzbd, and go back to Radarr > “Add Download Client – SABnzbd”. Enter the recorded information, Test and Save your configuration.
To learn everything there is to know about this fantastic Usenet client, check our latest SABnzbd Guide.
7. How to Use Radarr After Setup
Once Radarr is installed and configured, you’re ready to start building and automating your movie library. But how exactly do you use Radarr on a day-to-day basis?
In this section, we’ll walk through how to use Radarr to search for movies, add them manually or automatically, manage future releases, interact with download clients, and track download progress.
a. Searching for New Movies
Radarr makes it easy to search for movies you want to download or monitor. You can search for individual titles or browse through curated lists.
To search for a movie:
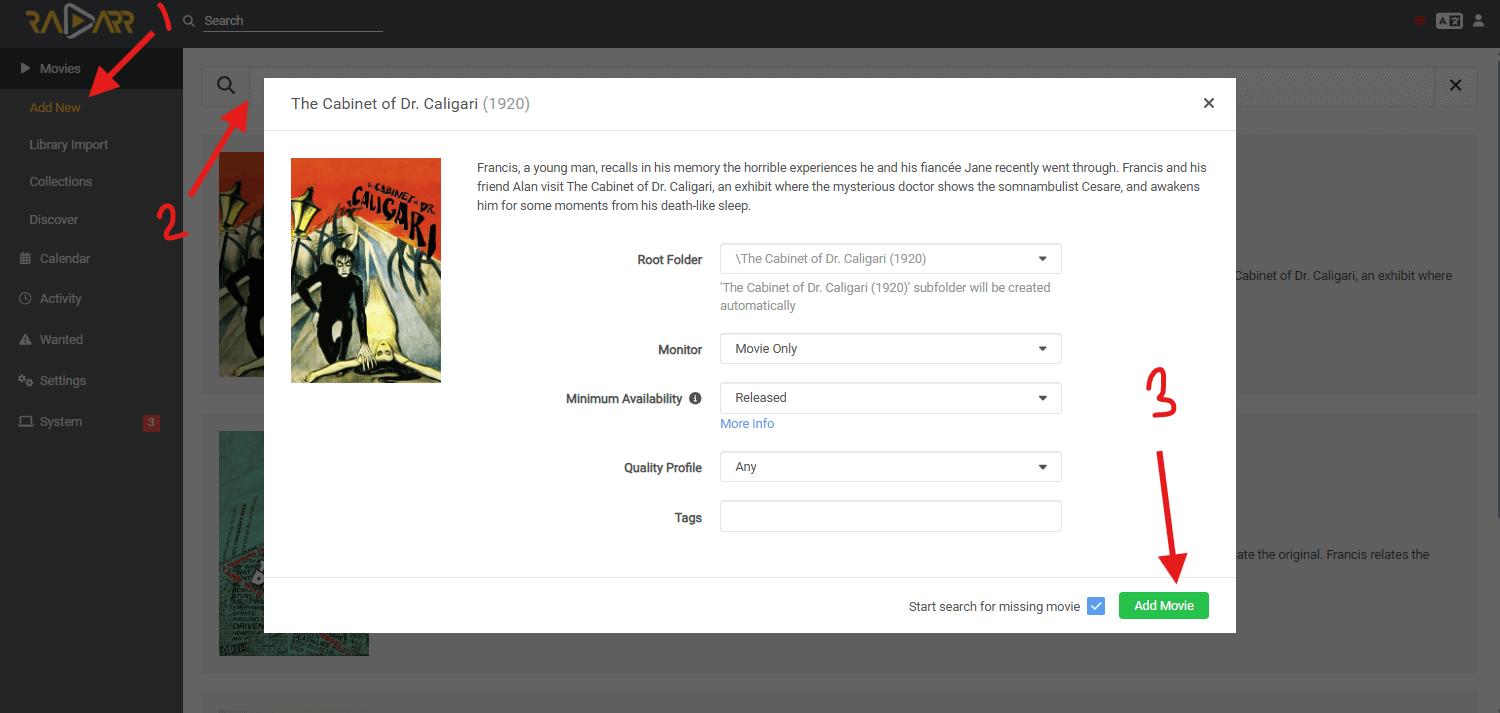
- Open the Radarr Web UI. Click on “Movies” > “Add New” from the left-hand menu.
- Use the Search tab to find a specific title.
- Click the “Add” button next to the movie you want to manage.
You can also explore movies via:
- Discover tab – Based on popular or trending titles.
- Lists – Import IMDb, Trakt, or other lists for batch importing.

b. Manually vs. Automatically Adding Movies
You have two options for managing your movie library in Radarr: Manual adding and automatic adding.
Manual Adding
This is ideal when you want full control over what gets downloaded.
- Search for a title and click “Add” > Choose the quality profile
- Decide whether to search for existing downloads now or only monitor for future releases
- Select the path where the movie should be stored
Automatic Adding (Lists or Scheduled Monitors)
Radarr can also automatically add movies from custom lists or external sources:
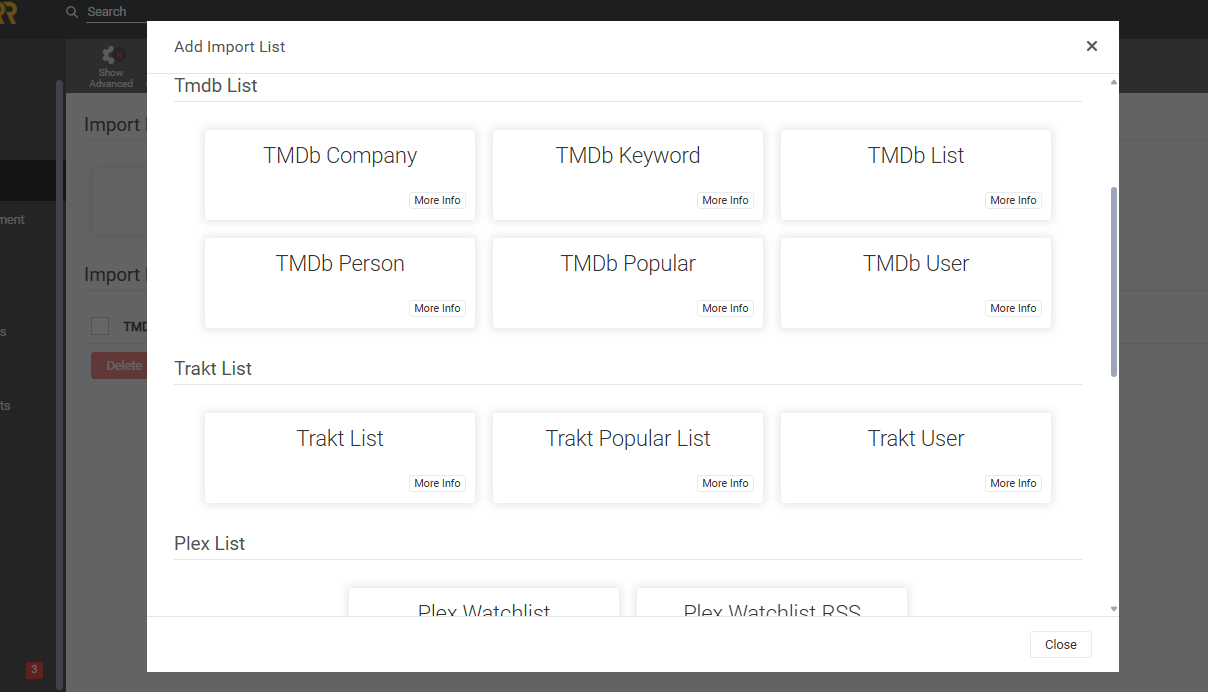
- Go to Settings (1) > Import Lists (2) > Add List (or +) (3)
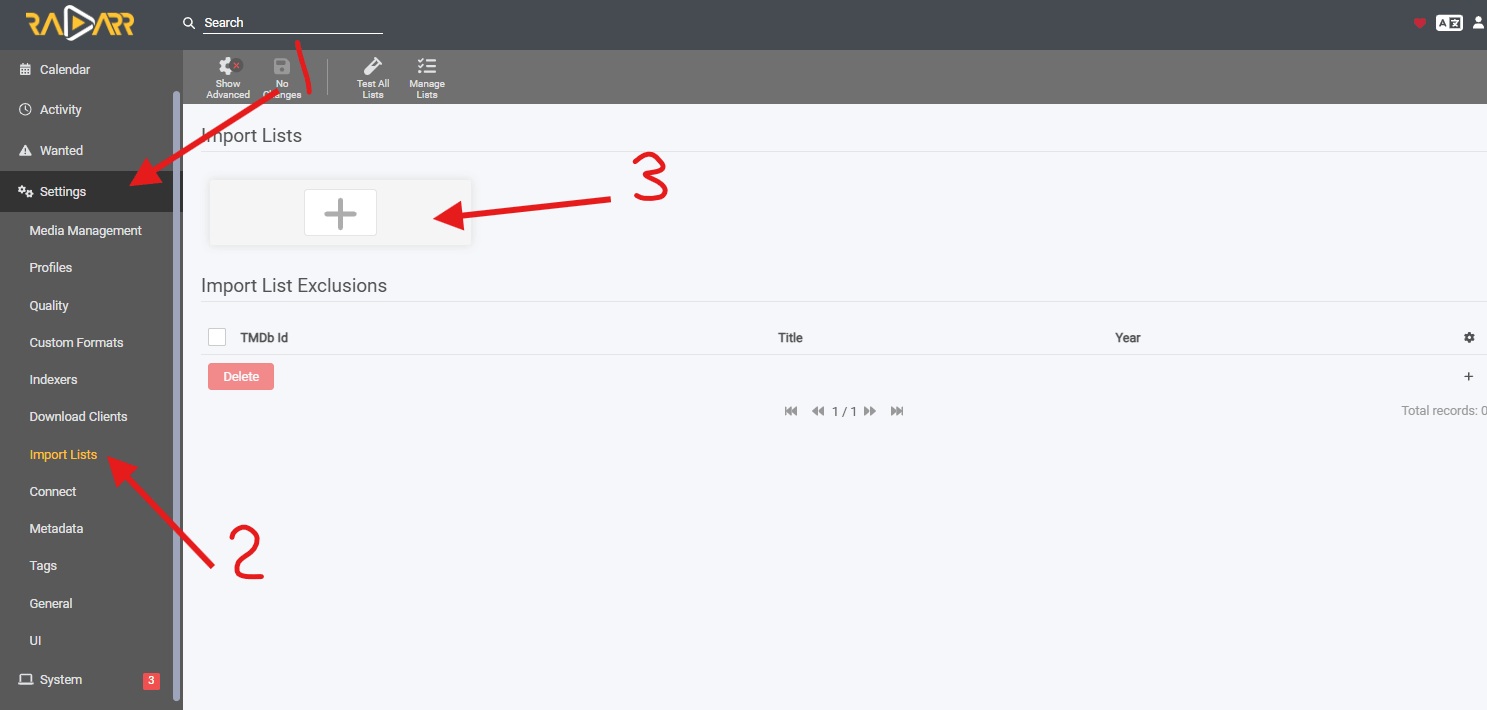
- Add an IMDb, Trakt, or TMDB list
- Set how often Radarr checks the list and whether it should start downloads automatically
c. Radarr Monitoring Options Explained
When you add a movie to Radarr, you get a Monitoring dropdown with these options:
- Monitor All – Radarr will monitor and try to download the movie and all quality upgrades until the cutoff is met.
- Monitor Only Available – Radarr will only look for versions that already exist (good for old or obscure movies).
- Monitor Future Only – Radarr won’t look for past releases, only future releases (great for upcoming movies).
- Do Not Monitor – Radarr adds the movie, but won’t search or download anything unless manually triggered.
| 📌 Note: The full “Monitor All / Available / Future Only / Do Not Monitor” dropdown appears when you add a movie, not during editing. |
Where to View or Change Monitoring in Your UI: You can change the monitoring status after adding the movie by doing the following:
- Click the movie title (e.g. “The Ghost Train”) in your library.
- In the movie details page, look for a bookmark icon (Tool or bell icon depending on version) — this is the monitoring toggle.
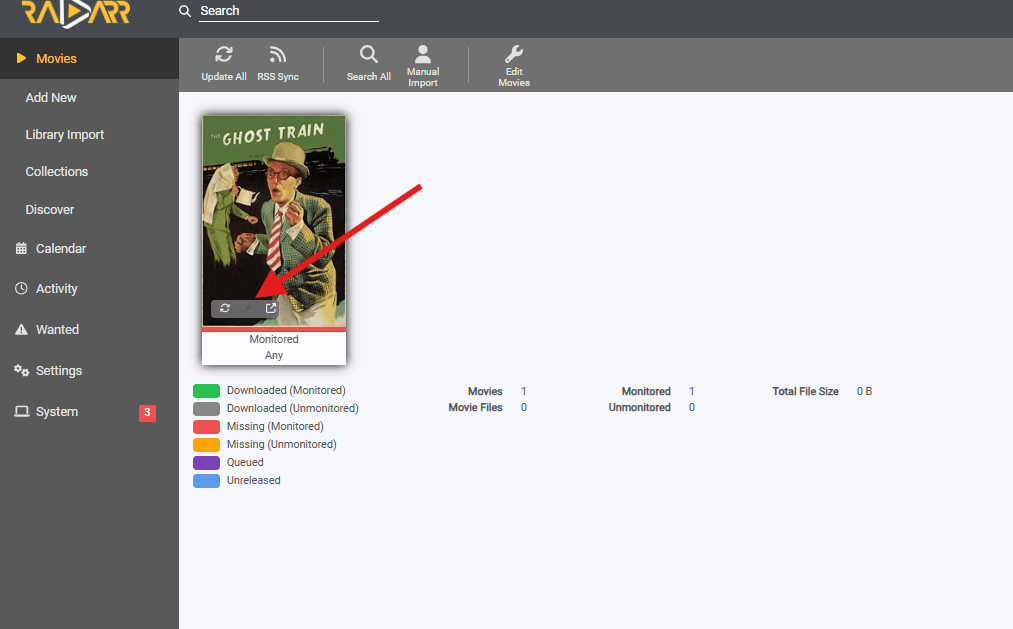
- Click it to cycle through the monitoring options or un/monitor the movie. You can control its monitoring behavior using the “Monitored” checkbox and Minimum Availability setting:
- Monitored: If checked, Radarr actively searches for the movie.
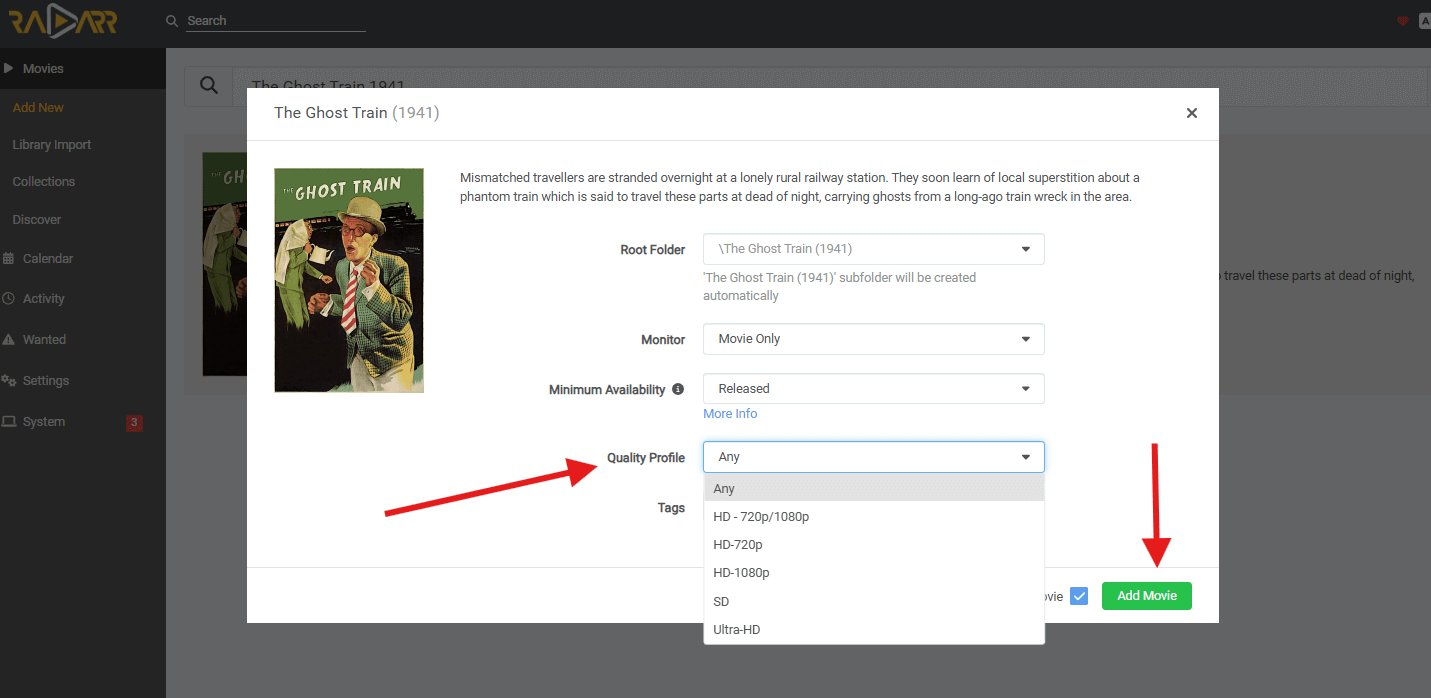
- Minimum Availability: Set this to “Released” if you only want Radarr to search for movies already out.
- Quality Profile: Selects what quality versions Radarr should grab (e.g. Any, HD-1080p, etc).
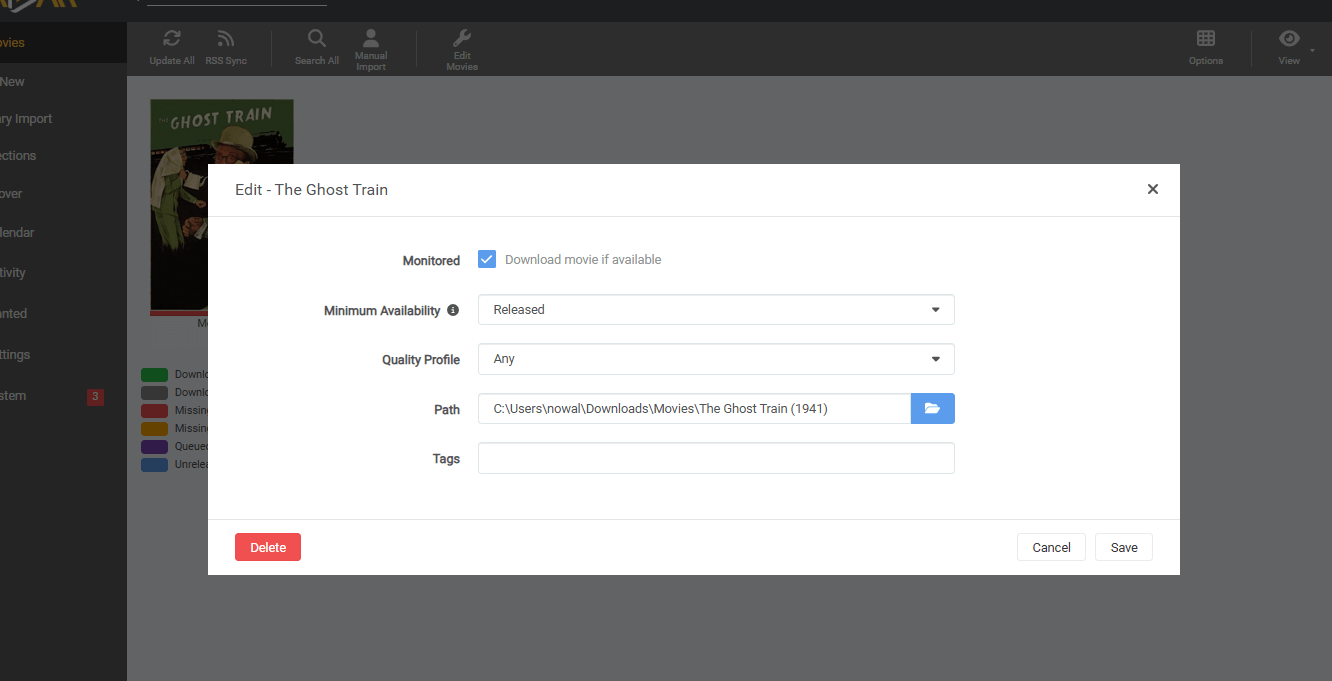
In our case. We have the following setting in place.
- ✅ The movie is Monitored
- ⚠️ It appears in Wanted because it’s missing
- ❌ Radarr hasn’t found a matching release yet — likely due to:
- Indexers not set up
- No torrents or Usenet matches are available.
d. Other easy ways to monitor:
Quick navigation recap from the sidebar
- Wanted = Missing monitored movies Radarr is trying to download.
- Missing = Tracks which monitored movies have no file.
- Cutoff Unmet = Movies that have been downloaded but don’t meet your quality profile cutoff, so Radarr keeps looking for better versions.

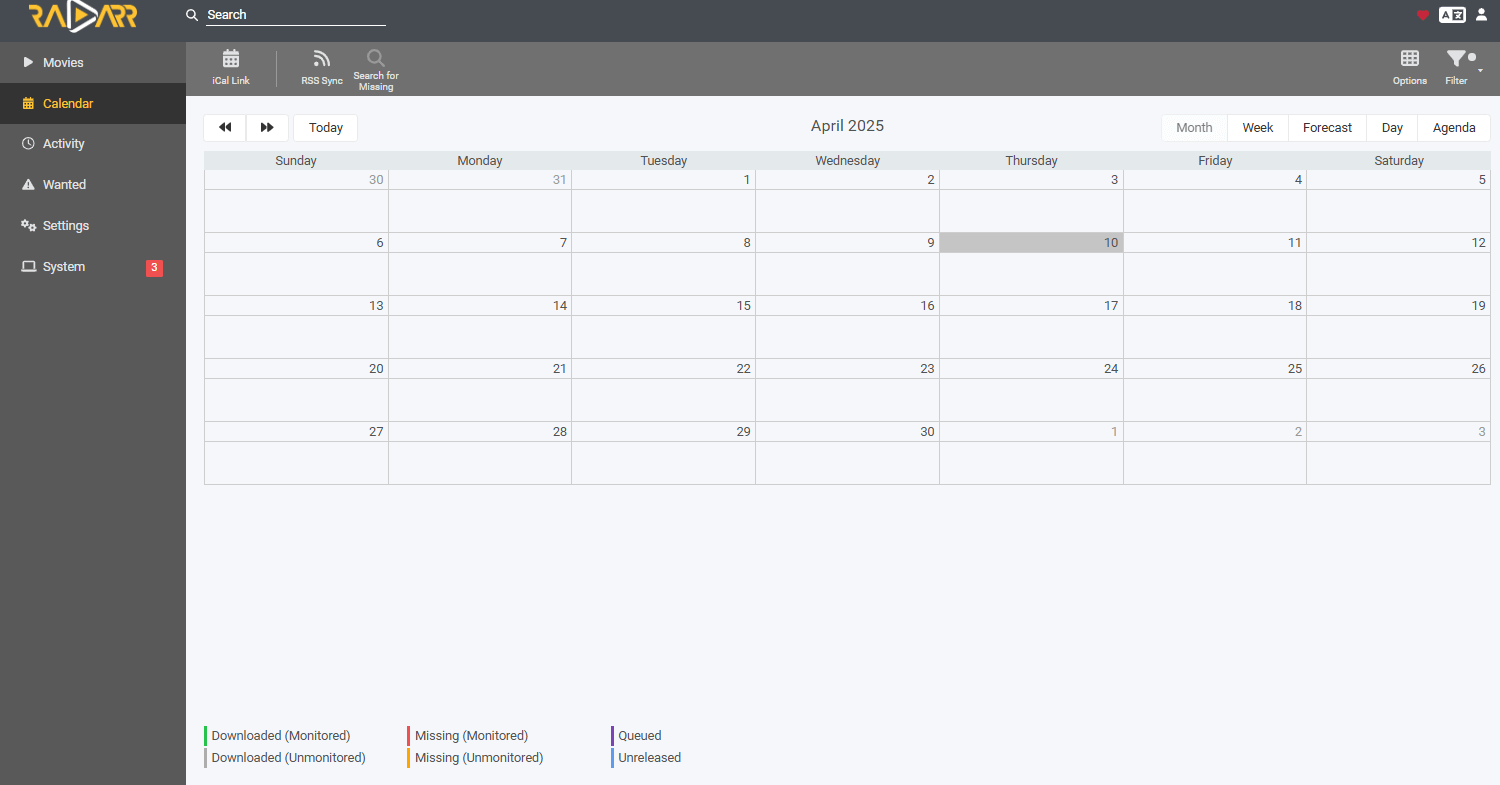
- Calendar = Shows monitored future releases.
- Activity = Shows download queue, history, and import events.
8. Radarr’s FAQ.
Most modern seedbox providers will include Radarr, Sonarr, Readarr (and other ARR applications) as part of their integrated solution. For instance, Rapidseedbox (if the plan allows) provides the one-click-installer “Radarr,” which lets you toggle on or off the application. If the seedbox plan does not include Radarr as a pre-installation application, you’ll have to install it manually.
In Radarr, go to Settings > Download Clients > and click on “+”. Enter all the requested information like connectivity and credentials. Test the connection and click on save. Remember that you’ll have to double-confirm the information on the other end (uTorrent or BitTorrent). For more information on how to do this, refer to the section above (how to set up Radarr).
To integrate it with Plex, you’ll need to go to Radarr > Setting > “Connect” > click on the + button > and find the Plex Media Server. On the “Add Connection” > Enter your Plex Media Server connection details such as host, port, username, and password, and click on “Test.” To learn how to find these details, refer to our complete guide to Plex. If you cannot integrate Radarr with Plex, ensure the details are correct or that the router and/or firewall allow both apps to communicate.
Docker is a great alternative for setting up Radarr on different platforms. Although you can install Radarr Docker in a new container, many ready-made containers are available from the Docker Hub. Get the image from the official Docker website and install it anywhere, whether Linux, macOS, NAS, or Windows. You can also install it via the cloud like AWS, GCP, or Azure. Radarr Docker is also a great fit to run on small computers like the Raspberry Pi.
Both Radarr and Sonarr are recognized as leading media automation tools and downloaders. While Sonarr focuses on TV shows and utilizes RSS feeds to send download requests to Usenet or torrent clients, Radarr performs the same functions for movies rather than TV shows. Despite this difference in functionality, Radarr shares many similarities with Sonarr. Learn more about Sonarr here.
There are several alternatives to Radarr that you can consider for managing your movie library and automating the downloading process. The best options to consider if you are looking for an alternative are CouchPotato, Watcher, and FlexGet.
Radarr Plex Watchlist is a feature that allows you to automatically add movies from your Plex Watchlist to your Radarr movie library. Essentially, when you add a movie to your Plex Watchlist, Radarr will automatically detect it and add it to your Radarr library, making it available for automatic download and management. To use Radarr Plex Watchlist, you’ll need to first connect Radarr and Plex.
To import existing movies into Radarr, use the “Add New Movie” option and select “Import Existing Library.” Choose your movie storage folder, and let Radarr scan and identify movies for management. This will integrate your existing collection with Radarr, and enable tracking and automated management.
To customize Radarr to fetch movie posters in Spanish: Go to Settings > Metadata. > In TheMovieDB settings, select Spanish (es-ES) as the preferred language. Save your changes, and refresh the metadata for existing movies to apply the new language setting. You can manually upload or link a Spanish poster in the movie’s Images section for further customization. You can do this in your Media Server, for example, Plex, Jellyfin, or Emby.
9. Final Words.
Let’s wrap up the ultimate guide to Radarr!
We’ve covered all the important concepts you need to know to get started with this awesome application. We showed you how to install and set it up, troubleshoot some common problems, and even integrate it with a few other apps.
But let’s be real – Radarr is so amazing that this guide only scratches the surface! There’s a whole world of possibilities out there, waiting for you to explore.
So, if you’re feeling inspired and want to dive deeper, don’t be afraid to leave a comment with your feedback or suggestions. We’d love to hear from you!
Turn Radarr into a Full Media Powerhouse
Radarr is just the start. Pair it with a seedbox and unlock seamless streaming, subtitle automation, and synced media libraries from anywhere.
Gran trabajo que valoro y te agradezco enormemente, pues es una gran guía para cualquier persona que quiera utilizar esta genial aplicación.
Sólo te pediría que “si es posible” añadieras si existe posibilidad de configurar los posters de las pelis en castellano pues en la actualidad me aparecen en inglés.
Muchas gracias de nuevo!
Hola Pere…
Muchas gracias por tus comentarios e igualmente valoro mucho tu interes en aprender sobre Radarr.
Cuando te refieres a los posters de las pelis… te refieres a la metadata de cada pelicula o al contenido en la fotos en si?
Saludos, Diego
Perdón por la tardanza en responder… Si, me refiero al contenido en las fotos. Lo demás si me aparece en español.
Gracias por tu respuesta y tu tiempo!
Un saludo
Hola Pere… si te entiendo.. las fotos en si. He agregado una pregunta con respuesta nueva (J.) en la section the Preguntas Frenquetes (FAQ).
En resumen… Ve a “TheMovieDB settings” o configuracion, y seleciona Espanol (es-ES) como el lenguage favorito. Tambien puedes hacer esto manualmente desde el servidor de media…Por exemple Plex or Emby… aunque es una tarea mas laboriosa.
Ok, desgraciadamente en ajustes, metadatos la opcion “TheMovieDB” que me comentas no aparece… sólo tengo Emby (Legacy), Kodi, RoksBox y WDTV. Solamente la opcion de Kodi aparece algo para configurar con idioma Español. Los demás no tienen nada para configurar.
Por cierto, mi versión de Radarr es la 5.11.0.9244.
Un saludo.
Hola Pere.
Hubo un problema en Radarr hace unos meses. Tuvo problemas para recuperar metadatos más recientes de TMDb para las películas agregadas en los últimos meses. https://github.com/Radarr/Radarr/issues/8345 – Muchos usuarios experimentaron la falta de información como la fecha de lanzamiento, elenco, equipo, póster y género para las películas más recientes, pero el problema pareció corregirse con el tiempo.
Y al parecer tu version es la ultima version de Radarr… En ese caso, te recomiendo revisarlo… Settings > Metadata. Tienes que ver TheMovieDB
Si no hay opción para pósters en español atravez TheMovieDB, puedes actualizar los pósters manualmente (En Radarr o Plex/Emby). Tambien te recomiendo revisar los indexers: Asegúrate de que soporten varios idiomas. Si no obtiene metadatos en español, usar Jackett con TheMovieDB podría ayudar.
Dondw encontrar una guía más básica que explique todo paso ampaso, incluyendo los valores a poner?
Hola Rafael, echa un vistazo a estas guías:
https://help.rapidseedbox.com/en/articles/6743479-sonarr-radarr-setup-guide
https://help.rapidseedbox.com/en/articles/6883376-radarr-quality-settings-including-4k
https://help.rapidseedbox.com/en/articles/6906818-getting-started-with-radarr-2025-update
https://help.rapidseedbox.com/en/articles/6852357-sonarr-radarr-lidarr-download-client-configurations