 Qua
Qua
If you provide access to your vast Plex media collection and get requests for new movies, TV shows, or any other media type every day, then you need to look at Overseerr.
Overseerr can help you streamline all those media requests for the Plex Media Server. It provides a centralized platform to manage requests (as a media server admin) or make them (as a media consumer).
In this guide, we’ll walk you through everything you need to know to get started with Overseerr, including installing it using Docker, configuring it to work with your existing servers and applications, and using it like a pro!

Tuyên bố miễn trừ trách nhiệm: Tài liệu này đã được phát triển nghiêm ngặt cho mục đích thông tin. Nó không cấu thành sự chứng thực cho bất kỳ hoạt động nào (bao gồm cả các hoạt động bất hợp pháp), sản phẩm hoặc dịch vụ. Bạn hoàn toàn chịu trách nhiệm tuân thủ luật hiện hành, bao gồm luật sở hữu trí tuệ, khi sử dụng dịch vụ của chúng tôi hoặc dựa vào bất kỳ thông tin nào ở đây. Chúng tôi không chấp nhận bất kỳ trách nhiệm pháp lý nào đối với thiệt hại phát sinh từ việc sử dụng các dịch vụ hoặc thông tin của chúng tôi ở đây dưới bất kỳ hình thức nào, trừ khi luật pháp yêu cầu rõ ràng.
Mục lục.
- A world without Overseerr?
- Intro to Overseerr.
- Tính năng
- Installing Overseerr.
- Choose your Setup Style
- Running Overseer on your Seedbox
- Installation on Docker (Linux Server).
- Installation on Docker Desktop (Windows Server).
- Opening the Overseer app.
- Configuring Overseerr.
- Sign in with Plex
- Configure Plex
- Configure Services.
- Plex Watchlist Sync Adjustments
- Using Overseerr.
- Requests.
- Users
- .
- Overseerr FAQ.
- Lời Kết
1. Intro to Overseerr.
One of the best parts of running a Plex Media Server is sharing your collection with friends. But as your user list grows, things can get messy—managing requests, handling permissions, and keeping everyone happy becomes a real chore.
Users are stuck with what you’ve got, not what they actually want. Sure, you could give them access to Radarr or Sonarr, but that only adds more complexity and confusion.
That’s where Overseerr comes in.
Overseerr is an open-source tool that makes it easy to request and manage media in your Plex setup. It connects smoothly with Radarr, Sonarr, and your existing media apps.
Users can request shows or movies with just a few clicks. As the server owner, you can handle those requests without lifting a finger—Overseerr keeps things organized and your library fresh.
No more digging for what’s trending or worth adding. Overseerr surfaces new content, automates downloads, and acts as the perfect front-end for your media flow.
How does it work?
The following diagram shows how Overseerr handles media requests. Viewers use their devices to ask for movies or shows. Overseerr sends those requests to Radarr (for movies) or Sonarr (for TV), then syncs with Plex to stream the content once it’s available, updating your library as it goes.

Apart from Overseerr’s web UI, users can also manage requests via chat using tools like Requestrr, a Discord chatbot for Sonarr/Radar
3. What can you do with Overseerr?
Below is a list of some of the most popular Overseerr’s features.
- Smarter Media Discovery. Overseerr makes it easier than ever to surface the content your users actually want to watch. The upgraded Discover page pulls in personalized recommendations based on trends, watchlists, requests, and more. You can also add custom streaming service sliders to show where content is available, so users can start watching right away. Plus, with the new TMDB Vote Count filter, you can highlight top-rated titles backed by real viewer approval, not just what’s trending.
- Streamlined Request Management. Overseerr gives you full control over movie and show requests. You can review, approve, or reject them with ease, set request limits per user, and track request status from start to finish. It’s a one-stop hub for managing your library’s growth—without the clutter.
- User Permissions. Easily assign specific features and permissions to each user. Whether you want to restrict certain tools or give trusted users more freedom, Overseerr’s permission system lets you fine-tune access for every member of your server.
- Integrated DVR Management. Connect Overseerr with popular DVR apps like Radarr và Sonarr to monitor downloads and request activity directly from the interface. It can even act as a front end for those apps, giving you a cleaner, unified dashboard to manage your media.
- Library Scanning & Sync. Overseerr scans your Plex libraries regularly and syncs availability with apps like Radarr and Sonarr. If media is removed or no longer monitored, its status updates automatically, so users can re-request it as soon as it’s gone.
- Smarter Notifications. Get real-time updates through platforms like email, Discord, Pushover, Slack, Telegram, and more. Choose custom sounds, include images, and configure how and when alerts arrive—whether it’s for new requests, approvals, or download status.
- Responsive Design. Access Overseerr from any device thanks to its mobile-responsive layout. Whether you’re on your phone, tablet, or desktop, you’ll get the full experience. You can even add it to your home screen for quick access like a native app.
- Language Expansion. Overseerr now supports more languages than ever, including Bulgarian, Finnish, Ukrainian, Indonesian, Slovak, Turkish, and Maori. It’s a more inclusive experience—whether you’re hosting a small family server or a global media hub.
- Developer Friendly. Power users and developers can dive into Overseerr’s API, GitHub repo, and CLI tool for advanced customization. Whether you’re building new workflows or just tinkering under the hood, Overseerr keeps things open and flexible.
4. Installing Overseerr.
Now that you know what Overseerr is, let’s learn how to install and run it on your server. The tool is still in its beta release and is only available on GitHub via a Docker-only installation. Being a Docker-container-based-only installation makes it easy to deploy and run if you know Docker containers. But it also keeps the general Windows and Linux public away from it.
| ⚠️ Heads up! The latest Overseer version is v.1.34.0. Find more information on the GitHub official repository. The guide has been previously made using an older version. Although there has been a change in the Docker image, the mechanics of installation over Docker images remain the same. Just a heads up when installing the new and updated version of Overseer. |
Lưu ý: If you have a VPS seedbox, you can leverage one-click apps and skip the entire installation process. But if you are starting from zero to deploy Overseerr on your premises, we recommend using Docker on Linux. Although you could install this tool in Windows, Linux, or Unraid, you will still have to run Docker or Snap to make the installation easier.
a. Choose Your Overseerr Setup Style
Just getting started? Or maybe you like to tweak every setting yourself? Either way, there’s a setup method that fits. Below are three ways to install Overseerr—from dead-simple to fully hands-on. Pick what works for you and get rolling. (More instructions on some of these methods in the coming sections)
🟢 One-Click Easy
Ideal for beginners or those seeking a hassle-free setup.
- Seedbox (RapidSeedbox): Utilize the One-Click App Installer from your client area to deploy Overseerr effortlessly.
- TrueNAS SCALE: Access the TrueNAS Apps Marketplace to install Overseerr directly.
- Unraid: Install Overseerr via the Community Applications https://forums.unraid.net/topic/122509-support-binhex-overseerr/
⚙️ Docker-Based (Manual)
Suitable for users comfortable with container management.
- Linux & Windows: Go back to the previous section or follow the official Docker installation guide to set up Overseerr using Docker Compose or CLI.
- Synology NAS (Docker or Portainer):
- Docker: Implement Overseerr using Docker on your Synology NAS. Or manage Overseerr containers via Portainer. I recommend checking out this step-by-step guide.
- QNAP NAS (Container Station): Install Container Station from the QNAP App Center, then pull the sctx/overseerr image from Docker Hub, map port 5055, and mount a volume to /app/config
- Portainer: For a visual approach to container management, use Portainer to deploy Overseerr.
🔬 Advanced / Developer Options
For developers or users seeking full control and customization.Bare-metal Linux (Node.js): Install Overseerr directly from source by cloning the GitHub repository and following this manual installation guide
b. Running Overseerr on your Seedbox.
Starting with Overseerr on your Seedbox is easier than deploying it from zero. If you have a seedbox from Rapidseedbox, we strongly recommend you run the tool using the one-click apps.
RapidSeedbox offers “One-Click Apps,” pre-configured applications that can be easily installed on the user’s seedbox with just one click. So, rather than starting from zero and spending energy and time, use the one-click apps and have the app running in seconds!
Tóm tắt:
- Go to Rapidseedbox’s Client Area. And ensure your VPS Seedbox is updated. Check our tutorial to learn how to bắt đầu và sử dụng các ứng dụng Một cú nhấp chuột..
- Open OCI installers on the left-hand menu and find Overseerr.
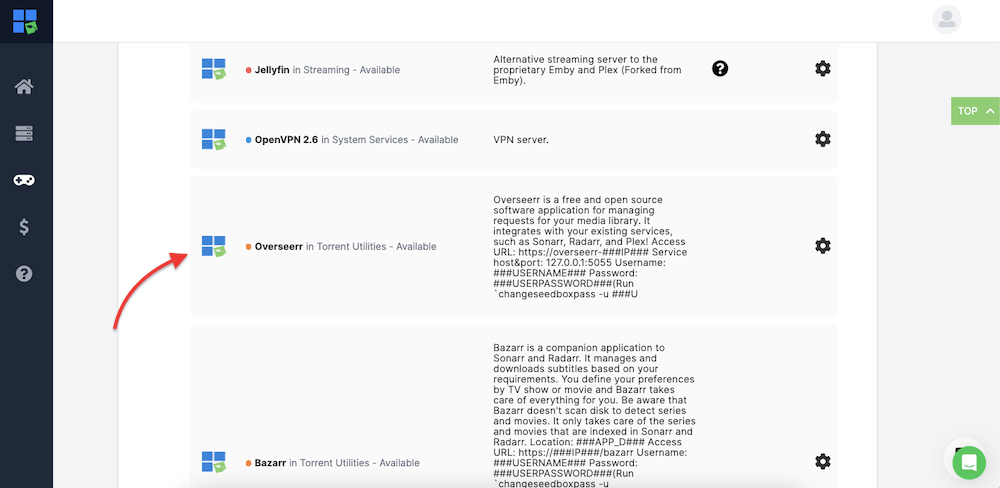
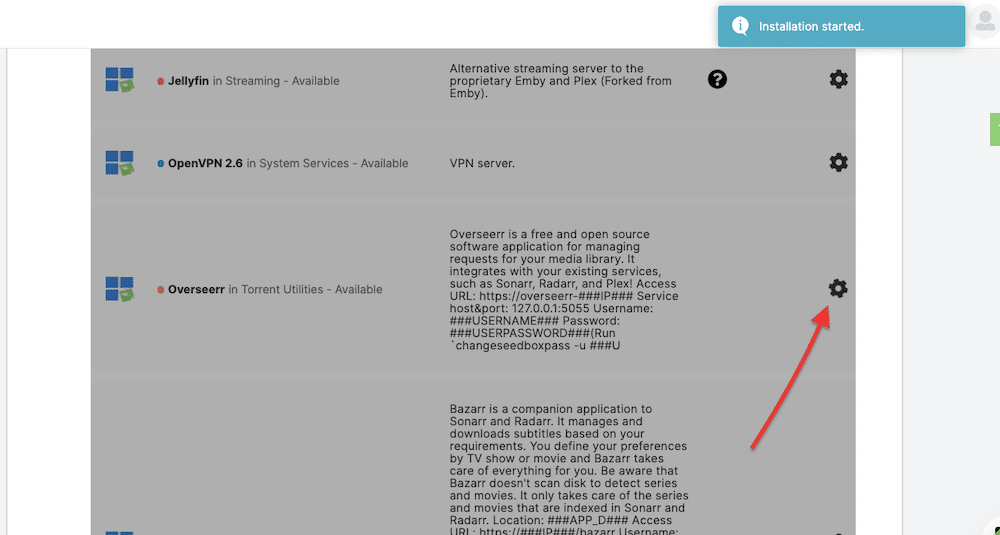
- Click on the gear icon on the right-hand side to install it.
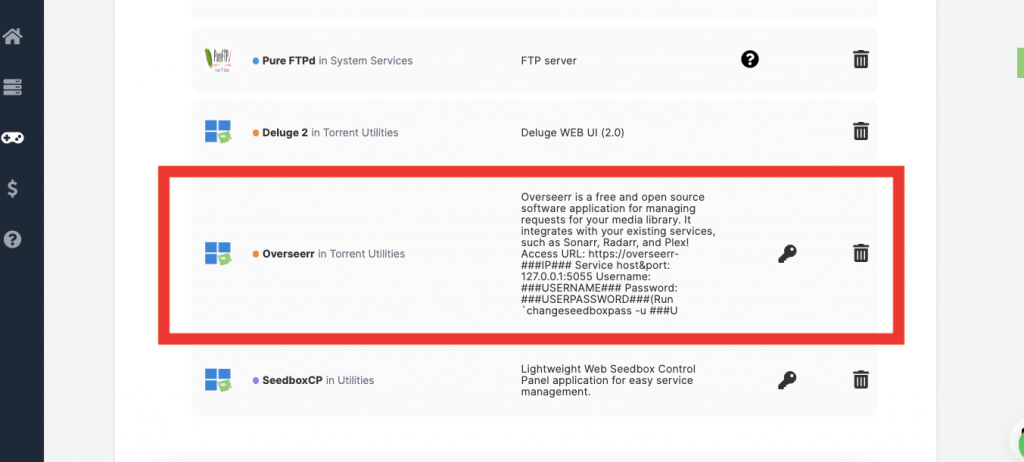
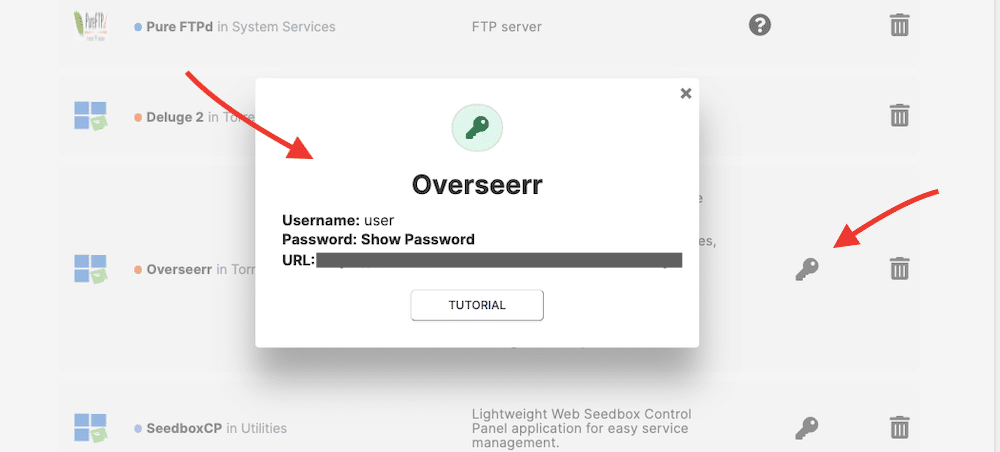
- Go to “Installed apps,” and you should see the app installed. Click on the key icon to see the credentials and URL.
- Copy the credentials (username and password) and URL.
- Go to your web browser and enter the URL and credentials when asked.
- The Overseerr’s GUI will open. We will go through the configuration details in the later sections.

By providing pre-configured applications (one-click apps), RapidSeedbox simplifies setting up and configuring applications like Overseerr on the seedbox, making it easier for you to get started.
c. Installing Overseerr on Docker (Ubuntu Server).
Here are the steps to install Overseerr using Docker (installed on an Ubuntu server):
- To start, you must install Docker on your system. Installing Docker is outside the scope of this article. There are two ways to install this application using Docker on a Ubuntu host: Docker CLI or Docker Compose. In this tutorial, we will use Docker Compose.
- To check your current Docker (and Docker Compose) version, use the following commands:
|
1 |
$ docker --version<br>$ docker-compose version |
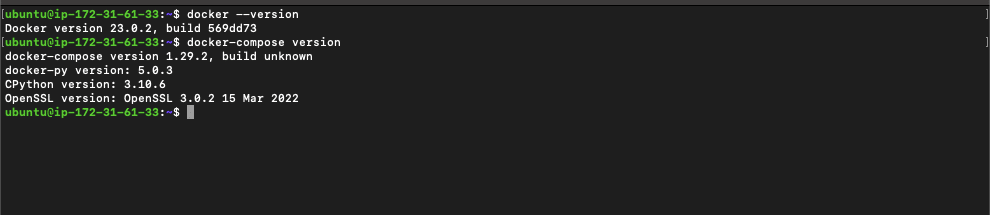
- Create a new Docker container using the Overseerr image. The Docker image is on the official GitHub page > https://github.com/sct/overseerr.
| ⚠️ Docker Image Updates: Note that the LinuxServer.io Docker image has been rebased to Alpine 3.21, which may affect installation and compatibility. |
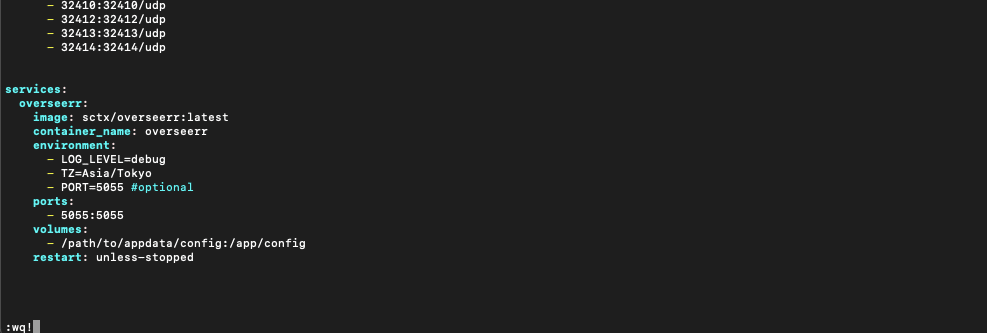
- Let’s define the service in your docker-compose.yml (YAML config file) as follows. Open your Docker-compose file (if using Linux, use text editors like vi, vim, or nano), and enter the following lines. You’ll likely have to change the version number and other parameters in the following configuration lines, especially TimeZone, Port number, or volume path.
| version: ‘2’ Services: overseer: image: sctx/overseerr:latest container_name: overseer environment: – LOG_LEVEL=debug – TZ=Asia/Tokyo – PORT=5055 #optional ports: – 5055:5055 volumes: – /path/to/appdata/config:/app/config restart: unless-stopped |
Lưu ý: Pay close attention to the volumes section. This section specifies the volumes to be mounted inside the container. The line, “- /path/to/appdata/config:/app/config” indicates that the host directory located at “/path/to/appdata/config” should be mounted as a volume inside the container at the path “/app/config.”
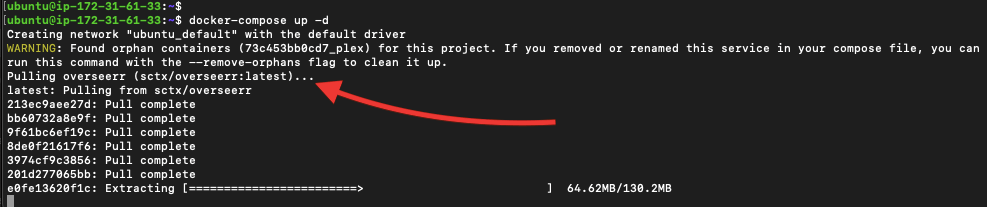
- Start all the new services defined in the Docker Compose file. To do this, use the following command:
|
1 |
$ docker-compose up -d |
- With the previous command, the Overseerr image (for sctx/overseerr:latest) will be pulled from the repository, creating the container.
- Once finished, you can check all the running containers. Use the “docker ps” command to do this:
|
1 |
$ docker ps |
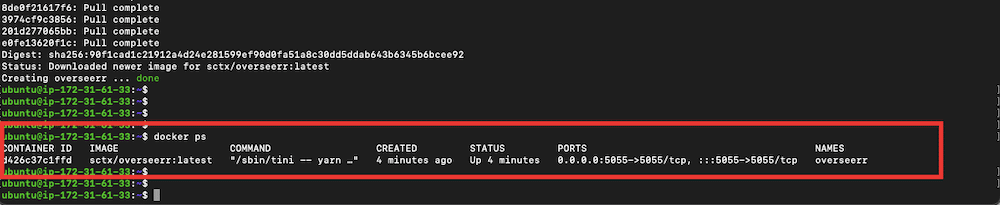
- As you can see, the new Docker container has been created, and port 5055/TCP has been exposed.
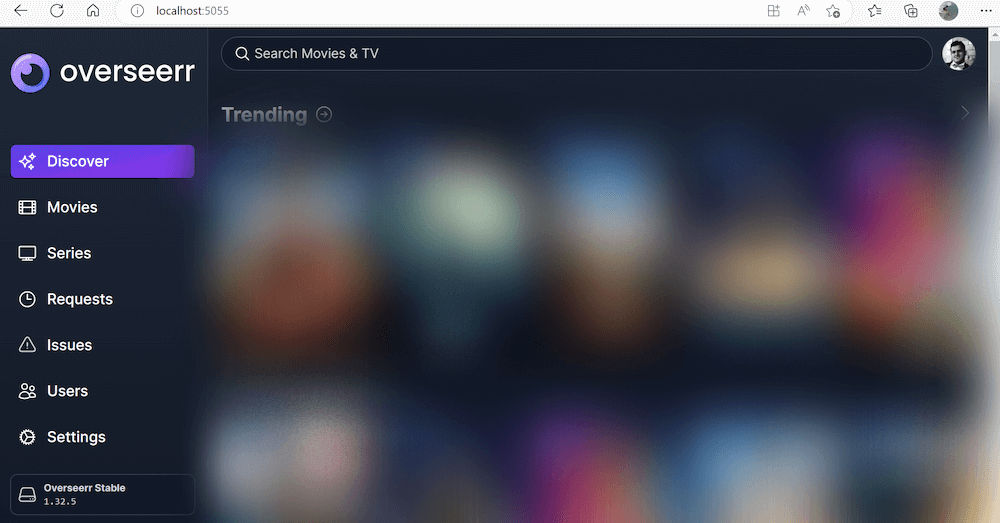
- Once the container runs, you can access the Overseerr interface by visiting your web browser: http://<hostname>:5055.
Looking to simplify media requests with Overseerr?
Overseerr makes managing media requests a breeze. Pair it with RapidSeedbox’s high-speed seedboxes for faster downloads and seamless integration.
d. Installing Overseerr Via Docker Desktop (on a Windows Server).
Ensure you can run Docker containers in Windows. We will use Docker Desktop for this installation, but you could also use Docker CLI. Using Linux as a host machine rather than Windows is always recommended.
Lưu ý 1: Docker on Windows does not run the same way as Docker on Linux. Docker on Windows runs inside a stripped-down Linux VM that relies on SMB mounts to expose volume mounts to Docker. While this works for media, it does not work for the /app/config directory. This is because SMB lacks file-locking support, which can result in database corruption.
While running Docker on Windows, it is recommended to mount the “/app/config directory” within the VM instead of on the Windows host. An application like Docker Desktop allows you to mount the “/app/config” directory within the Docker virtual machine (VM) instead of on the Windows host. Named volumes on Docker Desktop are automatically mounted within the VM. Therefore, the warning message about the /app/config directory on the setup does not apply to named volumes, as Docker manages them and does not depend on SMB mounts.
Điều kiện tiên quyết:
For this installation, you must create or assign a named volume to store Overseerr’s configuration data and install WSL2 to prevent DB corruption. First, create a volume to store the configuration data for Overseerr.
- Open the Docker Desktop app.
- Go to the Volumes tab on the right-hand menu bar.
- Click on the “Create” button on the top right corner.
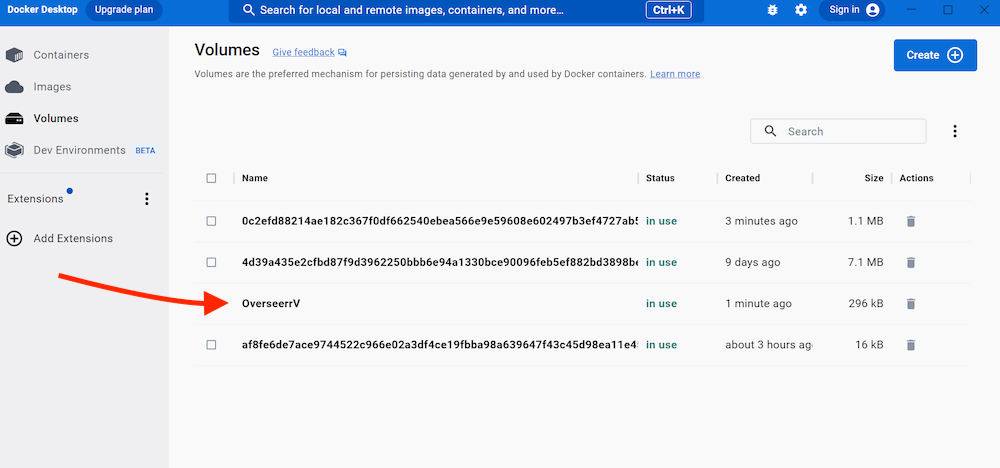
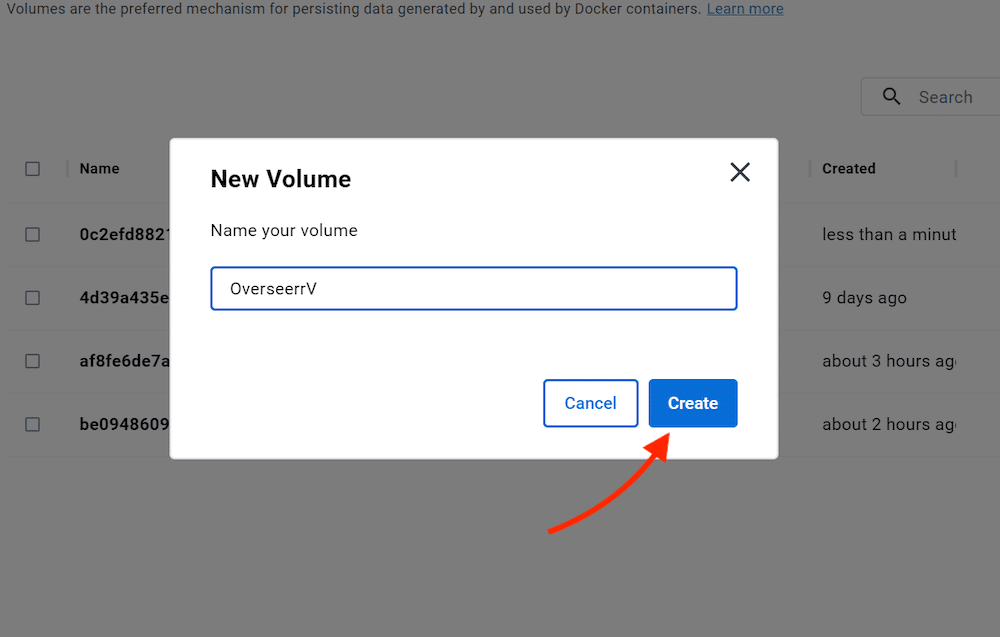
- Enter a name for the new volume (for example, “overseerr-data” or “OverseerrV”) and click on “Create.”
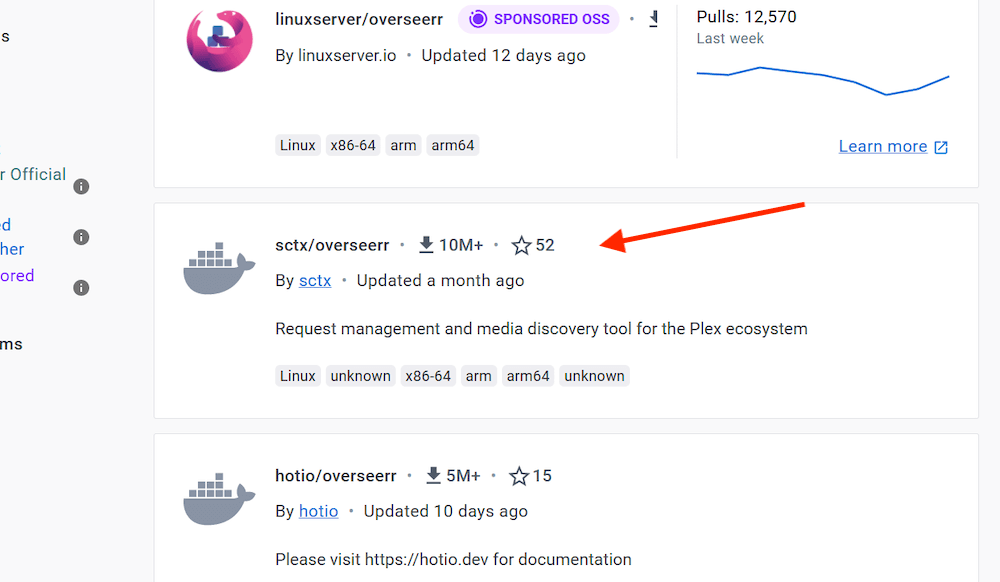
- Now, go to “https://hub.docker.com” and search for an “overseerr” image. You’ll find a couple of options. In this tutorial, we will deploy the official “stcx/overseerr” image.
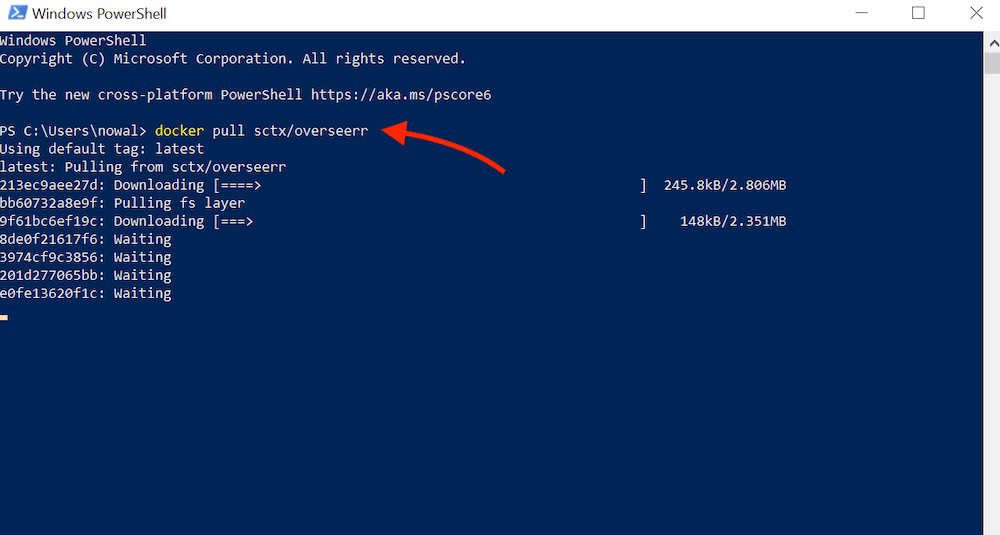
- Use the “docker pull image” command to download the image (i.e., sctx/overseerr). You can use a Windows CLI such as Command Prompt or Powershell.
$ docker pull sctx/overseerr
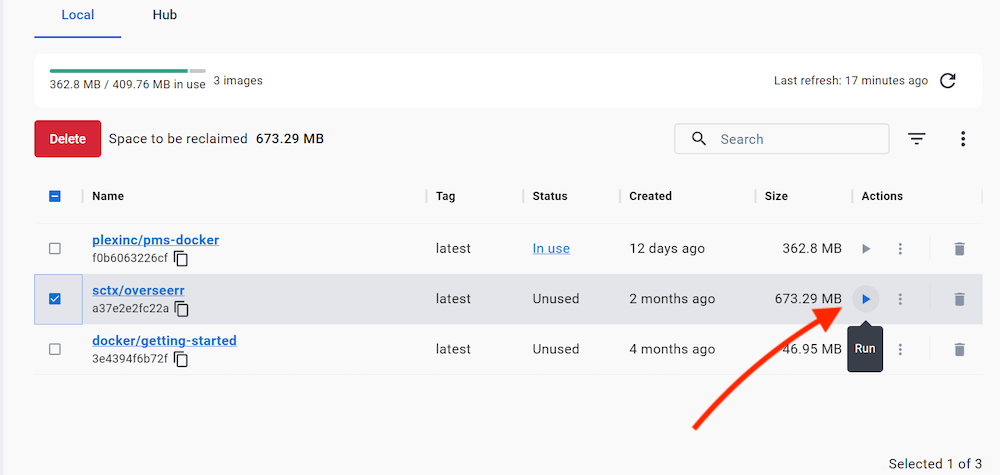
- Go back to Docker Desktop > Image. You should be able to see the new “sctx/overseerr” container image in place. The image’s size is about 637.29 MB. Click on the Run button to start the image.
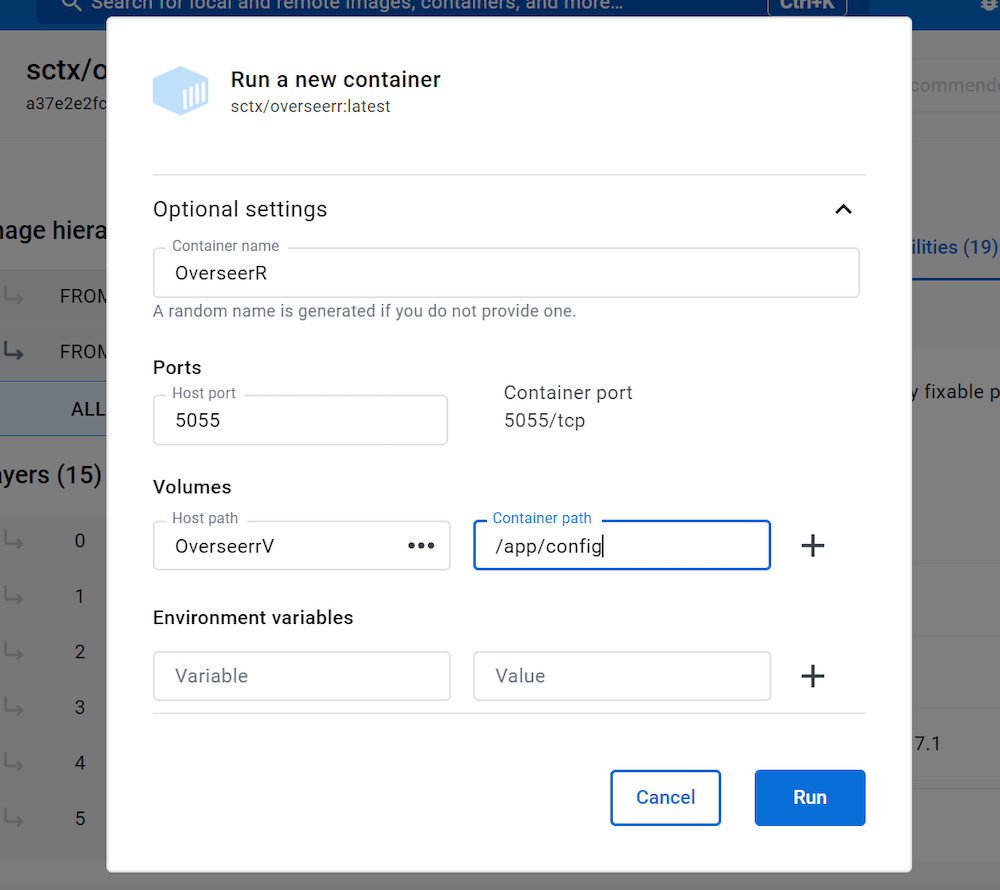
- Give the new container a name, map the port on the host (5055), and enter the new volume you created in the previous section on the host path. Then hit “Run.”
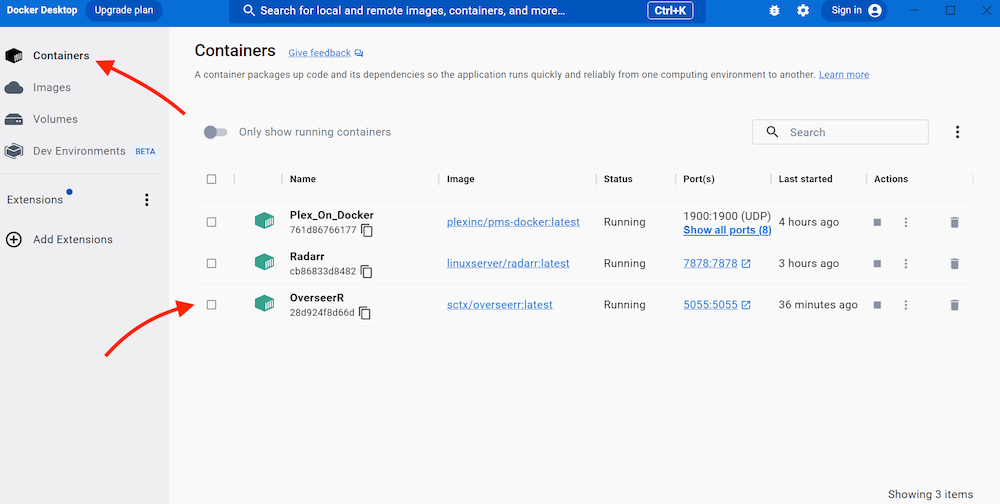
- Now, go back to Containers. You will see the new OverseerR container created. Its status is on running and exposes port 5055.
e. Opening Overseerr
If the Docker container is running correctly and was successfully installed, as shown in the previous section, you can open it and start using it.
- To open the app, go to your favorite and updated web browser and type: http://localhost:5055
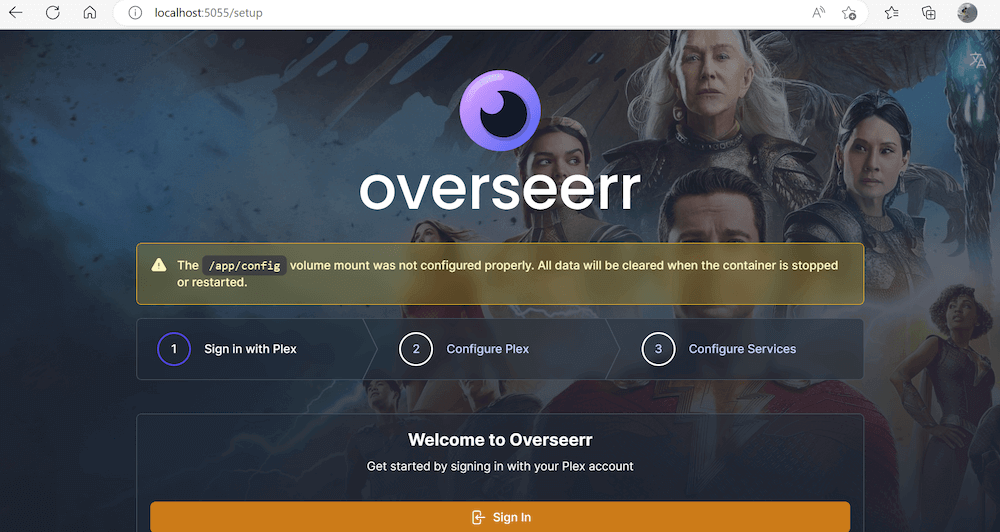
- You’ll notice that although Overseerr is up, running, and accessible, you might be getting the following message “The /app/config volume mount was not configured properly. All data will be cleared when the container is stopped or restarted.” When the container stops or restarts, any data that was stored in the “/app/config directory will be cleared. This can be problematic if you store important configuration data in this directory.
- To fix this issue, you should check the volume mount configuration and ensure it is set up correctly. This might involve checking the container configuration file or the Docker Compose file if you are using it to manage containers.
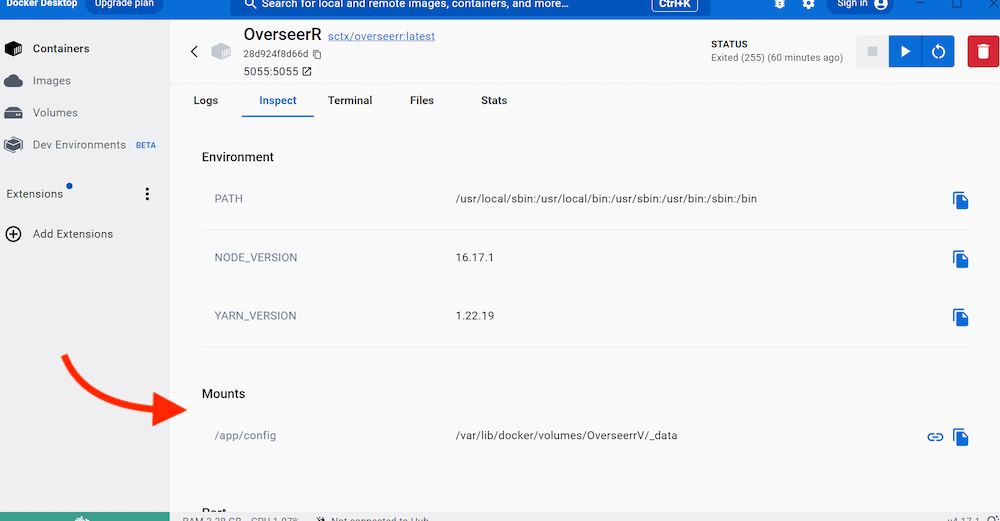
- When we previously started the container, we created a named volume. We mounted the directory “/app/config” to “/ver/lib/docker/volumes/OverseerV/_data”. As stated before, the named volume is automatically mounted inside the VM. This means the container can access and use the contents of the “/app/config” directory from the host operating system within the container.
- If this is the case (you mounted a named volume from Docker), and according to Overseerr, you should ignore the warning message.
5. Configuring Overseerr.
The three initial steps to start with Overseerr are: Sign in with Plex > Configure Plex > Configure Services.
a. Sign in with Plex.
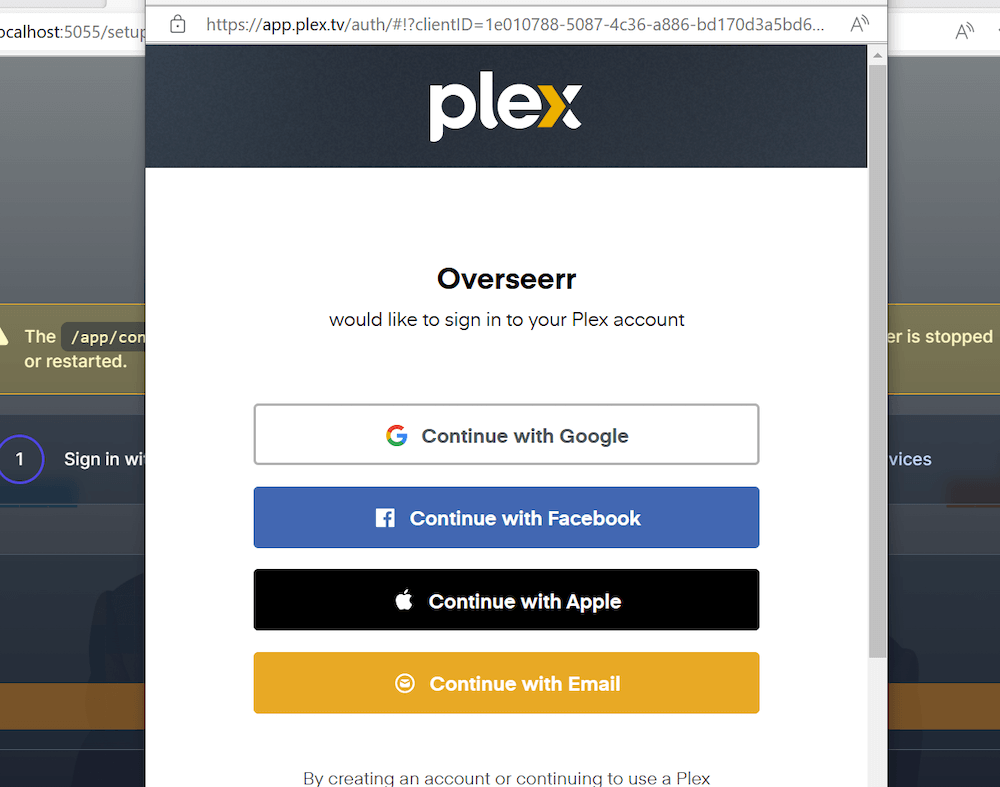
The first step in configuring Overseerr is to sign in with your Plex account. Signing to Plex allows Overseerr to access your library and sync your watch history. You can “Sign in” right from the web app.
You must use your Plex credentials to let Overseerr sign in to your Plex account.
b. Configure Plex.
After signing in with Plex, you must configure your Plex server settings within Overseerr. This configuration means adding the Plex Media Server parameters, such as IP, hostname, port, etc.
- Ensure you test your connection and get the “Plex connection established successfully!”
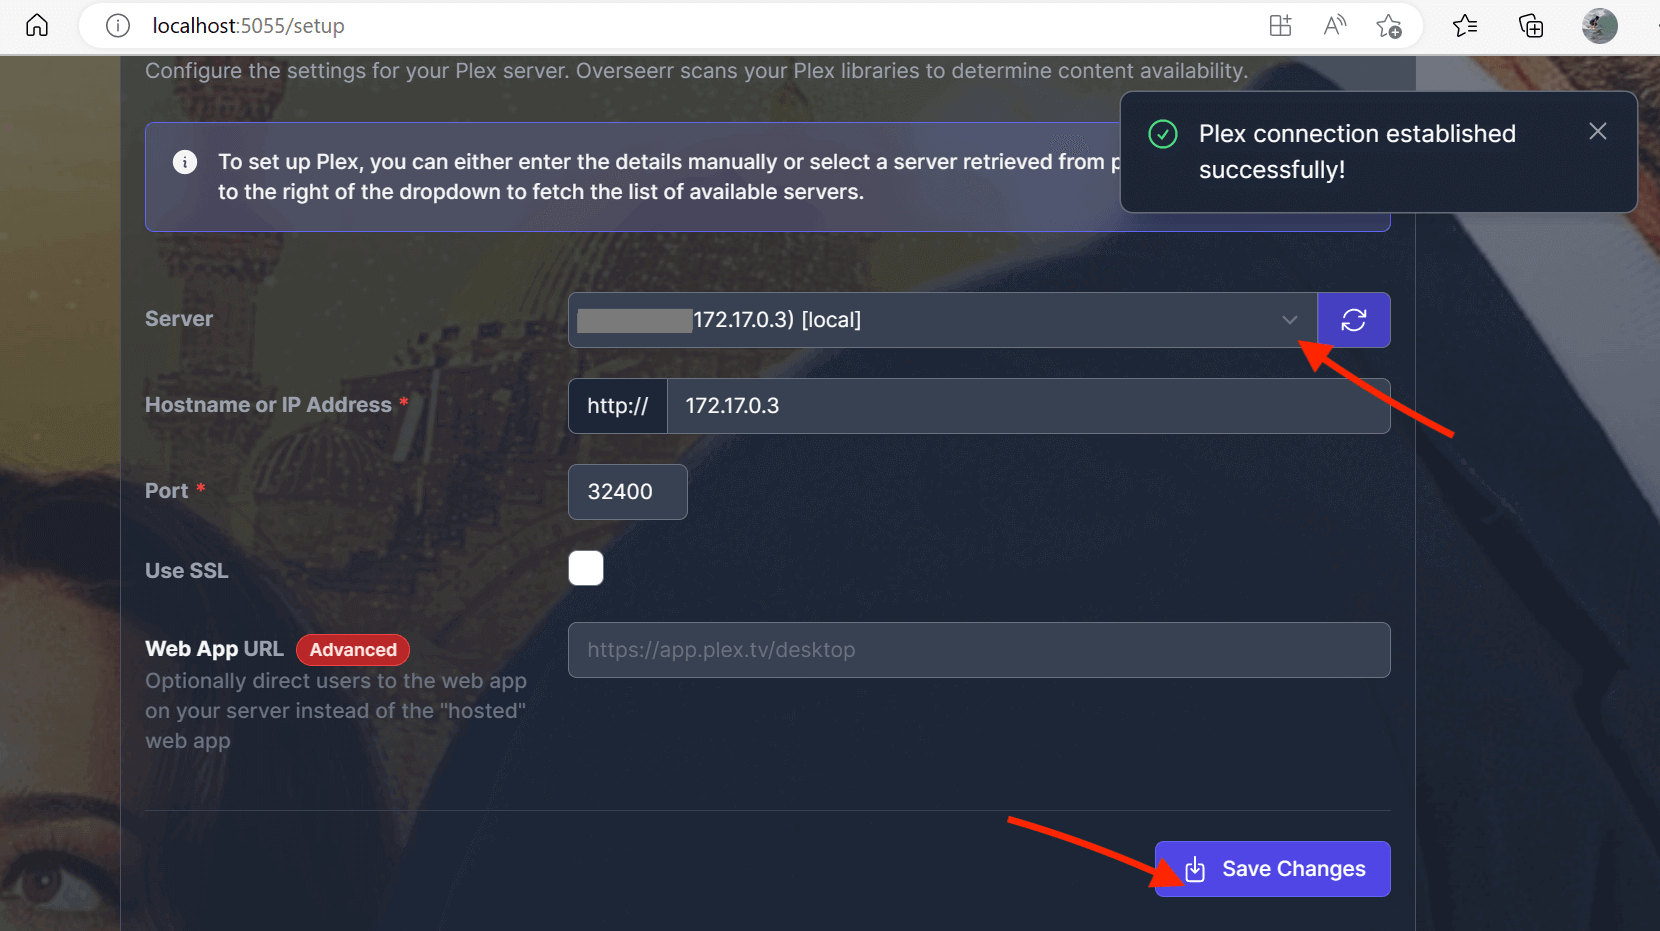
- At this step, you can also add and synchronize your Plex media libraries. Although Overseerr will automatically scan your library every 24 hours, it is recommended to manually scan it at this step to help the tool know about your media.
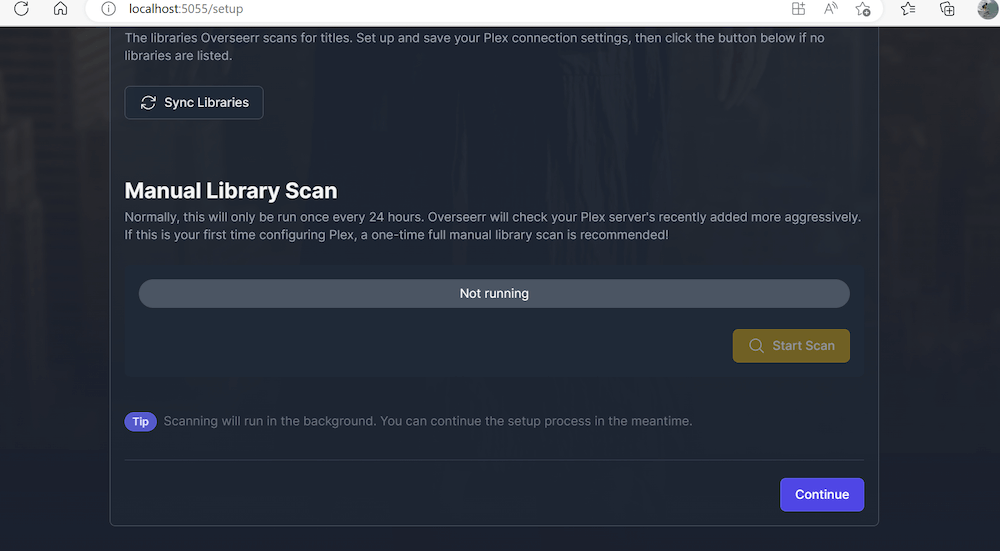
c. Configure Services (Radarr and Sonarr).
The next step is configuring the services Overseerr will use to retrieve information about movies and TV shows. At this step, you can add services such as Radarr or Sonarr.
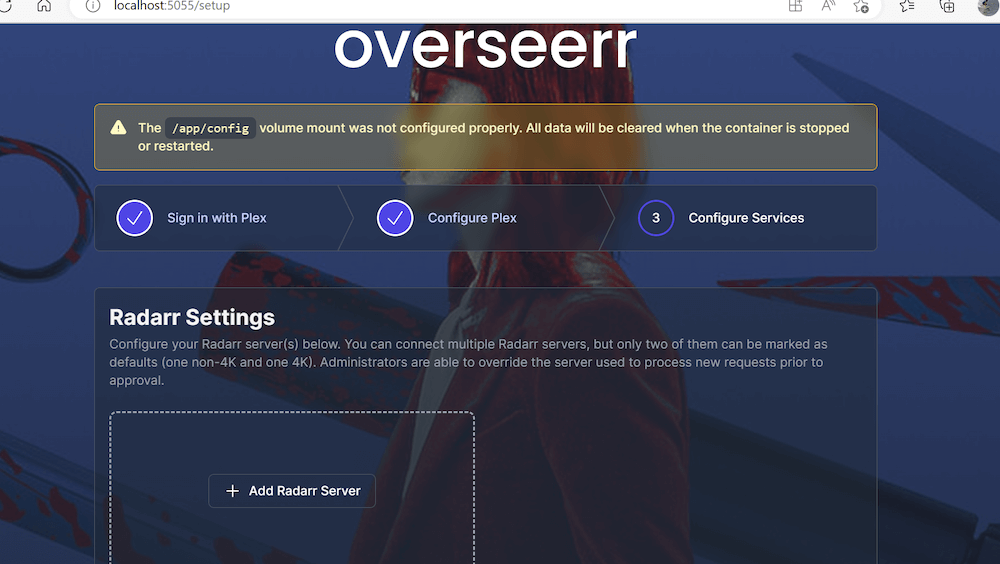
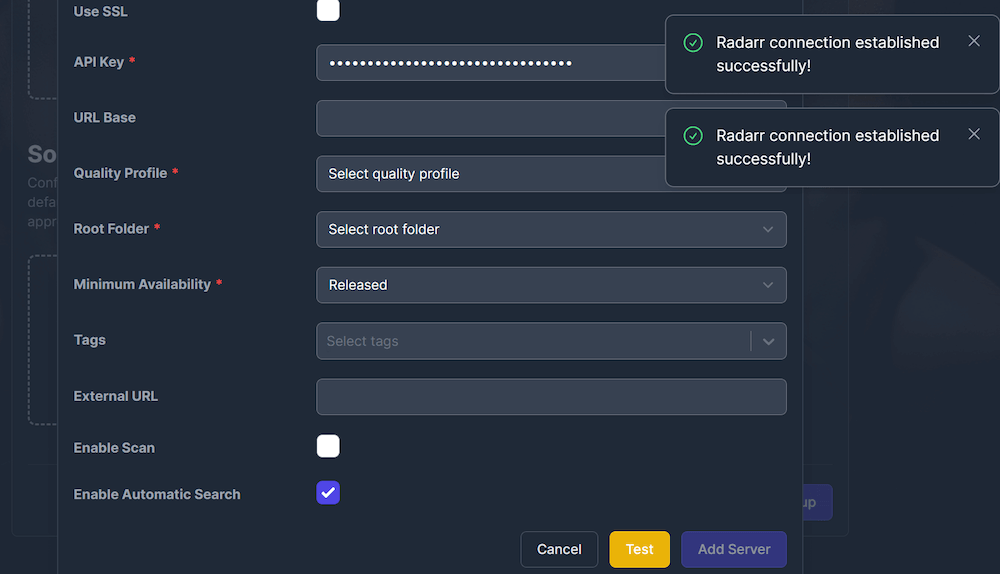
- For example, to add a Radarr Server, you must add specific parameters like Server Name, Hostname, IP address, Port, API key, etc.
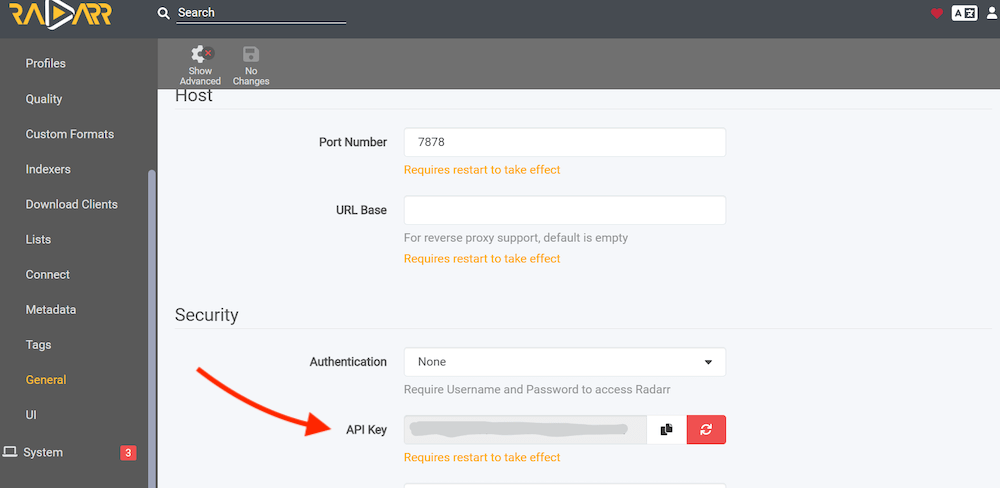
- To know some of this information, such as the API key, go to your Radarr server instance. Go into Settings > General > Security > API Key (Copy your API Key). For more on setting up and using these applications, check our comprehensive Radarr guide và Sonarr guide.
- Return to your Overseerr configuration and add the API Key you copied at the previous step.
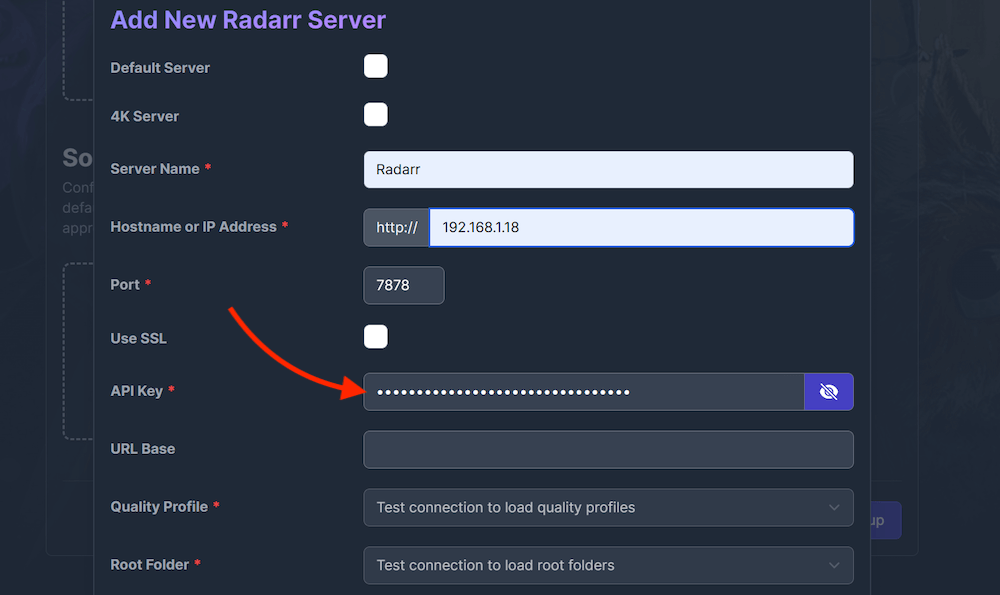
- Once all the information has been entered, including Quality Profile, Root Folder, and Minimum Availability, click on “Test.” If the test turns a “Radarr connection established successfully!” go ahead and click “Add Server.”
- Finish the configuration and open the interface.
- In Overseerr’s user interface, you’ll see Overseerr’s trending, popular movies and other “discover” titles. You can also see your Plex movies, series, requests, issues, users, and settings.
d. Plex Watchlist Sync Adjustments
Overseerr has updated its Plex Watchlist synchronization to reduce server load. The new behavior? The sync now occurs at randomized intervals, approximately every 15–20 minutes. Also, the option to customize the watchlist sync schedule has been removed.
Steps to Verify: Access the Overseerr Settings:
- Navigate to Settings > Jobs & Cache.
- Check Sync Status: Look for the “Plex Watchlist Sync” job to confirm it’s running as expected.

| 🔄 Lưu ý: For more immediate synchronization, consider using third-party tools like Watchlistarr, which can provide near real-time updates. |
e. Radarr/Sonarr Tagging Feature
Overseerr now allows tagging of user requests, enhancing organization within Radarr and Sonarr.
Why Tagging Helps? Tags keep things organized by letting you group requests by user—super handy when you’re managing a bunch at once. They also make it easier to filter media in Radarr or Sonarr, so you’re not digging through a mess to find what you need.
How to Enable Tagging:
- Navigate to Services Settings: Go to Settings > Services in Overseerr.
- Edit Radarr/Sonarr Instances: Click on each Radarr and Sonarr service you’ve added.
- Enable Tag Requests: Toggle the “Tag Requests” option to “On.”
| 🛠️ Lưu ý: To reflect these tags in Plex, additional tools like Kometa hoặc plex-requester-collections may be required. |
6. Using Overseerr.
a. Requests.
One of the most significant characteristics of Overseerr is its request management system. Your Plex Media Server users can request media content they want to see in your library. Or, if you are a user (media consumer), you can log into the app and submit a request for a movie or TV show that is not currently available in the library. All the requests will be added to a queue.
This feature is quite helpful for server owners to manage large media libraries, as it helps you to prioritize which content should be added next. Admins or moderators can then review the requests and decide whether or not to fulfill them by adding the requested content to the library.
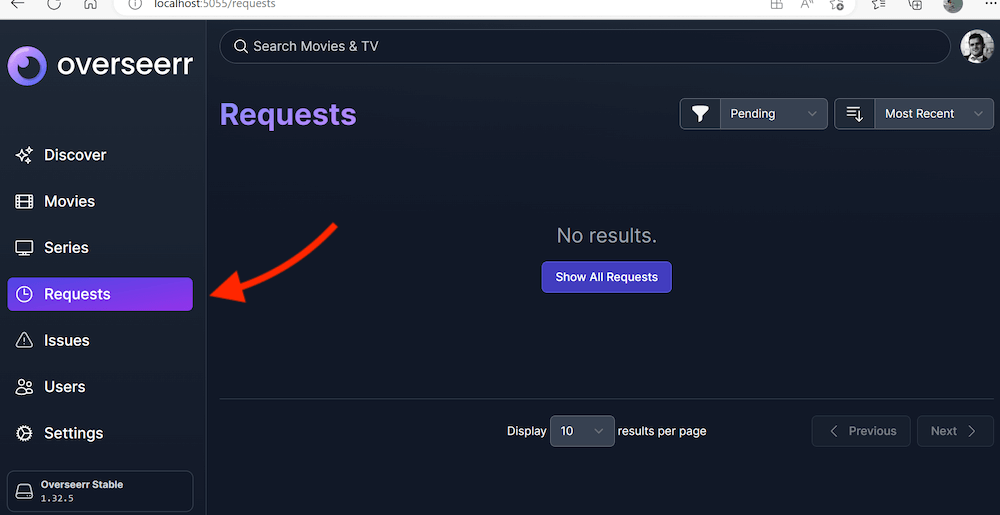
- Access your Overseerr’s requests in the side menu > Requests > See all your requests.
- Our Overseerr server is brand new, so it has no requests yet. But once the requests start rolling up, you will see the list populating and will be able to filter requests by most recent and pending.
b. Users
Overseerr has a robust user management feature that allows you to create user accounts for others to use the app. Each user can have their login credentials, and you can set different permissions and restrictions for each user. This is useful if you want to give friends or family members access to your media library but want to control what they can and cannot do, such as requesting content or modifying settings.
| 🧹 Handling Large User Request Histories: Note that users with over 1,000 requests can now be deleted. This is perfect for managing and maintaining the user database. |
- To see your User List, click on Users on the right-hand side menu. Here you’ll be able to see all your users, the requests, the type of user, the role, and the time joined.
- You can either create local users or import Plex users as members of your Overseerr instance.
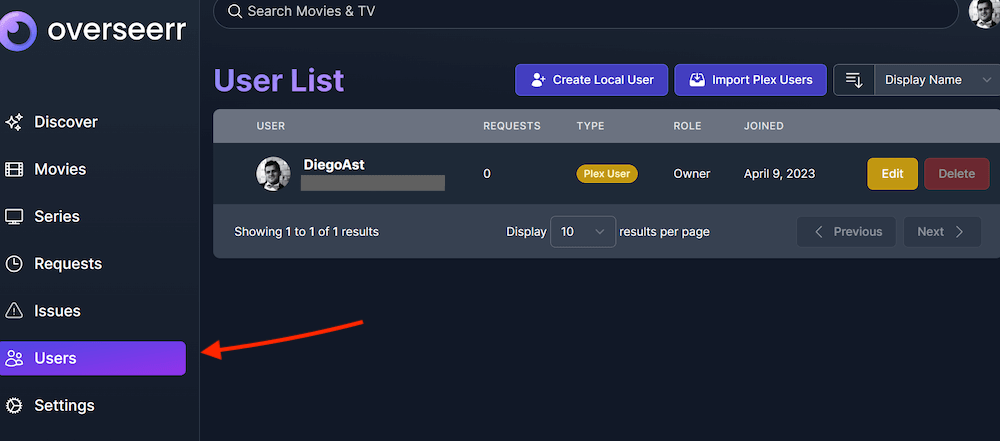
- To create a local user, go to the “Users” tab in the Overseerr settings. Click the “Create User” button to create a new local user. Fill in the required fields, such as the username and password.
- You can also assign users roles, defining their permissions and access within Overseerr.
- You can also import your Plex users by clicking the “Import Plex Users” button. To do this, you must enter your Plex credentials to connect to your Plex server.
- After connecting to your Plex server, you can select which Plex users you want to import into Overseerr. Once you’ve selected your users, click the “Import Selected” button.
- You can customize imported or local users’ access and permissions by assigning them different roles.
c. Settings.
These are configurable options that allow you to change the behavior and functionality of Overseerr.
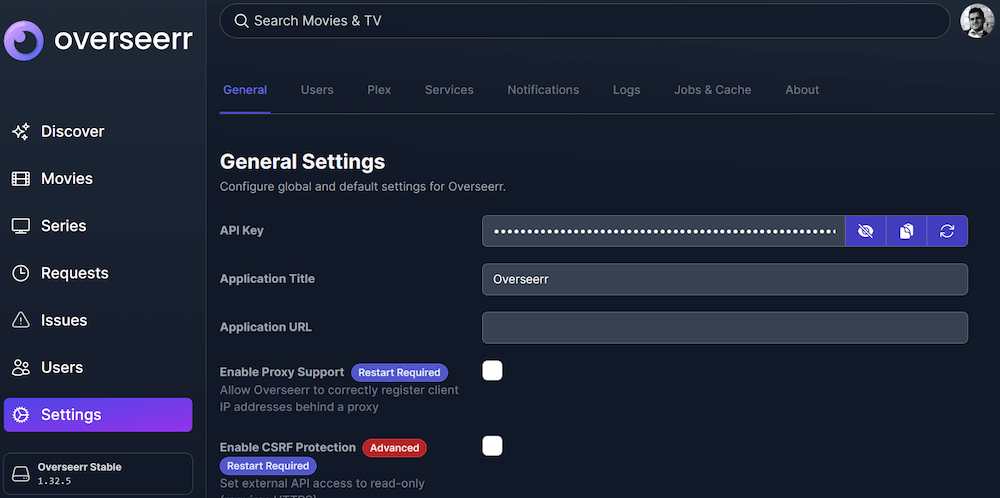
Here is a description of each setting in the provided list:
- General Settings contain the following: “API Key,” “application title,” “application URL,” “enable proxy support,” and “enable CSRF protection.” In addition to options like “enable image caching,” “display language,” “discover region & discover language,” “hide available media,” and “allow partial series requests.”
- The user’s section contains the following settings: “Enable local sign-in” and “Enable new Plex sign-in.” In addition to “Global Movie Request Limit & Global Series Request Limit” and “default permissions.”
- Plex settings allow you to configure Overseerr to connect to Plex. You can enter the details manually or select a server retrieved from Plex. It includes Hostname or IP Address, Port, SSL enabled, and Web App URL (optional).
- Services: The Overseerr “Services” settings refer to the different media server applications it can connect to and manage, such as Sonarr and Radarr. Here, you will see the integrated services or the ones you can incorporate.
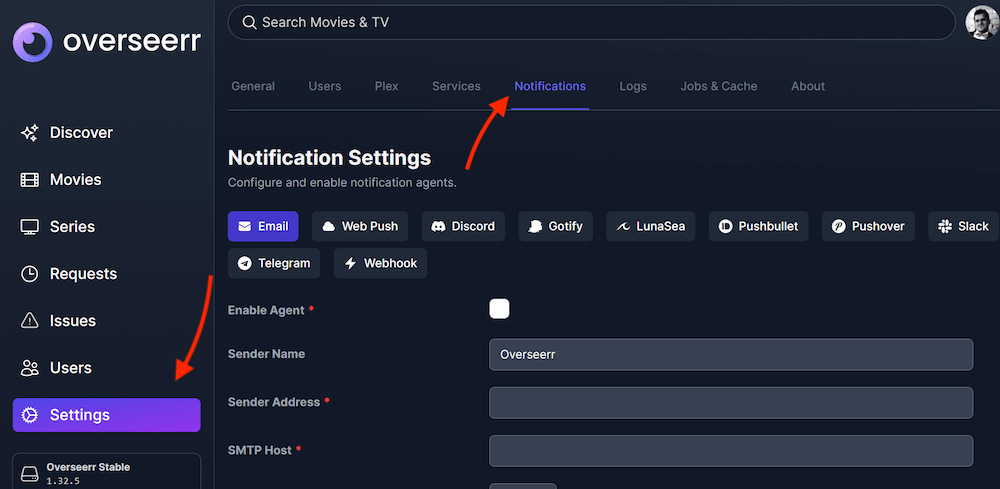
- Notifications: You can configure your desired notification agents in the Settings section of Overseerr. The tool supports several notification agents, including Email, Web Push, Discord, Gotify, LunaSea, Pushbullet, Pushover, Slack, Telegram, and Webhooks (refer to the screenshot below).
7. Overseerr FAQ.
A: Yes, Plex offers something similar called Watchlists, where you could have the “watchlist” automatically added to services like Radarr and Sonarr. However, access, authentication, and permissions to these services can become a pain as your user base grows.
A: Yes, you can create local users alongside Plex OAuth-based users. This enables you to create your own users and give access to Overseerr to your Plex home users.
A: You can add as many Radarr/Sonarr servers as necessary and as possible. You can also change between servers using the Advanced Requester when approving requests. Overseerr also supports 4K Radarr/Sonarr servers.
A: To access Overseerr outside your home network, you should forward an external port on your router to the internal port (i.e., 5500). Port forwarding is the easiest but least secure method. Another more secure (if using SSL) and friendlier way is setting up a web server and using a reverse proxy to access Overseerr. Setting up a VPN tunnel to your home server is also a highly secure method for remote access.
A: Verify that your library is using any of the supported agents. Refresh the metadata for the missing media item and perform a full scan in Overseerr. You can also check the logs for errors and ensure the media item has a GUID that Overseerr can match.
A: Check your Radarr/Sonarr settings. Check the minimum availability setting in your server and ensure that Radarr was not already monitoring the item before approving the request in Overseerr.
A: Jellyseerr and Overseerr are both media request and management tools. On the one hand, Jellyseerr was specifically built to support Jellyfin và Emby media servers, with added support for Plex, while Overseerr supports only Plex.
Overseerr works great with Plex and connects easily to tools like Radarr and Sonarr. It runs on most setups—Linux, Windows, macOS, Docker, and even NAS systems like Unraid or Synology. New features roll out often, so it keeps getting better.
Yes, but you might need to tweak a few settings. Some VPNs block local traffic, so make sure the right ports are open. Split tunneling can help if you want Overseerr to stay reachable on your home network.
Looking to simplify media requests with Overseerr?
Overseerr makes managing media requests a breeze. Pair it with RapidSeedbox’s high-speed seedboxes for faster downloads and seamless integration.
8. Lời kết.
It can be hard to imagine a world without a tool like Overseerr if you run a shared Plex Media server with massive amounts of media. With its user-friendly interface and feature-rich functionality, Overseerr has made managing your media library requests and discovery a breeze.
In this unofficial guide to Overseerr, we reviewed the installation process for Docker container Linux and Windows hosts. We also went through the configuration process, from signing in with Plex to configuring services like Radarr and Sonarr.
Thank you for checking our unofficial Overseerr guide; we hope it has been helpful to you. But remember, this guide is only the tip of the iceberg; we always recommend continuing to explore and checking official sources.
If you have any questions or feedback, please feel free to leave your comments below.
 English
  Français
  Español
  Tiếng Việt
  简体中文
简体中文  Русский
  Türkçe
  Bahasa Indonesia
  日本語
日本語  العربية
  Português
  Українська
This guide was so helpful. Thank you so much for this, I really appreciate you!
your most welcome Josh!
it’s always able to find my plex servers but they only ever load with an “etimedout” error so i can’t actually sync them. any ideas as to whats going on there? i can only seem to find other people in my situation but no actual resources. thanks!
Hi pmperk19! This sounds Plex is having difficulties during the connection. This message typically comes along with a ULR and port. The port number you’ll see on the error message is the one that your Plex installation is supposed to be using. Try using telnet to connect to that URL/Port combo. If the connection times out, then you’ll need to provide more details for troubleshooting I’m afraid. Another possible solution (albeit usually highly unpopular) is to try and delete then reinstall Overseerr. Hope this helps!
Helped a lot, using the Windows Desktop Version, still getting the “/app/config” warning, which su**s a bit.
Any Idea where I can change the Overseerr Name and Logo?
Hi Alf, AFAIK this feature is still a work in progress with the Overseerr team. There are apparently some unofficial fixes around, but we haven’t really looked though them.
I followed the guide and created container successfully but it appears unable to communicate with the host network. How do you let the container able to communicate with 10.10.10.0 subnet?
Hyper-V Switch : 172.22.208.1
Host IP : 10.10.10.16
Plex IP : 10.10.10.18
“Failed to connect to Plex” and my guess is because the docker using Hyper-V switch (WSL – Internal).
Name : WSL
Type : ICS
Subnet Address : 172.22.208.0/20
Gateway : 172.22.208.1
NETWORK ID NAME DRIVER SCOPE
59XXXXXXXX bridge bridge local
13XXXXXXXX host host local
09XXXXXXXX none null local
Hi, in a sense you’re probably correct since the subnets are different. You can try to manually bridge the networks:
New-NetIPAddress -InterfaceAlias "WSL" -IPAddress 10.10.10.200 -PrefixLength 24 -DefaultGateway 10.10.10.1netsh interface portproxy add v4tov4 listenaddress=10.10.10.200 listenport=32400 connectaddress=10.10.10.18 connectport=32400Then restart Docker. Hope this works for you.
If someone has access to seerr account and they cannot log in due to password issues, can the host server create a new account? They cannot change their password from the webpage of seerr. Any advice to get them connected? They have the Plexnapp but cannot make requests for movies or tv shows from the plex app even though they are connected to the aerver
Hi Pam,
In short, yes. The server/admin can either import the Plex user again or create/reset a local Seerr/Overseerr account for them. First, make sure their Plex login works directly in Plex and that their Plex account still has access to your Plex server. If Plex login keeps failing in Seerr, enable local sign-in and set them up with a local account and password. Also, requests usually happen from the Seerr/Overseerr web interface. If they want to request from inside Plex, that requires Plex Watchlist Auto Request to be enabled and the user needs the right permissions.
Hope this helps!
Kind regards,
Deyan