The transition from IPv4 to IPv6 is inevitable. It will ensure your network is future-proof and capable of supporting a vast number of unique IP addresses.
Don’t know where to start?
Welcome to the comprehensive 10-Step Guide to Transitioning to IPv6! This guide walks you through each crucial step, from initial assessment and preparation to implementation, deployment, and policy/documentation updates.
The 10 Steps to Transition from IPv4 to IPv6.
- Learn the IPv6 Basics
- Assess Current Network Infrastructure
- Acquiring IPv6 Prefixes
- Develop a Transition Strategy
- Budget and Resource Allocation
- Deploy Dual Stack Systems
- Configure IPv6 Addressing
- Test IPv6 Connectivity
- Monitor Network Performance.
- Policy/Documentation Updates

Step 1: Learn the IPv6 Basics
Before diving deep into IPv6 territory, it is vital to familiarize yourself with IPv6’s features, especially its addressing scheme. As you might already know, IPv6 uses 128-bit addresses, allowing for a vast number of unique IP addresses (unlike IPv4 which uses 32-bit address space). With that being said, and if you have been using IPv4 for a while, knowing their 11 differences (IPv6 vs IPv4) is key.
So, learning how to read, condense, compress, and use IPv6 addresses will be foundational in planning your transition.
Step 2. Assess Current Network Infrastructure
After learning what is IPv6 and how it can help you, it is time to start planning. The first step in transitioning to IPv6 involves running a complete assessment of your current network infrastructure. This means you’ll need to identify which devices and services are compatible with IPv6. At this step, you’ll also need to understand the scope of changes. Look for routers, switches, firewalls, and other network appliances, as well as software services that may require upgrades or replacements.
Plus, if you get your Internet services through an ISP, you’ll need to ensure they have an IPv6 deployment plan.
Using planning documents and lists such as the IPv6 Readiness Checklist can help you prepare in advance.
How to make a network assessment?
There are tools in the market like SolarWinds Network Performance Monitor (NPM), PRTG Network Monitor or ManageEngine OpManager that can conduct network assessments. You can leverage their automated scanning to discover all network devices and software. Plus, these monitoring tools evaluate performance, security vulnerabilities, configuration compliance in real-time, and much more.
Step 3. Acquiring IPv6 Prefixes
Deciding between Provider Independent (PI) and Provider Aggregatable (PA) IPv6 prefixes is another critical decision at the beginning phase of an IPv6 transition.
- PA addresses, given by LIRs and documented in the RIR Database, enable efficient routing across customers.
- PI addresses, directly assigned by RIPE NCC, ARIN, or a respective RIR (under IANA), can’t be aggregated and may cause routing issues.
When deciding between PI and PA IPv6 prefixes, you must weigh the balance between autonomy and cost-efficiency. PI prefixes offer network autonomy and ease in multi-homing but come with higher costs and administrative burdens. PA prefixes, on the other hand, are cost-efficient and simplify acquisition through ISPs but may complicate ISP changes and multi-homing due to dependency on the provider.
An example of a PA provider is Rapidseedbox. The ease and simplicity of PA prefixes, where this provider manages the IP addressing, allows users to focus on their activities without worrying about network renumbering or the complexities of IP management.
Step 4. Develop a Transition Strategy
Choosing the right transition strategy is pivotal. Dual-stack, tunneling, and translation each have their advantages and use cases. Dual-stack, for example, runs IPv4 and IPv6 in parallel and is widely considered the most straightforward approach to transition to IPv6. This approach allows for a gradual transition without losing connectivity to either protocol’s network.
Learn more about this in IPv6 Transition Mechanisms.
Take the following strategies and considerations when planning:
- Choose the migration strategy: Consider the specific methods you will use for implementing IPv6, such as native IPv6 deployment, dual-stack systems, or tunneling IPv6 over IPv4 infrastructure. Each approach suits different network segments and organizational needs.
- Always consider a gradual migration: A phased approach to migration allows for troubleshooting and minimizes disruptions. Start with less critical systems and gradually extend IPv6 deployment across your network, continuously monitoring for any issues that arise.
- Internet edge preparation: Consider your internet-facing services to be accessible over IPv6. This includes websites, DNS servers, email systems, and VPNs. Methods such as address translation, reverse proxies, and content delivery networks (CDNs) can facilitate this accessibility.
Upgrade to IPv6 with RapidSeedbox
Shift to IPv6 and overcome the IPv4 limitations with RapidSeedbox’s affordable leasing plans. Enjoy limitless connectivity, direct IP ownership, and 24/7 support.
Why Us?
Round-the-Clock Support
Direct IP Ownership
Savings with Annual Plans
Free 48-hour Trial
Step 5. Budget and Resource Allocation
Once you know the transition strategy and specific method, it is time to allocate budget and resources. Allocating the necessary budget and resources is critical for a smooth transition. This includes hardware upgrades, software updates, training for IT staff, and potentially hiring consultants or specialists to fill knowledge gaps.
The following table is an IPv6 transition budget template. It is designed to help you plan and allocate resources efficiently for your transition to IPv6.
How to use it?
- Fill in estimated costs based on quotations, proposals, and internal assessments.
- Review and regularly update the budget to accommodate changes.
- Track your spending to stay on budget.
| Category | Description | Estimated Cost |
| Planning and Assessment | Initial Assessment and Planning | [Insert Cost] |
| Planning and Assessment | Consultation Fees | [Insert Cost] |
| Hardware Upgrades | Routers and Switches | [Insert Cost] |
| Hardware Upgrades | Firewalls and Security Appliances | [Insert Cost] |
| Hardware Upgrades | Servers and Storage | [Insert Cost] |
| Software Updates and Licensing | Operating Systems | [Insert Cost] |
| Software Updates and Licensing | Network Management Tools | [Insert Cost] |
| Software Updates and Licensing | Security Software | [Insert Cost] |
| Training and Development | IT Staff Training | [Insert Cost] |
| Training and Development | Certification Courses | [Insert Cost] |
| Miscellaneous | Testing and Validation | [Insert Cost] |
| Miscellaneous | Contingency Fund | [Insert Cost] |
| Total Estimated Budget | [Total Cost] |
Need more reasons to start transitioning to IPv6? Learn more about this topic in: Cost-saving of IPv6 (as compared to IPv4)
Step 6. Deploy Dual Stack Systems
If you followed the previous five steps in this step-by-step guide to transitioning from ipv4 to ipv6, you should by now, have already audited the existing infrastructure for IPv6 capability, and know the current network setup, so how to begin deploying dual-stack systems?
Upgrading your network to support dual-stack operation is a giant leap. The goal is to guarantee that across the entirety of your network, both IPv4 and IPv6 are accessible and functional. This compatibility provision eases the transition.
How to begin deploying dual-stack systems?
Note that this configuration will vary from OS to OS and device to device but to get an idea the general steps should be:
- Apply necessary firmware updates for IPv6 support.
- Replace devices that lack IPv6 capabilities.
- Update firewall rules for IPv6 traffic.
- Ensure that IPv4 stays operational, while you gradually introduce IPv6.
What are some pros and cons of Dual stack?
Pros:
- Avoids the overhead of tunneling or translation.
- Works seamlessly with both IPv4 and IPv6.
- Grows naturally with IPv6 adoption and fades out IPv4 later.
- Embraces the future of IPv6 networks.
Cons:
- Requires IPv6 support on devices.
- Not ideal for networks short on IPv4 addresses.
Note: For parts of your network where a direct transition to IPv6 isn’t feasible (for example lack of IPv6 support), implementing tunneling (such as Teredo) or translation mechanisms will be necessary. These technologies allow IPv6 and IPv4 networks to communicate, ensuring connectivity during the transition period.
Step 7. Configure IPv6 Addressing
Applying IPv6 addresses to your devices and configuring the necessary network settings is key. This step will involve setting up IPv6 address schemes, DHCPv6 for automatic IP address assignment, and updating DNS to support IPv6.
Before configuring IPv6 addressing on your devices, ensure servers and core services like DNS and DHCP support IPv6. Knowing how to subnet IPv6 and use subnet and monitoring tools is also key.
- From the previous step, you might have already prepared your systems to use IPv6. Now it is time to enable IPv6 in the respective OS.
- Enable IPv6 on routers, switches, servers, and security devices. At this step, you will have to choose the address acquisition method (Router Advertisement, DHCP, or Manual).
- Addressing Preferences: For dual-stack > Set preferred IP mode (IPv4 or IPv6).
- Restart Services: Restart necessary services or systems for them to take effect.
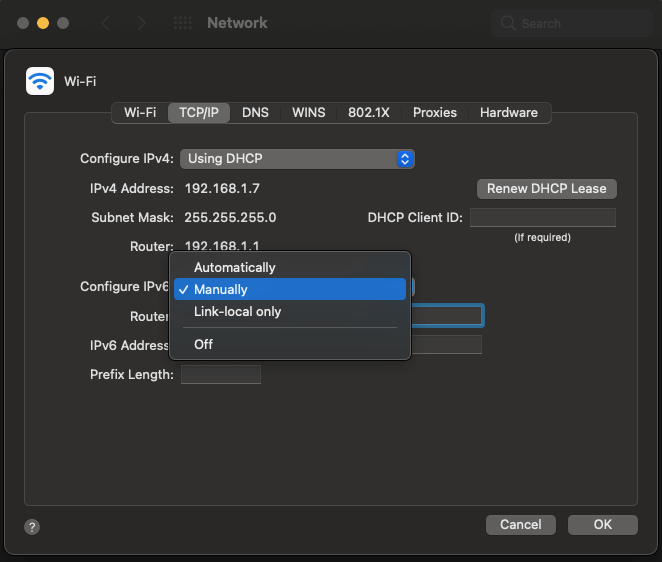
Configuring IPv6 addressing on popular systems.
- Configuring IPv6 on a mac. Go to Settings > Network > Configure IPv6 (Choose, automatic, manual, or link-local only).
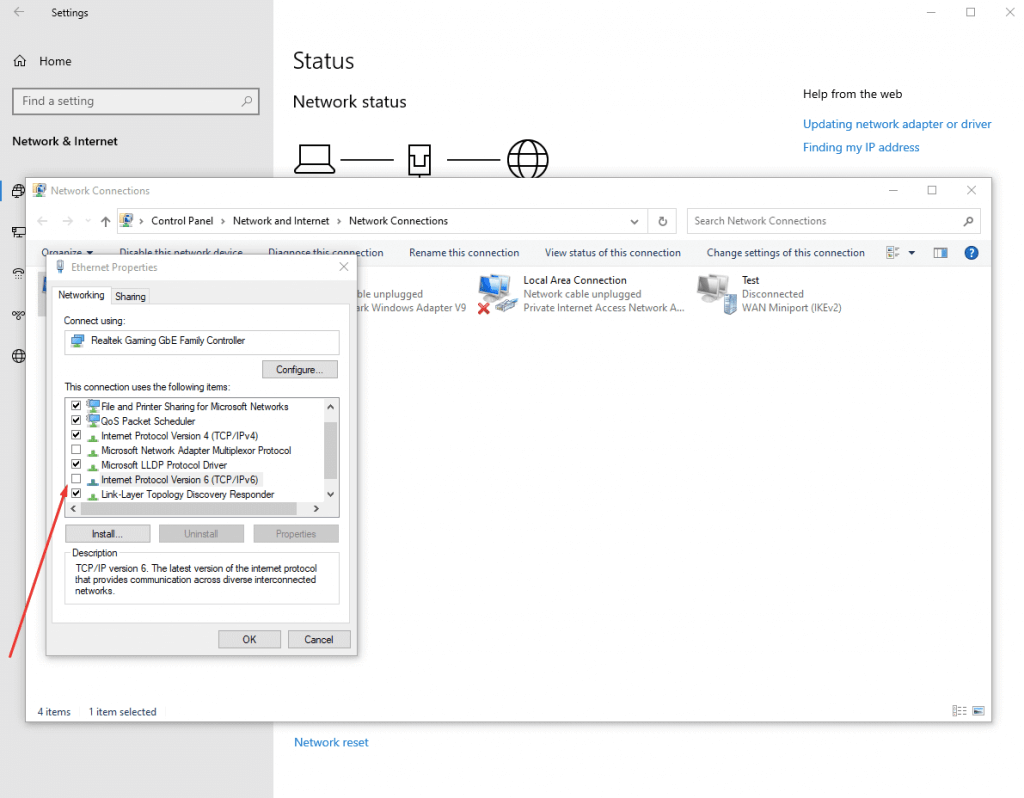
- Configuring IPv6 on a Windows. Open network settings > Access adapter settings > Modify properties > Enable IPv6 > Apply
- Configuring IPv6 on Linux: To enable IPv6 system-wide on a Linux >
- Edit sysctl.conf (e.g., sudo nano /etc/sysctl.conf) and uncomment the following lines:
- net.ipv6.conf.all.disable_ipv6 = 0
- net.ipv6.conf.default.disable_ipv6 = 0
- Save and apply: sudo sysctl -p
- Next, configure network interface > Edit your interface file (e.g., /etc/network/interfaces):
- Add <interface name> inet inet6 static (replace <interface name> with your actual interface name).
- Alternatively, use dhcp-ipv6 for DHCPv6 assignment.
- Save the file.
- Restart network:
- Ubuntu/Debian: sudo systemctl restart networking.
- Red Hat/CentOS: sudo systemctl restart network.
- Want to disable IPv6? Check our full guide to disable IPv6 on various systems.
- Edit sysctl.conf (e.g., sudo nano /etc/sysctl.conf) and uncomment the following lines:
To learn more about IPv6 addressing, check the following sources:
Learn the basics of IPv6 in What is IPv6? What are the differences between IPv6 and IPv4, what are the IPv6 address types, and the quick guide to IPv6 compression rules.
Step 8. Test IPv6 Connectivity.
Testing is a key step to ensure that IPv6 works. This includes testing ipv6 connectivity, validating application compatibility, and ensuring security.
Test connectivity.
Testing is vital to ensure that IPv6 connectivity works as intended. This includes internal connectivity within your network and external connectivity to the IPv6 internet. Testing should cover basic connectivity, application functionality, and performance benchmarks.
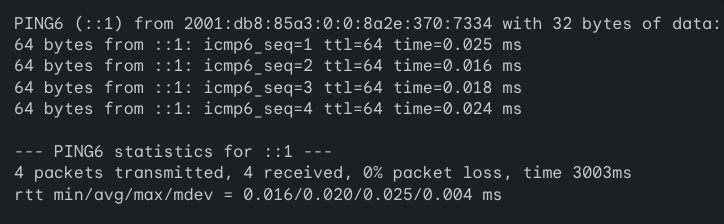
Use utilities such as Ping6, Traceroute6, MTR, NDPing, and Iperf3 to test IPv6 connectivity.
Ping6 Output Example:
Validate application compatibility
Ensure that your applications can operate over IPv6. This step involves testing each application for IPv6 compatibility and functionality. It helps you identify any issues that need addressing before full deployment.
What are the ways you can validate application compatibility?
- Manual testing. Observe and interact with an application to uncover errors. For IPv6 compatibility, you can configure your system and attempt to use the application as usual. While manual testing is simple, it can be time-consuming and error-prone for multiple applications.
- Automated testing. Use tools like Selenium, JMeter, or K6 to validate IPv6 functionality in applications. Auto-testing saves time, reduces human error, and enables extensive testing. However, it requires scripting knowledge and initial setup effort.
- Virtualization tools. Software like Docker can create virtual environments with IPv6 configurations. This helps developers observe and test applications in different environments. Advantages to this are: Isolated testing, varied IPv6 configurations, and automated testing integration, but virtualization needs technical expertise and resources.
- Third-party testing services, like BrowserStack or IPv6test.com, offer automated testing in IPv6 environments with detailed reports. Submit your application for testing in various IPv6 environments and receive comprehensive reports.
Security Considerations
Updating your security policies and firewall rules to accommodate IPv6 is essential. IPv6 has different header structures and potential vulnerabilities, so firewalls, intrusion detection/prevention systems, and other security mechanisms need to be IPv6-aware. Below is a 5-step guide to securing your IPv6 transition:
- Review Policies: Update them to cover IPv6 traffic and address vulnerabilities.
- Check Firewall: Ensure it supports IPv6 filtering and update as needed.
- Secure IDS/IPS: Update signatures and rules to include IPv6 threats.
- Harden Security: Patch devices, update software, adjust ACLs for IPv6.
- Monitor & Test: Regularly monitor activity and conduct penetration testing.
Note: Remember, security is ongoing. Adapt and update your defenses as your IPv6 deployment evolves.
Step 9. Monitor Network Performance and Troubleshoot issues.
Now, that you have already implemented, tested, and deployed IPv6, it is now time to set up a solid network performance monitoring system and a way to troubleshoot any issues as they arise.
Ongoing monitoring of your network’s performance is essential for detecting and addressing any issues promptly. Again, use tools such as market like SolarWinds Network Performance Monitor (NPM), PRTG Network Monitor, or ManageEngine OpManager to monitor network performance. Plus, tools that perform IP Address Management (IPAM) are invaluable for managing and tracking IPv6 (and IPv4) addresses across your network.
In addition, be always prepared to troubleshoot connectivity, security, or performance issues as they arise. Plus, having a knowledgeable team and the right tools (as the ones previously mentioned) in place will be critical for quickly resolving any problems.
Step 10. Continuous Education and Policy/Documentation Updates.
After successfully transitioning to IPv6 and establishing a monitoring and troubleshooting framework, it is crucial to maintain an ongoing commitment to education and policy and documentation updates. This process involves:
- Staying Informed: Keep up with the latest developments in IPv6 technology, security vulnerabilities, and best practices. This can be achieved through subscribing to industry newsletters, participating in relevant forums, and attending conferences.
- Training and Development: Regularly schedule training sessions for IT staff to ensure they are up-to-date with the latest IPv6 features and security practices. Consider certifications for team members to deepen their expertise in IPv6.
- Update documents: Keeping detailed documentation of your network’s configuration, including IPv6 implementations, is crucial. This documentation will be invaluable for future troubleshooting, audits, and planning.
- Policy Revision: Periodically review and update network policies to reflect the latest IPv6 standards and security recommendations. This includes access control lists (ACLs), security policies, and network architecture designs.
Final Words.
Switching over to IPv6 is a step-by-step ‘gradual’ process. The complete shift will likely take time but we will be there someday. This change will undoubtedly give you a lot of address space and simply make your network work better.
We hope that through this guide you found a roadmap for a smooth transition. Remember, the 10-step guide to transition to IPv6 emphasizes the importance of planning, resource allocation, and continuous learning.
Thank you for exploring this guide.
Here’s to a successful transition to IPv6 and a future-proofed network ready for the digital age’s demands.
0Comments