Welcome to the wonderful world of xTeVe! — an open-source and free M3U proxy server designed for Plex DVR and Emby Live TV services.
In this tutorial, we’ll be diving into the nitty-gritty details of what xTeVe is, what you need to get started, and how to download and install it on various operating systems. We’ll walk you through the initial configuration and show you how to use the interface for ongoing configuration.
Disclaimer: This material has been developed strictly for informational purposes. It does not constitute endorsement of any activities (including illegal activities), products or services. You are solely responsible for complying with the applicable laws, including intellectual property laws, when using our services or relying on any information herein. We do not accept any liability for damage arising from the use of our services or information contained herein in any manner whatsoever, except where explicitly required by law.
Table of Contents.
- What is xTeVe?
- xTeVe: What do you need to get started?
- Downloading and Installing xTeVe (Linux, Windows, and Docker).
- xTeVe initial configuration.
- xTeVe’s ongoing configuration.
- Final Words.
1. What is xTeVe?
xTeVe is an M3U proxy server designed for Plex DVR and Emby Live TV services. It is free and open-source under the MIT license. It establishes communication between your IPTV service provider, Plex DVR, and Emby Live TV services. xTeve uses M3U (files or URLs) and XMLTV (files or URLs) to get playlists and guide information.
Let’s get technical:
M3U files contain a list of names, URLs, metadata, and file paths for the multimedia files that make up a multimedia playlist. Within the context of an IPTV, the M3U file can provide a list of channels and streams that can be accessed by an IPTV player or client application such as Plex or Emby.
Although you could use a media player such as VLC, media player, or Kodi to play the media contained within the playlist, you would need an M3U proxy like xTeVe to allow access and stream live TV channels over the internet and build up entire channel guides. It also lets the client device play the IPTV channels without directly accessing the provider’s server. An advantage of using such an M3U proxy is that it allows access to IPTV channels anywhere in the world.
How does it work?
The M3U proxy reads the M3U playlist file and establishes a connection with the IPTV provider. It acts as the middleman between the IPTV provider and the client app, such as Plex or Emby.
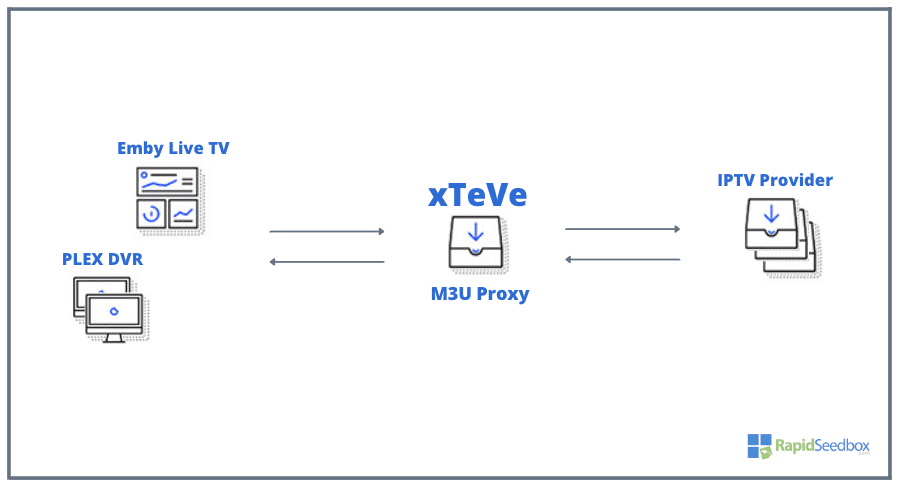
The M3U proxy server takes the IPTV streams from the provider, repackages them into a compatible format, and then streams them to the client device.
2. xTeVe: What do you need to get started?
You’ll need a server to run xTeVe (compatible with Windows, Linux, and macOS). Additionally, you’ll also need an active account with an IPTV provider. This account should give you access to the TV channels that you want to watch. You will also need the IPTV playlist file, which you can get from the IPTV provider (or third-party providers). And last, remember that there is no built-in player, so you’ll need a separate media player such as Plex or Emby.
a. Server’s requirements.
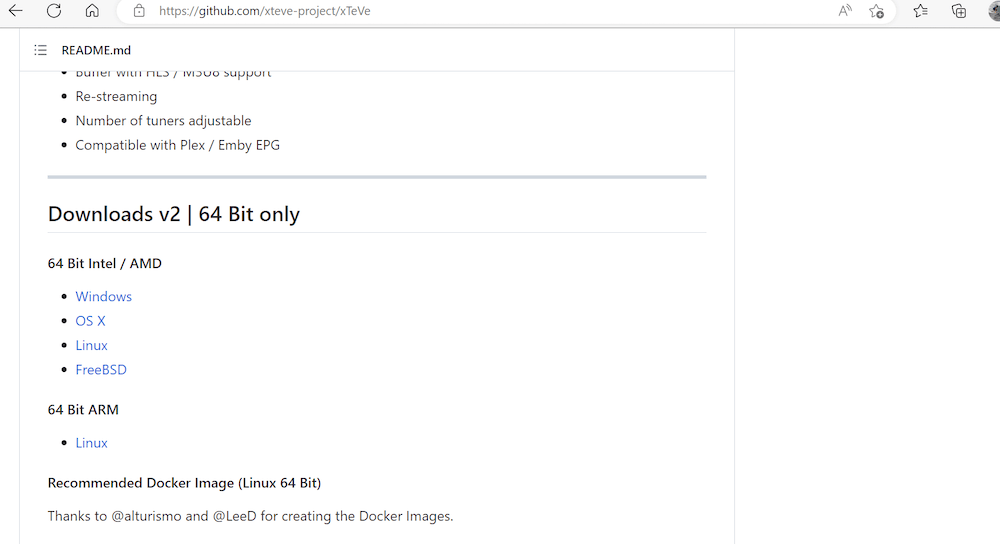
xTeVe is only supported by 64-bit processors. It can be installed in Windows, OS X, Linux, and FreeBSD (64-bit Intel/AMD), and in Linux (64-Bit ARM). It is, recommended to install it in a Docker container (hosted by Linux 64-bit). Your server should also be running an updated version of Plex Media Server or Emby. Learn all about setting up Plex Media Server in our complete guide.
Plex Requirements.
- Plex Media Server (1.11.1.4730 or newer)
- Plex Client with DVR support
- Plex Pass
Emby Requirements.
- Emby Server (3.5.3.0 or newer)
- Emby Client with Live-TV support
- Emby Premiere
b. Configuration Requirements.
As mentioned in the previous section, xTeVe uses M3U (files or URLs) and XMLTV (file or URL) to deliver the list of channels and streams to the IPTV player or client apps like Plex or Emby. It reads the M3U playlist and opens communication between the IPTV provider and the app.
Therefore, to set xTeVe up, you would need access to the M3U and XMLTV data, which the IPTV provider usually delivers, but you can also find from third-party sources.
Finding M3U playlists
The easiest way to find M3U playlists is by searching online through a search engine platform such as Google or Bing. You can get M3U files or URLs on websites or forums, but it is paramount not to use sites that may host malware or pirated media. In addition, if you are currently subscribed to a streaming service such as Spotify or Apple Music, you can generate a playlist and export it as an M3U file.
Getting an XMLTV file
When you enter an M3U playlist URL in xTeVe, the server reads the playlist file and extracts the channel information. However, the M3U playlist file typically only contains the channel names and the stream URLs for the channels. It has no additional TV listing information, such as channel logos, program guide information, or channel metadata. This is where the XMLTV file comes into play. By importing an XMLTV file, you can add program guide information and other metadata to the channels in your M3U playlist.
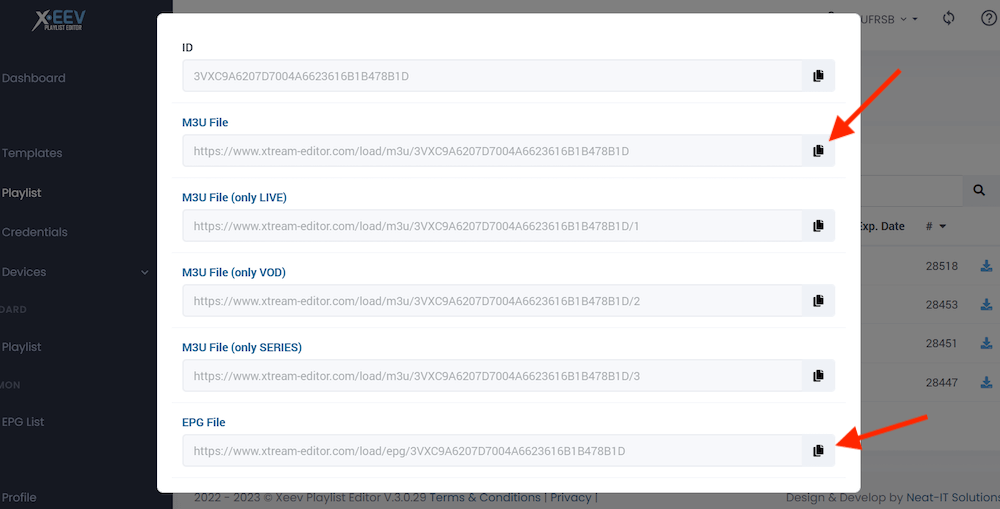
To manage IPTV playlists and EPG (Electronic Program Guide) data (XEPG and PMS), you can use the Xtream Editor, a web-based platform that allows you to organize and customize your channel listings.
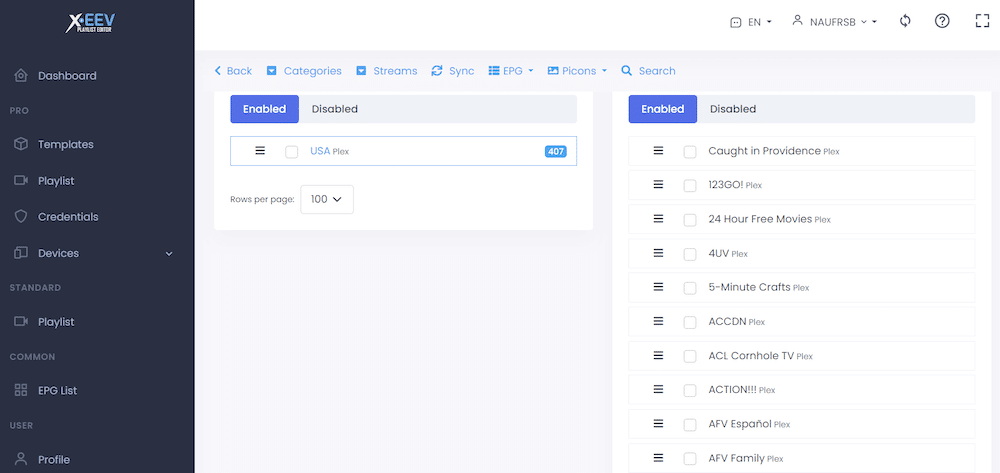
In Xtream-Editor, you would need to create a template > then create a playlist > and then download the M3U file and EPG data (XMLTV). With this software, you can create playlists (along with their XMLTV data) and then copy them.
Note: The steps to fully manage IPTV playlists and EPG data are outside the scope of this tutorial.
🔧 Want to unlock xTeVe’s full potential?
Download the pro-level guide most users never find: xTeVe Advanced Configuration PDF3. Downloading and Installing xTeVe (Linux, Windows, and Docker)
In this section, we will guide you through the process of downloading and installing xTeVe. We’ll cover the installation process on three different platforms: Linux, Windows, and Docker (via Linux and Windows).
Disclaimer: The following guide to download and install xTeVe is for educational purposes. We at Rapidseebox do not offer it as part of our solution or provide any customer support for this software.
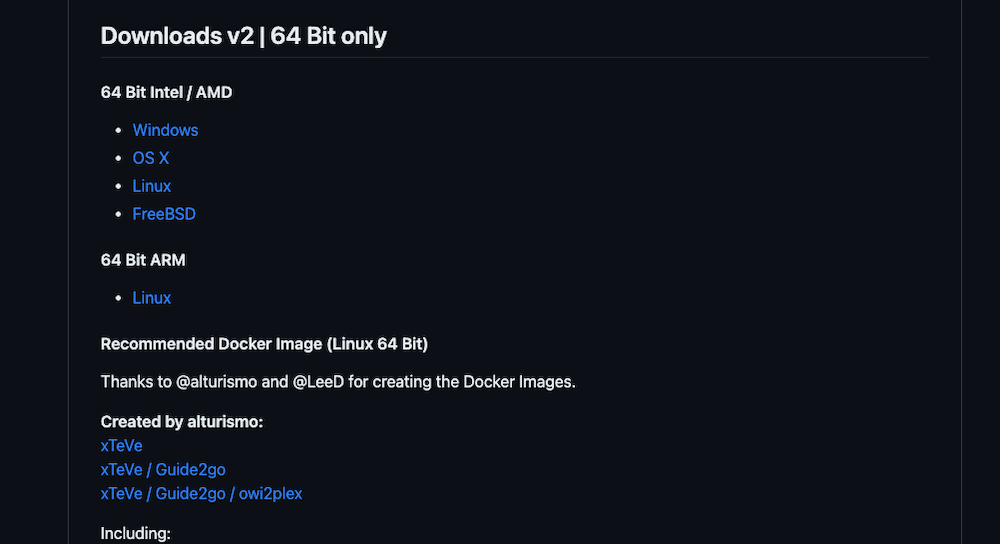
a. Installing xTeVe via a Docker Container (recommended).
The following are the recommended Docker images for xTeVe (according to official sources) if you are running it from Docker containers. These Docker images are designed for Linux 64-bit operating systems. They are packaged with additional components such as Guide2go (an XMLTV grabber for Schedules Direct), owi2plex (an XMLTV file grabber for Enigma receivers), and Zap2XML (open-source a Perl-based zap2it XMLTV grabber).
The recommended Docker images are:
- Created by Altruismo
- https://hub.docker.com/r/alturismo/xteve (docker pull alturismo/xteve)
- https://hub.docker.com/r/alturismo/xteve_guide2go (docker pull alturismo/xteve_guide2go)
- https://hub.docker.com/r/alturismo/xteve_g2g_owi (docker pull alturismo/xteve_g2g_owi)
- Created by LeeD.
- https://hub.docker.com/r/dnsforge/xteve (docker pull dnsforge/xteve)
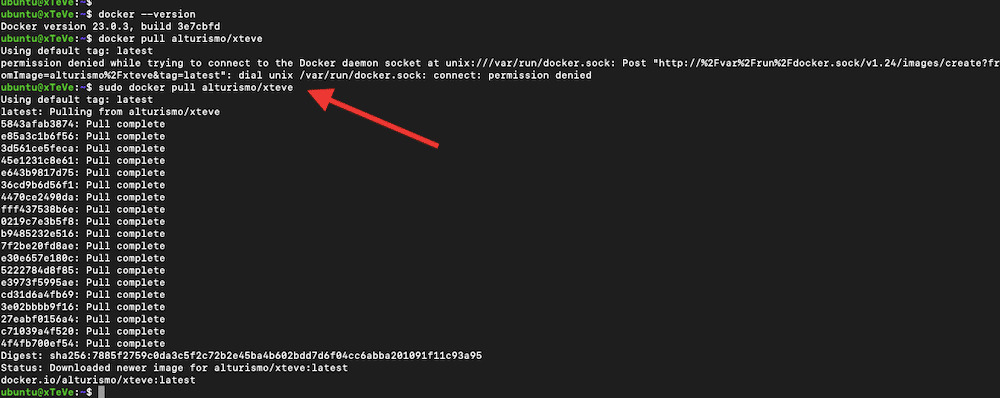
How to Install the xTeVe Docker Container (Linux).
- First, ensure you are running an updated version of Docker, then issue the “pull” command. We will be running xTeVe on Docker with cron.
|
1 2 |
$ docker --version $ sudo docker pull alturismo/xteve |
- To run the Docker container from the image, issue the following command. This command will start the Docker container running the xTeVe application (in detached mode -d, which means it is running in the background).
Note: This is an example provided by (https://hub.docker.com/r/alturismo/xteve. You will need to change your TimeZone and mount volumes. For example, we changed the time zone and the mount volumes in the below configuration lines.
|
1 2 3 4 5 6 7 8 9 10 11 |
docker run -d \ --name=xteve \ --net=host \ --log-opt max-size=10m \ --log-opt max-file=3 \ -e TZ="America/New_York" \ -v /mnt/user/appdata/xteve/:/root/.xteve:rw \ -v /mnt/user/appdata/xteve/_config:/config:rw \ -v /tmp/xteve/:/tmp/xteve:rw \ -v /mnt/user/appdata/tvheadend/data/:/TVH \ alturismo/xteve |

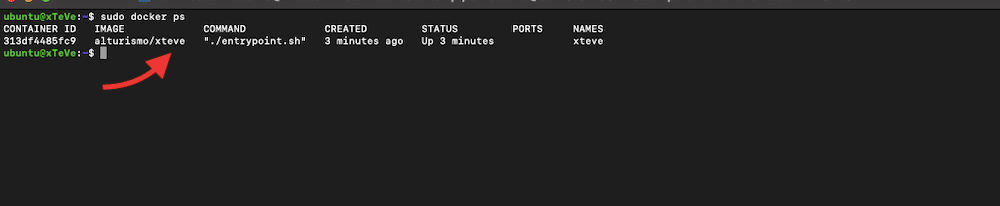
- To check the status of the container, use the following command:
|
1 |
$ sudo docker ps |
- Use the following command to run the xTeVe container’s cronjob script. The ./config/cronjob.sh argument specifies the path to the cronjob script inside the container. This script is used to update the EPG data and other scheduled tasks.
|
1 |
$ sudo docker exec -it "xteve" ./config/cronjob.sh |

- After running the xTeVe Docker container and checking its status, you can now access the xTeVe GUI by opening your web browser and going to http://localhost:34400/web. This can vary if you change the port or access the xTeVe server from a remote machine.
Alternative Installation (Docker on Windows).
For Windows, you can use a Docker container manager such as Docker Desktop.
- We downloaded the xTeVe Guide2Go image from the Docker Hub and created the container. The xTeVe + Guide2Go container is now running.
- If you installed the container, you’d use the http://localhost:34400/web/ URL address to access the GUI console. Or, you may have to change the local host if you are accessing xTeVe from a remote machine.
😖 xTeVe driving you crazy with stream issues?
Get the free troubleshooting guide and fix it fast: xTeVe Advanced Configuration PDFb. Installing xTeVe directly on a Linux machine.
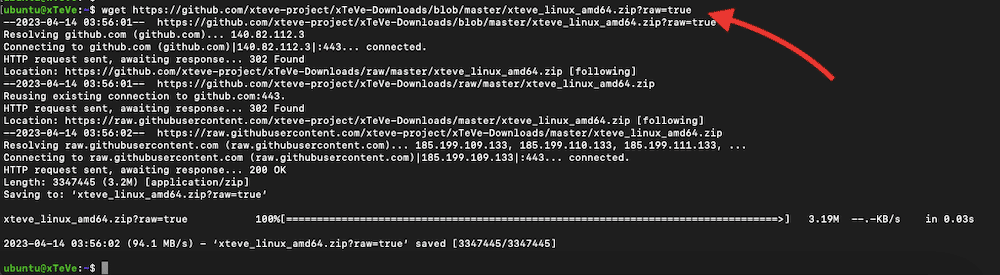
- Download the latest xTeVe Linux amd64 package available. To see the URL or check for the latest package, visit https://github.com/xteve-project/xTeVe.
- Open your Linux (Ubuntu) terminal and use the “wget” command to download the latest xTeVe package.
- For example:
|
1 |
wget https://github.com/xteve-project/xTeVe-Downloads/blob/master/xteve_linux_amd64.zip?raw=true |
- Now, extract the new xTeVe package. You can create a new directory to save all extracted folders.
- We will create a directory named “bin” in the home directory “~/” and we will extract all the contents of the new file “xteve_linux_amd64.zip” into this “bin” directory.
|
1 2 |
$ mkdir -p ~/bin $ unzip xteve_linux_amd64.zip?raw=true.1 -d ~/bin/ |

- We are now ready to use the xTeVe binary to run the xTeVe application. Go to the directory where you have extracted the xteve_linux_amd64.zip archive, set the correct permissions, and run the binary.
|
1 2 3 |
$ cd /home/ubuntu/bin $ chmod +x xteve $ ./xteve |
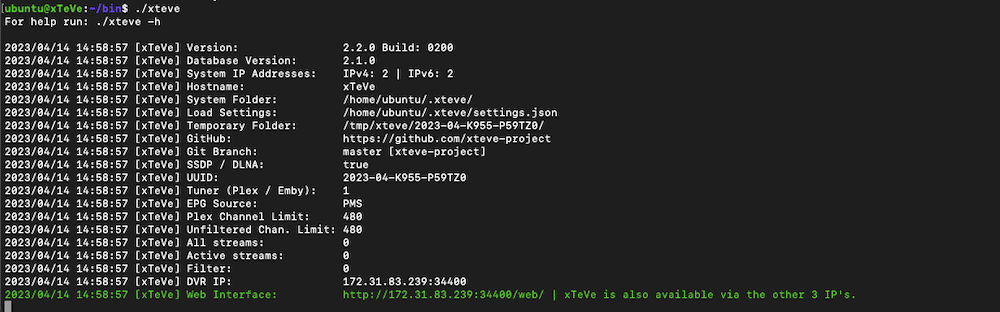
- Running the binary will run the xTeVe application. The path “/home/ubuntu/bin/xteve” (or ./xteve) is the path to the xTeVe executable we’re currently running.
- xTeVe is now ready to start serving your configured IPTV channels. To stop the xTeVe application from running, press Ctrl + C where xTeVe is running.
Configuring xTeVe
Now, you can launch xTeVe and generate the configuration file. You must rerun the xTeVe binary with the –configure option. If you have already extracted the xteve_linux_amd64.zip archive to the /home/ubuntu/bin/ directory (as we did previously), you can now follow these steps:
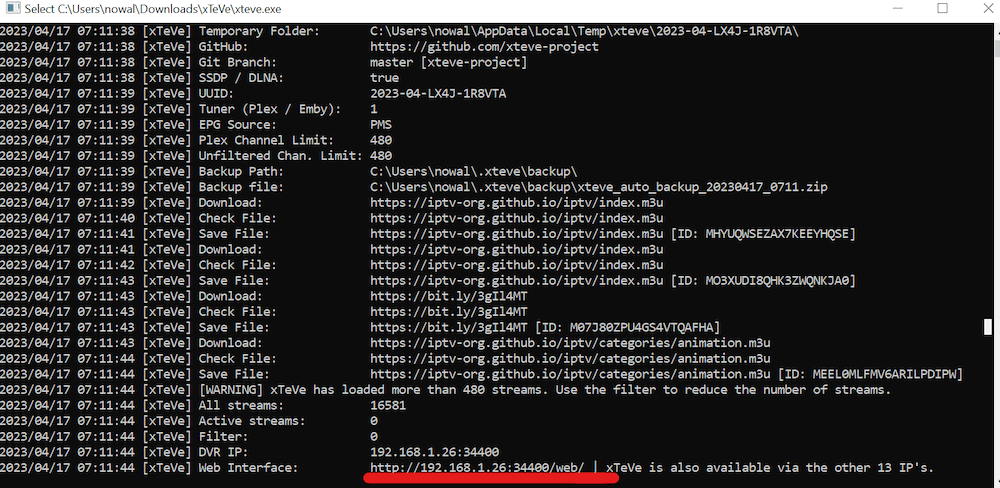
- From the output (./xteve), you’ll see various xTeVe parameters. This output is quite helpful information that can help you configure xTeVe. Below is a summary of the relevant parameters.
- Tuner (Plex / Emby): This line shows the number of tuner devices available for Plex or Emby. In our case, it is only one (1).
- EPG Source: This line indicates that the EPG (Electronic Program Guide) source for xTeVe is PMS (Plex Media Server).
- Plex Channel Limit: Specifies the maximum number of channels that xTeVe can provide to Plex Media Server, which is set to 480 (by default).
- Unfiltered Chan. Limit: This line specifies the maximum number of unfiltered channels that xTeVe can provide, which is also set to 480 (by default).
- All streams: This shows that no streams (0) are playing in xTeVe.
- Active streams: According to this line, there are currently no active (0) streams in xTeVe.
- Filter: This line indicates that there are no filters (0) set in xTeVe.
- DVR IP: This line specifies the IP address and port number of the DVR (Digital Video Recorder) that xTeVe is connected to. In our case, it is 172.31.83.239:8080.
- Web Interface: This line specifies the URL for the xTeVe web interface, which is accessible through the specified IP address and port number and three other IP addresses.
Now, let’s configure xTeVe:
|
1 2 |
$ cd /home/ubuntu/bin $ /home/ubuntu/bin/xteve -config (or ./xteve --configure) |
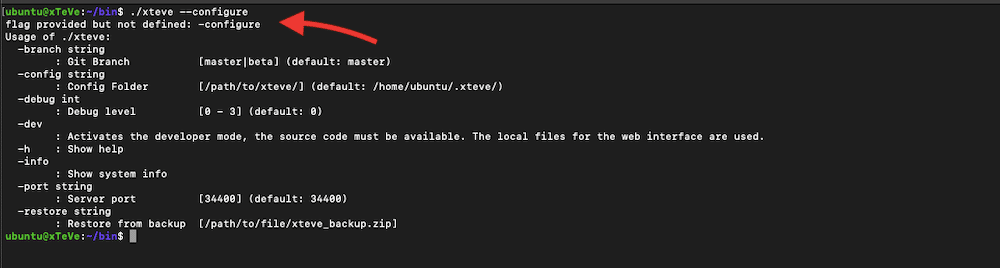
- xTeVe will allow you to modify the parameters; as an example, in the following section, we will change the xTeVe port.
- The above command (/home/ubuntu/bin/xteve -config) will launch xTeVe in configuration mode. It will generate a configuration file name xteve.json in the same directory as the xteve binary.

- By default, xTeVe runs on port 34400, but we can specify a different port using the “-port” flag.
- As an example, the following command launches xTeVe on port 8080.
|
1 |
$ /home/ubuntu/bin/xteve -port 8080 |
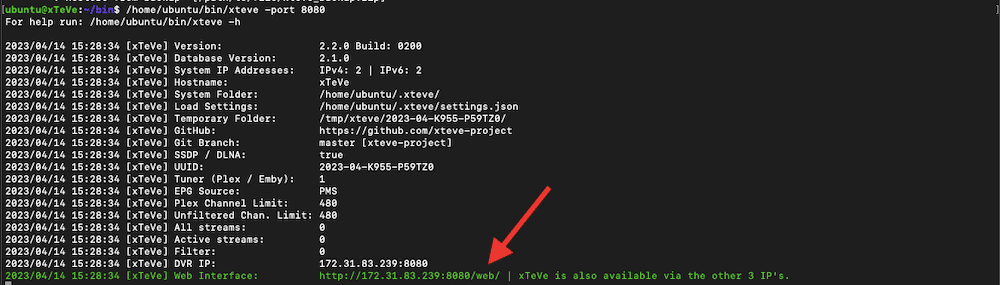
- By default, you can access the xTeVe web interface by opening a web browser and navigating to http://localhost:34400/web/ (or any other port if you changed it, such as in the previous example localhost:8080/web). If you are running xTeVe on a remote server, replace localhost with the IP address or hostname of the server.
- To stop xTeVe, press Ctrl + C in the terminal window where xTeVe is running.
Note: if you have configured xTeVe to run as a daemon or service, you can start and stop it using the appropriate commands for your system.
c. Downloading and installing xTeVe on a Windows machine.
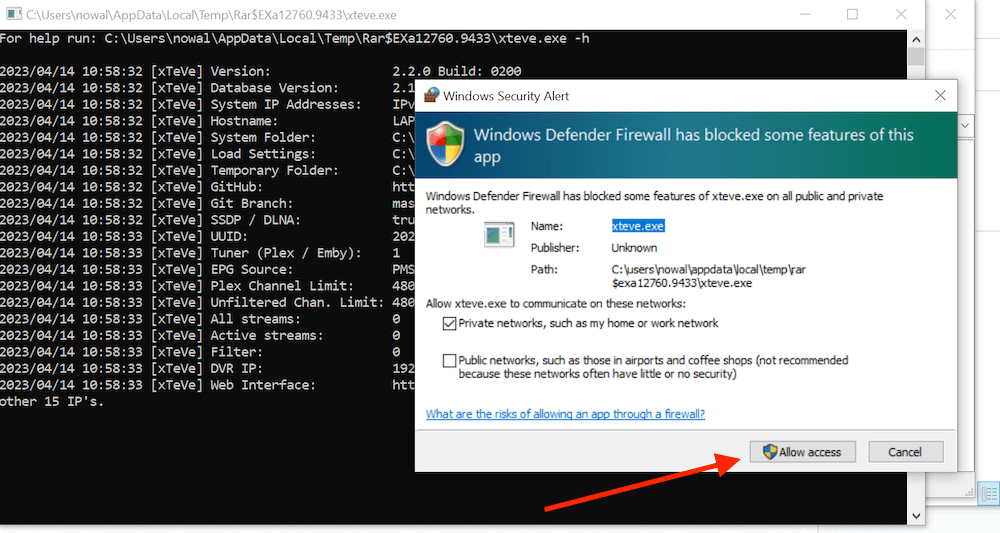
Downloading and running xTeVe on Windows is as simple as going to the official download link, downloading the zip file, uncompressing it, and running the .exe file with admin permissions.
- Go to https://github.com/xteve-project/xTeVe
- Select the appropriate package for your Windows machine.
- xteve.exe is a binary file that must be started with a double-click.
- Download the Windows (xteve_windows_amd64.zip) file, double-click it, and allow access to the Windows Firewall. Create a new folder, “xTeVe” or whichever you prefer, and extract the zip file’s contents there.
- Don’t forget to run the .exe as an administrator!
- The xTeVe service will start and will run in the background. Once running, you can access it by going to the provided web interface (localhost:34400/web or IP_XteVe_server:Port/web).
Install xTeVe as a Windows service.
You may also want to install xTeVe as a Windows service to make it automatically start when your computer starts. It will run in the background and won’t interfere with other applications you use on your computer. Running as a Windows service will also guarantee that xTeVe is reliable and manageable.
- Start by downloading a service manager such as NSSM and extract the contents to a folder on your computer.
- Open the Command Prompt as an administrator and navigate to the folder where you extracted NSSM.
- Type the following command to launch the NSSM service installer: “nssm install Xteve”
- Set the following options:
- Path: Enter the full path to the xTeVe executable file, e.g. C:\PathToXteve\xteve.exe
- Startup directory: Enter the path to the folder where xTeVe is installed, e.g. C:\PathToXteve
- Arguments: Enter any additional arguments you want to pass to xTeVe, such as -config=C:\PathToXteve\Config or -port=”XXXX” (where XXXX is the desired port number).
- Click the “Install service” button to install xTeVe as a Windows service.
- To start the xTeVe service, type the following command “nssm start xteve”
Want to optimize your live TV streaming with xTeVe?
xTeVe enhances your live TV experience with seamless integration. Combine it with RapidSeedbox’s high-speed seedboxes for smooth streaming and fast downloads.
4. xTeVe Initial Configuration.
Now that xTeVe is running on your server and you can successfully open it, you must configure it. When you start with xTeVe, you’ll be asked to set up a few vital settings.
Note: If xTeVe’s Web Interface IP address keeps changing every time you open it, you would need to assign it a static IP address from your router. This is likely because a DHCP server (most likely your home router) keeps “dynamically” assigning new IP addresses every time you start the xTeVe service.
Open xTeVe’s GUI using the “IP_address:port/web” or “localhost:port/web.” You’ll be welcomed by the installation wizard.
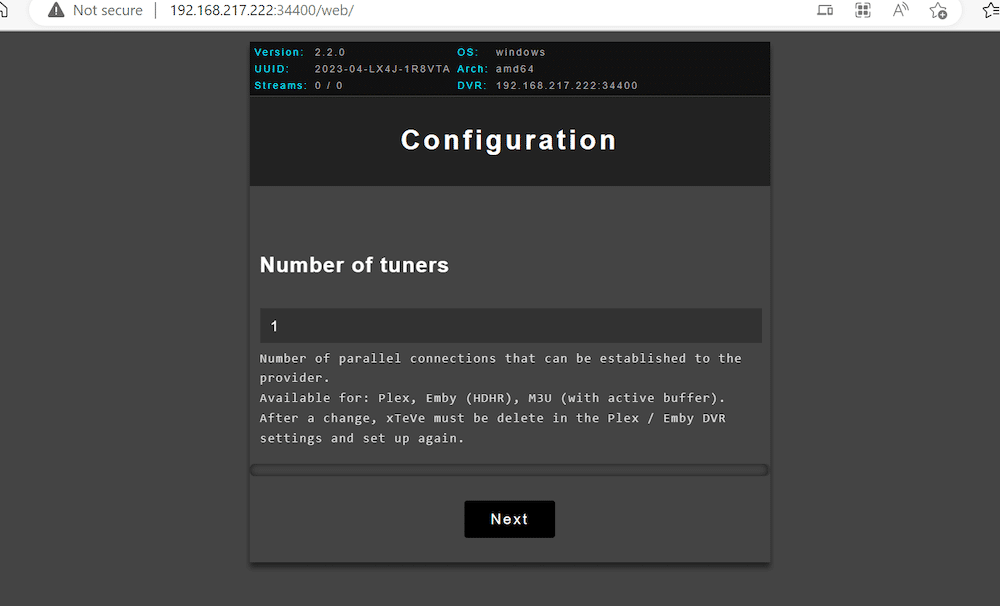
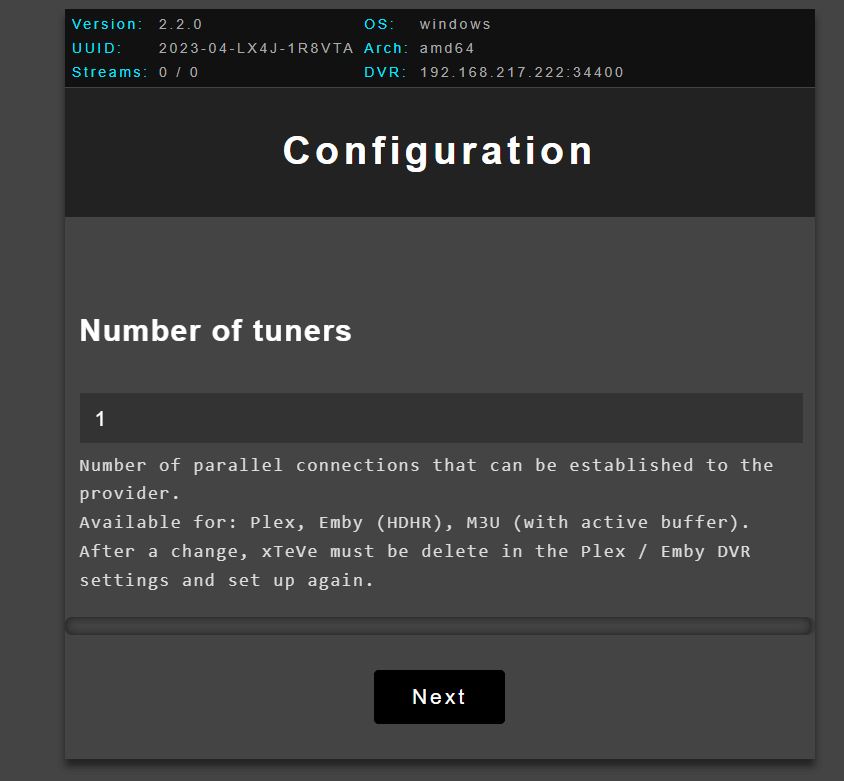
a. Number of Tuners.
- Set the number of tuners. xTeVe’s installation wizard will ask you to set up the number of tuners. Tuners are the number of parallel connections that can be established to the IPTV provider. If your IPTV provider provides you with more than one simultaneous user that can be on the same account, you’ll need to define it here. The number of parallel connections established with the provider will depend on the provider’s policies and restrictions.
- To know the number of tuners, you’ll need to find out how many streams the IPTV provider gives you. Currently, we only have one tuner available, meaning xTeVe can only stream one channel simultaneously.
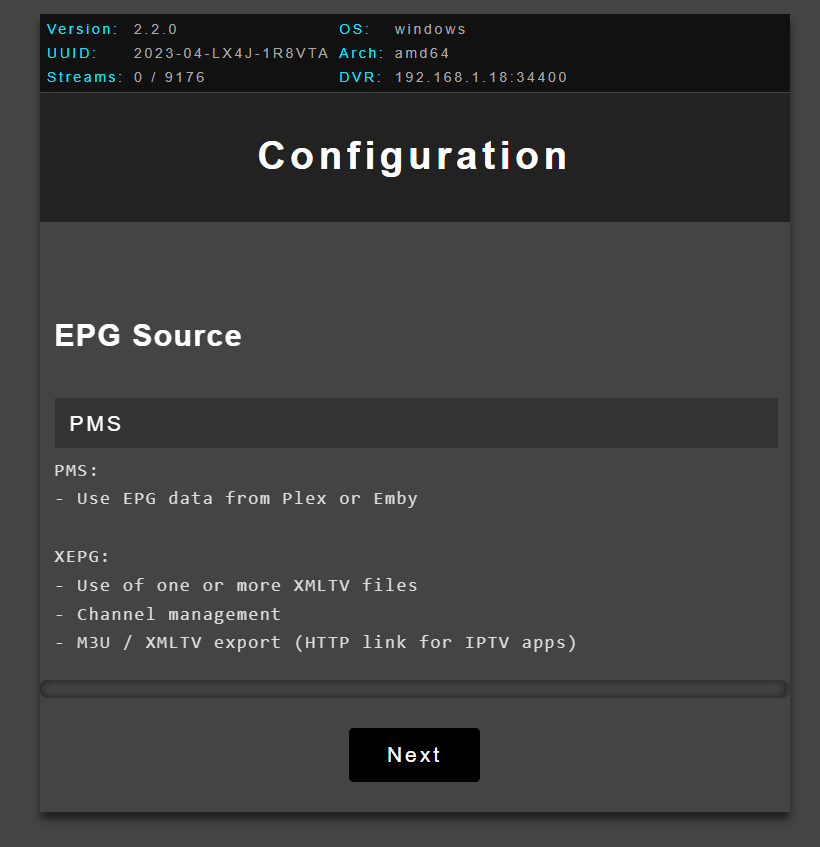
b. Select the EPG Source for xTeVe.
An Electronic Program Guide (EPG) source is a data feed with information about TV channels and their programming schedules. These EPG sources are built in a machine-readable format. They are usually used by TV listings services, media center software, and IPTV servers to display TV guide information to users.
With xTeVe, you can select two EPG formats:
- PMS: Where Plex / Emby does the configuration of the EPG data
- XEPG: The EPG data in xTeVe is available as an XMLTV file which needs to be specified as the source. Your IPTV provider should provide XMLTV links, but you can also use third-party providers like epg.best, xtream-editor, or the iptv-org/epg community.
- Find an M3U Playlist file or URL. As mentioned in the previous section, you can find one M3U playlist with a quick online search (but keep in mind that you’ll also need to bring the XMLTV file).
- A good source for playlists is GitHub – iptv-org/iptv: A Collection of publicly available IPTV channels worldwide.

- If you selected XEPG as the EPG source in the previous section, you must specify an XMLTV file, local or from a web server.
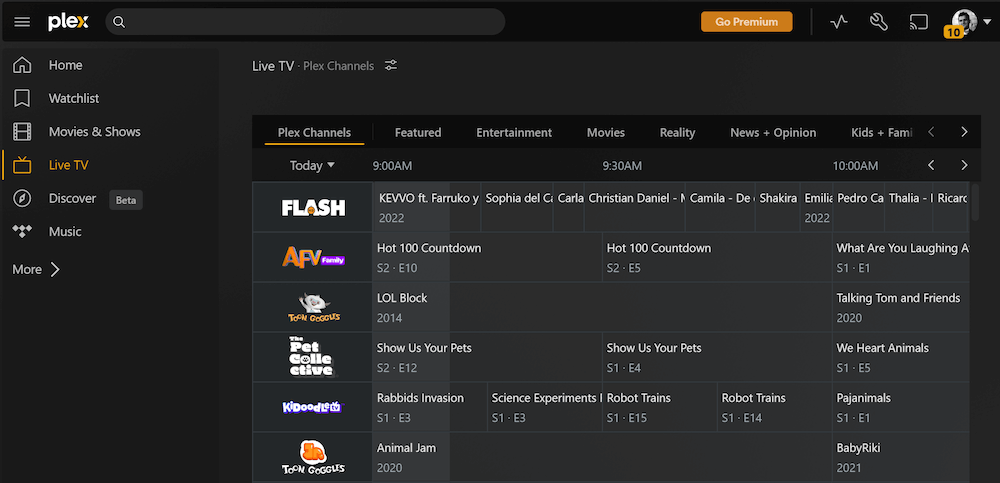
- The xTeVe web user interface (PMS as EPG source) will open as follows:
🤯 We’ve been there — xTeVe is awesome *when it works*.
Here’s the fix the pros use (free download): xTeVe Advanced Configuration PDF5. xTeVe Ongoing Configuration.
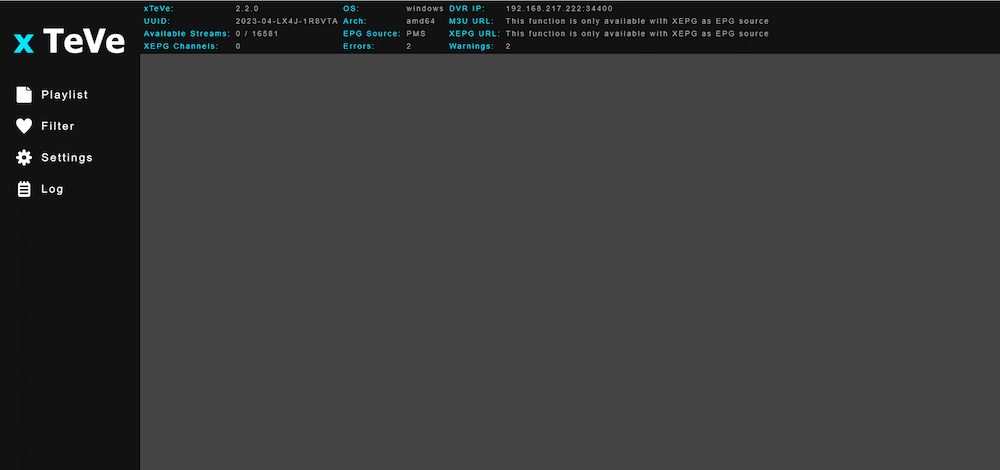
xTeVe’s GUI is simple but quite functional. At the top, you’ll find vital information on your settings. As shown in the installation section via CLI, in the GUI, you can also see information like xTeVe version, OS, DVR IP, UUID, Arch, M3U URL, Available Streams, EPG Source, XEPG URL, XEPG Channels, Errors, and Warnings.
The xTeVe’s left-hand menu shows important features like Playlist, Filter, XMLTV, Mapping, Settings, and Log.
a. Managing your Playlists.
The following is an xTeVe web user interface (XEPG as EPG source).
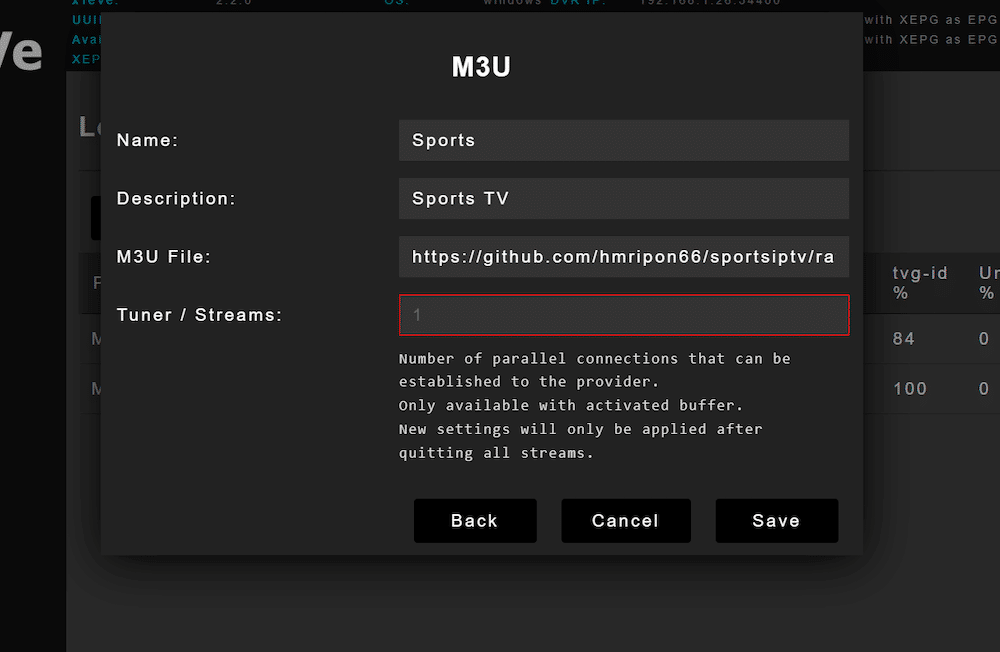
- On the Playlist window, you can see the current M3U playlists and their information. In addition, you will also be able to create “New” playlists from here.
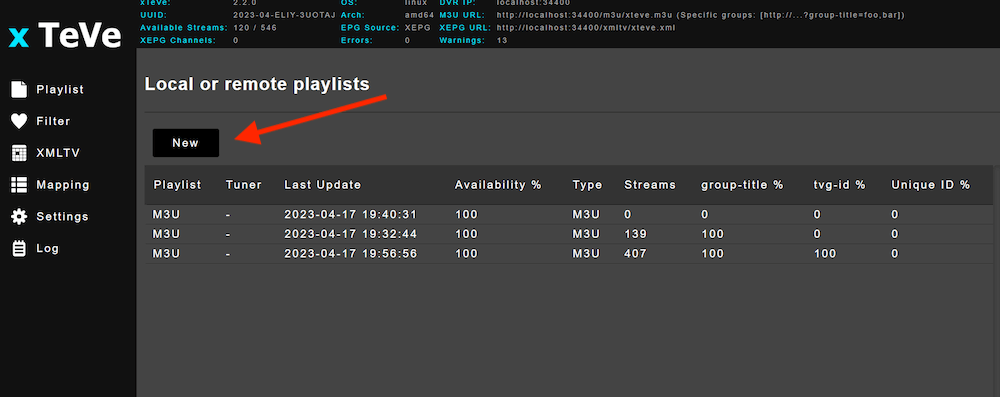
- If you click “New” > Add the new M3U playlist information, including Name, Description, M3U file, and Tuner/Streams.
b. Checking Logs
Checking the logs from the start helps find any errors and warnings that resulted from your configurations.
- Go to the “Log” menu in the left-hand menu and read through the logs to find any red or yellow lines. For example, we have got one warning.
- WARNING >… [xTeVe] [WARNING] xTeVe has loaded more than 480 streams. Use the filter to reduce the number of streams.
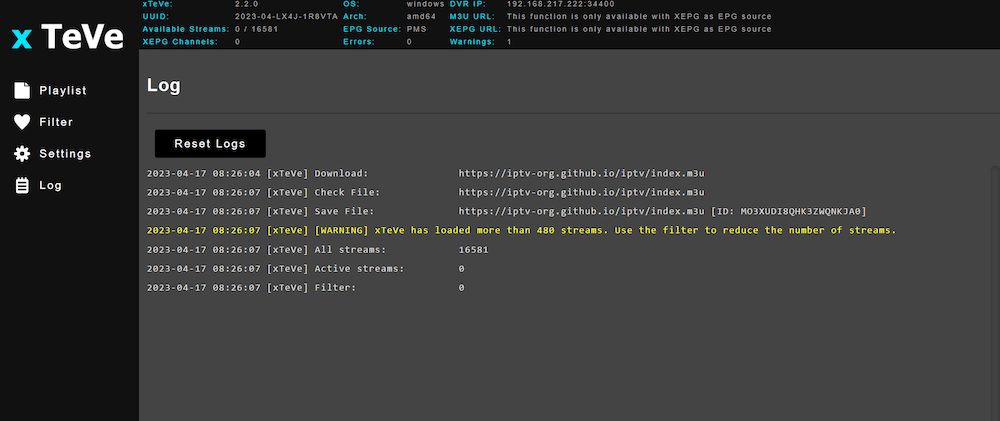
- So, now we will create a filter because Plex can’t have more than 480 channels.
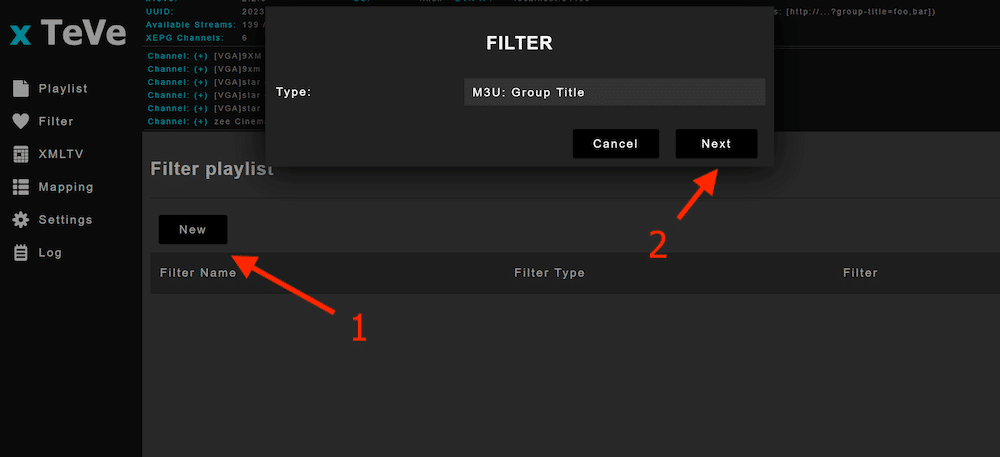
c. Creating Filters.
Filters in Xteve allow you to manage and organize your channels. With filters, you can customize your IPTV playlist to suit your preferences, remove unwanted channels, or improve performance (by reducing the amount of data that xTeVe has to process).
Here’s how to create filters in Xteve:
- Click on the “Filters” tab on the left-hand menu.
- Click on the “New” button to create a new filter.
- Select the type of filter (i.e. M3U Group Title).
- Name your filter and select the criteria you want to use to filter your channels. You can filter channels by name, category, country, language, etc.
- Once you have selected your criteria, click the “Save” button to create your new filter.
- Your new filter will now appear in the “Filters” tab.
- You can click on it to view the channels that meet the filter criteria.
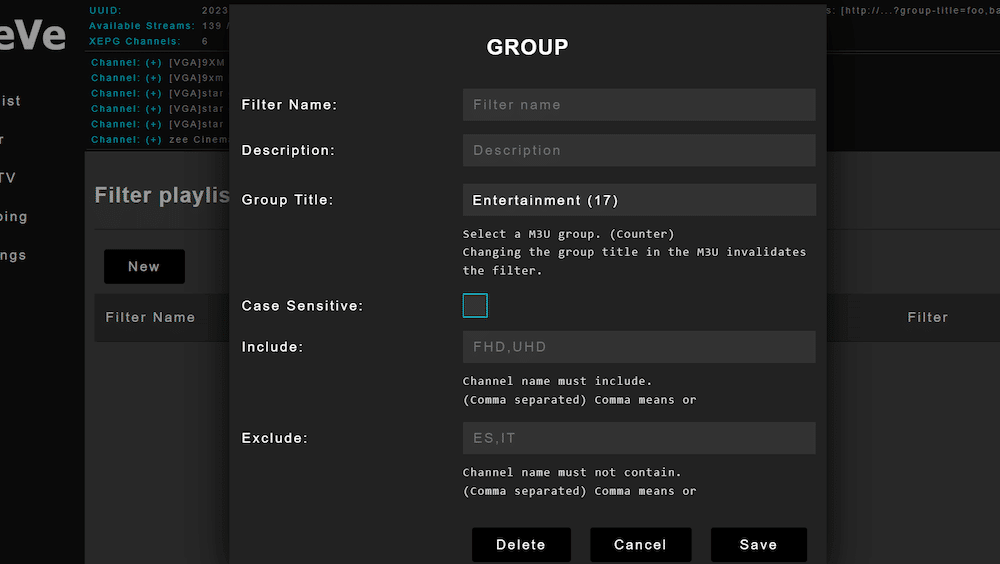
Note: Bear in mind that if you create filters in xTeVe, and add channels later, the established filters will affect the new data that comes into xTeVe. So, you might not be able to see available streams or channels if you have pre-established filters.
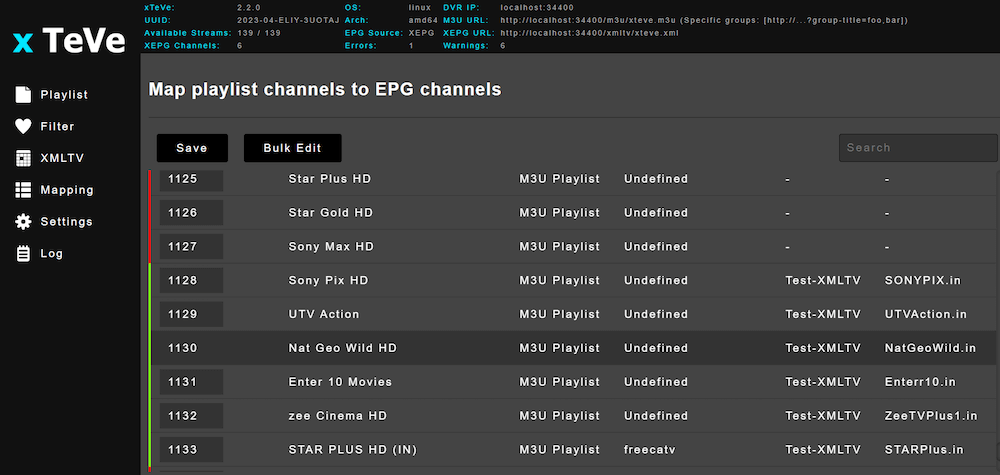
d. xTeVe Mapping
In xTeVe GUI, mapping refers to the process of assigning a specific channel from your IPTV source to a specific channel number on your device or player.
- Once you add playlists and EPG channels, you must map playlist channels (M3U data) to EPG channels (XMLTV data).
- You will notice that some channels have their logo included but still need to be mapped.
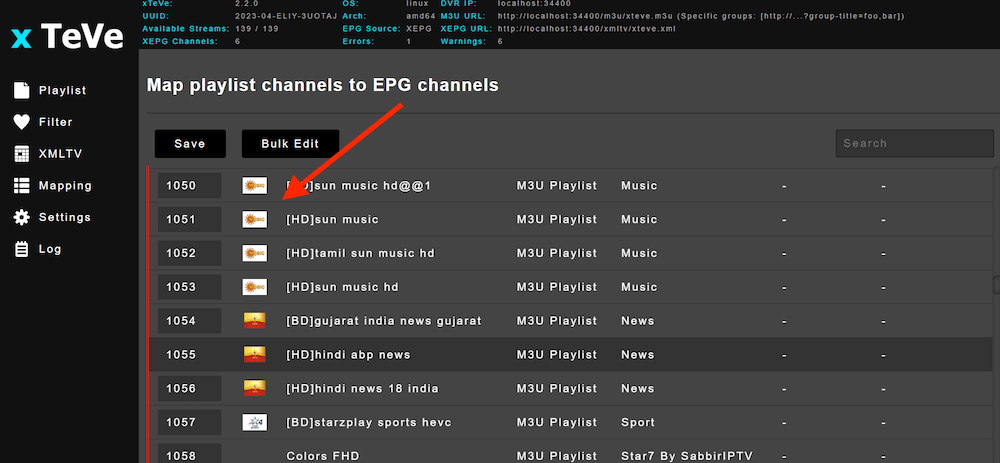
- Double-click on a channel. Give the channel a name, find the logo URL (if there is one), and select the EPG category. Most importantly, select the correct XMLTV file and XMLTV channel.
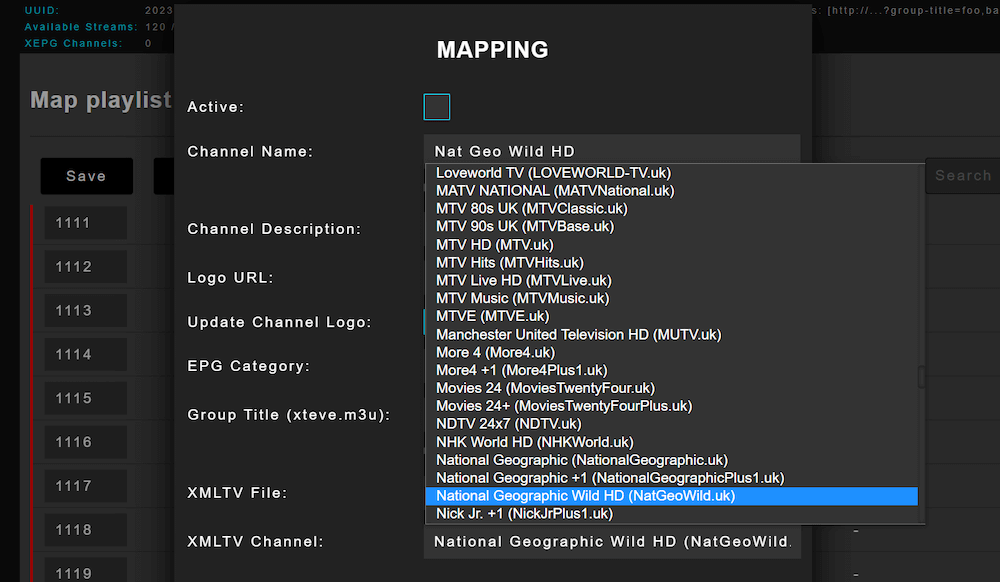
- xTeVe uses color labels. The channels in red are not mapped, while the green ones are ready. When you start mapping, look for the correct EPG ID and match it with the channel name. If there is an EPG ID, there is media content.
- Once you have mapped enough playlist channels to EPG channels, click Save. You will also notice that XEPG channels start to appear.
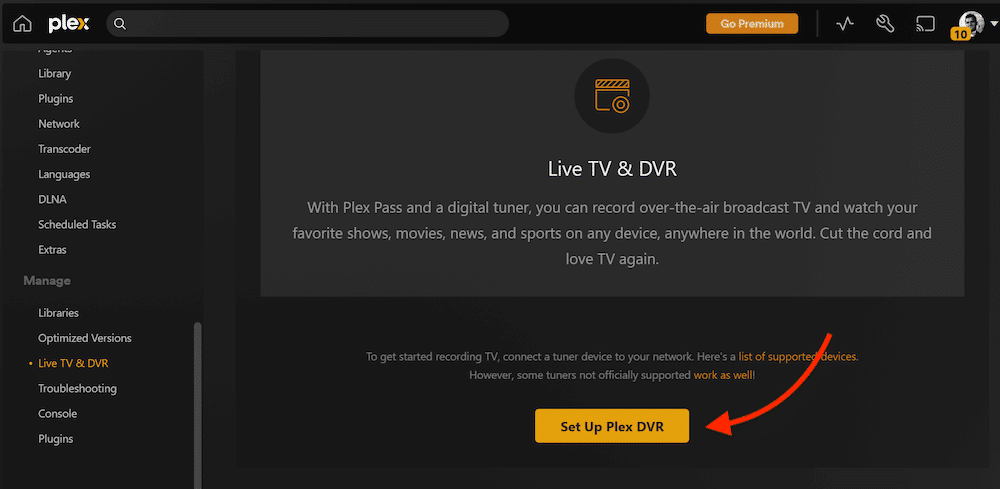
e. Configuring xTeVe with Plex Media Server.
Your xTeVe server should be running an updated version of Plex Media Server (PMS). In addition, your Plex Clients should come with DVR support, and your account should also have the Plex Pass.
- Start by going to xTeVe and copying the DVR IP
- Go to Plex Media Server > Live TV. You will see the list of channels provided by Plex.
- To illustrate how to add channels to PMS using xTeve, we will configure Plex’s Live TV and DVR settings.
- Go to Settings > Live TV & DVR > Click on “Set Up Plex DVR.”
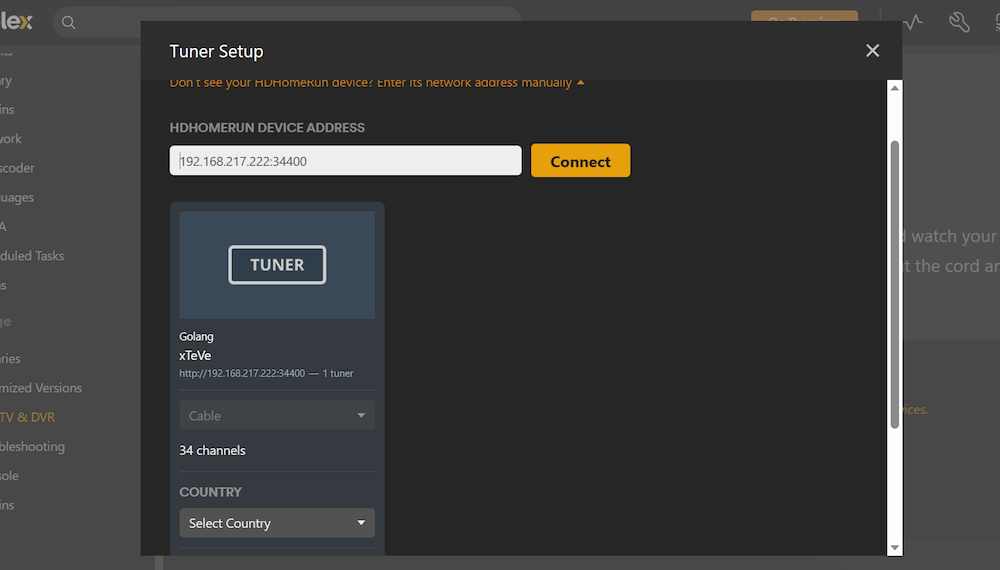
- Plex Media Server will start looking for HDHomRune-based tuners. Click on “Don’t see your HDHomeRun device? Enter its network address manually.”

- Enter the HDHomeRun device address (your xTeVe server IP) and click “Connect.”
- Your Plex Media Server will find it and recognize it. It will also find the available channels.
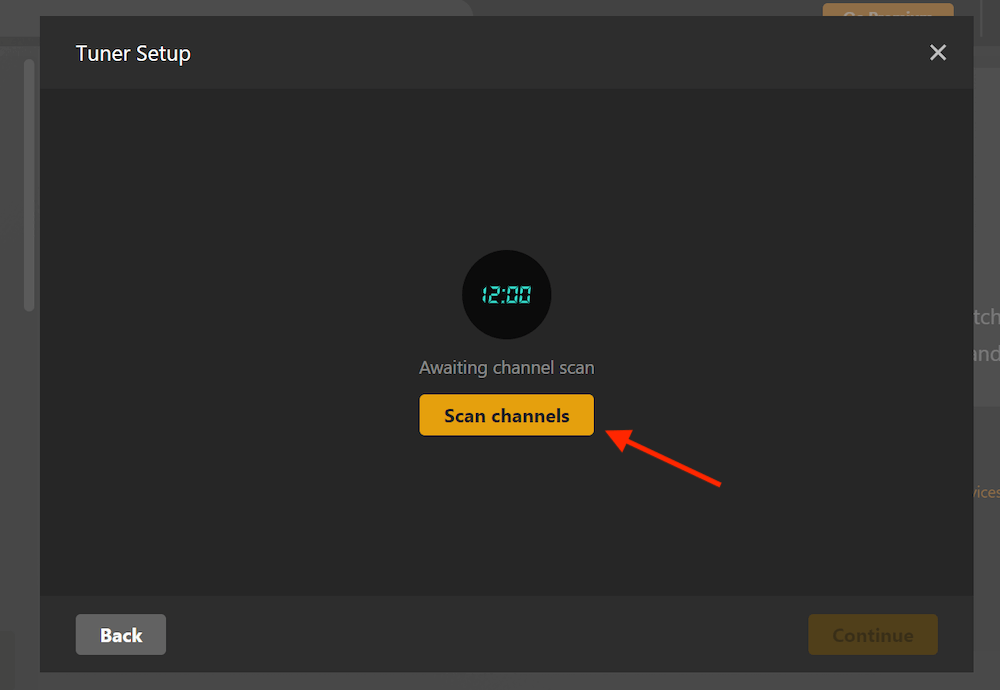
Tuner Setup.
- If you are in a location where Plex’s built-in DVR guide data is unavailable or does not include the channels you need, you can use an external XMLTV service to provide the guide data for your Plex DVR. Using an external XMLTV service, you can expand the number of channels available to you in your Plex DVR.
- To use an XMLTV Guide, you must provide the language and the XMLTV guide link and give the guide a title.
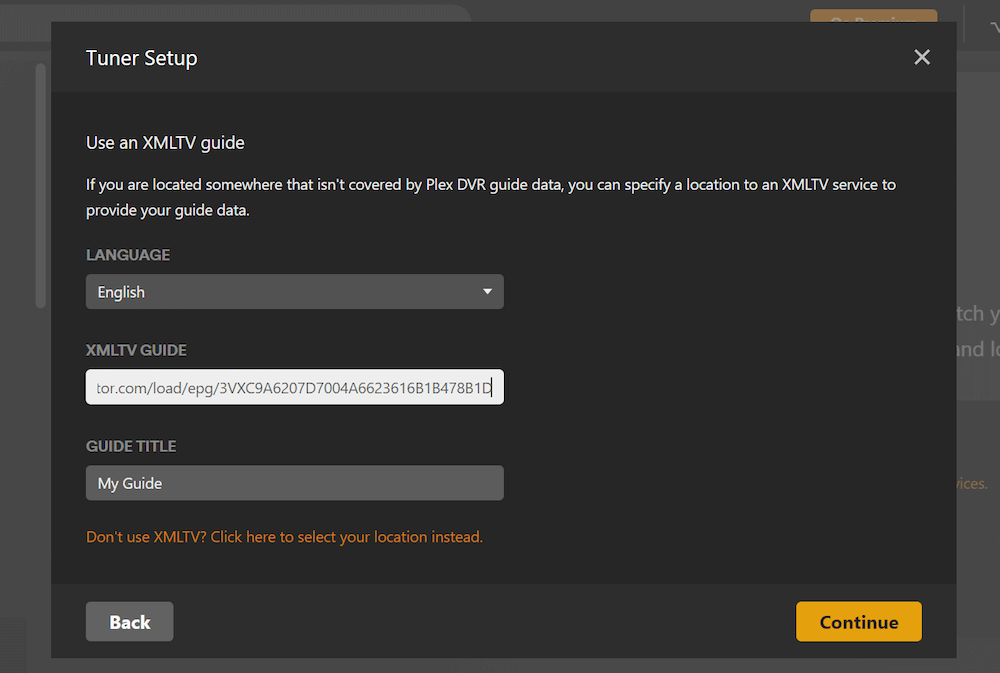
- Click “Continue” to start the channel scan.
- Plex Media Server will start downloading EPG data. It will give you access to your guide and channels in the Live TV in the sidebar menu.
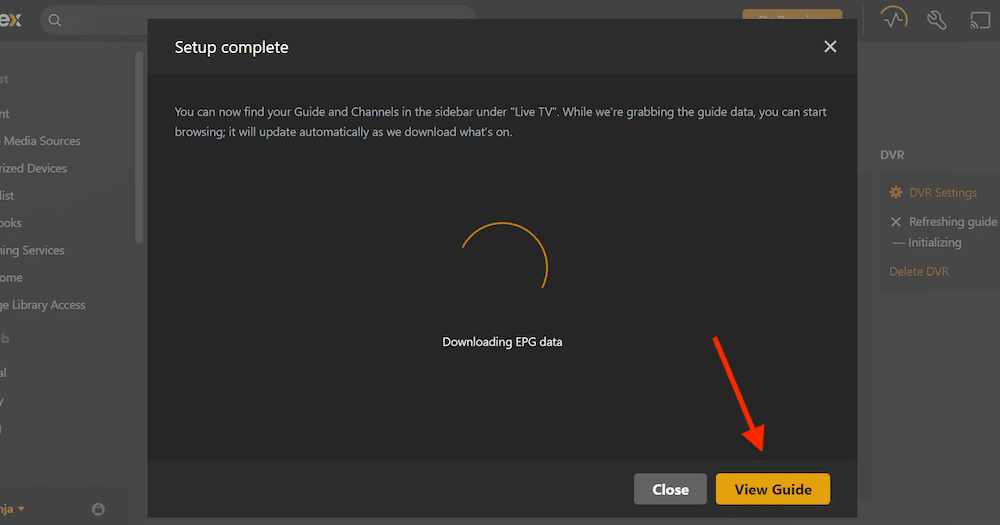
- Click on “View Guide.” On this screen, you will see the available channels.
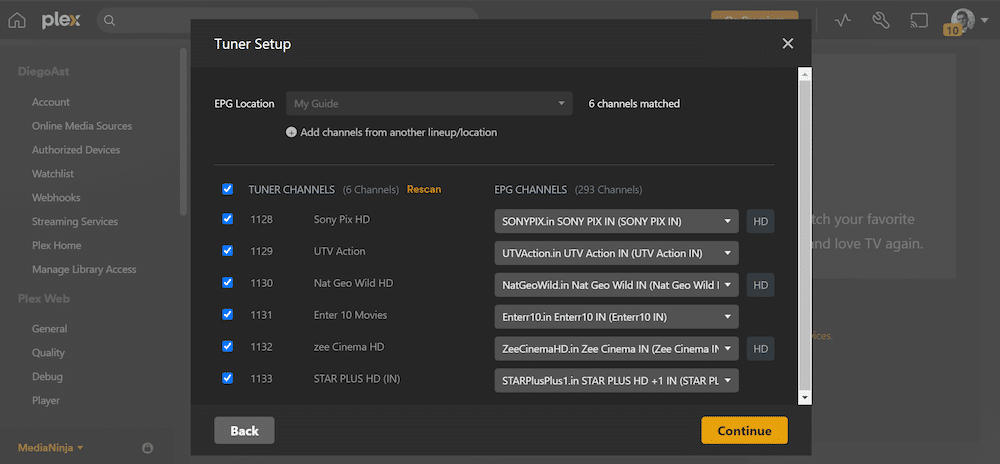
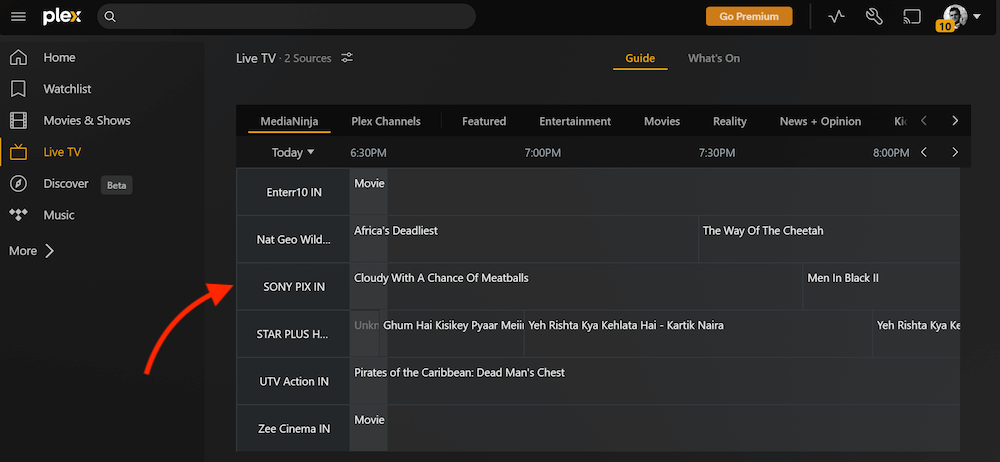
- Go back to LiveTV, and you will find the channels from your channel playlist added in xTeVe.
Note: If you cannot play the content, check the antenna or cable settings on Plex. In addition, you might also need to try changing the country along with the zip code (if you are using a third-party-provided XMLTV file).
Want to optimize your live TV streaming with xTeVe?
xTeVe enhances your live TV experience with seamless integration. Combine it with RapidSeedbox’s high-speed seedboxes for smooth streaming and fast downloads.
Frequently Asked Questions About xTeVe
xTeVe is a lightweight IPTV proxy that lets Plex, Emby, or Jellyfin use M3U playlists as if they were tuners. It translates your IPTV streams into a DVR-friendly format. Think of it as the middleman that connects an IPTV provider with your media server.
To set up xTeVe with Plex, install xTeVe, add your M3U playlist, then configure Plex Live TV with the xTeVe tuner URL. The tuner usually runs on port 34400 (for example: http://server-ip:34400/m3u). Once linked, Plex treats IPTV channels like standard TV tuners.
The default xTeVe port is 34400. You can access the web interface at http://localhost:34400. If another service conflicts with that port, you can change it in the config file or Docker Compose settings.
The easiest way is to run xTeVe in a Docker container with your config and playlist mounted as volumes. Many users prefer Docker Compose for repeatability. A minimal Compose file sets the container image, volume mounts, ports, and restart policy. Official and community images exist on GitHub and Docker Hub.
Yes. xTeVe works across Windows, macOS, Synology NAS, and Unraid.
– Windows: download the .exe release and run it.
– Mac: use the .dmg file or Homebrew.
– Synology/Unraid: install via Docker or community templates.
– Cross-platform support is one reason xTeVe is popular with Plex IPTV users.
xTeVe lets you link XMLTV files to provide EPG (Electronic Program Guide) data for IPTV. You can either host your own XMLTV file or point xTeVe to an external provider. Once loaded, the EPG data syncs with Plex, giving you TV schedules and program metadata.
You can get the latest xTeVe releases on its official GitHub repository. Look for the most recent release that matches your OS (Windows, macOS, Linux) or Docker image. Avoid downloading from unofficial sources to prevent malware.
6. Final Words.
And that’s a wrap, folks! We hope you found this tutorial helpful and informative. With xTeVe, you now have the power to organize and streamline your streaming channels like never before. Remember, this is just the tip of the iceberg regarding what xTeVe can do.
Experiment with the interface and get creative with your channel mappings to truly make it your own. Happy streaming!
Which IPTV provider are you using? I see that I am trying to do the same for some Indian channel but unable to find a IPTV provider which support this type of integration
Hi there Harris,
You can get an free trial from an IPTV provider and give it a shot. just make sure you get the .m3u for the streams and you must also get the EPG (electronic program guide) in XML format.
I hope that helps!
is the xml format required in xtream editor? Also by doing that will it add all the Jpeg images to each channel like the EPG is on the free plex channels?
Hey there Kyle,
So, When you import an XMLTV file into xTeVe, it adds program guide info and other metadata to the channels in your M3U playlist. This includes things like channel logos, program guide info, and channel metadata.
For sure, using Xtream Editor to manage IPTV playlists and EPG data will definitely help enhance your channel listings with additional info and images.
Thanks for the tutorial mate! There’s just one thing I don’t get when setting up XTeVe in your tuto is that you go from PMS to XEPG, is it possible to setup the link between Plex and XTeVe in this configuration ?
If I use PMS, when making the link with Plex, I get the channels sure but no mapping is being done despite the EPG provided, any idea why ?
Hi there Max. So, I assume you want Plex to properly use the EPG data from XTeVe, is that correct?
If XTeVe is set up correctly and has successfully imported your IPTV channels and EPG data, then I believe it woudl be a matter of checking your Plex Media Server configuration.
I hope it helps!
I was successful, however I was only able to find 23 of the 441 on plex that was picked up from my xteve tuner. today when i try to watch one of the 23 channels i get a playback error: Could not tune channel. Please check your tuner or antenna. do you know what could be causing the issue?
Hey there Kyle!
I am glad you were able to pull it off.
“It sounds like there might be a problem with your tuner or antenna connection.”? — yes, this is pretty common.
You can double-check all the connections to make sure they’re tight. Also, make sure the tuner is properly configured in both XTeVe and Plex. If you’re still having trouble, you might want to check the support resources for your specific tuner model.
I hope this helps!
Hi,
I am trying to add the xteve m3u url to plex tuner but Plex won’t detect it. Any idea how to proceed?
Thanks in advance
Hi there Casey,
If you have already correctly configured both xTeVe and Plex…. try the following: In xTeVe, verify that the M3U playlist is properly set up and that the M3U URL is accessible. In Plex, when adding the tuner, make sure to enter the correct URL provided by xTeVe. Also, and sometimes can happen… network issues or incorrect configurations in xTeVe, which can lead to Plex not recognizing the URL.
I hope that helps!
Hey Guys,
I’ve been a fan of Plex for many years but moved to Emby as it had IPTV. I’ve now moved back to Plex because I like the interface and the way it manages media.
I have a Windows 10 workstation with more than enough grunt to achieve what I am trying to do. I run xTeve as a service in Windows and have a FireCube that is also a client running Plex.
I have setup xTeve as all the sites have recommended including this one. All the EPG and channels seem to be OK unless you try and play one. I get the “Could not tune channel. Please check your tuner or antenna.” message.
Here is what xTeve thinks is going on – relevant part of the log below:
2024-02-21 13:25:22 [xTeVe] Streaming Status: Playlist: Brisbane – Tuner: 0 / 1
2024-02-21 13:25:46 [xTeVe] Streaming Status: Playlist: Brisbane – Tuner: 1 / 1
2024-02-21 13:25:46 [xTeVe] Streaming Type: [HLS / M3U8]
2024-02-21 13:25:46 [xTeVe] Streaming URL: https://i.mjh.nz/7mate-bri.m3u8
2024-02-21 13:25:47 [xTeVe] Streaming Status: HTTP Response Status [200] OK
2024-02-21 13:25:47 [xTeVe] Content Type: application/vnd.apple.mpegurl;charset=UTF-8
2024-02-21 13:25:48 [xTeVe] Streaming Status: HTTP Response Status [200] OK
2024-02-21 13:25:48 [xTeVe] Content Type: application/vnd.apple.mpegurl;charset=UTF-8
2024-02-21 13:25:48 [xTeVe] Streaming Status: HTTP Response Status [200] OK
2024-02-21 13:25:48 [xTeVe] Content Type: video/MP2T
2024-02-21 13:25:48 [xTeVe] Streaming Status: Client has terminated the connection
2024-02-21 13:25:48 [xTeVe] Streaming Status: Channel: 7mate (Clients: 0)
2024-02-21 13:25:48 [xTeVe] Streaming Status: Channel: 7mate – No client is using this channel anymore. Streaming Server connection has ended
2024-02-21 13:25:48 [xTeVe] Streaming Status: Playlist: Brisbane – Tuner: 0 / 1
Can anyone give me some ideas? I’ve hit a brick wall. If you need more info let me know.
Thanks,
Stuart
Hi Stuart, Can you try to toggle your xTeVe buffer? The term is a bit deceptive, but that’s what handles how the streaming URL is handled. It may resolve your connection issues.
Your guide was very helpful. Wanted to let you know you’ve got a small typo in the docker example where you run xteve with the substituted mount values. For the max-file log-opt you’re missing a hyphen, should be “–log-opt max-file=3” instead of “-log-opt max-file=3”
Hey Ed, thanks for catching that! We’ve made the correction. Hope you have a great day and appreciate your contribution to helping us make this a better site!
Bonjour
Super tuto
J’ai tout réussi, sauf l’étape dans PLEX quand j’ajoute mon serveur DVR… Là ca me dit “Il y a eu un problème lors de l’ajout de l’appareil : 192.168.0.52:34400…”
Xteve est en docker sur mon syno, j’ai testé le fichier M3U il est ok, bref je bloque…
Une idée ?
Bonjour Jérém, Il semble que tu as un souci pour ajouter ton serveur DVR dans Plex (192.168.0.52:34400). Voici quelques conseils :
– Vérifie xTeVe : Assure-toi qu’il fonctionne dans Docker et que le fichier M3U est bien chargé via http://192.168.0.52:34400/web.
– Pare-feu et réseau : Vérifie qu’aucune règle de pare-feu ou de réseau ne bloque le port 34400.
– Paramètres Plex : Assure-toi que l’URL DVR est correcte et reconfigure si nécessaire.
– IP statique : Si l’IP de xTeVe change, attribue une IP fixe à la machine.
Tiens-moi au courant si ça aide !
I successfully configured my IPTV service but I’m not able to play any channels. It successfully pulled my channel list, and I used a public EPG for the XMLTV File. When trying to stream from Plex it says it cannot access the stream, to check the tuner or antenna. I tested my IPTV URL on VLC Media player and it played successfully. Any ideas?
I fixed it! had to change the “Stream Buffer” to xTeVe (xTeVe connects to the streaming server)! Thanks for the tutorial!
Bom dia,
Não consegui o Plex nao passa da tela “Usar um guia XMLTV
Se você está em um local que não possui cobertura de dados do guia do Plex DVR, você pode especificar um local em um serviço XMLTV para fornecer os dados do gui” Adicionar dados da programação ou local do EPG, “Não foi possível encontrar um guia do Plex DVR para o seu local neste momento. Por favor, selecione outro local ou use um guia XMLTV.”
Eu nao tenho um link nem tenho o arquivo, não tem como usar minha lista .m3u?
Ola Cristiano,
O Plex precisa de dados EPG (um arquivo ou link XMLTV) para corresponder os canais da sua lista .m3u. Sem isso, você só verá os nomes dos canais, sem o guia de programação. Aqui está como resolver isso:
Opções para Adicionar Dados do Guia:
1. Use Serviços XMLTV de Terceiros: Ferramentas como epg.best ou Xtream Editor podem gerar arquivos XMLTV compatíveis com sua lista. Rápido e fácil!
2. Procure Arquivos XMLTV Gratuitos: Confira o repositório EPG do IPTV-ORG — talvez já exista um guia compatível com sua lista.
3. Crie Dados XMLTV Você Mesmo: Ferramentas como WebGrab+Plus ou editores XMLTV permitem criar seu próprio guia, mas isso exige mais trabalho.
4. Use o xTeVe Sem EPG: Sem arquivo XMLTV? Sem problemas! O xTeVe ainda pode gerenciar sua lista, mas o Plex só mostrará os nomes dos canais, sem informações do guia.
Para ter a experiência completa do Plex com um guia de programação, é essencial obter os dados XMLTV!
Espero que isso ajude!
Diego
Really appreciate the guide here. I am new to docker and I have docker installed on my UGREEN Nas. Do you have any step by step instructions that may be of use to a noob like myself. I would love to install XTEVE on my docker on my NAS
Hello Arpan, Im happy to see you found the guide helpful.
We will keep xTeVe on Docker (for NAS) on our next article’s update.
Why would I want to quit xteve? You need it running for it to work. Rather than explaining how to quit xteve, you should explain how to keep it running even after closing the terminal.
Hi Steve,
Thanks for your feedback! You’re right. xTeVe needs to stay running to function properly. The article doesn’t recommend quitting xTeVe, but rather points out that closing the terminal window will stop the service, which can be an issue for some setups.
That’s why we included the section about running xTeVe as a service (e.g., with NSSM on Windows). That method ensures xTeVe continues to run in the background, even after you close the terminal or restart your machine.