Emby is a personal media server that lets you organize your movies, shows, music, and photos and stream them on any device. If you’re wondering what Emby is, how the Emby Server works, or how to set it up, this guide walks you through everything step-by-step.
You’ll learn how to install Emby on any platform, add and organize your media, use Emby Connect, enable remote access, and optimize performance. Whether you’re completely new to Emby or want a clear tutorial you can follow at your own pace, this guide will help you build a fast, private, and flexible home media setup.
Let’s get started and turn your media collection into a fully organized, easy-to-stream library with Emby.
Disclaimer: This material has been developed strictly for informational purposes. It does not constitute endorsement of any activities (including illegal activities), products or services. You are solely responsible for complying with the applicable laws, including intellectual property laws, when using our services or relying on any information herein. We do not accept any liability for damage arising from the use of our services or information contained herein in any manner whatsoever, except where explicitly required by law.
Table of Contents.
- Emby: The Ultimate Media Solution
- Overview of Emby’s Key Features.
- Installing Emby on Linux, Windows, and Docker (and Seedbox).
- Starting Up With Emby.
- Creating and Accessing Your Media Library
- Configuring Local and Remote Access to Streaming Devices.
- Personalizing Your Entertainment Experience with Emby.
- Advanced Emby Configurations.
- Emby: Frequently Asked Questions (FAQ)
- Final Words.
1. Emby: The Ultimate Media Solution
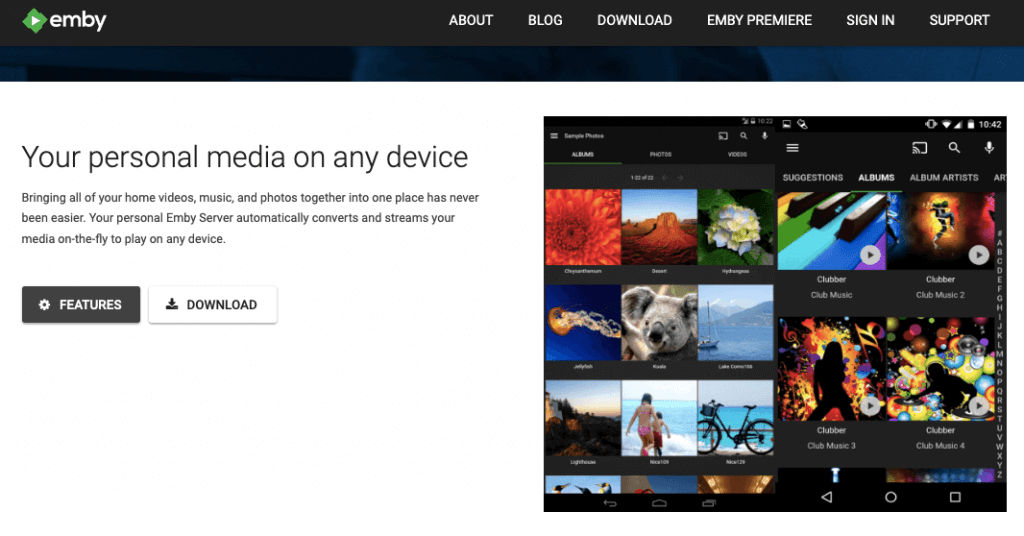
Emby is the ultimate media solution that transforms the way you access and manage personal media. With it, you can centralize all your multimedia (home videos, music, and photos) into one convenient place, making it easy for you to organize, play, and stream on virtually any device.
But Emby goes beyond organizing and streaming your media. It also offers a full gamut of features and services that aim to enhance your entire entertainment experience. For instance, you can stream live TV to any device, manage your DVR, and enjoy your library of recordings. The app also comes with parental restriction features that give you full access control (and management) to home content.
Although Emby’s ultimate media solution is 100% free, you can also expand its value with Emby Premiere. With Premiere you can unlock additional bonus features like cover art, mobile sync, cloud sync, and free Android apps. It is also one of the top alternatives to Plex.
Emby’s code is proprietary (closed license). The software was developed using C# and is currently maintained by the Emby Team.
What is not Emby? It is not a media streaming service and does not provide content like YouTube or Netflix would. You need to have your own server installed and your own media or Live TV tuner.
a. How does Emby work?
Emby works using the client-server architecture. This enables its users (clients) to seamlessly access their media content remotely or locally from the server. The software is designed to serve your media whenever you need it by pulling it from a server that stores media files. This is why NAS devices are quite useful for running media servers and the software supports a wide range of them. Emby’s client software is a vital component of the architecture. It is installed on any playback-capable device including TVs, computers, or mobiles. The client connects to the media server and streams the content.
b. Emby’s Background.
At first, Emby (known as Media Browser at that time) had mostly open-source components, with a few closed-source elements. But later, the software releases available on the website became proprietary, which made replication from the source impossible (due to proprietary build scripts). The later, Version 3.5.3 marked Emby’s full transition to a complete closed-source model, while the open-source aspects remained explicitly for plugins. This significant shift gave rise to Jellyfin, an independent fork that is both free and open-source.
c. Emby’s Pricing and Licensing model.
Emby uses two plans – Basic and Premiere. The Basic’s license provides the necessary features you need to build a robust media solution. With a Premiere license, you’ll get additional features that enhance your personal media server setup. The Premier licenses are Monthly ($4.99 per month – recurring payment), One-Year License (at $54), and Lifetime License (one-time payment of $119). All these Premiere licenses are for single household use and come with a 25-device limit.
d. Compatibility.
- Emby Server. Computers running on Windows, Linux, macOS, and FreeBSD. It is also compatible with NAS products including ASUSTOR, FreeNAS, Netgear, Open Media Vault, QNAP, Synology, TerraMaster, Thecus, TrueNAS, unRAID, and Western Digital. The Server also runs other platforms like Android, Docker, Cloudron, Flatpak, NVIDIA Shield, and SNAP.
- Emby client. Users can connect to the the server from a compatible client including web-based (HTML5), mobile including Android and iOS, computers’ OS Linux, macOS, and Windows. The software also runs on various streaming devices like Roku, Android TV, Amazon Fire TV, Chromecast, and Apple TV. It is also compatible with gaming consoles like Play Station 3 and 4, and Xbox One and 360. The client also runs on voice assistance (Alexa), Car infotainment Systems (Android Auto), Smart TVs (LG Smart TV and Samsung Smart TV), NAS (QNAP), and others like NVIDIA Shield, Raspberry Pi, Kodi, and SNAP.
e. Emby’s Community and Support.
Emby values community and support. We encourage you to join the community to connect with other media server enthusiasts. You can ask for advice, share recommendations, and even discover new content. In addition, The company provides fantastic comprehensive learning resources and documentation, making it easy for you to get started and resolve any questions or issues.
2. Overview of Emby’s Key Features.
Emby offers a wide range of features and benefits that make it the ultimate media solution:
a. Easy Access
Emby uses Emby Connect (with a free license) to allow you to connect to your server (and stream content) from anywhere. This feature reduces the need for dealing with multiple devices and IP addresses. To use this feature simply sign in and stream your media.
b. Live TV and DVR management
Emby allows you to stream your favorite live TV on any device. In addition, you can also manage your DVR by scheduling individual or series recordings. Live TV and DVR management are only available with a Premier license.
c. Parental Controls
Emby comes with easy-to-use parental controls. It allows you to set up restrictions, access schedules, time limits, and more for a safe watching environment. Parental controls are available with the free basic license.
d. Automatic Metadata Gathering and Library Organization.
Emby organizes your personal media into beautiful displays, enhancing your media collection management and browsing experience. The software can also retrieve detailed metadata for your movies, TV shows, music, and other media files. These are basic features available for free.
e. Server Manager Empowerment
The Emby server offers various free features designed to improve the management of the media server. As a server manager, you have access to the server’s notifications, a centralized dashboard, server activity logs, remote control, user management, media library organization, scheduled tasks, and full plugin management.
f. DLNA Support.
DLNA (Digital Living Network Alliance) support enhances content sharing and remote control capabilities. With this feature, Emby automatically detects DLNA devices, enabling seamless content sharing and remote control.
g. Free full Playback on key devices.
Emby allows full playback on key devices like PCs, Mobile Browsers, Roku, Chromecast, Apple TV, and Smart TV (LG and Samsung) included in the free basic license. For full playback on other devices such as smart TVs or mobile devices, you’ll need to get the Premier license.
h. Key Emby Premiere’s features:
Upgrade to Premier for additional features such as cover art, mobile sync, cloud sync, offline media, Emby Live TV and DVR, hardware accelerated transcoding, easier media management, and free additional apps (FireTV, iOS, Android, Xbox, etc). In addition, the Premier license also gives you access to full playback on various devices and Smart Home integration.
3. How to install Emby on Linux, Windows, and Docker (and Seedbox)?
In this section, we will install Emby on Linux, Windows, and Docker. But before we go through this extensive step-by-step installation guide, we will review the details you need to know about Emby on a Seedbox (for pros only!).
Pro Tip! Emby is often used in combination with a seedbox. You can build your media collection with an online seedbox, allowing remote access and efficient storage for your media.
Disclaimer: Please be aware that Rapidseedbox does not provide support for the installation and operation of Emby on your premises, except for the assistance covered in this guide. While we strive to provide accurate and up-to-date information, we cannot guarantee the suitability, reliability, or effectiveness of the installation process or the functionality of the software. Installing and running it on your premises is done at your own responsibility. But that being said we do want to hear your feedback and comments. Please leave them in the comment section below.
a. Running Emby on your Seedbox.
Starting with Emby on your Seedbox is more manageable than deploying it from scratch. If you have a Rapidseedbox’s VPS seedbox, we strongly recommend running it using the one-click apps provided. With a one-click, you will be able to skip the entire installation (on your VPS Seedbox).
To run Emby on your seedbox
- Go to Rapidseedbox’s Client Area and ensure your VPS Seedbox is up to date.
- Check the tutorial on how to start with and use one-click apps.
- Open the OCI installers in the left-hand menu and locate Emby.
- Click on the gear icon on the right-hand side to install it.
- Go to “Installed apps,” where you should see the app installed.
- Click on the key icon to view the credentials and URL.
- Copy the credentials and URL (IP_ADDRESS:PORT) and paste them into your web browser.
- This will open Emby’s web user interface, allowing you to access and configure your Emby server.
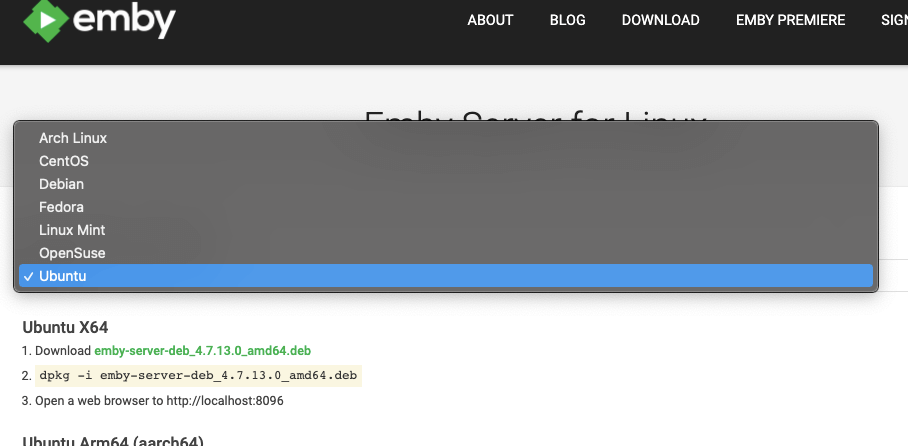
b. Install Emby on Linux.
Emby supports various Linux distributions, including Arch Linux, CentOS, Debian, Linux Mint, OpenSuse, and Ubuntu. For illustration purposes, we will install it on Ubuntu.
02- Photo by the official website-Linux Server
To install Emby on Linux, (specifically on Ubuntu 22.04-amd64-server) using the provided package, you can follow these steps:
- Open the terminal and download the respective package. Use ‘wget’ for Ubuntu.
- Navigate to the directory where you downloaded the Emby server package. We recommend “~/Downloads” or creating a new directory.
- Run the following command. Replace <package-name> with the actual name of the downloaded package:
|
1 |
sudo dpkg -i <package-name> |
- For example:
|
1 |
sudo dpkg -i emby-server-deb_4.7.13.0_amd64.deb |
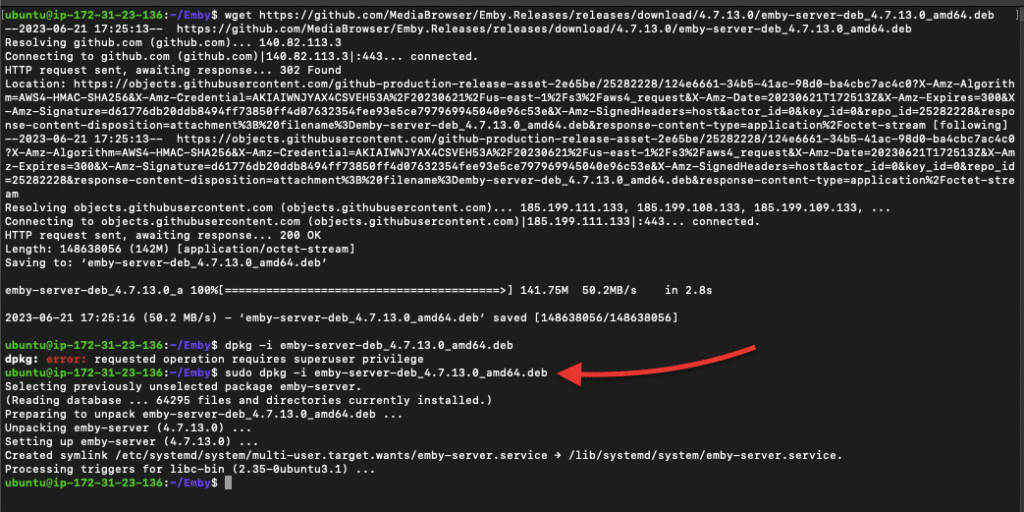
- Check whether the server package was successfully installed and the server is running. Use the following command:
|
1 |
sudo systemctl status emby-server |
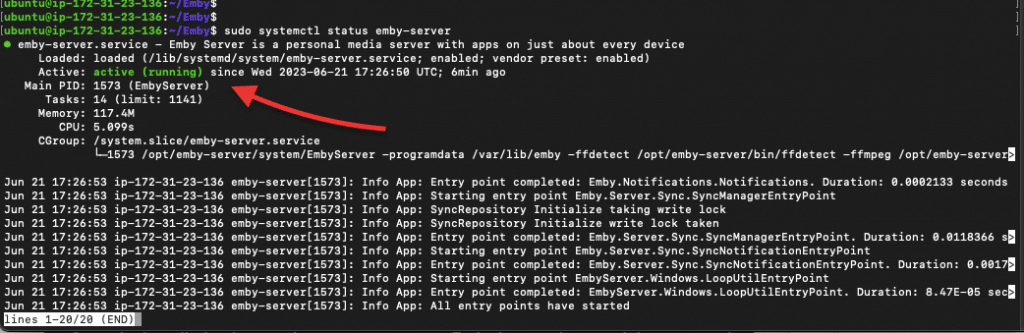
- If the service is not running, use the following command: (sudo systemctl start emby-server). Once the installation is complete and the server is up and running, you can access it by opening a web browser and visiting the following URL: http://localhost:8096
c. Install Emby on Windows.
To install Emby Server on Windows, you can follow these steps:
- Go to Emby Downloads and find the Windows section. Choose the version of the Server you want to install, and ensure you download the appropriate version for your system architecture (x64 or x86).
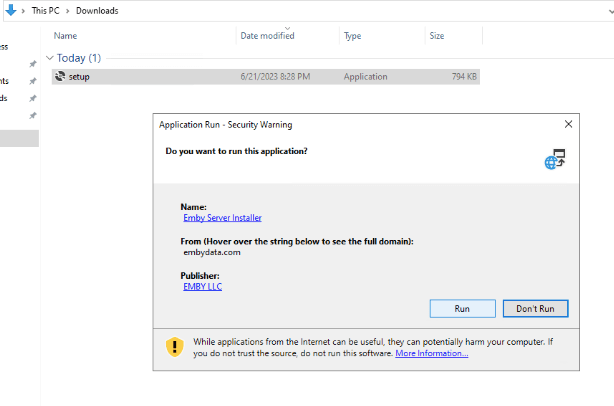
- Once the download is complete, locate the downloaded setup.exe file. Double-click on it, and approve the application as “Safe to Run”.
Note: Some versions for Windows will come as .zip files. Extract them, locate the sub-folder, and find the “.exe” file.
- This will start extracting the package and installing it on your Windows server.
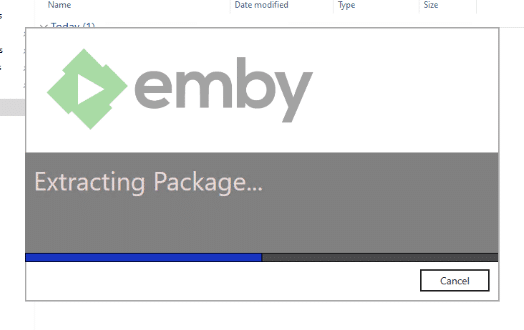
- The Emby server software will automatically install and start running in the background.
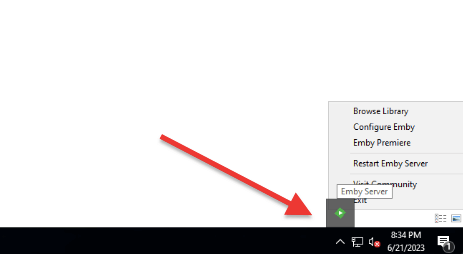
- To check whether your server is running, go to the bottom menu on the Windows task bar and locate the “Emby Server” icon. Click on it, and you will find various options like “Browse Library,” “Configure Emby,” “Emby Premiere,” “Restart Emby Server,” “Visit the Community,” and “Exit”.
- Click on “Configure Emby” to open the web-based setup wizard in your default web browser. If it doesn’t open, you can manually open your web browser and enter the following address: http://localhost:8096 (as shown below).
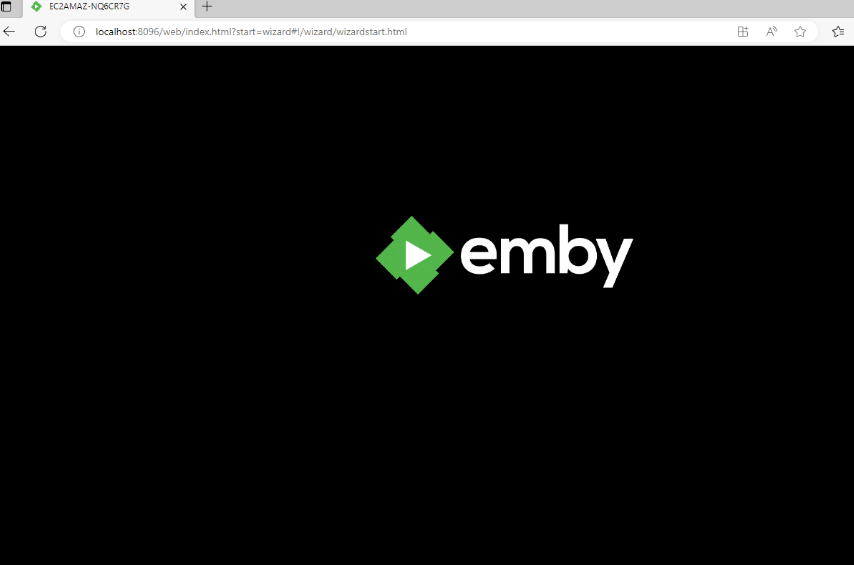
- The setup wizard will guide you through the initial configuration. Follow the prompts to set up your library, add media folders, and configure any desired settings (more on this in the next section).
- That’s it! You have successfully installed Emby Server on your Windows system.
c. Installing Emby on Docker.
To install Emby Server using Docker, you can follow these steps:
- Choose the appropriate Docker image. There are different images for different architectures, including x64, Arm64 (aarch64), and Armv7 (armhf). You have two options for Emby Docker images: emby/embyserver or linuxserver/emby.
- You can find these images on Docker Hub:
- emby/embyserver (by emby): Visit the page for more information on this image at https://hub.docker.com/r/emby/embyserver
- linuxserver/emby (by linuxserver.io): Visit the Docker Hub page for linuxserver/emby at https://hub.docker.com/r/linuxserver/emby.
Although you’ll find installation details on the Docker Hub page of each Emby Docker image, we will provide a quick illustration of how to go through this process.
Pulling the Docker Image.
- Open a terminal or command prompt on your Docker host machine.
- Pull the Emby Docker image from Docker Hub by running the following command:
| docker pull <image-name>:<tag> |
- Note: Replace <image-name> with the name of the Emby Docker image you chose (emby/embyserver or linuxserver/emby), and <tag> with the desired version or tag of the image (e.g., latest for the latest stable release). For example:
| docker pull emby/embyserver:latest |

Running the Docker Container
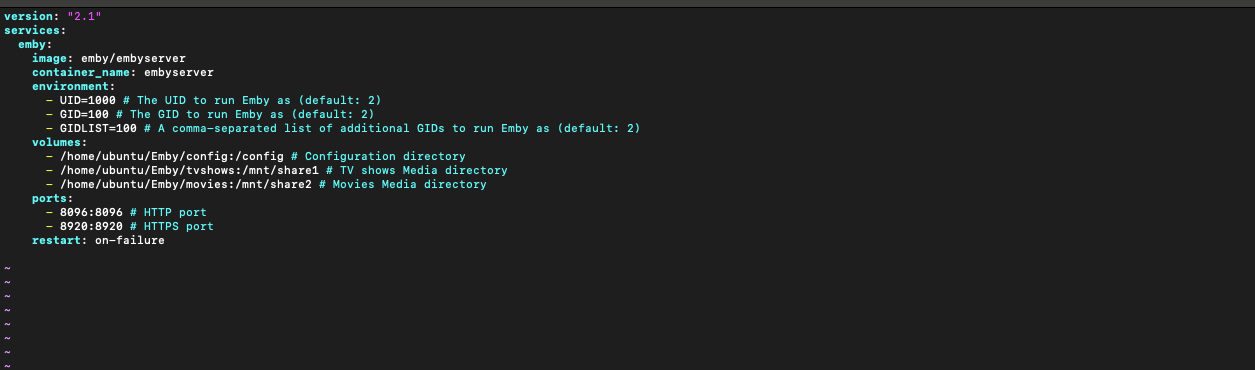
- Once the image is downloaded, you can run the Emby Server container using the “docker run” command. You can use the ”Docker run” command to quickly start the container with the required options or use the Docker Compose tool by defining a YAML file with the required parameters.
Note: The exact command may vary depending on your specific requirements. Typically, you will need to specify volumes for configuration data and media files, set port mappings for accessing the Emby web interface, and provide any necessary environment variables.
- Create a Docker container using either Docker Compose or the docker run command (docker run -d \) followed by its specific parameters.
- If there is a docker-compose.yml file, open it and add the following line to the end of the file. If there is no docker-compose.yml create one.
Note: Make sure to replace parameters like runtime (If you don’t have NVIDIA GPUs, remove runtime), volumes, (/path/to/programdata, /path/to/tvshows, and /path/to/movies), ports (only if they need to be changed to different port numbers), and devices (the line maps specific device nodes from the host to the container)
| version: “2.3” services: emby: image: emby/embyserver container_name: embyserver runtime: nvidia # Expose NVIDIA GPUs network_mode: host # Enable DLNA and Wake-on-Lan environment: – UID=1000 # The UID to run Emby as (default: 2) – GID=100 # The GID to run Emby as (default: 2) – GIDLIST=100 # A comma-separated list of additional GIDs to run Emby as (default: 2) volumes: – /path/to/programdata:/config # Configuration directory – /path/to/tvshows:/mnt/share1 # TV Shows Media directory – /path/to/movies:/mnt/share2 # Movies Media directory ports: – 8096:8096 # HTTP port – 8920:8920 # HTTPS port devices: – /dev/dri:/dev/dri # VAAPI/NVDEC/NVENC render nodes – /dev/vchiq:/dev/vchiq # MMAL/OMX on Raspberry Pi restart: on-failure |
As an example.
Note that in the following example, we removed parameters like runtime, network_mode, and devices, and changed volume. Our container will run on default (Bridge Network). This mode allows containers to communicate with each other using internal IP addresses. If you want to access the Emby server from outside the host, you will need to map the container’s ports to the host using the ports directive in the Docker Compose file.
- Ensure that Docker Compose is installed correctly and that you saved the docker-compose.yml file successfully. Now, navigate to the same directory containing the docker-compose.yml file and run the following command. This command starts all the containers defined in a Docker Compose file in detached mode.
|
1 |
sudo docker-compose up -d |

- The Emby container is now running. You can verify the Docker container status using the command “docker-compose ps” to check the status of the containers managed by Docker Compose.

- Once the container is running, you can access the Emby web interface by opening a web browser and visiting http://localhost:8096 or https://localhost:8920 if you enable HTTPS.
That’s it! You have now installed the Emby Server using Docker. You can proceed to configure and customize the software using its web interface.
How to Unlock Your Ultimate Media Experience! 🎥
Transform your home media library with a powerful seedbox from RapidSeedbox!
Unlimited bandwidth for seamless torrenting/streaming
Secure and private connections
Easy setup and management
Take your Emby setup to the next level.
———
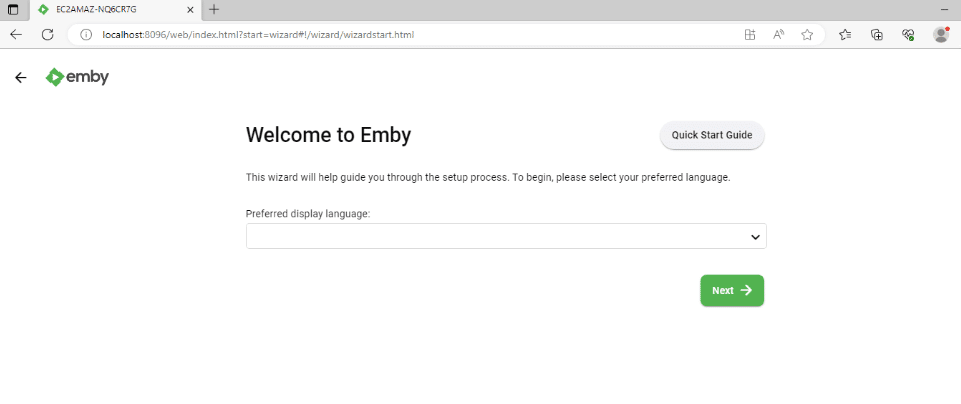
4. Starting up with Emby.
Starting with Emby is a breeze with its user-friendly startup wizard. All you have to do is read the instructions, click “Next”, read the instructions again, click “Next” again, and so on until you finish the setup.
Note: Although you could skip the setup wizard during Emby’s initial installation and configure the settings later, we recommend going through the setup wizard. When you skip the setup wizard, Emby will use default settings for most of the configurations, so you won’t be able to customize and add security to your server from the start. If you skip the installation wizard, you can still later, access the Emby server’s web interface and go to the settings section to adjust each configuration to your preferences.
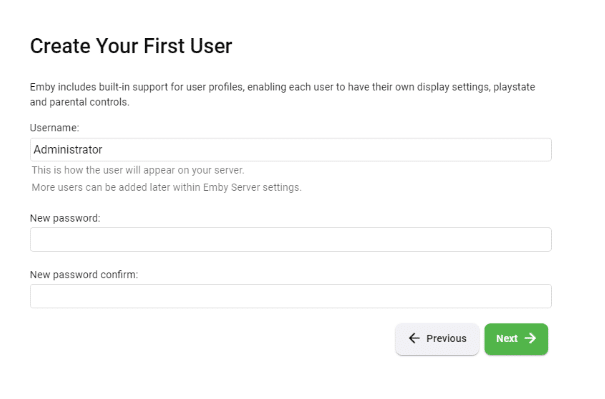
Create Your First User
- Create the first user account for accessing and managing your Emby server. You’ll be prompted to enter a username and password for this account. Make sure to choose a secure password.
Preferred Language
- Emby allows you to select your preferred language for the user interface. You can choose the language that you’re most comfortable with.
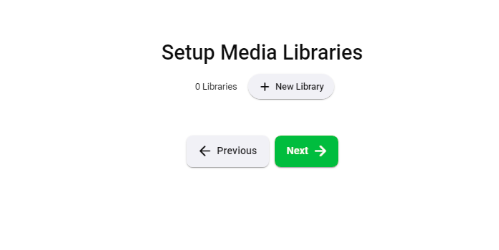
Setup Media Libraries.
- In this step, you’ll be able to configure the media libraries that you want to include in your Emby server. Emby supports various types of media, such as movies, TV shows, music, and photos. You can specify the folders or directories where your media files are stored, and Emby will scan and organize them automatically.
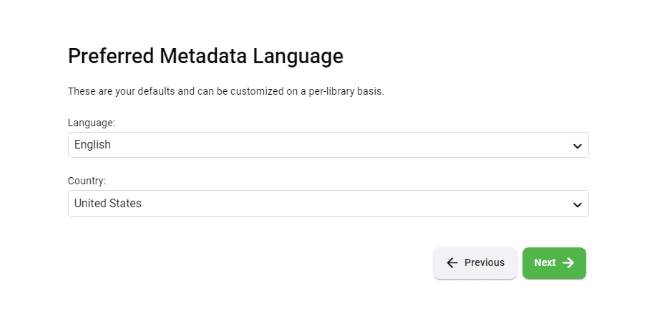
Preferred Metadata Language:
- Emby uses metadata to enhance the information and artwork associated with your media. You can choose the preferred language for the metadata, which will affect the language of the descriptions, summaries, and other metadata details displayed in Emby.
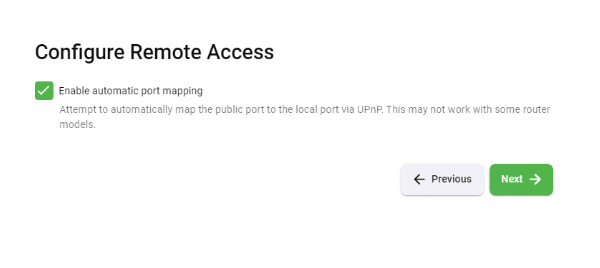
Configure Remote Access
- Emby provides remote access capabilities, allowing you to access your media server from outside your local network. In this configuration wizard step, you can “enable automatic port mapping,” which simplifies the process of setting up remote access by automatically configuring the necessary network settings.
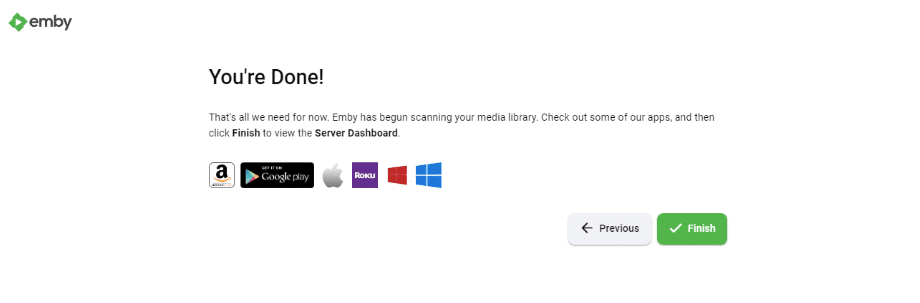
- Go Through and Accept the Emby Terms of Service. Emby will present its Terms of Service, which you should review and accept to proceed with the installation.
- Finish: Once you’ve completed the previous steps, you’ll reach the final screen. Clicking on the “Finish” button will save your configurations and launch the Emby Server.
Once Emby Server is installed and correctly configured you will need to download Emby apps for all your favorite playback devices, such as mobile, Android, iPhone, iPad, etc. Emby apps are also available for Android TV, Amazon Fire TV, Chromecast, Roku, Xbox, Home Theater Computers, and more, making it convenient for you to enjoy your media anywhere within your comfort.
5. Creating and Accessing Your Media Library
One of the standout features of Emby is its comprehensive media management capabilities. With this feature, you can easily organize and access your extensive media library, ensuring that your favorite content is just a click away. Whether you’re a fan of music, movies, or TV shows, Emby supports a wide range of media formats.
If you configured your media Playlists on the installation wizard, you should be able to see them in the home dashboard.
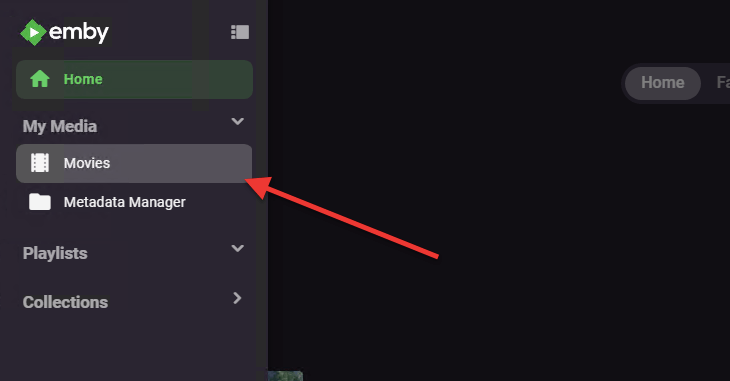
- Click on the top left menu icon and click on “Library”.
- If you haven’t configured any Library initially go to the top right “settings” gear icon (1).
- Then, click on “Library” (2). In the Library menu (3), you’ll see the number of libraries configured.
- If you configured libraries already and can’t find them here, try “Scan Library Files”.
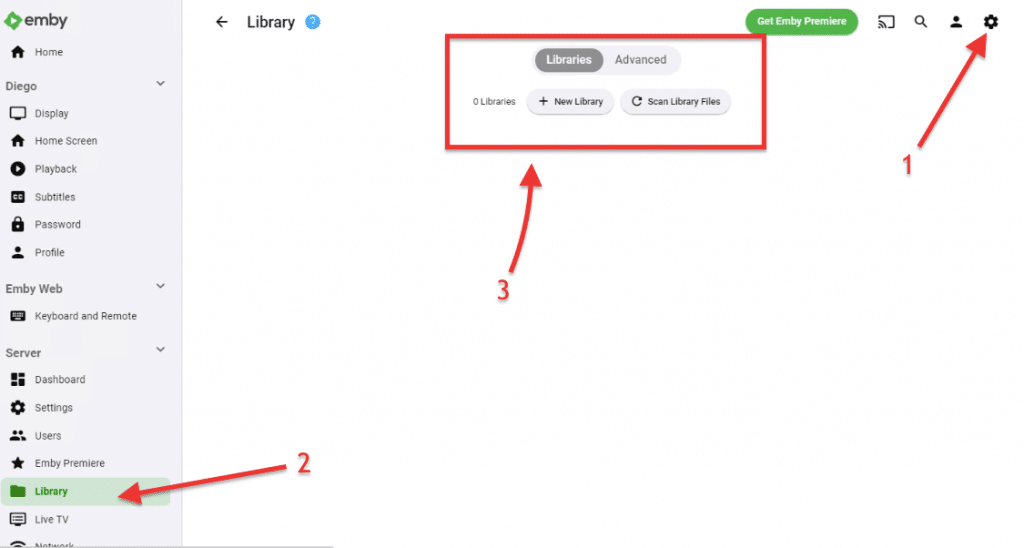
- If you want to add a new library click on the “+ New Library” button (3). The “New Library” window will open. Here, you’ll be able to configure all the library settings.
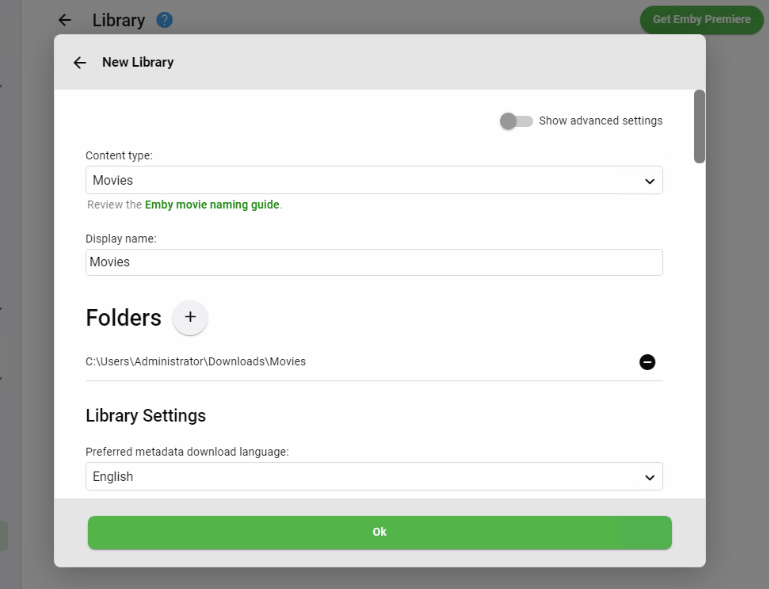
- Content-Type: You can choose any type of media content for your specific Library, including Movies, TV shows, Music, Photos, Books, Games, Home Videos, etc.
- Display Name: Specify the name used to identify the library.
- Folders: Specify the folder where your media is located.
Note: We recommend that, prior to specifying the library, prepare your folders according to content. For example, create one folder for movies, one for TV shows, one for music, and so forth. Also file naming is quite important. Re-name all your media content with a standard naming structure.
- [Optional] Specify other relevant library information such as :
- Preferred Metadata Download Language.
- Enable Real-Time Monitoring.
- Metadata Readers.
- Movie Metadata Downloaders
- Subtitle information
- Playback settings.
- And more.
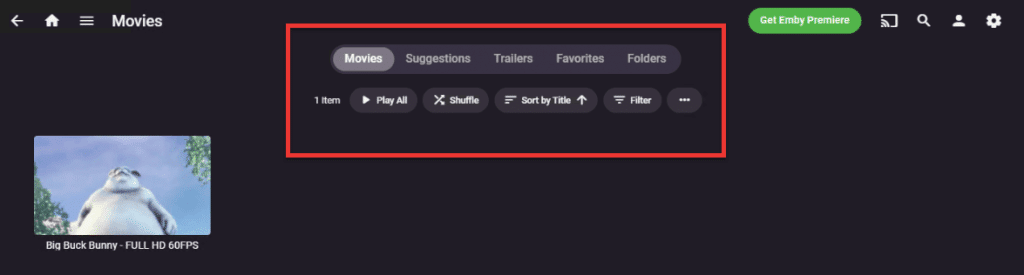
Accessing your Media Libraries
- Once your media libraries are created, you’ll see them on the top of the main Emby dashboard (My Media). Also, you will see all your “Latest Additions” on the main dashboard.
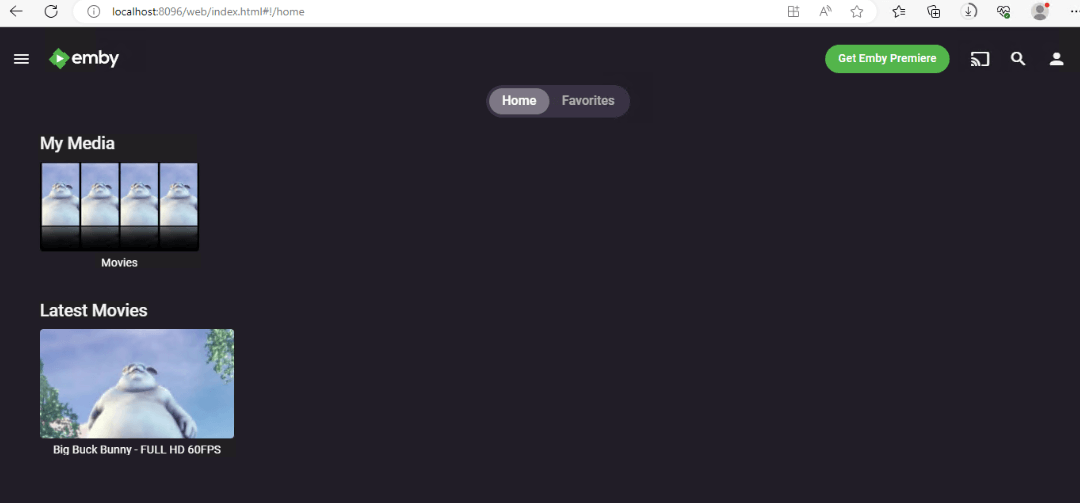
- You can also access all your Emby libraries, by going to the top left menu.
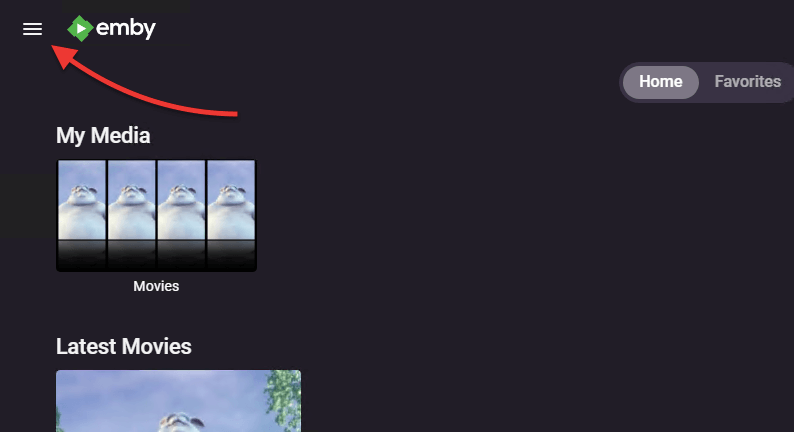
- On the “My Media” menu, choose your specific library.
- Here, you’ll see a menu with more options like Suggestions, Trailers, Favorites, and Folders. Additionally, you will also see playback options like Play all, Shuffle, Sort by Title, Filter and more.
6. Configuring Local and Remote Access to Streaming Devices.
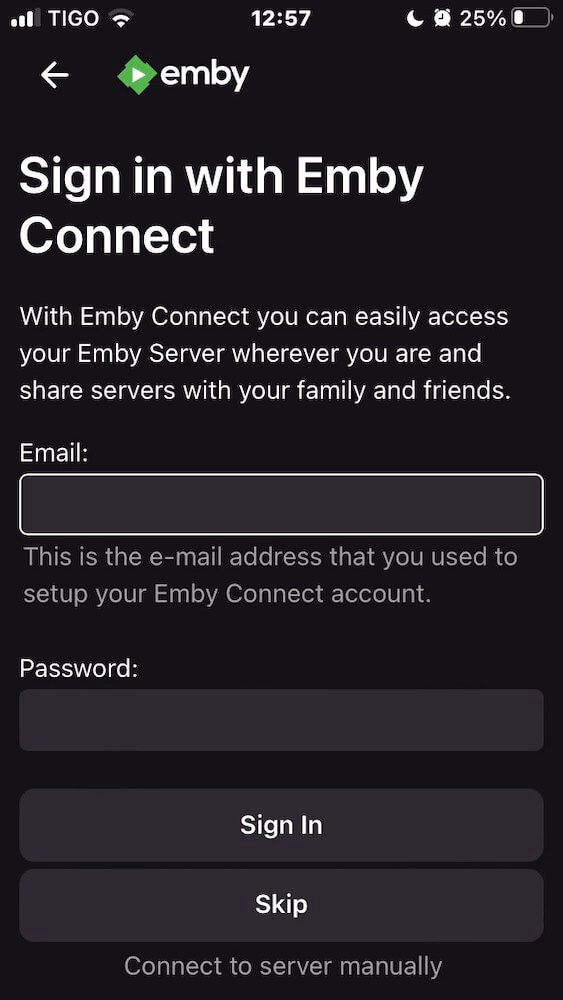
The most straightforward way to connect to your Emby server is to use Emby Connect. For this feature, you’ll only need to sign up (supported by a free account) > Sign in (from any Emby app) > and access your Emby server from anywhere.

Configuring Emby access for streaming users?
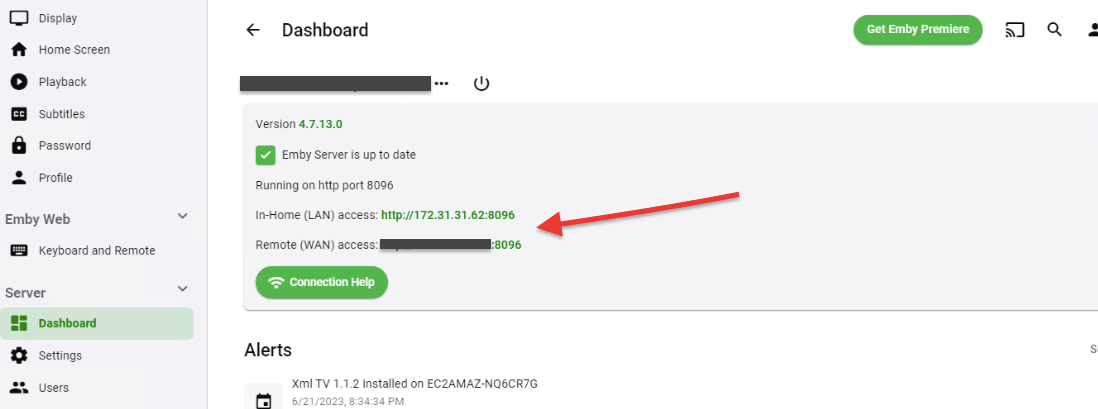
If you prefer to have full control over your remote connections, we encourage you to use the IP addresses. There are two important addresses (hostname or IP address) along with the port, that allows you access to the Emby server for management and usage (stream content). To find these addresses:
- Go to Settings > Server > Dashboard. On the Server’s Dashboard, you’ll be able to see vital information such as in-home (LAN) access (the private IP address from your Emby Server) and remote (WAN) access (the public IP address from your Emby Server).
- If you and your users want to stream media, they should enter these IP addresses on their web browser to access content and stream it. Also, if you or they are around (on the outside world), you’ll be able to stream media content from any location.
Troubleshooting.
If you are experiencing a failed connection to the Emby Server, here are some troubleshooting steps you can follow:
- Ensure that the Emby Server is running and accessible. Sometimes restarting the Emby Server and Client can help resolve connection issues. In addition, ensuring both your Emby server and client software are up to date can help resolve failed connections. As a good practice, if you are accessing Emby Server through a web browser, clear the cache and cookies of your browser.
- Verify your network connectivity. If both the Emby Client and the Emby Server are on the same network, simply ensure they are accessible. However, if they are on different networks (such as a remote network), ensure you are using the correct server IP and port, check firewall and router settings (check for rules and port forwarding), and check or try updating your DNS settings.
- Dynamic DNS or Static IP are recommended. If you want to access your Emby server remotely and you have a dynamic IP address from your ISP, you’ll have a hard time connecting to your server. We recommend using a DDNS service. Also, if you have a static IP address, you can use that directly without the need for DDNS.
- Check firewall and router settings: Emby Server uses specific ports for communication. Ensure that your firewall or network router is not blocking the required ports. The default port for the Emby Server is TCP port 8096. Verify that the necessary port is open and forwarding correctly if you are accessing the server remotely.
Controlling and Streaming Media to Various Devices with Emby:
Now, that you have installed the Emby Server correctly, configured media libraries, and connected your Emby clients to the Server successfully, you can now stream media to each of these clients. To do this, follow these steps:
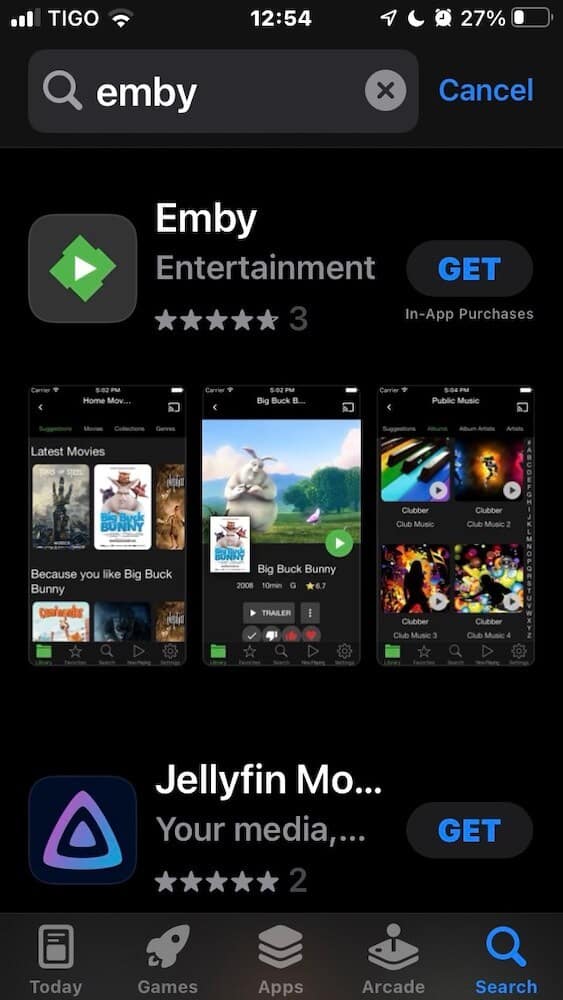
- Ensure your playback device is running the Emby client software. Keep in mind that Emby apps are available for a wide range of platforms, including smartphones, tablets, smart TVs, streaming devices, and web browsers.
- Below is an example of the Emby iOS (iPhone) app.
- Open the Emby app on your device, and during the initial setup, you’ll be prompted to connect to your Emby Server. Enter the server’s IP address or domain name, along with your login credentials.
- The app will establish a connection with your server.
- Once connected, you can browse and access your media libraries from the Emby app. You can stream movies, TV shows, music, and photos directly to your device. Emby supports various streaming protocols, ensuring compatibility with different devices.
7. Personalizing Your Entertainment Experience with Emby:
a. User Profiles.
Emby allows you to create individual user profiles for each member of your household. Each user can have their own customized media libraries, watch history, playback settings, and parental controls.
To create a new user:
- Open Emby Server Settings (1) > navigate to “Users” (2). This is where you can manage user profiles. Click on “+ New User” (3).

- Provide the necessary information such as username, password, and any additional details you want to include.
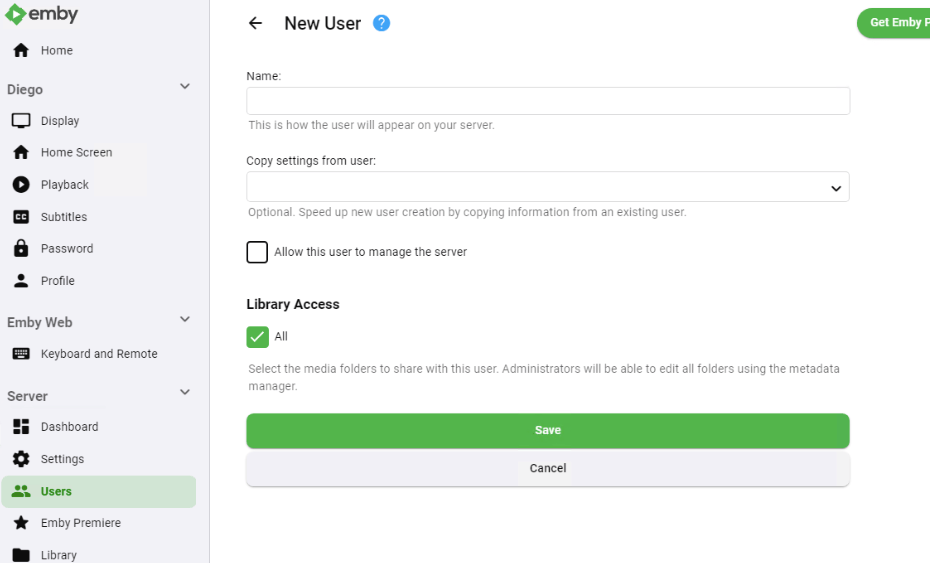
- Once the user profile is created, you can customize the user further. This includes setting up media libraries specific to the user, configuring watch history, playback settings, and more.

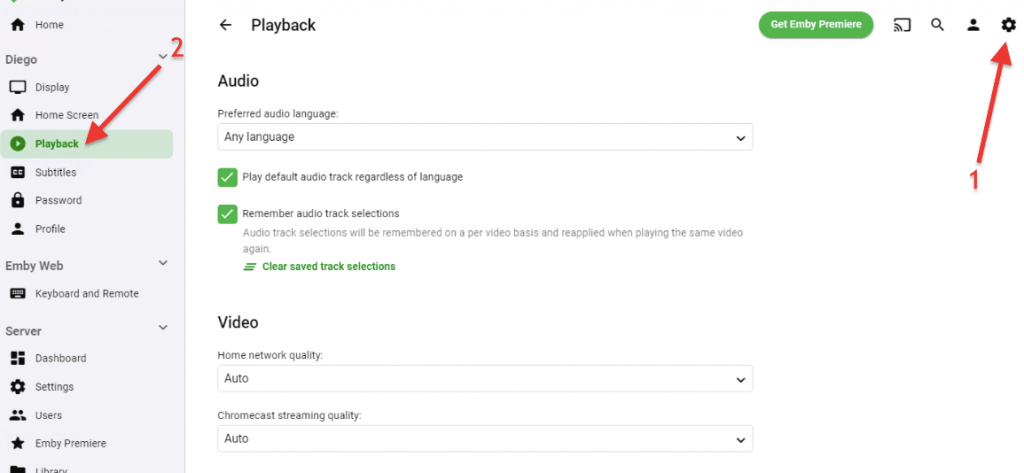
b. Playback and Subtitle Settings (Local and Global):
Emby offers a range of playback and display settings so that you can personalize your viewing experience. You can adjust subtitles, audio tracks, video quality, and display options to suit your preferences. Keep in mind that these playback settings are local (meaning that server managers and users can both adjust).
- Look for the settings menu (1) > navigate to the “Playback” section (2), under your Emby account name. On playback settings, you can adjust configurations related to playback, such as audio tracks, video quality, and streaming options.
- To adjust subtitles for the local account, go to Settings (1) > and find Subtitles (2) under your Emby account name. In the subtitle menu, you’ll be able to configure options like preferred subtitle language, subtitle mode, appearance, etc.
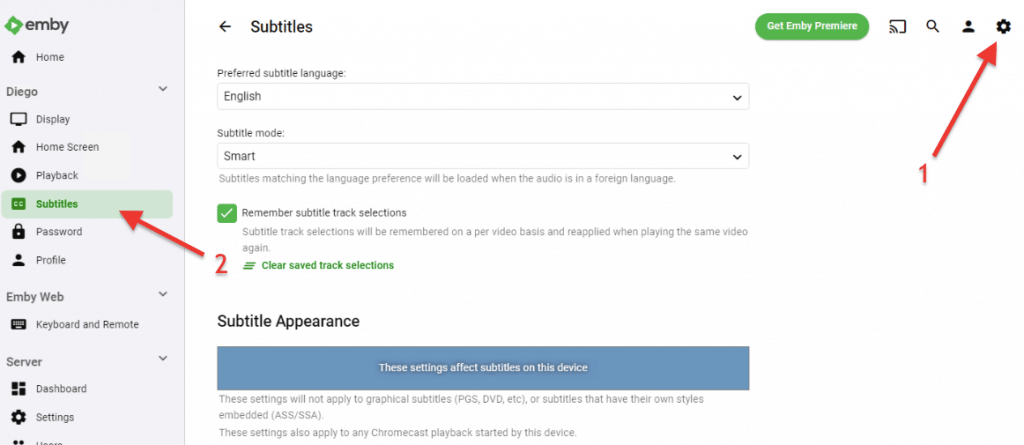
Adjusting Global Subtitles.
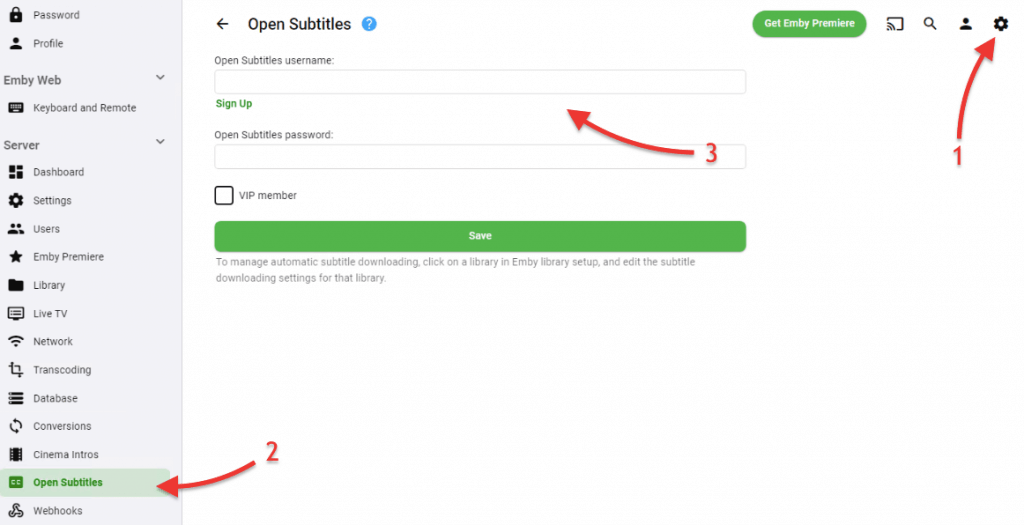
Emby allows you to manage automatic subtitle downloads. It supports Open Subtitles as its main source of subtitle data. The following subtitle settings are global; they will affect all server users.
- Go to Settings (1) > Open Subtitles (2), under the Server menu, and Enter your Open Subtitle credentials (3) > Hit on “Save”.
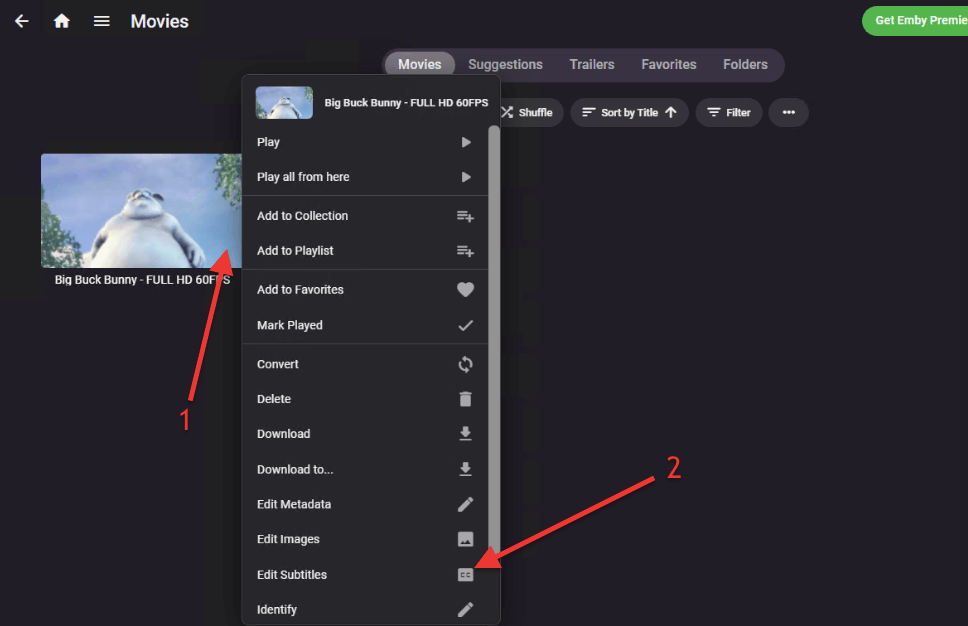
- Now, anybody (server manager and users) can easily click on a specific media file— the three dots on the bottom right of the movie poster (1) and search for and edit the subtitles (2).
8. Advanced Emby Configurations.
a. How to install a plugin on Emby?
Emby supports various plugins that aim to improve its functionality and add features. Finding and installing those plugins (via Emby’s Plugin catalog) that cater to your specific needs, is quite easy. For instance, you can find plugins such as subtitle downloaders, metadata providers, or channel plugins for live TV integration.
- Go to Emby Settings (1) — the gear icon on the top right > Click on (2) Plugins (Under the Advanced menu) > On the Plugins window, you’ll find “My Plugins” and “Catalog” (3).
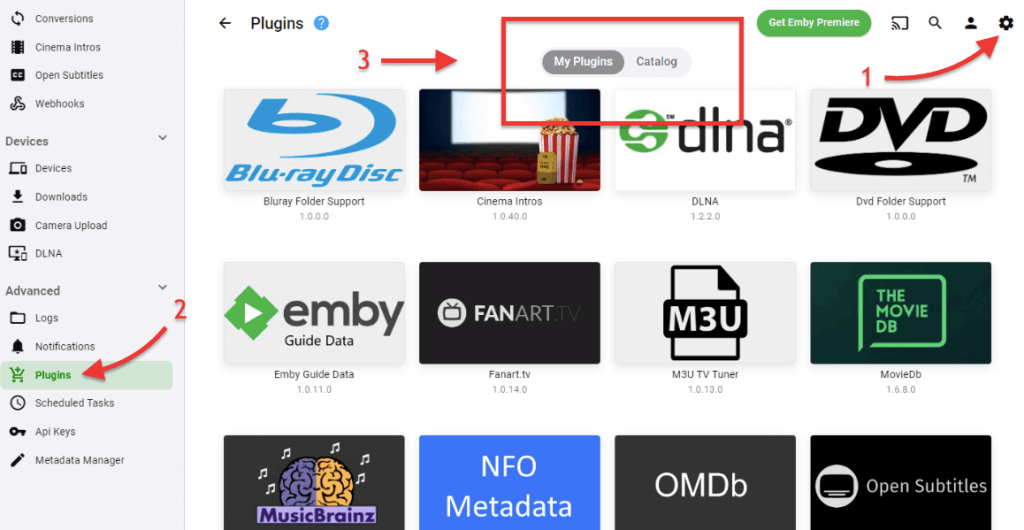
- To install a new plugin in Emby, go to Plugin Catalog.
- In the Plugin Catalog, you can explore the available plugins. Use the search bar or browse through different categories to find the plugin you are looking for.
- Once you find the plugin double-click on it. This will take you to the plugin’s details page.
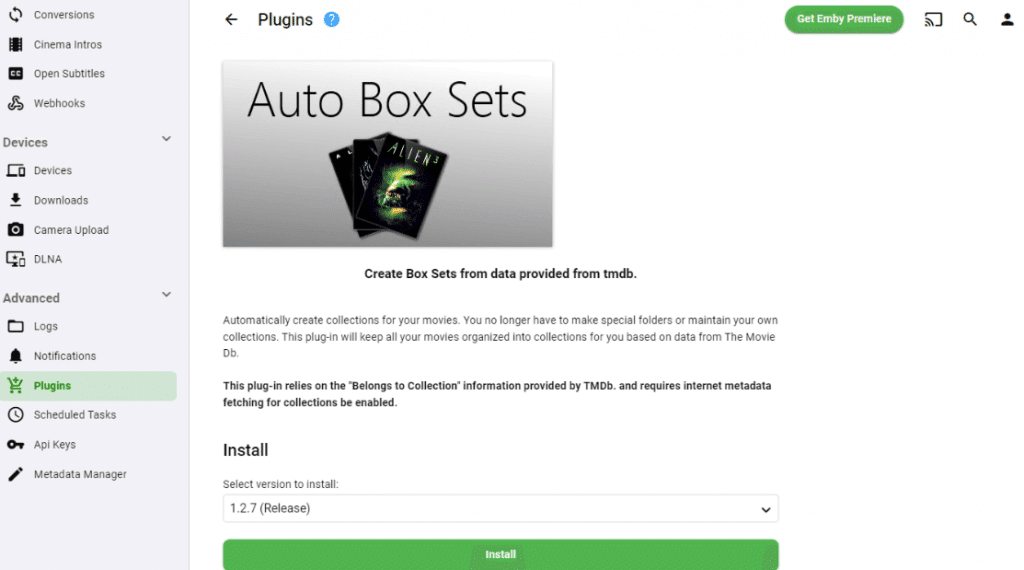
- On the details page, click the “Install” button.
- Follow the on-screen instructions to complete the installation.
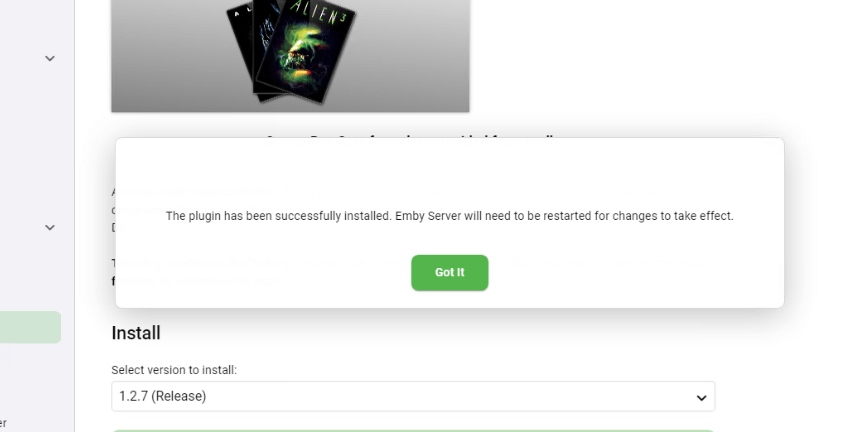
- In some cases, a plugin installation may require a server restart to take effect. If prompted, restart the Emby Server to ensure the plugin is fully integrated.
- After the installation, you may need to configure the plugin settings. This can usually be done within the plugin’s section in the Emby Server dashboard. Refer to the plugin’s documentation or instructions for specific configuration steps.
b. Configuring Transcoding.
Emby provides powerful transcoding capabilities to convert media files into a compatible format on the fly. Transcoding allows smooth streaming and playback on devices that may not support certain formats ‘natively’. This feature is key to ensuring compatibility across different devices and network conditions.
To configure certain parameters of transcoding:
- Go to Settings (1) > Transcoding (on the Server menu) > and check all your options.
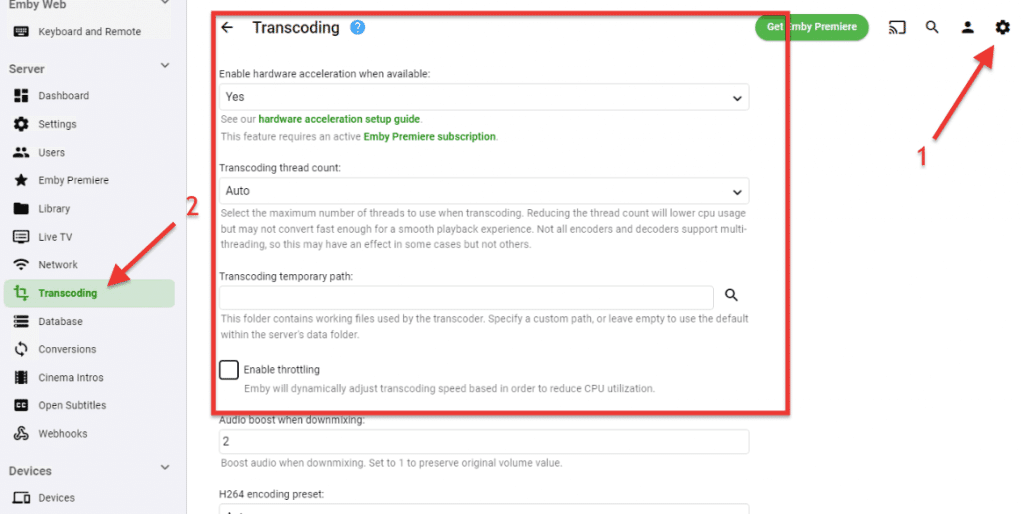
Here’s a brief explanation of some of the most relevant transcoding configurations.
- Enable hardware acceleration when available: This option allows Emby to use hardware acceleration for transcoding (if supported). Keep in mind that this requires an active Emby Premiere subscription.
- Transcoding thread count: A higher thread count can improve conversion speed but may increase CPU usage.
- Transcoding temporary path: Specifies the folder for temporary files used by the transcoder. The default path is within the server’s data folder.
- Enable throttling: Emby dynamically adjusts transcoding speed to reduce CPU utilization.
- H264 encoding preset: Choose a faster preset for better performance or a slower preset for better quality during H264 encoding.
- Enable HDR tone mapping: Enables correct color conversion for transcoding HDR content. This feature requires additional driver components and an active Emby Premiere subscription.
We recommended checking the official Emby documentation for more detailed information and specific configuration steps.
c. How to integrate Emby with *arr apps like Sonarr or Radarr?
Radarr and Sonarr (and other similar apps) come with a feature that allows you to send notifications to Emby when new movies are added to your Radarr/Sonarr library. This integration helps keep your Emby server in sync with the movies you’re managing in Radarr or Sonarr. So instead of having to manually add new movies or TV series to Emby, the integration with Radarr automates the process. It ensures that your media server stays up to date with the latest movies or TV shows you’ve added in Radarr or Sonarr.
To integrate your Emby with *arr apps like Sonarr or Radarr, follow these steps:
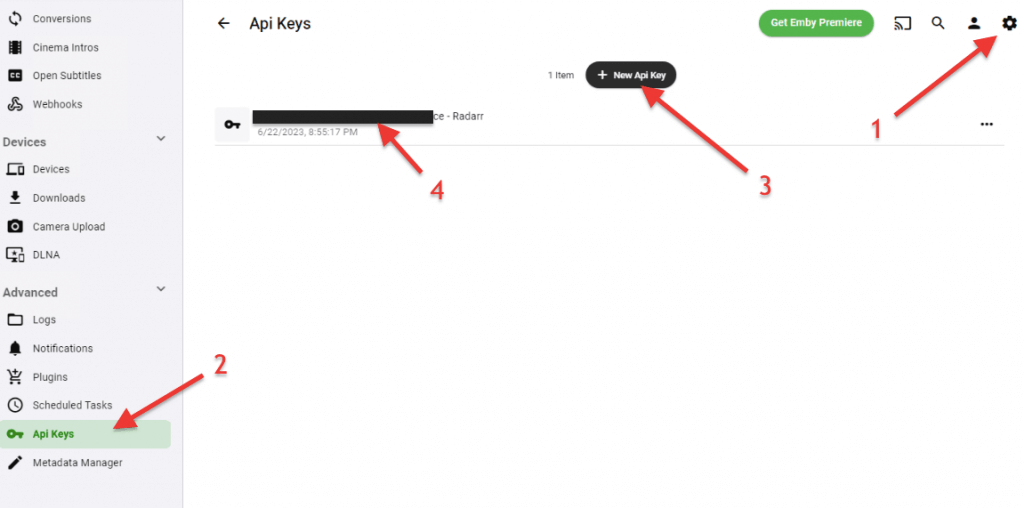
- First, create an API key on Emby, which will be specific for Radarr or Sonarr. Go to Emby’s settings (1) on the top right gear > go to API Keys (2), on the bottom “Advanced” menu > Click on “+ New API Key” (3).
- This will generate a new API key. Give it a name, for example, “Radarr” and copy it (4).
- Now, ensure that your Sonarr or Radarr is configured correctly and reachable from the Emby server.
- As an example, to integrate Radarr with Emby, go to Radarr > Settings (1) > “Connect” (2).
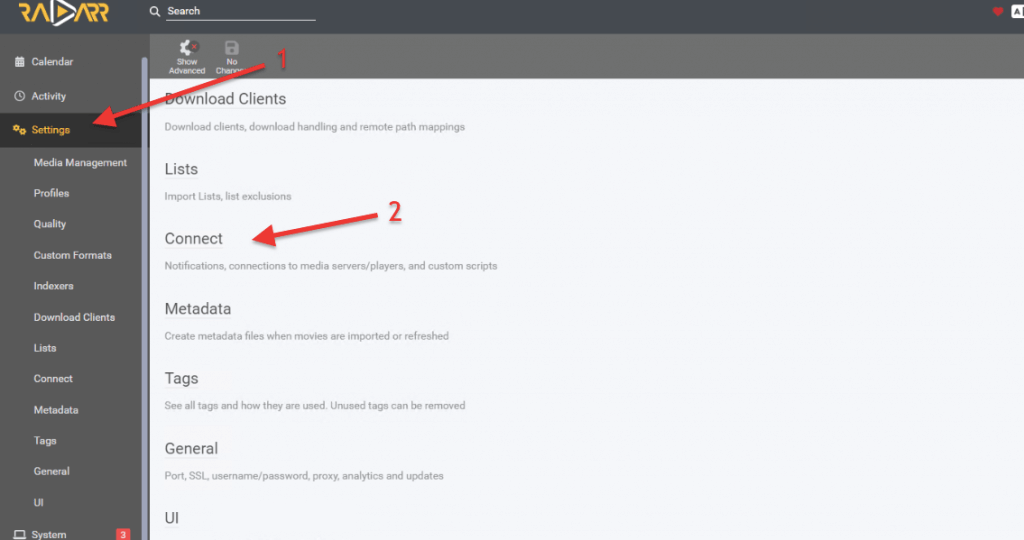
- Click on the + button > on the “Add Notification” > find the Emby Server (labeled Emby/Jellyfin)
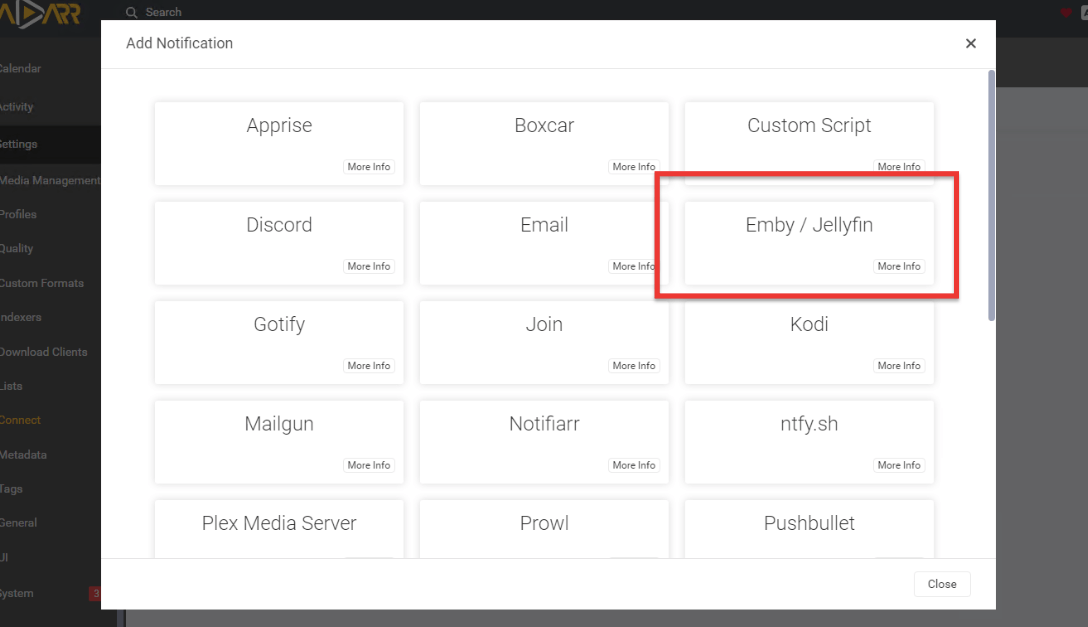
- On the “Add Connection – Emby / Jellyfin” > enter your Emby Server connection details such as host, port, whether you are using SSL, API (which you copied initially), and click on “Test.”
- If you see the green check, it means your configuration was successful.

- Click on “Save” and go back. You should now see your new Emby connection established.

To learn more about Radarr and Sonarr check the following complete guides.
9. Emby: Frequently Asked Questions (FAQ)
Emby Connect is a free feature that allows you to access your Emby server remotely over the internet. To set up Emby Connect, create a free Emby account and sign in to your Emby server. Once you create an account, you can give it to an Emby admin to manage the server.
Jellyfin and Emby are siblings – both are media server solutions coming from the same “source code”. Both platforms offer similar functionalities for organizing and streaming media but have many differences. They differ in their underlying technologies and licensing. On the one hand, Emby is a closed-source media server with additional premium features available through Emby Premiere subscription. Jellyfin, on the other hand, is an open-source media server that is free to use and does not offer premium features.
Both Emby and Plex are popular media solutions that offer closed-source, cross-platform functionality. While their pricing is similar, with Plex having a notably lower yearly subscription cost, there are distinct differences between the two. Plex stands out for its user-friendly interface, easy installation process, visually appealing GUI, and broad compatibility. On the other hand, Emby excels in customization options, allowing users to personalize their experience through an extensive add-on catalog and third-party plugins.
Emby Theater is a client-based application that allows you to access and stream media from your Emby server. It is explicitly designed for Windows-based devices. The highlight of this Premium-based feature is that it provides a user-friendly interface optimized for media playback. It gives you access to your favorite shows, movies, and live TV. Emby Theater provides fast browsing, powerful search, and content discovery.
To streamline the discovery and management of media content in Emby, you can use Ombi. Ombi is a complementary application that integrates quite well with Emby, allowing users to submit requests for specific movies, TV shows, or music. As the Emby administrator, you can review and approve these requests, and Ombi can automate the process of searching and adding the requested media to your Emby library. This integration enhances the user experience and simplifies the management of media content in Emby.
To integrate your IPTV service provider with Emby Live TV, you can use an M3U proxy server such as xTeVe that acts as a bridge between the two. This proxy server allows Emby to access the IPTV channels and program guide information, enhancing your live TV experience within the Emby media server.
Final Words.
As we conclude this Emby guide, we hope you’ve gained valuable insights into harnessing the power of this media solution. With this knowledge in your hands, you will revolutionize your media streaming and organization.
Remember to explore the FAQ section for any lingering questions you may have. Now, it’s time to unleash your inner Emby pro and enjoy a seamless and customized media journey.
Great article, I needed some brushing up as it has been a few years since I’ve been down this rabbit hole. Thanks Diego!
Perdona que te moleste, Diego.
Un fantástico artículo.
Acabo de cambiar el Smart TV, LG, como el anterior, y al intentar añadir el servidor de EMBY el TV me dice que debo actualizarlo pero en el TNAS, que es donde se encuentra el servidor, me dice que está actualizado.
Alguna sugerencia?
Gracias.
Hola Carlos,
Si puede conectarse a su servidor Emby desde otros dispositivos, la causa probablemente sea un problema con el certificado de seguridad de su nuevo televisor. Una posible solución es intentar ver si hay una nueva versión de firmware para su televisor LG. Eso puede resolver su problema de conexión. ¡Espero que esto ayude!
Hola! Perdona, no veo cómo eliminar definitivamente una cuenta de Emby. A ver si me puedes ayudar. Gracias.
Hola Wen, para eliminar tu cuenta de Emby, haz clic en tu nombre, ve a la configuración de la cuenta y selecciona la última opción, “Eliminar mi cuenta”.
Buenas tardes, tengo Emby en el móvil y al ponerlo en la TV con fire TV me dice que he superado el límite de dispositivos de Premiere. Me dice que adquiera el desbloqueo de la aplicación desde el menú de usuario en la pantalla de inicio, al entrar y desbloquear me pide pagar unos 5€, por lo que te go entendido no hay que pagar nada más.
Alguna sugerencia? Gracias
Hola Diego, Emby limita la cantidad de dispositivos que puedes usar de forma gratuita. A menos que estés dispuesto a pagar por Emby Premiere, es posible que debas considerar una alternativa.
I have read so many content on the topic of the blogger lovers but this piece of writing is really a fastidious piece of writing, keep it up.
Thanks a lot, Medi! Really appreciate the kind words — glad this one stood out for you. Let me know if there’s a topic you’d like to see next! 🙌
hi…how to change the emby logo, my email [email protected],How much would it cost for you to fix another logo for me?
Hi Glaucio Fernando C.! Thanks for reading our Emby guide.
To change the Emby logo, you usually need to replace the default image file in your Emby server’s installation directory.
The exact steps depend on whether you’re using Windows, Linux, or Docker. If you’d like, we can help guide you through it.
Hola, muchas gracias por su ayuda. Eh aprendido muchas cosas. Lo que no encuentro es sobre las instancias en Emby.
Hola Yony…
Excelente sugerencia para el proximo update de este articulo.