How to SSH to a IPv6-enabled server? How to configure SSH (on your server or computer) to accept IPv6 connections? These are SSH Client and Server questions that we’ll answer in this guide.
In a nutshell: To SSH to IPv6, (on any UNIX-based system) use the following command:
| ssh username@your_server_ipv6 |
But there is more than just this simple command.
To learn more continue reading.

This article will walk you through setting up SSH and IPv6 (in Ubuntu Linux), so you can have secure and efficient network communication. We’ll cover everything from installing and configuring SSH to enabling IPv6 and managing network configurations. We’ll also go over some common SSH commands for IPv6 networks, a quick rundown into how to do it in other systems and give you some troubleshooting tips to help you deal with any problems that come up.
Table of Contents
- Setting Up SSH and IPv6 on Ubuntu
- Installing SSH Server
- Configuring SSH
- Connecting to the Server via SSH
- Enabling and Configuring IPv6 on Ubuntu
- Checking Kernel IPv6 Configuration
- Configuring IPv6 Networking
- Security and Network Configuration for SSH IPv6 Setup
- Common SSH Commands and IPv6 Network Management
- Basic SSH Commands
- Basic SSH IPv6 Commands
- Advanced SSH Commands
- SSH to Ipv6 into Other Systems
- SSH IPv6 Configuration in Cisco Devices
- SSH IPv6 in Windows and PowerShell.
- SSH IPv6 on macOS.
- Troubleshooting FAQ
- Final Words.
1. Setting Up SSH and IPv6 on Ubuntu
Setting up Secure Shell and IPv6 on Ubuntu involves a few critical steps to ensure secure and efficient network communication. Below is a comprehensive guide detailing each step, including configuration and commands.
a. Step 1: Install SSH Server
- Open your terminal and update your package list with:
| sudo apt update. |
- Install the OpenSSH server with (if it is already installed, you’ll be informed here):
| sudo apt install openssh-server |

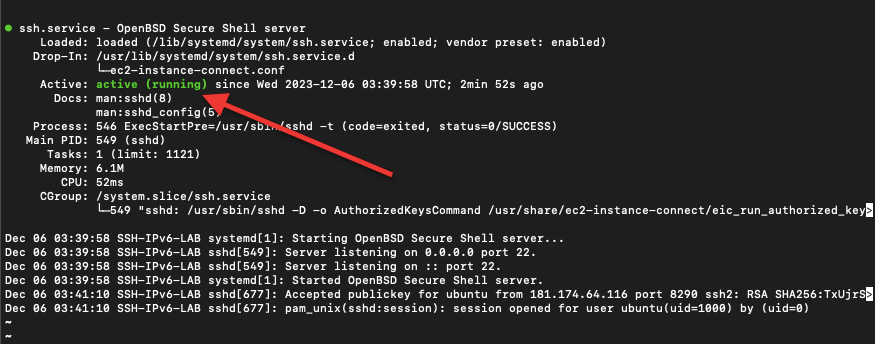
- Once installed, the SSH service should start automatically. To check its status, use:
| sudo systemctl status ssh |
b. Step 2: Configure SSH (Optional)
- The main configuration file for SSH is /etc/ssh/sshd_config. Make a backup before editing:
| sudo cp /etc/ssh/sshd_config /etc/ssh/sshd_config.bak |
- Open the file for editing with:
| sudo nano /etc/ssh/sshd_config (or sudo vi /etc/ssh/sshd_config) |
- You can make several changes here, such as:
- Changing the default SSH port (Port 22) to a custom one for added security.
- Disabling root login by setting PermitRootLogin no.
- Restricting SSH access to specific users with AllowUsers username.
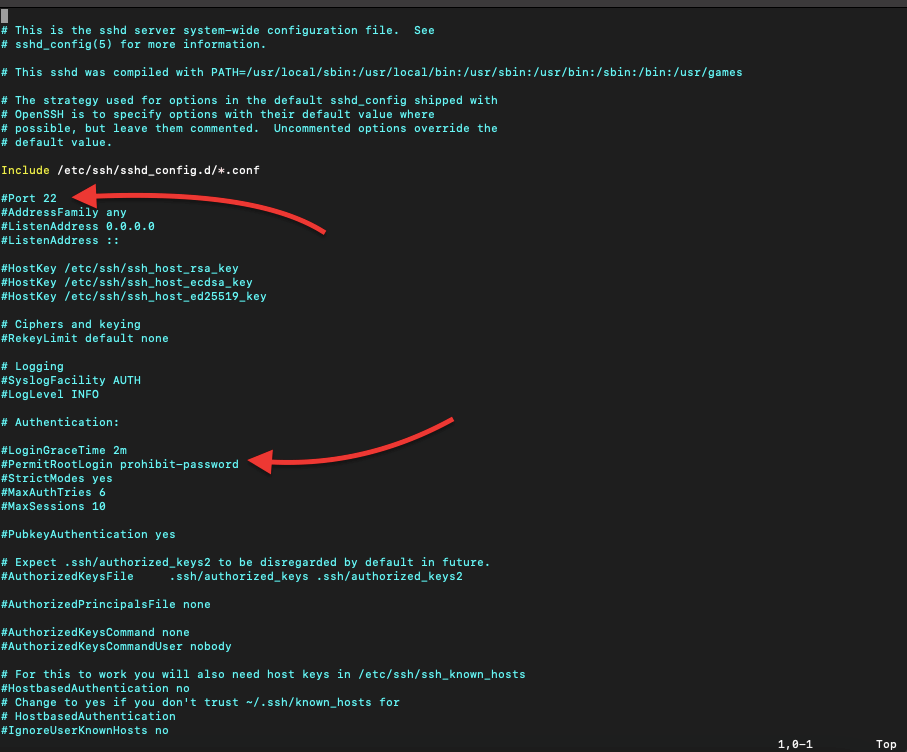
- After making changes, save and exit the editor (CTRL+X, then Y, then Enter).
- Restart the SSH service to apply changes:
| sudo systemctl restart ssh |
c. Step 3: Connect to Your Server via SSH
- From another machine, use:
| ssh username@your_server_ip |
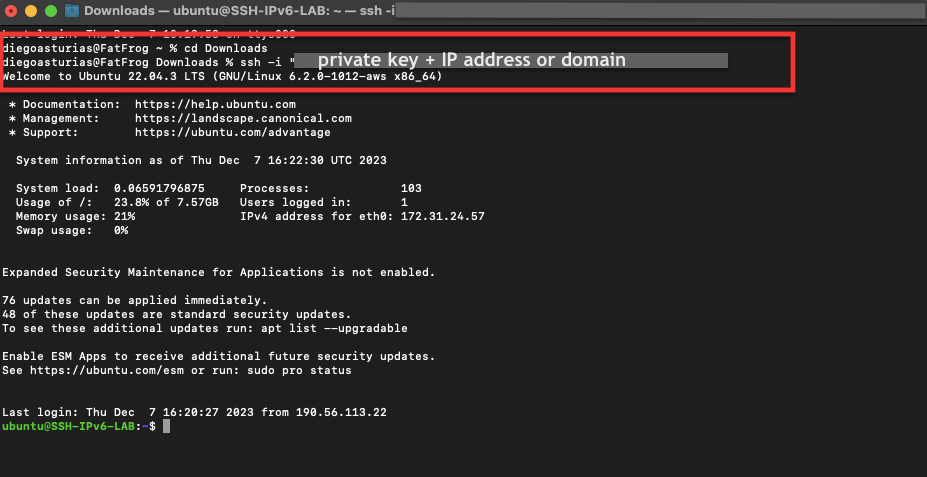
- For example, from our macOS machine, we will ssh into our “IPv6-SSH-LAB” Ubuntu Linux machine (which is really an AWS EC2 located remotely in the U.S.)
- We will use the default ‘ubuntu’ username and the server domain name. Plus for security reasons (instead of using a password) we are using a private key file, which is located on our local computer.
- First, locate on the same folder where the private key is, and then execute the following command:
| ssh -i “name_of_private_key.pem” username@domain_of_server |
Note: The -i option in the SSH command specifies the identity file (private key) used for the connection. So, use this option, only when you are using a private key file to ssh to an IPv6, IPv4 or domain.
We have the protocol configured in our server, but IPv6 is likely not enabled or even configured. We’ll do this in the next section.
2. Enabling and Configuring IPv6 on Ubuntu
This section will walk you through enabling and configuring IPv6 on Ubuntu. We’ll cover how to check and enable IPv6 in the kernel, set up IPv6 networking, and implement key security measures for a secure network configuration. The following steps will ensure your server is IPv6-ready and secure.
a. Step 1: Ensure IPv6 is Enabled in the Kernel
NOTE: It’s also important to note that even if IPv6 is enabled at the kernel level (which is often the default in modern Linux distributions), it still requires proper network configuration and an IPv6 address from your network or ISP to be fully operational.
- Check if IPv6 is enabled with cat /proc/sys/net/ipv6/conf/all/disable_ipv6.
- If it returns 0, IPv6 is enabled.
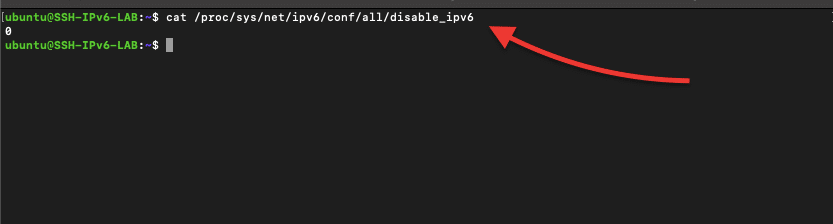
- If it returns 1, IPv6 is disabled.
- Enable it by editing /etc/sysctl.conf:
| sudo nano /etc/sysctl.conf (or sudo vi /etc/sysctl.conf) |
- Add the following lines at the end of the file:
| net.ipv6.conf.all.disable_ipv6 = 0 net.ipv6.conf.default.disable_ipv6 = 0 |
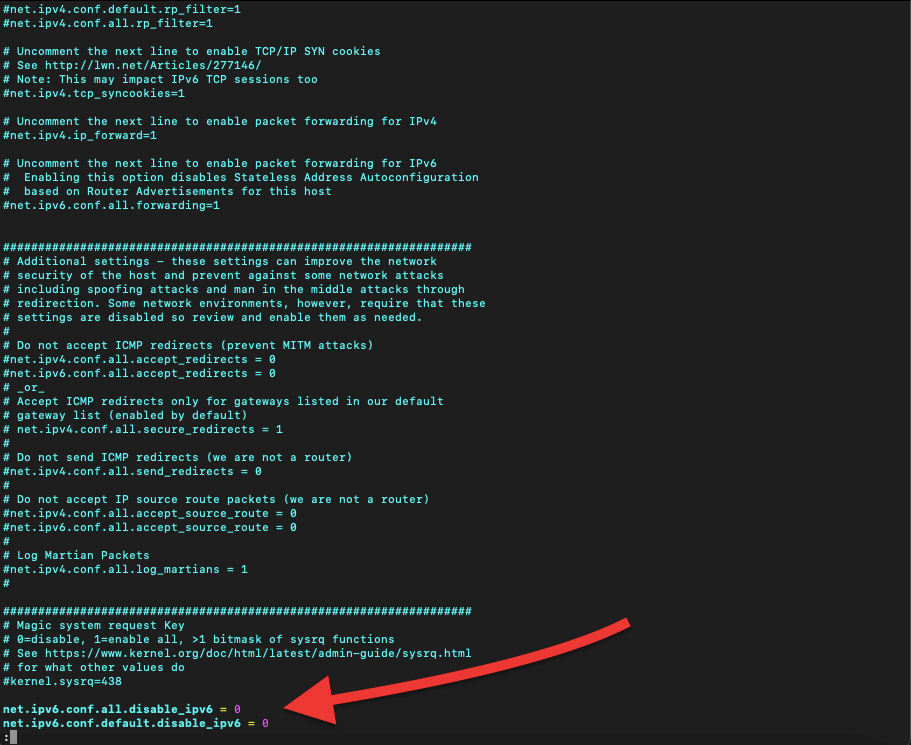
- Save and exit the editor.
- Apply changes with:
| sudo sysctl -p |
b. Step 2: Configure IPv6 Networking
- Open the network interface configuration file:
| sudo nano /etc/network/interfaces (or sudo vi /etc/network/interfaces) |
- You may see your IPv4 settings under iface eth0 inet dhcp (or similar).
- For static IPv6, add the following (replace with your details):
| iface eth0 inet6 static address YOUR_IPV6_ADDRESS netmask YOUR_IPV6_NETMASK gateway YOUR_IPV6_GATEWAY |
- For DHCPv6, simply add:
| iface eth0 inet6 dhcp |
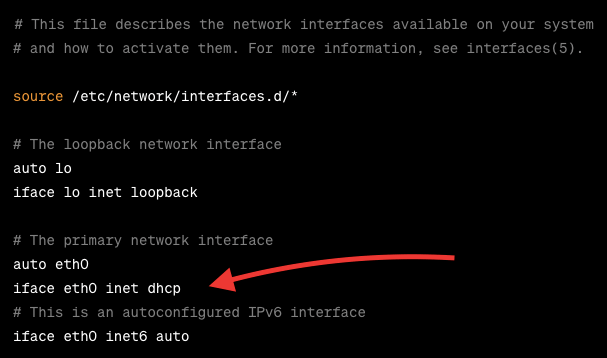
- Save and exit the editor.
- Restart the networking service:
| sudo systemctl restart networking |
Want to learn more about DHCPv6? Check our absolute guide to DHCPv6.
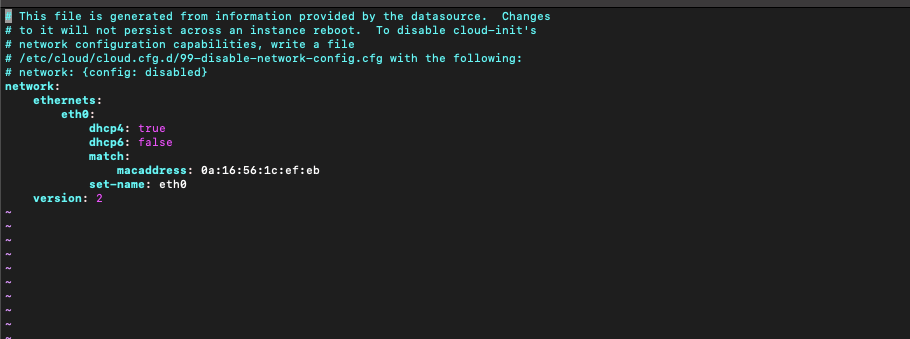
Note: If you are using a modern Ubuntu system, especially anything running Ubuntu 16.04 LTS and later, network configuration is typically handled by netplan, instead of the traditional /etc/network/interfaces file. The netplan configuration files are usually located in /etc/netplan/. The filenames can vary but often end in .yaml. And edit the Netplan configuration using any text editor.
c. Step 3. Consider security and network configuration for your SSH IPv6 setup.
When you’re setting up SSH and IPv6 on your server, it’s important to make sure you have strong security measures and efficient network configurations in place.
This step will focus on best practices for improving the security of your setup, as well as ensuring your network runs smoothly. Consider these, as guidelines or best practices that will help you protect your server from potential threats and ensure your network performs reliably.
- Regularly Update Software: Keep your Ubuntu server updated with ‘sudo apt update && sudo apt upgrade’.
- Use Key-Based Authentication: For SSH, prefer key-based authentication over passwords for added security.
- Firewall Configuration: Set up a firewall (like UFW) to control incoming and outgoing traffic.
- Monitor Logs: Regularly check logs in /var/log/auth.log for SSH and /var/log/syslog for general system activities.
- Disable Unused Services: Disable any services or ports that are not in use.
- Regular Backups: Ensure you have a backup system in place for your configuration and critical data.
By following these steps, you can effectively set up SSH and IPv6 on your Ubuntu server, ensuring both a secure and efficient network configuration.
Dive into the future of SSH connections with IPv6 at RapidSeedbox. 🚀
Enhanced SSH Security with IPv6.
Hassle-Free Global Connectivity.
24/7 Expert Support.
Flexible Hosting with LOA.
Clear Pricing & 48-hour refund.
Ready to Upgrade?
————
3. Common SSH Commands and IPv6 Network Management
a. Essential SSH commands for managing Linux servers.
Working with Linux servers often involves using SSH for remote management. Here are some common SSH commands that are essential for server management:
a.1 Basic SSH Commands
The following are basic ‘everyday’ SSH commands that will allow you to connect to a server, copy files to and from it (using the SCP protocol), and securely transfer files or directories (using the SFTP protocol).
- Connect to a Server.
| ssh username@server_ip |
- Copying Files to the Server:
| scp /path/to/local/file username@server_ip:/path/to/remote/directory |
- Copying Files from the Server:
| scp username@server_ip:/path/to/remote/file /path/to/local/directory |
- Securely Transfer Files/Directories: Use the following command.
| sftp username@server_ip |
a.2 Basic SSH IPv6 Commands:
When working with IPv6, the commands are fundamentally the same, but you need to correctly format IPv6 addresses. Here’s how you can adapt the previously shown SSH commands:
- Connect to a Server Using IPv6 via SSH:
| sftp username@server_ip Example: ssh username@[2001:0db8:85a3:0000:0000:8a2e:0370:7334] |
- Copying Files to and from the Server Using IPv6:
| To Server: scp /path/to/local/file username@[ipv6_address]:/path/to/remote/directory From Server: scp username@[ipv6_address]:/path/to/remote/file /path/to/local/directory |
- Securely Transfer Files/Directories Using IPv6:
| sftp username@[ipv6_address] |
a.3 Advanced SSH Commands
SSH offers more than just basic connectivity for sophisticated server management. It can also generate SSH keys for secure access without passwords, copy those keys to your server for easy login, execute commands remotely, and set up tunneling or port forwarding for secure data transmission.
These advanced commands enhance security and give you more ways to interact with your servers.
- SSH Key Generation:
| ssh-keygen -t rsa |
- Copy SSH Key to Server:
| ssh-copy-id username@server_ip |
- Execute a Remote Command:
| ssh username@server_ip ‘command’ |
- SSH Tunneling/Port Forwarding:
| Local: ssh -L local_port:destination_server_ip:remote_port username@ssh_server_ip Remote: ssh -R remote_port:local_server_ip:local_port username@ssh_server_ip |
b. Additional SSH IPv6 Tips
You can define an Internet Protocol v6 address in your SSH config file (~/.ssh/config) for easier connection management. This file might not exist by default, but you can create it or edit it if it’s already there.
- In the editor, you can define an entry for your server using its IPv6 address. Here’s an example:
| Host myserver HostName 2001:0db8:85a3:0000:0000:8a2e:0370:7334 User username |
- Save and Close the File.
Note: You can add several additional directives in the SSH config file (~/.ssh/config) to streamline your connection settings, including specifying a private key file (which we previously used to connect to our SSH server). However, it’s important to note that you cannot directly specify passwords in the SSH config file for security reasons. SSH is designed to discourage the hardcoding of passwords and encourages more secure methods like key-based authentication.
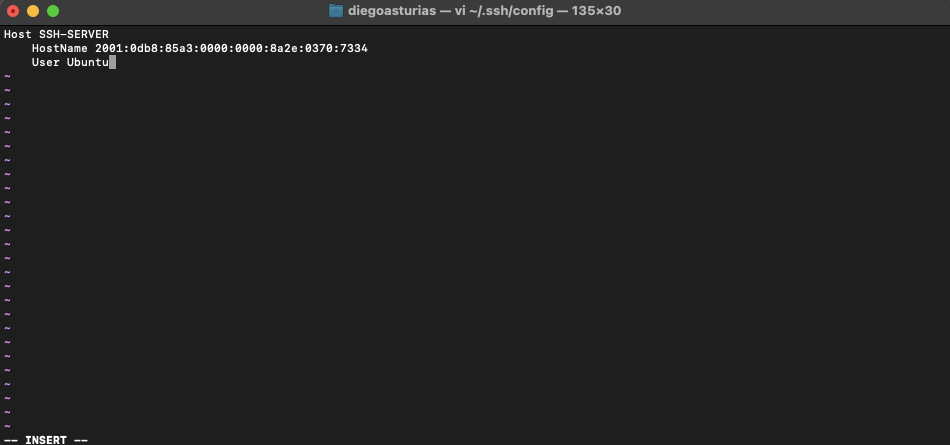
- Replace ‘myserver’ with a nickname for your server, 2001:0db8:85a3:0000:0000:8a2e:0370:7334 with the actual IPv6 address of your server, and username with your SSH username on that server.
- Remember, you can compress IPv6s to make them easier to remember and write (IPv6 Compression Rules)
- Connect to the Server: Now, you can connect to your server simply by typing: ssh ‘myserver’ or in our case ssh SSH-SERVER
Note 1: If you’re using scripts to automate tasks (such as, SSH IPv6 automatically), make sure you handle and format IPv6 addresses properly.
Note 2: Ensure that your firewall is configured to allow SSH traffic over IPv6 if you’re operating in a dual-stack environment.
4. Setting SSH for IPv6 On Other Systems.
This section will go over the ins and outs of configuring SSH over IPv6 on various platforms, including Cisco devices, Windows systems (with PowerShell), and MacOS.
a. SSH IPv6 Configuration in Cisco Devices
Cisco provides strong support for IPv6 across its devices. Configuring SSH for IPv6 on Cisco routers and switches is a key step in ensuring secure remote management in a modern network. Here is a quick guide on how to configure SSH IPv6 for Cisco.
Note: Before configuring SSH, it’s essential to enable IPv6 on your Cisco device. This can be done using the ‘ipv6 unicast-routing’ command in the global configuration mode.
- Setting Up SSH for IPv6:
- To enable SSH on a Cisco device, you first need to set the hostname and domain-name.
- Generate RSA keys which are required for SSH using the ‘crypto key generate rsa’ command.
- Enable SSH and specify which version (preferably version 2) using the ‘ip ssh version 2’ command.
- Configure the ‘line vty’ settings to use SSH and specify the IP address access.
- SSH Access via IPv6 Address:
- Assign an IPv6 address to the device interface and ensure it’s reachable over the network.
- Connect to the Cisco device using an SSH client, specifying the IPv6 address.
b. SSH IPv6 in Windows and PowerShell.
SSH to IPv6 is not just for Cisco or Linux devices. As the adoption grows, Windows users, from network admins to developers, will also need to know how to use SSH over this protocol. Plus with PowerShell, an invaluable tool for scripting and automating network tasks, you can automate and manage SSH connections, seamlessly.
b.1 Running SSH IPv6 in Windows.
- Windows SSH Client:
- Modern versions of Windows 10 and Windows Server come with a built-in SSH client, allowing users to establish SSH connections using IPv6 addresses easily.
- To use SSH, open PowerShell or the Command Prompt and use the standard SSH syntax, specifying the IPv6 address in brackets, like “ssh username@[IPv6_Address].
- Third-Party SSH Clients: For a more feature-rich experience, third-party clients like PuTTY can be used. PuTTY supports IPv6 addresses, allowing connections to SSH servers configured with IPv6.
- Network Configuration for SSH over IPv6: Ensure that your Windows machine is correctly configured for IPv6. This includes having a valid address and ensuring that your network and firewall settings allow SSH traffic over IPv6.
b.2 Use PowerShell to manage SSH IPv6 connections.
- PowerShell SSH Module: Windows PowerShell 6.0 and above has native support for SSH-based remoting. This means you can use PowerShell to establish SSH connections, including Internet Protocol v6 addresses.
- Scripting SSH Connections: PowerShell can be used to script the SSH connection process to devices with IPv6 addresses. This includes automating login procedures, executing remote commands, and handling data retrieval or configuration changes over SSH.
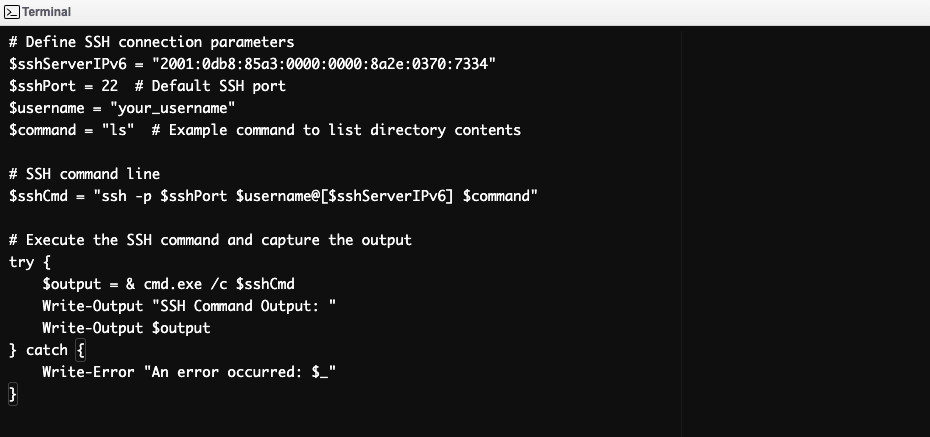
The below is an example of a PowerShell Script for this purpose. This PowerShell script automates an SSH connection to a server using an IPv6 address. It constructs and executes an SSH command, runs a specified command, and captures the output. The script is designed to work in environments with passwordless SSH access.
c. SSH IPv6 on Mac
MacOS, known for its robust networking capabilities, also offers comprehensive support for SSH with IPv6.
- Use the Terminal for SSH IPv6 Connections: MacOS’s terminal can handle such connections natively, allowing for seamless sessions. The syntax is similar to other Unix-like systems: “ssh username@[IPv6_Address]”
- Configure SSH for IPv6:
- MacOS allows advanced SSH configurations through the ~/.ssh/config file. You can specify IPv6 addresses in this file for easy connection management.
- Advanced SSH settings, including key authentication and port specifications, can also be defined in this config file for Internet Protocol v6 connections.
- Network and Firewall Settings: To ensure successful connections over IPv6, verify that your Mac’s network is correctly set up for IPv6. Additionally, check the firewall settings to ensure that SSH traffic over IPv6 is not blocked.
5. Troubleshooting FAQ.
If you’re unable to connect using an IPv6 address, check that the server’s address is correctly configured. Additionally, both your client and server both support IPv6. Plus, ensure no firewall is blocking SSH traffic on IPv6. Furthermore, ensure the server is listening on the IP address (check with netstat -tuln | grep ssh).
This error usually indicates a routing problem. Ensure:
– Both client and server have valid IPv6 addresses.
– Your network is correctly configured for IPv6.
– There’s no IPv6 connectivity issue between the client and the server.
SSH timeouts can occur due to network issues or incorrect SSH configuration. To troubleshoot follow these steps on SSH client and server:
– Check your network’s IPv6 connectivity.
– Adjust the ServerAliveInterval in your SSH client configuration.
– Ensure the server’s SSH config (/etc/ssh/sshd_config) isn’t set to disconnect idle sessions too quickly.
SSH supports several encryption algorithms like AES, Blowfish, and 3DES for secure data transmission. Additionally, it uses RSA, DSA, and ECDSA for key exchange and authentication. For enhanced security, it’s recommended to use the Ed25519 algorithm for generating SSH keys.
Using SSH keys for authentication is safer and more convenient than passwords. SSH keys provide a more secure way of logging into a server and help automate the login process without sacrificing security.
On Ubuntu, edit the netplan configuration file (usually in /etc/netplan/) to add your IPv6 address, subnet, and gateway. Apply the changes with ‘sudo netplan’ apply, and ensure your server listens on the IPv6 address.
The “invalid argument” error typically occurs if the IPv6 address format is incorrect or improperly entered. Ensure that the IPv6 address is correctly formatted. For example: ssh username@[2001:db8::1234]. Also, verify that the address is valid and assigned to the host you are trying to connect to.
The “no route to host” error indicates a routing issue. Check your network configuration to ensure that the route to the IPv6 address of the server is correctly set up. Confirm that both your client and server have valid and reachable IPv6 addresses. Additionally, ensure that any intermediate routers or firewalls are configured to allow IPv6 traffic to the destination.
The “port 22: invalid argument” error typically suggests a problem with the SSH command format. This is particularly regarding how the IPv6 address is specified. Ensure that the address is correctly formatted and that there are no syntax errors in your SSH command. For example, the correct format is ssh username@[2001:db8::1234].
6. Final Words.
This guide has carefully introduced the fundamentals of SSH and IPv6 configurations, from the installation basics to the complex aspects of advanced setup. By following these practices, you will be able to, not only connect via SSH to your servers but also to create a robust and high-performing network infrastructure.
We hope you find this guide informative and useful. And remember the sky is the limit. So we have to keep on learning!
To expand your knowledge about IPv6 addressing, check the following blog posts with valuable and relevant information.
0Comments