NZBGet is one of the fastest and most lightweight Usenet downloaders available today. Whether you’re new to Usenet or optimizing your automation workflow, this guide covers installation, setup, NZB indexers like NZBGeek, and how to use NZBGet securely on any device.
For smoother downloads and privacy, pair NZBGet with a reliable seedbox to protect your IP and improve speed.

Disclaimer: This material has been developed strictly for informational purposes. It does not constitute endorsement of any activities (including illegal activities), products or services. You are solely responsible for complying with the applicable laws, including intellectual property laws, when using our services or relying on any information herein. We do not accept any liability for damage arising from the use of our services or information contained herein in any manner whatsoever, except where explicitly required by law.
Table of Contents.
- What is NZBGet?
- Features Summary
- NZBGet Setup.
- On a Seedbox.
- Windows Installation.
- Linux Installation.
- Mac Installation.
- Initial NZBGet Setup.
- Setting up Security.
- Setting up Usenet Servers.
- Finding your Usenet Server Details.
- Adding more servers.
- Use NZBGet to download NZB Files.
- How to Find NZB Files?
- Adding NZB files.
- Setting up the NZB Watch Directory.
- Merging NZB files.
- Keeping track of your downloads.
- Valuable NZBGet Integrations and Extensions.
- Valuable integrations.
- Integration with your Indexer via RSS
- Integration with your Automation tools (i.e Radarr)
- NZBGet: Frequently Asked Questions (FAQ.)
- Final Words.
1. What is NZBGet?
NZBGet is a lightweight, open-source NZB “binary” downloader that can run on various platforms, including desktops (Windows, Linux, BSD, Mac), mobiles (Android) routers, NAS devices, and media players. This open-source software (official website) is available on GitHub, where it is hosted, developed, and maintained.
2026 UPDATE! Software deprecated: The Latest software release (21.1) was on Jun 3, 2021
Although the software is deprecated, NZBGet is still a powerful and handy tool for downloading files from Usenet. It operates as a background process, accessible through a browser-based interface. This allows users to access it from mobile devices, tablets, and its host hardware, ensuring a consistent experience across all platforms.
Using the tool is straightforward. You can add NZB files from the interface, copy them to NZBGet’s incoming folder, or simply provide a URL for the program to download the desired files. The tool is optimized for speed, even on low-end devices (the developer claims it can run with less than 32MB of RAM).
While NZBGet is user-friendly for newcomers to newsgroups, its true value lies in its advanced features for expert users. Automation options include powerful RSS filters, an extensive range of customizable settings, and the ability to control every aspect of the program through an RPC API and personal scripts.
Unique Software Features Summary:
- High Performance: It is optimized for high performance. It uses efficient algorithms, avoids unnecessary calculations, and maximizes CPU power to ensure fast and reliable downloads. In addition, it can run on low-end devices with minimal resources.
- Multi-server Support: This binary downloader supports using multiple Usenet servers. You can configure and connect to multiple Usenet providers simultaneously. You can configure these servers with priority levels and introduce redundancy in your downloads.
- Fast Deobfuscation: This Usenet downloader can quickly restore original file names for obfuscated files downloaded from Usenet. This unique feature eliminates the need for using time-consuming external tools.
- Quick PAR-Verification: NZBGet is directly integrated with the PAR2 recovery algorithm. This algorithm helps skip the time-consuming verification step and directly starts the repair process. Overall, it saves time and improves efficiency.
- Retry Failed Articles: This Usenet downloader allows retrying failed downloads at the article level. Instead of starting the download from scratch, it re-downloads only the missing file pieces (articles).
- Post-Processing Scripting: With this feature, after completing the download, you can define custom scripts to automate various actions, such as renaming files, moving them to specific folders, extracting archives, and executing external programs.
- Full-Featured API: There is a comprehensive API. With this API, anyone can have access to its entire functionality. The API is not only for third-party developers but is also extensively used by NZBGet itself.
- RSS with Duplicate Check: It offers powerful RSS support for automating downloads. It allows filtering and customization based on various criteria. It can also handle duplicate downloads efficiently, manages failed downloads, and automatically falls back to alternative releases if necessary.
What is an NZB file and how it works?
An NZB file is an XML file that tells NZBGet where to find specific articles on Usenet servers.
Instead of downloading directly from websites, NZBGet reads these small NZB files and fetches the corresponding binaries (like videos or software) from Usenet providers.
Each NZB file contains message IDs – pointers to files stored across multiple servers. This system makes downloads faster and more reliable, especially when combined with automation tools.
2. Downloading and Installing NZBGet
In this section, we will go through the step-by-step process for downloading and installing NZBGet. We will focus on the installation of different operating systems, including Linux, Windows, and macOS.
Pro Tip! If you’re looking to take NZBGet to the next level, consider using a seedbox. A seedbox is a remote server specifically designed for high-speed downloading and uploading of digital files, including Usenet content like NZBs and torrents. By integrating a seedbox into your setup, you’ll unlock a world of benefits, including faster downloads, improved privacy, enhanced ratio maintenance, and the coolest additional features.
a. Running NZBGet on a Seedbox.
If you have an online VPS seedbox, you can leverage one-click apps and skip the entire installation. Plus running NZBGet on a Seedbox provides a powerful and dedicated environment for efficient downloading, secure operations, and seamless integration with other media management tools.
- If you have a seedbox from Rapidseedbox, we strongly recommend you run NZBGet using the One-Click apps. These are pre-configured applications that can be easily installed on the user’s seedbox with just one click.
- To do this, go to Rapidseedbox’s Client Area, and ensure your VPS Seedbox is updated.
- Open OCI installers on the left-hand menu and find NZBGet. Click on the gear icon on the right-hand side to install it.
- Go to “Installed apps,” and you should see the new app installed. Click on the key icon to see the credentials and URL. Copy the credentials (username and password) and URL.
- Open your web browser and enter the URL and credentials when asked.
- The seedbox’s NZBGet user interface will open. We will go through the configuration details in the later sections.
- For more, check out our tutorial and learn how to start with and use One-Click apps.
a. Windows Installation.
- Download NZBGet for Windows from the Official Download page or GitHub Repository
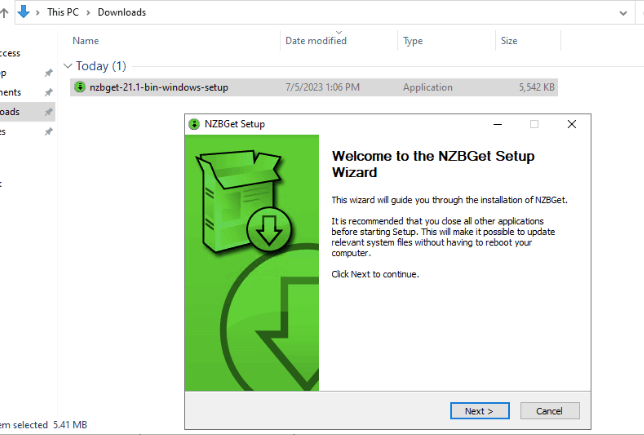
- Run the setup wizard. Accept the license agreement, choose an install location (or leave it as default) and install the program.
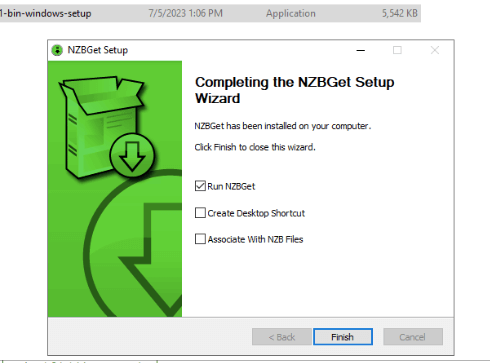
- Follow through the installation and click on Finish. Once you complete the setup wizard, you can either choose “Run NZBGet,” “Create a Desktop Shortcut,” and select the app to associate with NZB files. The application will start immediately.
- If the application does not start automatically after installation, you can also start the app through the start menu or desktop shortcut. It will place an icon in the tray area and open a browser window.
Windows Service:
Running NZBGet as a Windows service enhances convenience, reliability, and security by allowing it to operate independently in the background, ensuring uninterrupted downloading and efficient resource management.
- To install the service, run the “nzbget-command-shell.bat” batch file as administrator and type the command:
- nzbget -install
- To start or stop the service, use the Windows management console or command line:
- net start NZBGet
- net stop NZBGet
- To remove (uninstall) the service, use the command:
- nzbget -remove
b. Linux Installation.
- Visit the NZBGet Download page to find the Universal Linux installer.
- The installer package can be downloaded directly on your device using the following command (if wget is available):
- wget https://nzbget.net/download/nzbget-latest-bin-linux.run
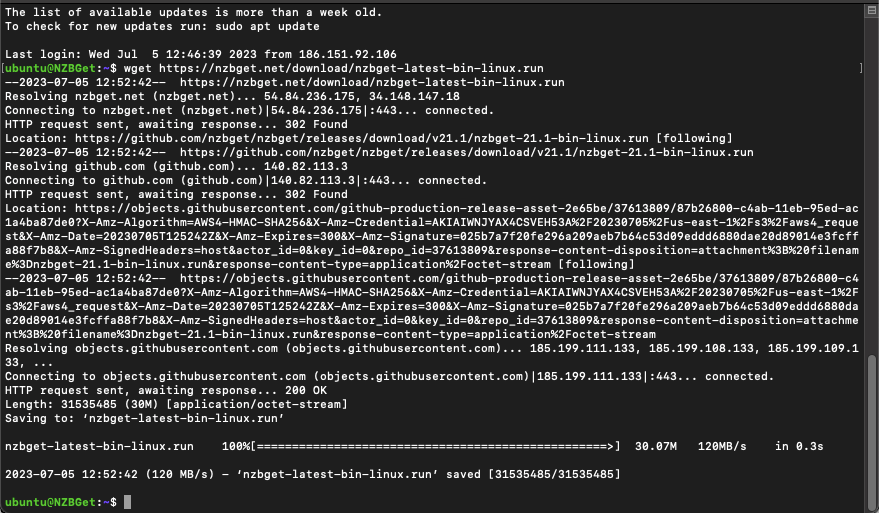
- Open the terminal and run the installer:
- sh nzbget-latest-bin-linux.run
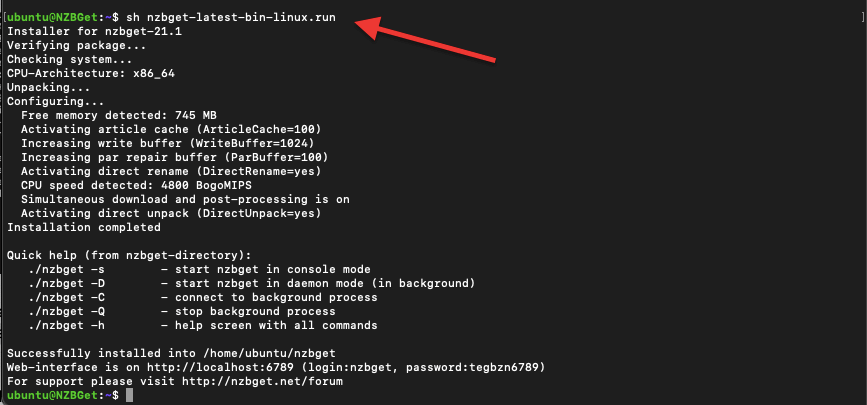
- [Optional]: The default installation directory is “nzbget” in the current directory. You can specify a different directory using the
--destdirparameter:- sh nzbget-latest-bin-linux.run –destdir /path/to/install/nzbget
- Test the installation by starting NZBGet in console server mode. Open a terminal and run:
- <nzbget-directory>/nzbget -s
- For example: “/home/ubuntu/nzbget/nzbget -s”
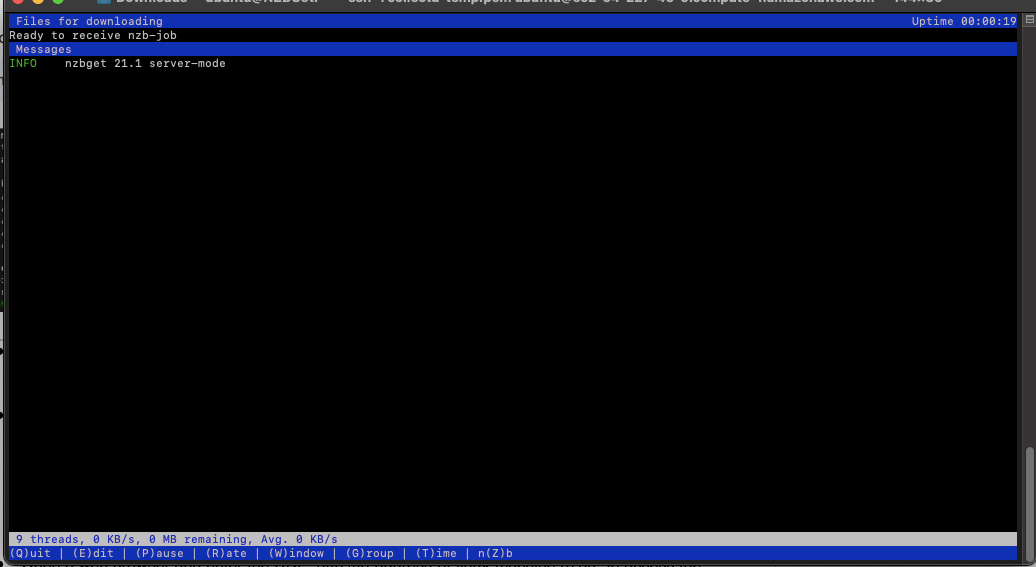
- If you encounter a “Can not open terminal” error, try starting NZBGet in output mode log <nzbget-directory>/nzbget -s -o outputmode=log
- Open a web browser and enter the URL “http://ip-address:6789” to access the NZBGet web interface.
- The default login credentials are:
- username: “nzbget”
- password: “tegbzn6789”
c. NZBGet Mac Installation.
- Download NZBGet from the Download page or the official GitHub repository.
- If the downloaded app wasn’t automatically unpacked by your browser, manually unpack it.
- In addition, Mac might not recognize it as a reliable and trusted application. If you downloaded from its official site or the GitHub repository, allow the app.
- Click the lock to make changes (1). Enter the admin password.
- Click on “Open” (2) > Move to Applications Folder (3)
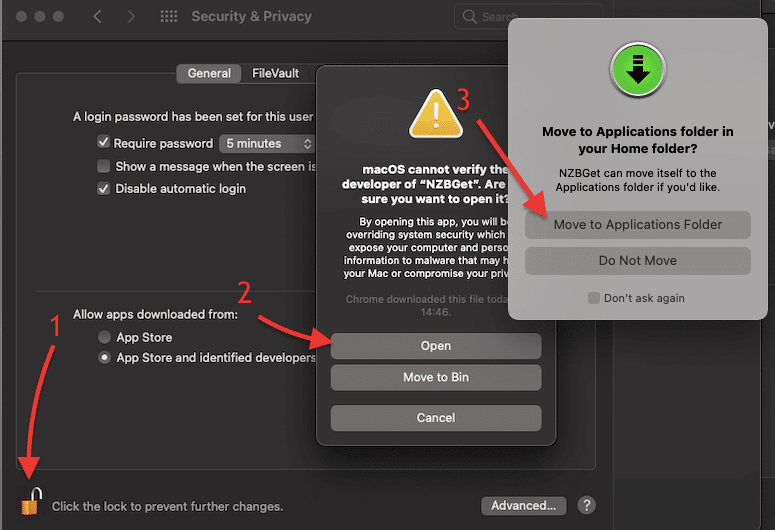
- You’ll get the following message: “Do you want the application “nzbget” to accept incoming network connections?” Click on “Allow”
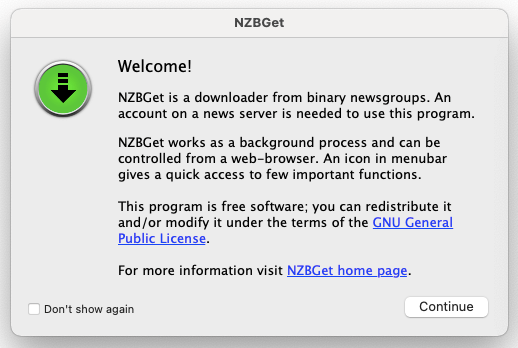
- The installation will begin. Just click on Continue and follow the installation wizard.
- Once the installation is successful, the app will open. You can also open your browser and type > http://localhost:6789/
3. Initial NZBGet Setup.
When setting it up for the first time, it is recommended to stick with the default settings as much as possible (unless you know what you are doing).
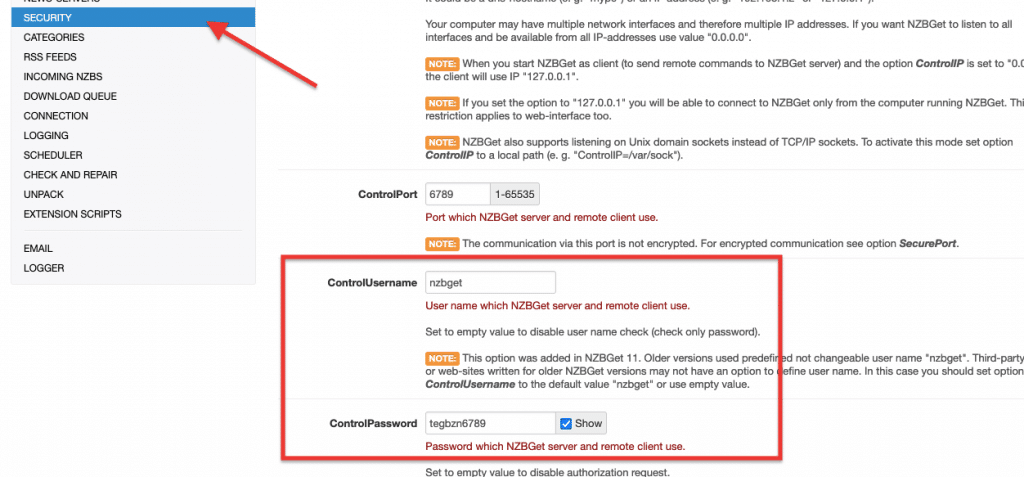
a. Setting up Security.
- To start off, open the web interface of NZBGet. Open your favorite browser and type ” http://localhost:6789/ ” in the web interface, go to the Settings (1) page > then open SECURITY (2) menu.
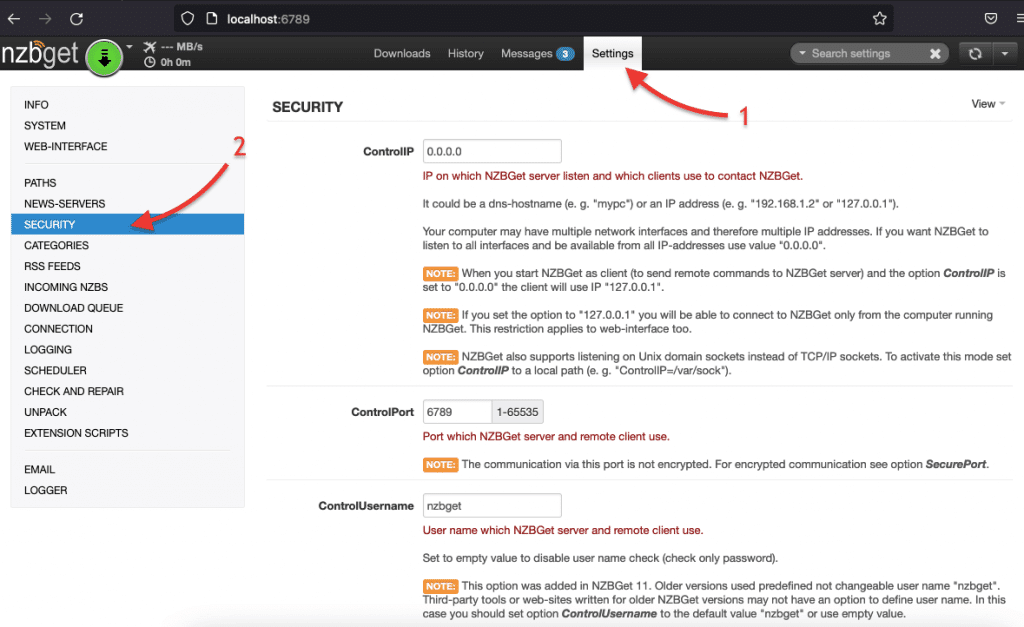
- The most relevant security settings to consider are the following:
- ControlIP: This setting specifies the IP address or hostname on which the server listens and from which clients can connect. By default, it is set to “0.0.0.0,” which means it listens on all network interfaces and is accessible from all IP addresses. Note: If you leave the Control IP to “0.0.0.0,” NZBGet will listen on all network interfaces and be accessible from any IP address. On the other hand, if you set the Console IP to “127.0.0.1,” it will only be accessible from the local machine.
- ControlPort: This setting determines the port number used by the server and remote clients for communication. The default port value (6789) is usually ok, but you can adjust it if necessary.
- ControlUsername and ControlPassword: These settings define the username and password required for authorization when accessing the server and remote clients. By default, the ControlUsername is set to “nzbget” (in older versions), and the ControlPassword is empty. It is recommended to change the default password to enhance security.
- SecureControl: Enabling this option allows secure control of the server via HTTPS (web interface and RPC). It requires providing a certificate and key files (SecureCert and SecureKey) for encrypted communication. This option enhances security when accessing NZBGet remotely.
b. Setting up Usenet Servers.
Before starting to use NZBGet, you’ll need to configure access to a Usenet server. The former is a Usenet client software, which is specifically designed to download files from Usenet newsgroups. Accessing the Server, via the NZBGet allows you to browse newsgroups, download files, and simply go through the vast Usenet resources. For more on this topic, check our “How to Start with Usenet guide“.
b.1 Finding your Usenet Server Details.
To get access to a Usenet server, you’ll need to find a proper service provider. These providers operate the hardware and software of Usenet servers, which store and distribute the articles and files shared on Usenet. All server providers are paid services, requiring a subscription or membership fee to access their servers. However, many of these providers offer free trials, allowing you to test their services before committing to a paid subscription.
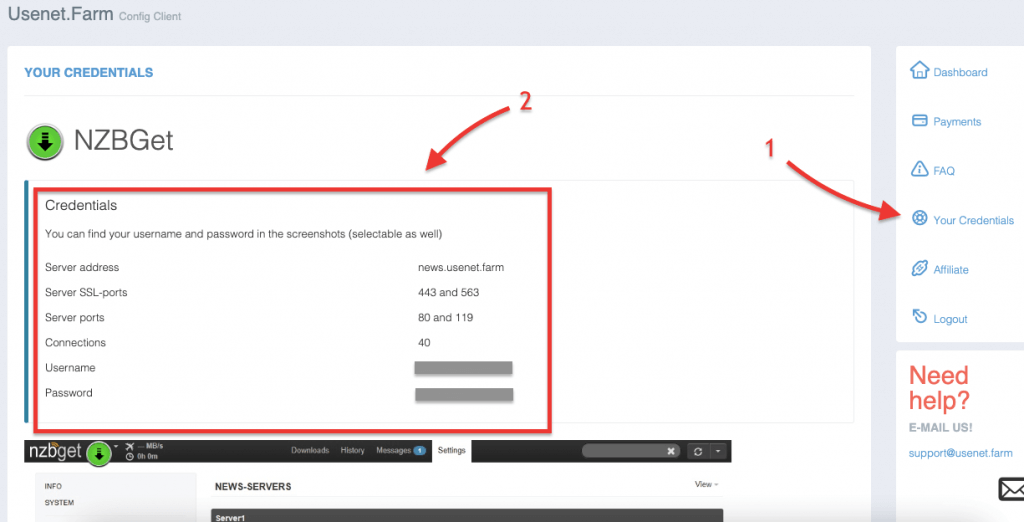
- For the purpose of this guide, we are using a free trial of the Usenet Server provider: usenet.farm
- Go to your Usenet Server’s Dashboard and to “Your Credentials” (1) > and look for (and record) the following information: Server address, ports, and username/password.
Now, let’s configure a Usenet Server (or Newsgroup Server).
- Go to the settings page (1). You will need to set up at least one server in the NEWS-SERVERS section (2).
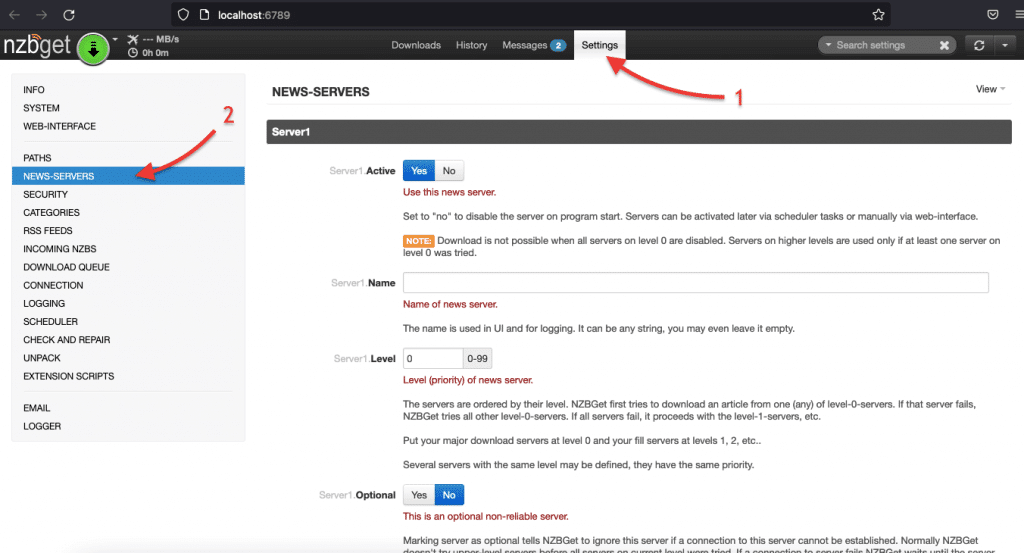
- The important settings to enter are as follows (leave the rest by default):
- Active: If this is an operational Usenet server, click on “Yes” to activate it.
- Name: Choose a name that helps you identify your main Usenet provider.
- Host: Obtain this address from your Usenet provider. For example, news.usenet.farm or news.newshosting.com.
- Port: Use the default port setting of 119, which is widely supported.
- Username: Provided by your Usenet provider, this is the username for accessing the news server.
- Password: Enter the password associated with the username for news server access.
- Connections: Stick with the default setting of 4 connections for now.
- Notes: Optional field for any additional account-related information.
- Click on Test Connection and ensure the connection is successful.
- If the connection is successful click on “Save all Settings,” if the connection failed, check whether all your Usenet Server details are correct. Check the Port setting, which should be set to the default value of 119.

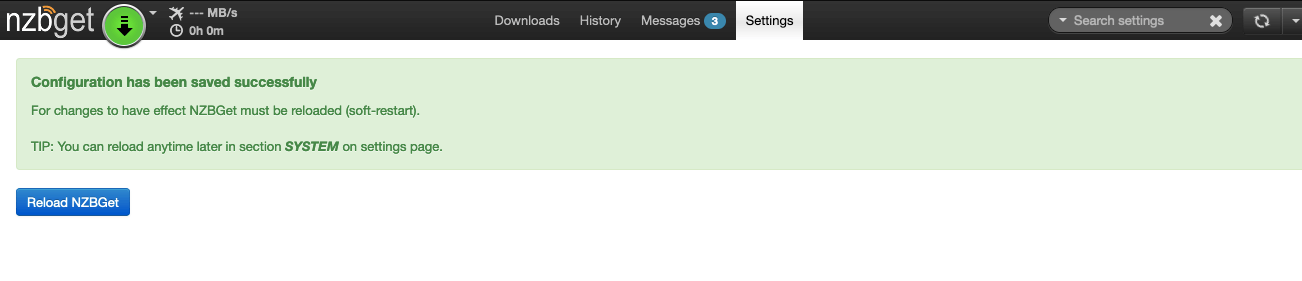
- Save the settings and reload NZBGet.
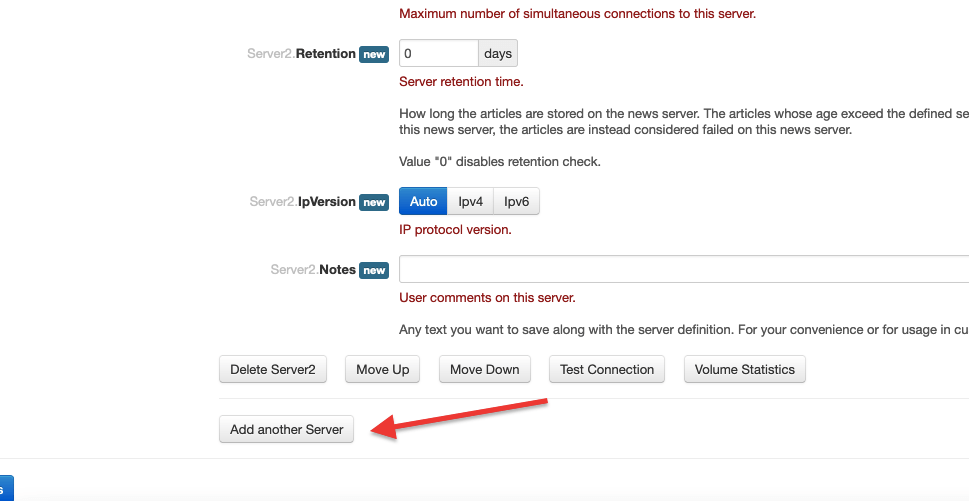
Adding more servers.
- Click “Add another Server” if you need to add additional servers.
Want to optimize your NZBGet experience?
Enhance your Usenet downloads with RapidSeedbox’s high-speed seedboxes. Enjoy faster downloads, seamless integration, and exceptional support for a superior experience.
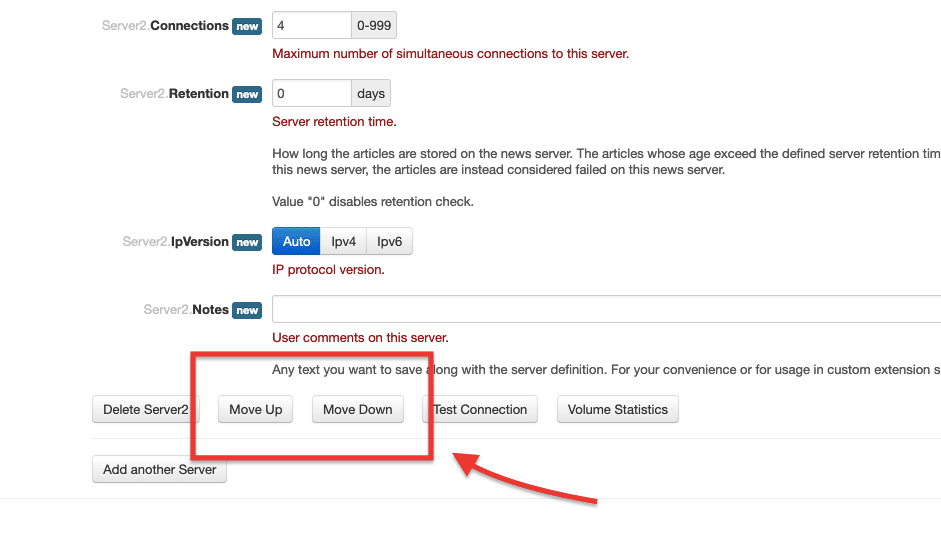
- You can rearrange servers by using the “Move Up” or “Move Down” option if they are added in the wrong order. After entering all the news server account data, select “Save all changes” and reload NZBGet for the changes to take effect.
- It also comes with a “Level new” option, which refers to the priority or level assigned to news servers for downloading Usenet articles. This option allows you to define and organize servers based on their priority to ensure efficient and reliable downloading.
- The priority for downloading Usenet articles is determined by the order in which servers are listed. You can set Usenet’s Server priority in the Level option (0-99).

Note: We recommend adding unlimited monthly Usenet subscription plans first, followed by block accounts or pay-per-download accounts. Usenet.Farm provides specific recommended settings for various newsreader software, including NZBGet.
- If you added more servers or rearranged their priority, reload the app. Click on “Reload NZBGet” on the NEWS-SERVERS menu or under the System menu.
- You can now start adding NZB files and start downloading.
NZBGet Default Login and Port Settings
- Default URL:
http://localhost:6789 - Default Port:
6789(HTTP),6791(HTTPS) - Default Username:
nzbget - Default Password:
tegbzn6789(reverse of port number)
You should change the default password after installation for security.
Go to Settings → Security → ControlPassword and enter your own.
If you run NZBGet remotely (e.g., on a VPS or seedbox), make sure ports are open in your firewall and use HTTPS for secure access.
4. Use NZBGet to download NZB Files.
NZB files are key components of the Usenet downloading process. These files contain metadata about the articles that make up a particular download, including their unique IDs and locations on Usenet servers.
These files are specific for the Usenet downloading software (newsreader clients) like NZBGet or SABnzbd. Meaning that this software exclusively downloads content via NZB. Newsreader clients use these files to efficiently retrieve and assemble the required articles from the specified servers. NZB files are similar to torrents and allow you to download specific content by submitting the NZB to your newsreader.
a. How to Find NZB Files?
You can get NZB files from Usenet search engines or NZB indexing websites (Easynews, NZBGeek, NZBPlanet, Binsearch, and DogNZB). You can also find NZB files by looking through Usenet communities (forums like Reddit’s r/Usenet).
- NZB indexers are preferable as they offer higher-quality search results and organize content into categories and subcategories. But keep in mind that most of these NZB indexers are paid subscription services.
- Some NZB Indexers often provide additional features like reviews, episode information, thumbnail previews, and support for RSS feeds.
- Use an NZB indexer to search for desired content and locate an NZB associated with it.
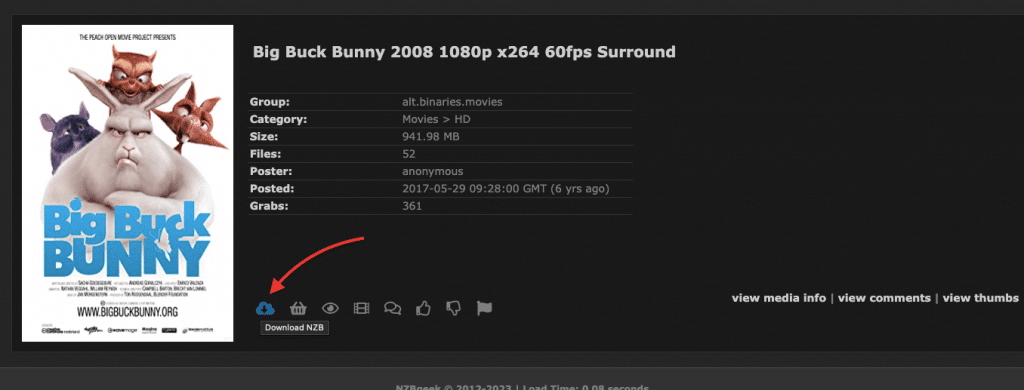
- Browse through the categories of the indexer to find the desired content. Select the NZB associated with the content. Always consider factors like file size and popularity.
- Some NZB Indexers often provide additional features like reviews, episode information, thumbnail previews, and support for RSS feeds. View the detailed information provided by the indexer.
- Download the NZB file by clicking on the NZB download icon or adding it to your “shopping cart” for batch downloading.
b. Adding NZB files.
- To add an NZB file to your NZBGet download client, click the “+Add” button (or drag-n-drop to the downloads area).
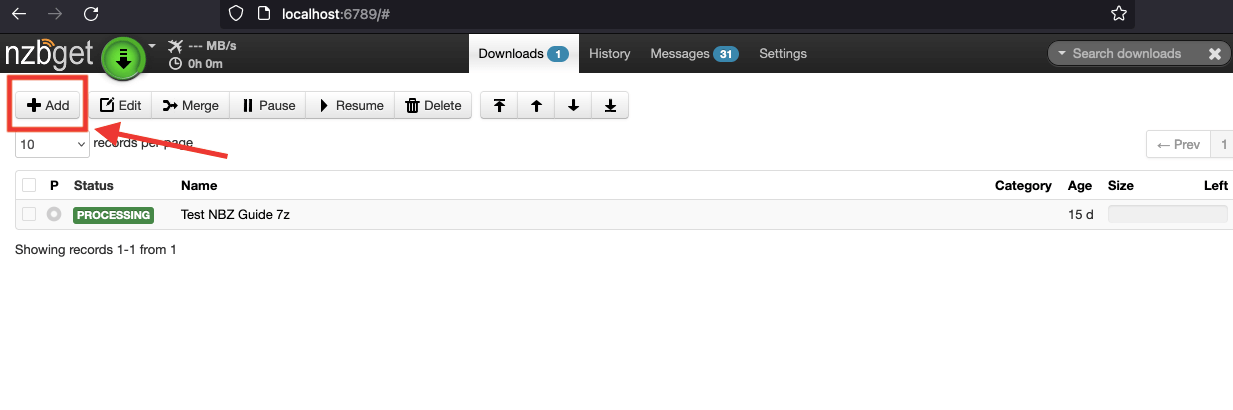
- On “Add NZB-Files to Download Queue” window, you will see three options, to add NZB file from a URL (1), from local files (2), or from NzbDir (3). Optionally, you can set a priority or category for the content.
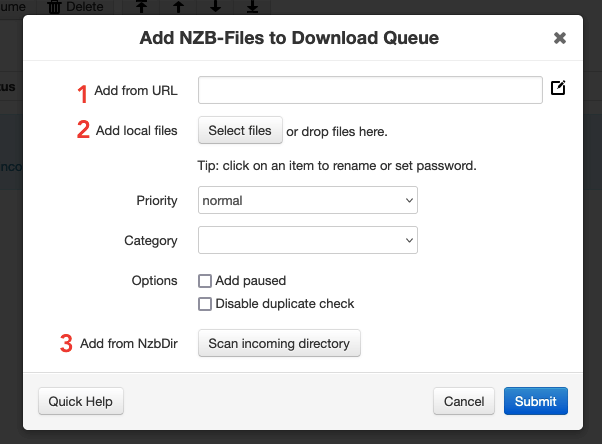
- Local Files: If you have downloaded an NZB file (.nzb) directly to your device, you can manually add it.
- Select “Select Files”. Navigate to the folder containing the NZB file and choose it.
- Click “Submit” to begin the download.
- From a URL: If you have the URL of an NZB file, you can directly add it to the queue.
- Enter the NZB file URL in the “Add from URL” field.
- Click “Submit” to start the download.
- From an NZB directory (NZBdir): If you have an automated process that downloads NZBs into a specific folder, you can configure NZBGet to monitor this folder and automatically download any new NZB files added to it. More on this on the next section (NZB Watch Directory).
- Click the “Scan incoming directory” button next to “Add from NzbDir.”
- The tool will scan the folder and add any new NZB files to the queue.
c. Setting up the NZB Watch Directory.
An NZB Watch Directory is a folder monitored by NZBGet for new NZB files. It serves as a central location for placing NZB files. When an NZB file is added to the watch directory (by either an automated or manual process), it automatically detects it and processes it according to your settings.
- To set up an NZB Watch Directory, you need to configure the NzbDir setting, which defines the location automatically scanned for NZB files.
- Click the “Settings” tab (1) on the top bar. Select “Paths” (2) from the left-hand side menu and locate the NzbDir setting (3) and choose your default watch folder.
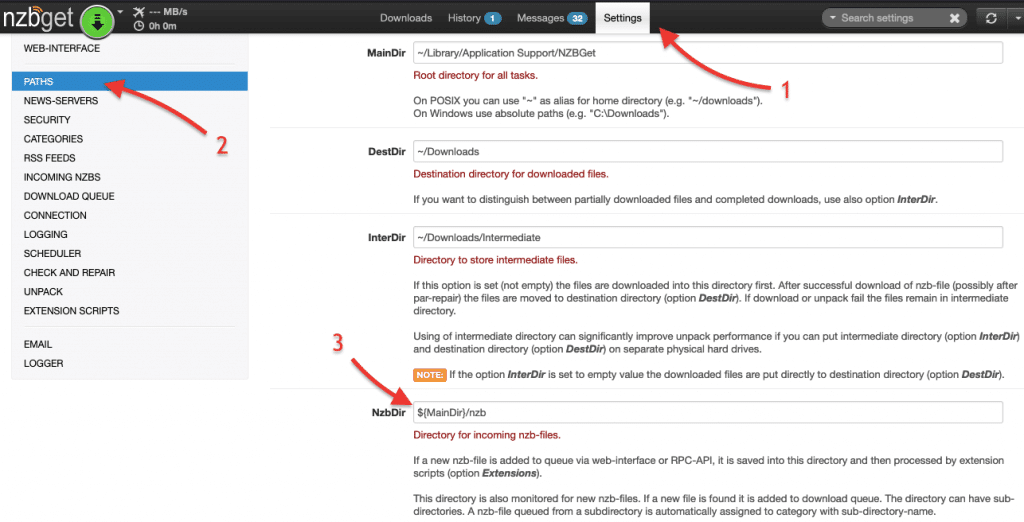
- Configuring the directory will enable the automatic processing of NZB files. NZBGet will monitor the directory for NZB files, may categorize files (if configured properly), and automatically add all “new” NZB files to the download queue.
- Click “Save all changes” to save the settings.
- To scan the NZBdir (as shown previously), you can go to + add NZB > “Add from NzbDir.” > “Scan incoming directory”.
d. Merging NZB files.
This Usenet downloader comes with a “Merge” function that allows you to combine multiple NZB files into a single NZB file. When you have multiple NZB files of the same content type, such as different parts or segments of a larger file, the Merge function allows you to merge them into one unified NZB file.
By merging NZB files, you can ensure that all the necessary segments or parts are included in a single download. This makes it easier to manage and retrieve the complete file or content.
- In the main area, select the queues (1) you want to merge.
- Click the “Merge” (2) button at the top. This action will combine the downloads into a single queue.
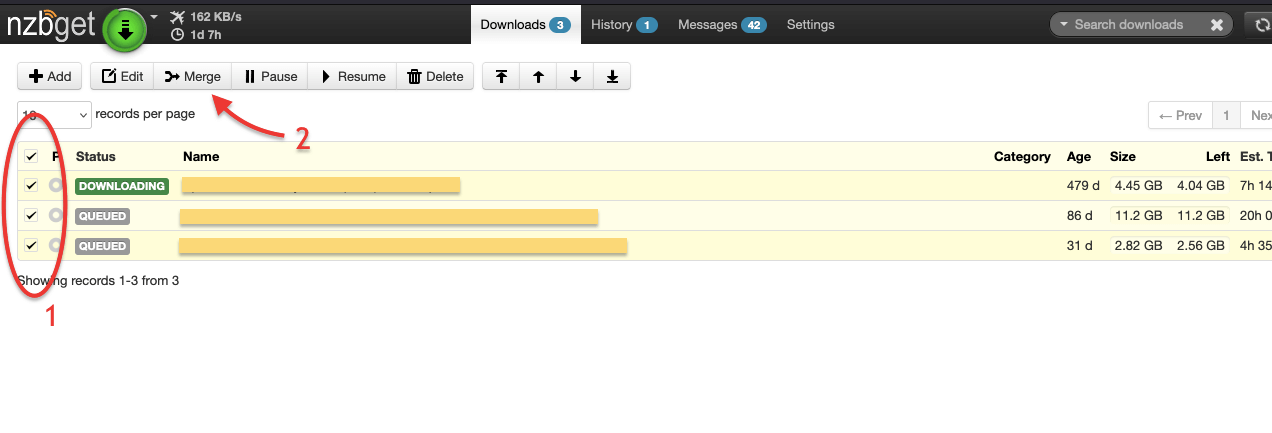
Your downloads will proceed as usual, and each file will be downloaded into its respective folder within your downloads directory.
e. Keeping track of your downloads.
Regardless of how you choose to add the NZB file, once you select it, the NZB’s filename will be added to NZBGet. The software will start downloading the content files associated with the added NZB.
- In the main Downloads display, you can track the progress, including the amount of data and estimated time remaining for each download.
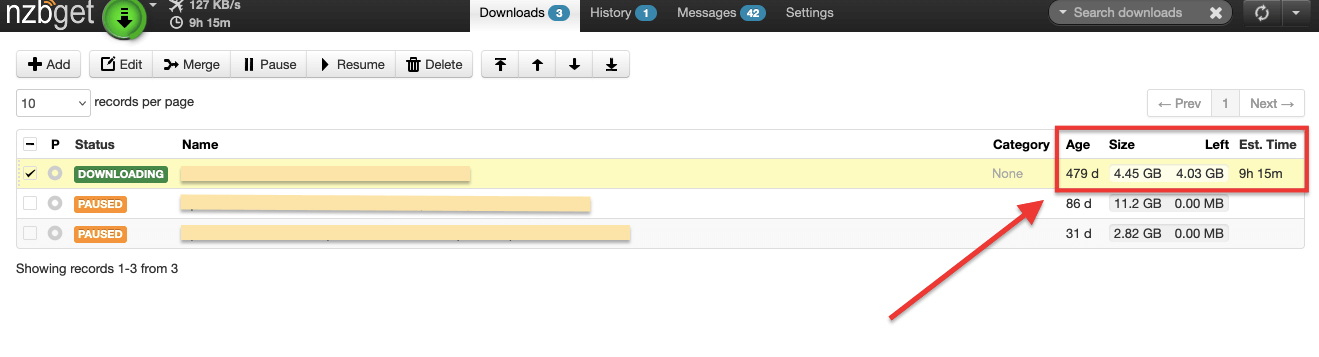
- Clicking on an item’s name in the Downloads list provides more details about the download, including Statistics with vital information like “Health” and the number of files and articles.
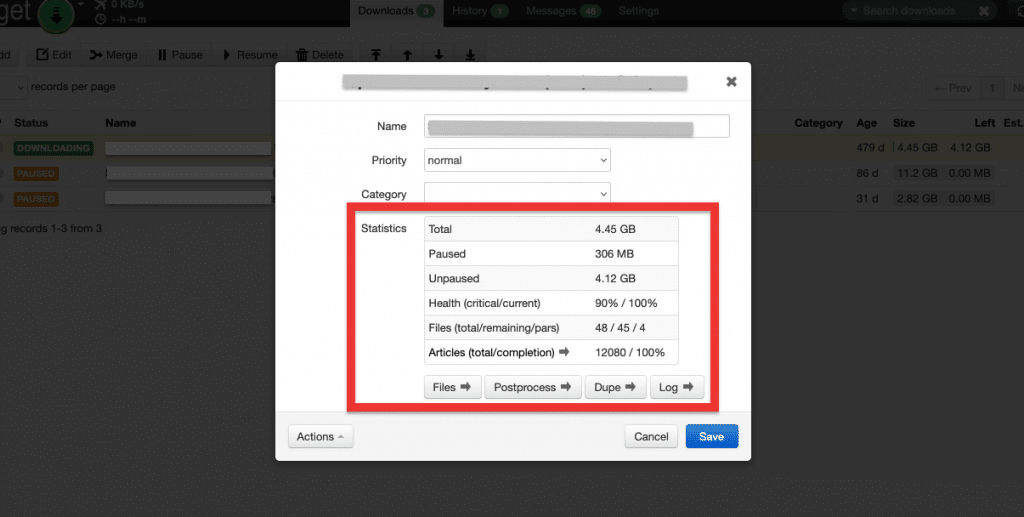
On the bottom, you’ll notice four additional NZB file information:
- Files: Allows you to view the individual files that are part of the NZB file.
- PostProcesses: Provides options for post-processing actions to be performed on the downloaded files. This can include tasks like unpacking, repairing, renaming, moving, or executing custom scripts on the downloaded content.
- Dupe: Checks for duplicate NZB files in your download queue. This option helps prevent redundant downloads.
- Log: Displays the log information related to the processing and status of the NZB file. This can include details about errors, warnings, completion status, and other relevant information.
5. Valuable NZBGet Integrations and Extensions.
NZBGet can be integrated and extended with various tools and services. With integrations, you can automate the entire downloading and processing of content and also organize content. Additionally, with plugins and extensions, you can enhance the downloader’s functionality. It takes time and perseverance to set up such systems, but they are worth it in the end.
Here are some examples of the available integrations:
- Automation software: Tools like Sonarr, Radarr, CouchPotato, and SickChill can be integrated with NZBGet to automate the search, download, and organization of TV shows and movies. They communicate with the tool to initiate downloads based on your preferences and manage the post-processing tasks.
- RSS feeds: It supports integration with RSS feeds from indexers. By configuring RSS feeds, you can automatically monitor and download new content as soon as it becomes available on the RSS feeds. This automation saves you time and ensures you don’t miss any desired releases.
- Popular media servers and streamers: It can be seamlessly integrated with popular media servers such as Plex, Emby, or Jellyfin to enhance your media streaming experience. These integrations ensure that your downloaded content is readily available for streaming on your preferred media server or streamer device, allowing you to enjoy a seamless media playback experience.
- Plugins and extensions. The tool provides a plugin system that allows you to customize its functionality. Examples of these plugins are “The Scheduler” which enables you to schedule specific download tasks at predefined times or on specific days. Other popular extensions are web interface themes and Notification plugins (Pushbullet, Pushover, or Slack).
Other interesting (but indirect integrations).
- Oveseerr and Ombi integrate with automation tools like Sonarr and Radarr, which directly send download requests to NZBGet. These tools act as a request and discovery system for media content. It allows users to request movies or TV shows they want to watch.
- Prowlarr is an indexer management and proxy tool. It allows you to manage and search multiple Usenet and torrent indexers in one place. It can integrate with NZBGet and other download clients to send search queries and retrieve NZB files for downloading.
- Jackett, a proxy server and indexer aggregator for various torrent and Usenet indexers. It can be used to integrate additional indexers into NZBGet’s RSS feed functionality. By configuring Jackett as an indexer in NZBGet, you can retrieve the RSS feed URL provided by Jackett for a specific indexer.
a. Integrating NZBGet with your Indexer / via RSS
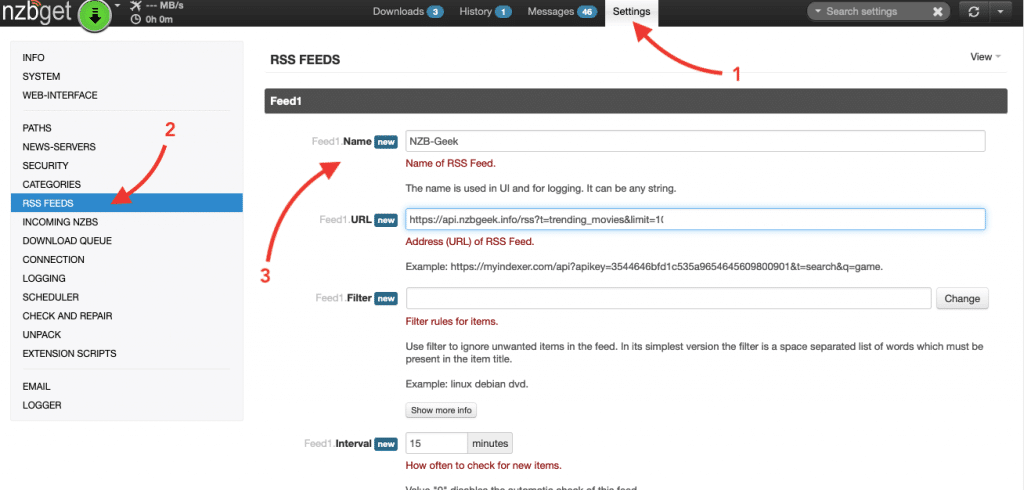
Consider integrating NZBGet with your NZB indexer for enhanced convenience. Some provide integration settings for Usenet downloaders like NZBGet. This option allows direct transfers of NZB files to your NZBGet without having to download them separately. Most common NZB indexers provide an RSS generator, which provides a convenient way to filter and receive updates for the content you are interested in.
- NZBGet supports integration with RSS feeds from indexers. By configuring RSS feeds within NZBGet, you can automatically monitor and download new content as soon as it becomes available on the RSS feeds.
- Look for the RSS Generator of your NZB indexer. The query types may range from categories, my Cart, iMDB id, TVDB id, Trending, movies, trending shows, new movies, popular movies, and more.
- Copy the RSS feed URL.

- Go to NZBGet > Settings (1) > RSS Feeds (2), and enter the information of your new Feed. Give it a name, enter the URL feed (which you copied previously), and set other options like filters, intervals, etc. Test your configuration and save it.
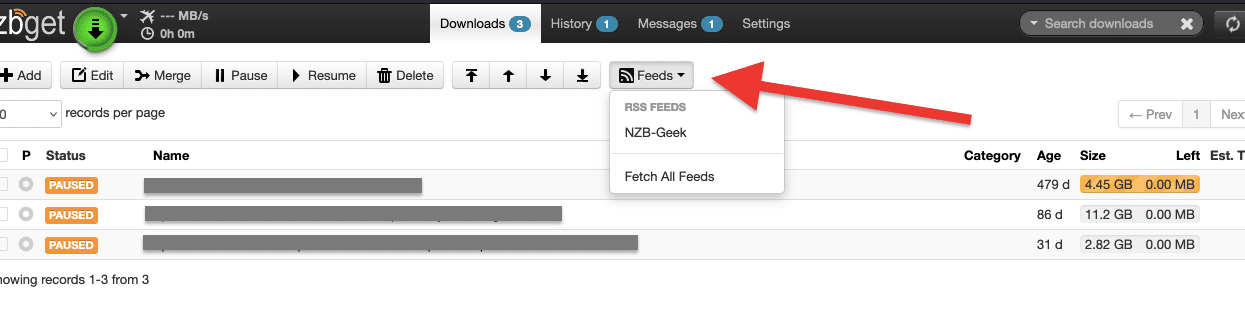
- Your new RSS feed should appear on NZBGet’s main dashboard
b. Integrating NZBGet with your Automation tool (i.e Radarr)
You can integrate NZBget with Radarr (or Sonarr) to automate the search, download, and organization of TV shows and movies. As an example, to integrate Radarr with NZBGet, you can follow these steps:
- Access your Radarr web interface. Don’t know how to start? Check our comprehensive handbook to Radarr and guide to Sonarr.
- In the Radarr web interface, go to “Settings” and then select “Download Client.” Click on the “+” icon to add a new download client.
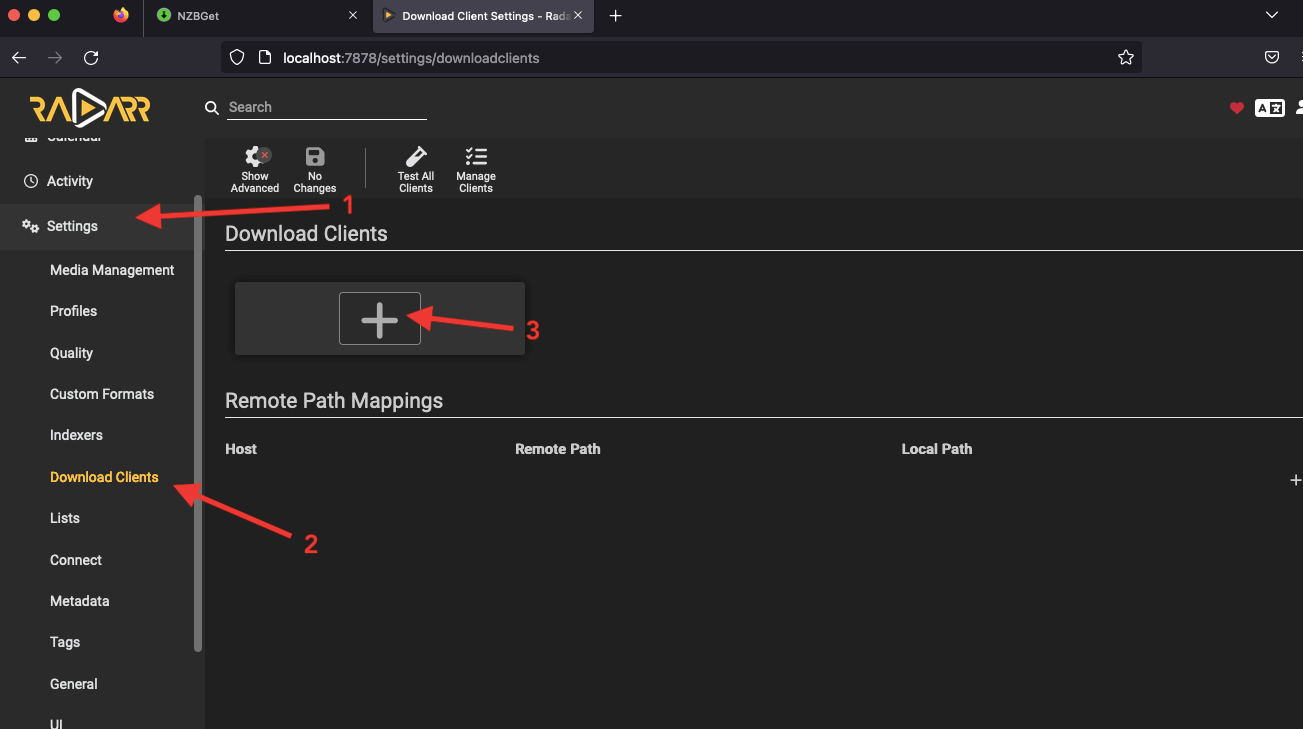
- From the list of download clients, under Usenet, find and choose “NZBGet.”

- Radarr and Sonarr come with NZBGet default settings which should work without additional configuration, except adding a name if Radarr and NZBGet are on the same computer (localhost). Still, you can change the following integration details.
- Name: Give a name to identify the NZBGet client.
- Host: Enter the IP address or hostname of the machine where NZBGet is installed.
- Port: Specify the port number on which NZBGet is running (default is 6789).
- Username/Password: Provide the login credentials for accessing NZBGet, if applicable.
- Category: Set a category that Radarr will use when sending downloads to NZBGet.
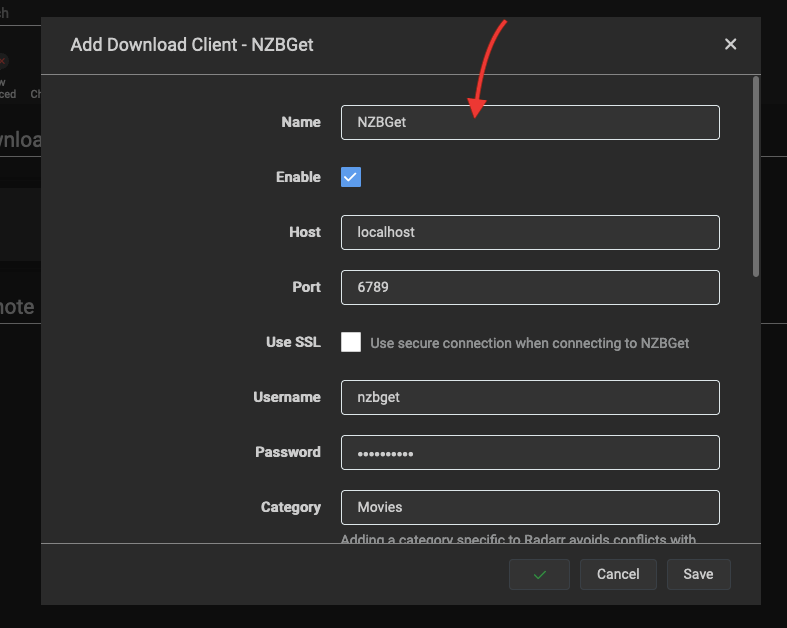
- Test the connection: Click on the “Test” button to verify if Radarr can connect to NZBGet successfully. You will see a green check.
- If you don’t know the username and password and port, you can go to NZBGet > Security and find the details. The NZBGet default login details are:
- The NZBGet port is: 6789
- The NZBGet default user is: nzbget
- The NZBGet default password is: tegbzn6789
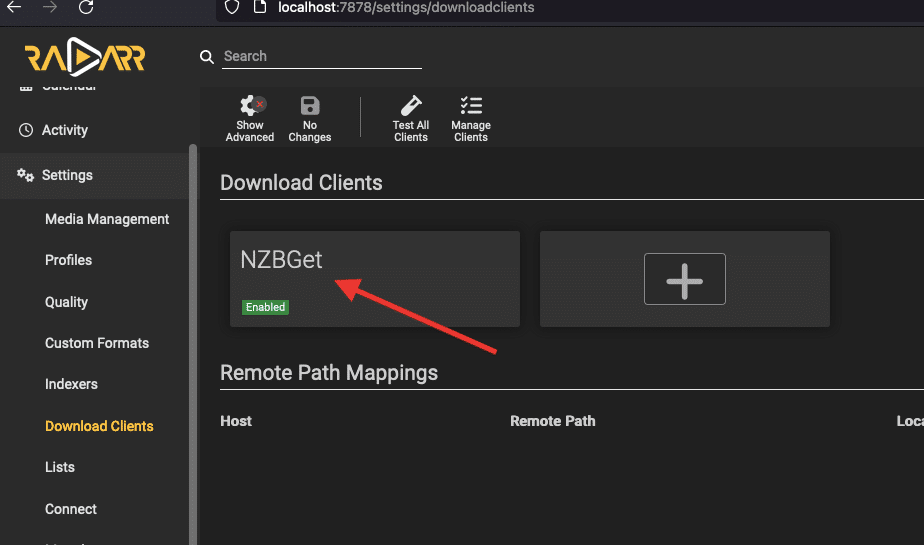
- Save the settings: Once the connection is confirmed, click on “Save” to save the NZBGet configuration in Radarr. The new NZBGet instance will appear in the “Download Client” window.
6. NZBGet: Frequently Asked Questions (FAQ.)
a. Is NZBGet dead?
Although NZBGet is currently working pretty well, its development has officially been abandoned. Over the past few years, new releases have become increasingly scarce, and now it has been confirmed that Hugbug, the original developer, has ceased NZBGet’s development. The GitHub repository for the project has been archived and made read-only.
b. What is the default password for NZBGet?
The default password for NZBGet is usually blank or “tegbzn6789” (without quotes). However, we recommend setting a secure password during the initial setup to ensure the security of your NZBGet installation.
c. How can I open the NZBGet folder on Synology?
To access the NZBGet folder on your Synology NAS, you can follow these steps:
- Open the DiskStation Manager (DSM) web interface.
- Go to the “File Station” app.
- Navigate to the folder where NZBGet is installed. By default, it is located in the “nzbtodownload” folder.
- You can now view and manage the files and folders related to NZBGet on your Synology NAS.
d. What are the differences between NZBGet and SABnzbd?
NZBGet and SABnzbd are both popular Usenet downloaders, but they have some differences. NZBGet is known for its efficiency, speed, and low system resource usage. It offers extensive customization options and supports multiple platforms. SABnzbd, on the other hand, focuses on simplicity and ease of use. It has a user-friendly interface and provides a comprehensive set of features for managing Usenet downloads.
e. How do I set up Radarr with NZBGet?
We recommend going back to the section (Integrating NZBGet with your Automation tool (i.e Radarr)). But generally, to set up Radarr with NZBGet, you can use the following steps:
- Open the Radarr web interface and go to “Settings” and then select “Download Client.”
- Click on the “+” button to add a new download client, then choose “NZBGet” from the list of options.
- Enter the required information, such as the host, port, username, and password for your NZBGet installation. Save the settings, and Radarr will now be connected to it for downloading and managing your movies.
f. I’m receiving an “NZBGet certificate has expired” error. What should I do?
If you encounter an “NZBGet certificate has expired” error, it means that the SSL certificate has expired. To resolve this issue, you can either update the SSL certificate manually or disable SSL verification in the settings. However, it is recommended to update the SSL certificate to ensure secure communication with NZBGet.
g. How can I delete the history in NZBGet?
To delete the history in NZBGet, you can follow these steps:
- Open the NZBGet web interface. Go to the “History” section (on the main dashboard)
- Select the items you want to delete from the history.
- Click on the “Delete” button or the trash bin icon to remove the selected items from the history.
- Confirm the deletion when prompted.
- The selected items will be removed from the history in NZBGet.
Want to optimize your NZBGet experience?
Enhance your Usenet downloads with RapidSeedbox’s high-speed seedboxes. Enjoy faster downloads, seamless integration, and exceptional support for a superior NZBGet experience.
7. Final Words.
Phew! We now reached the end of this ultimate guide to NZBGet.
We hope that this guide has provided you with the knowledge and tools to effectively use NZBGet. With NZBGet’s powerful features, seamless integration capabilities, and efficient downloading process, you can take full control of your Usenet experience.
Although this was a quite comprehensive guide to NZBGet, in reality, there is so much more you can do with this fantastic tool.
As always, remember to explore the various settings, options, and extensions available in NZBGet to customize them to your preferences.
If you have any comments or further questions don’t forget to leave them in the comments section below!
if you are under windows look at this downloader nzbzip
Great sugestion Nik… thanks!
It seems this is online tool is for converting NZB files to ZIP, is that right?
I just wanted to drop a line and say thank you for your consistent posting of guides and the pushing them direct to my email address! While many times they are simple topics I’ve known for sometime, there’s rarely a guide you create that I don’t learn something new or at the very least say to myself,”Oh crap, I forgot that was even a feature”! So, thank you again for all the work you put into these detailed guides!
Thank you Ryan! Your kind words mean the world to us!
We’ll keep sending handy tips to you 🙂