The Deluge BitTorrent client may seem like an old VW Beetle from the outside, but once you open the hood… it is like looking at a Ferrari engine.
Once you learn to optimize Deluge like a pro, you can quickly turn it from a simple, light BitTorrent client into the most robust torrenting tools out there. Many of our Seedbox clients choose Deluge as their favorite client since it’s reliable, convenient, and easy to use.
The following ultimate unofficial guide to mastering Deluge will teach you how to optimize this BitTorrent client like a pro. You will learn how to set up Deluge, use it with speed and anonymity, and troubleshoot it.
Disclaimer: This material has been developed strictly for informational purposes. It does not constitute endorsement of any activities (including illegal activities), products or services. You are solely responsible for complying with the applicable laws, including intellectual property laws, when using our services or relying on any information herein. We do not accept any liability for damage arising from the use of our services or information contained herein in any manner whatsoever, except where explicitly required by law.
Table of contents
- What is Deluge?
- Where to Download Deluge?
- Pros and the Cons.
- How to install Deluge?
- Managing Deluge
- Optimizing User Experience.
- How to install a Deluge Plugin.
- Improve Deluge speed and anonymity.
- Troubleshooting.
1. What is Deluge?
Deluge is a fully-featured cross-platform BitTorrent client that works on Linux, Windows, macOS, BSD Unix, and more. It is open-source, 100% free, and ads-free (as opposed to BitTorrent and uTorrent).
Deluge is one of the best clients among serious torrent users simply because it is lightweight, highly customizable, and fast. It can be highly customized to fulfill the demands of even the most hard-to-please torrent users. Thanks to programmable modules (or plugins), you can implement different software complements and take Deluge’s functionality to a new level.
This will make you happy: Deluge does not come with unnecessary extensions and advertisements, so it consumes low resources, is fast, and looks good! This torrenting software can run as a standalone desktop and a client-server application. In Thin-client mode, a daemon handles all the BitTorrent activity and can run in the background on your machine while you connect to the user interface (WebUI) remotely from any other platform.
a. Deluge GTK desktop UI vs. the Deluge Web UI: What are their differences?
The Deluge GTK desktop UI is a traditional graphical user interface that runs natively on your desktop environment. The Deluge Web UI, on the other hand, is a web-based interface that can be accessed through a web browser. Both are part of the same Deluge BitTorrent client and share the same underlying code and functionality.
b. What has changed in the latest Deluge releases?
The latest Deluge release is 2.1.1. Available on Linux, Windows, and Mac OS X. Here is a summary of the most critical changes in the recent software releases:
- Version 2.1.1 (July 10, 2022): This version includes several bug fixes, including a fix for missing trackers added via magnet and support for handling magnets with tracker tiers.
- Version 2.1.0 (June 28, 2022): This version removes Python 2 support and increases the libtorrent minimum requirement. It also adds support for SVG tracker icons and fixes several bugs in the Web UI, Gtk UI, and Console UI.
- Version 2.0.5 (December 15, 2021): This version fixes a js minifying error that resulted in a blank screen in the Web UI and silenced erroneous missing translations warning.
- Version 2.0.4 (December 12, 2021): This version includes bug fixes and improvements for the Packaging, Gtk UI, Web UI, Console UI, Core, Documentation, Stats plugin, Notifications plugin, Autoadd plugin, and Execute plugin.
For more information on Deluge versions, check the release notes.
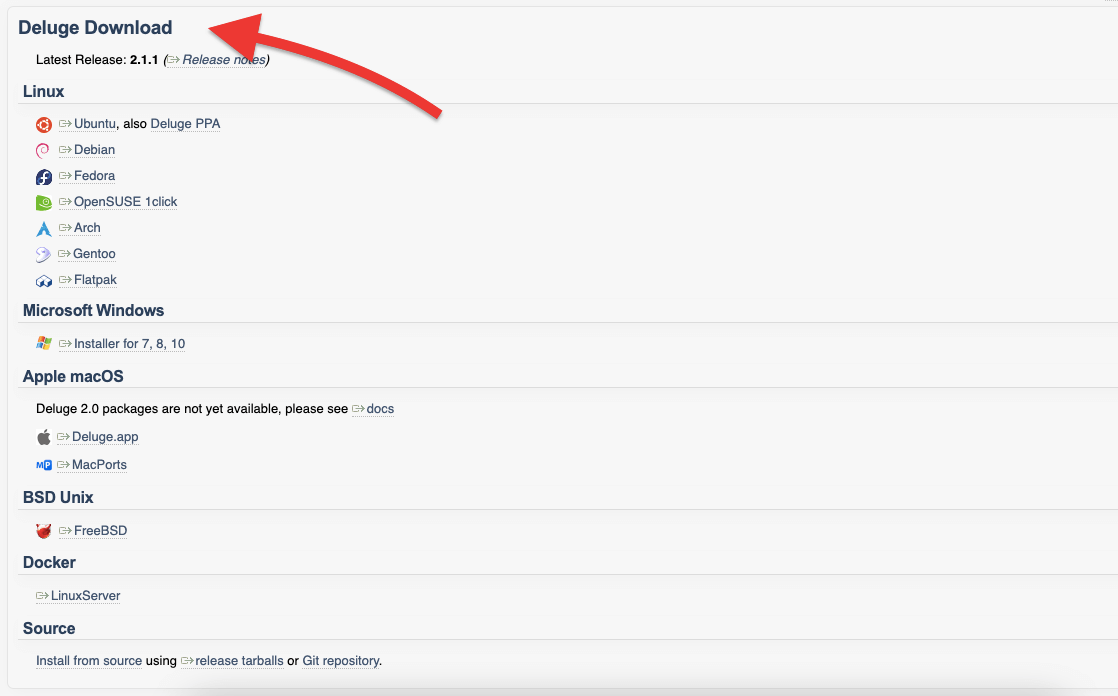
2. Where to Download Deluge?
There is no better place to download Deluge clients than the Official Deluge website. Download Deluge the latest version (2.1.1) here:
Where to download Deluge’s source code? Generally, open-source software is safe, protects the privacy of its users, and does not contain any malicious code. If you want to install Deluge from the source, use the following Deluge Git Repository download link.
3. Deluge: The Pros and Cons.
The Deluge BitTorrent client comes with all the foundational features of a typical torrent client. As you will notice, when it is missing something, a feature, a fix, etc., it will be only a matter of time before someone from the community builds a plug-in or fixes the bug.
a. The Pros.
- Deluge is open source and free.
- It is free from advertisements.
- Plug-ins and extensions to improve its functionality.
- Deluge is super light.
- It can encrypt BitTorrent traffic using MSE/PE or Message Stream.
- It is highly portable and can be installed on a USB and run directly from it.
- Deluge comes with all the basic torrent features, such as DHT, PEX, prioritization, Magnet-Links, etc.
- It has a graphical web and command-line interface (with daemon).
- It allows automatic port mapping with UPnP, NAT-PMP, and NAT for router configuration.
b. The Cons.
- Not able to override queuing settings or “Force start” downloads.
- There is no built-in search engine.
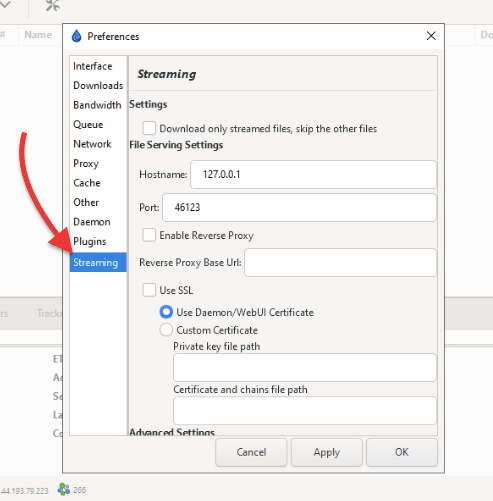
- It is unable, by default, to stream media files while a download is in progress. But there is a workaround to stream videos. Use a plug-in called Deluge Streaming.
- There is limited magnet URL functionality. There is no way to get information about torrent content in a magnet link until the download has started.
- No super-seeding setting by default. But you can apply this plug-in to get around this issue.
- It does not allow tracker exchange functionality.
- Lack of web-seeding support
- Not able to share files with an embedded tracker.
- The demon consumes large CPU resources as compared with other clients.
4. How to install Deluge?
When you download Deluge, you will find a wide availability of different platforms.
The current Deluge release (2.1.1) as mentioned before, is available for Linux, Mac OS X, and Windows.
Download the correct version and follow the next instructions to set up Deluge.
a. How to install the Deluge client on Ubuntu?
The official Ubuntu repositories include Deluge, so you might get away with the Ubuntu install from the terminal using the command: “sudo apt-get install deluge.” However, bear in mind that those repositories might be outdated, so we recommend using the PPA repository.
- Issue the following commands:
|
1 2 |
sudo apt-get update sudo add-apt-repository ppa:deluge-team/ppa |
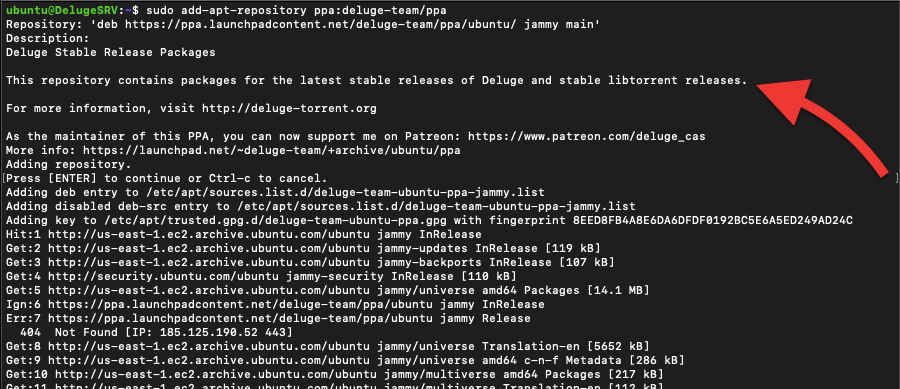
Note: If you see the error: “E: The repository ‘https://ppa.launchpadcontent.net/deluge-team/ppa/ubuntu jammy Release’ does not have a Release file.” and Err:7 https://ppa.launchpadcontent.net/deluge-team/ppa/ubuntu jammy Release 404 Not Found [IP: 185.125.190.52 443], as it happened to use at the time of installation, then it is likely that the repository is temporarily unavailable, or the package list is being removed or moved to a different location.
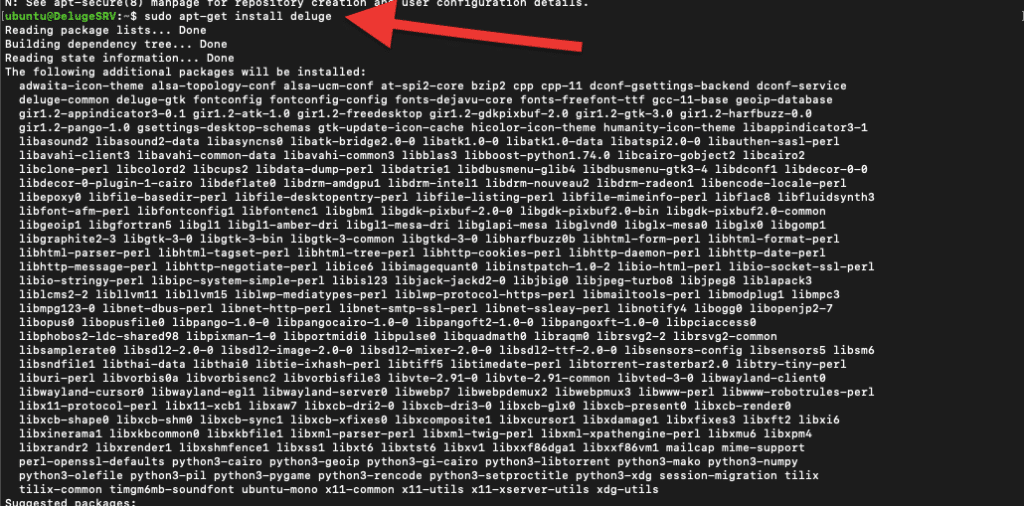
|
1 |
sudo apt-get install deluge |
Check the installed version with:
|
1 |
sudo deluge --version |
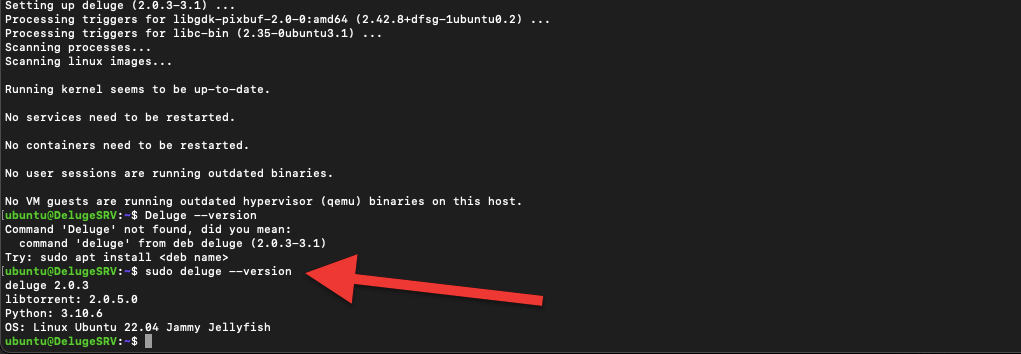
As you will notice from the above output, we’ve got the version for deluge 2.0.3 (not the latest).
b. Deluge setup on Windows.
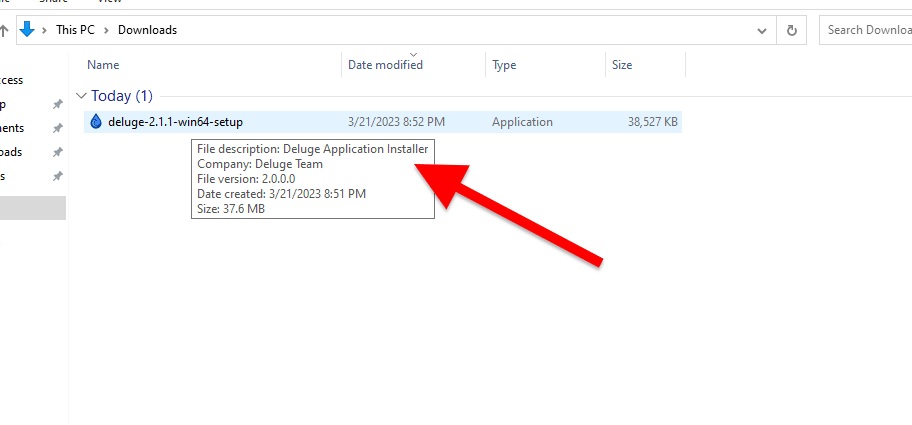
Installing Deluge on Windows is easy. If it was downloaded from a source other than deluge-torrent.org, you might want to scan it against Malware. Check its size and developer company. As you might have noticed, we are installing Deluge 2.1.1.
- Once downloaded and checked, run the executable file (.exe).
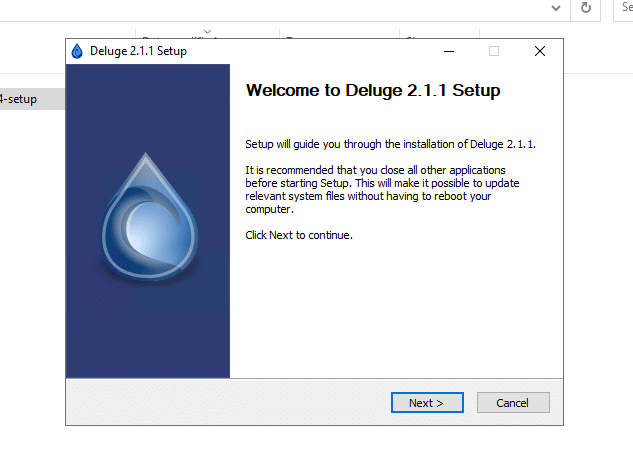
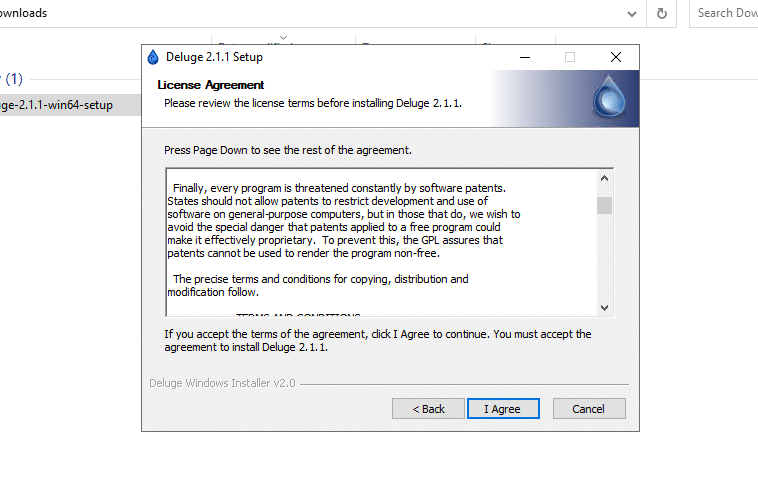
- Accept the license agreement.
- In the next step, select the components for the Deluge setup. If both are selected, any torrent file you download will be automatically associated with Deluge, and any magnet link will be opened with Deluge.
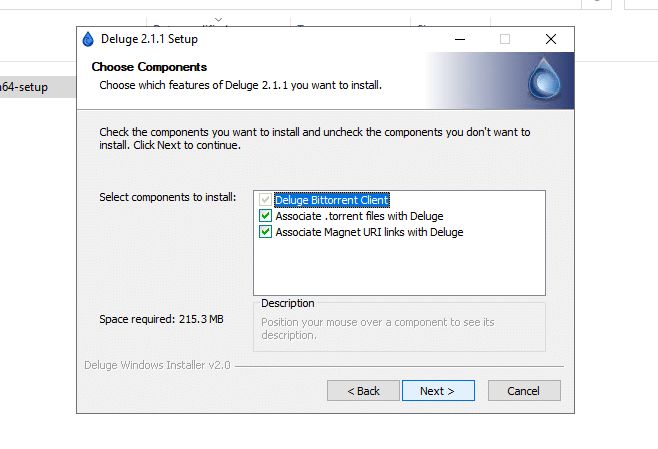
- If you have another torrent client, such as uTorrent, and want to leave that client to handle either magnet URLs or torrent files, choose here. For instance, let uTorrent take all .torrent files and Deluge all magnet links.
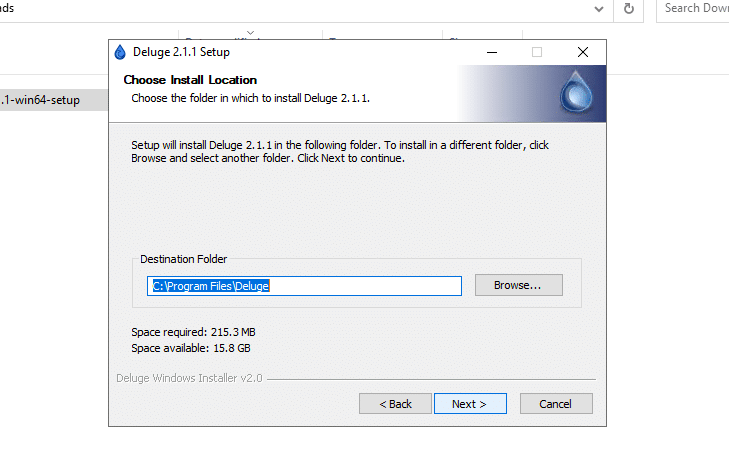
- In the next step, choose your install location and click Next.
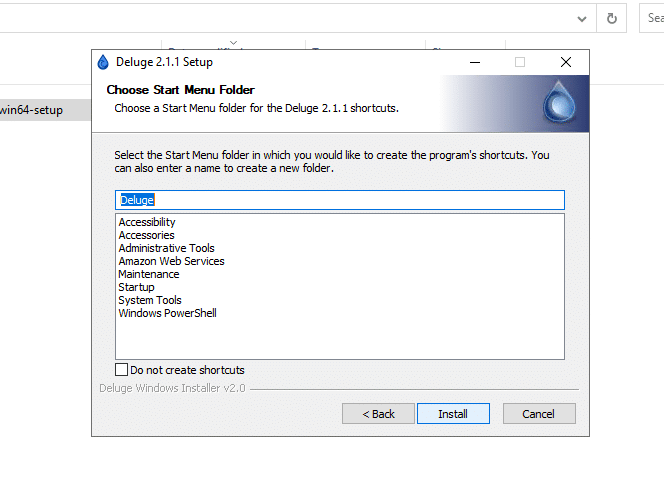
- Leave by default or Choose the Start Menu Folder. Click Install.
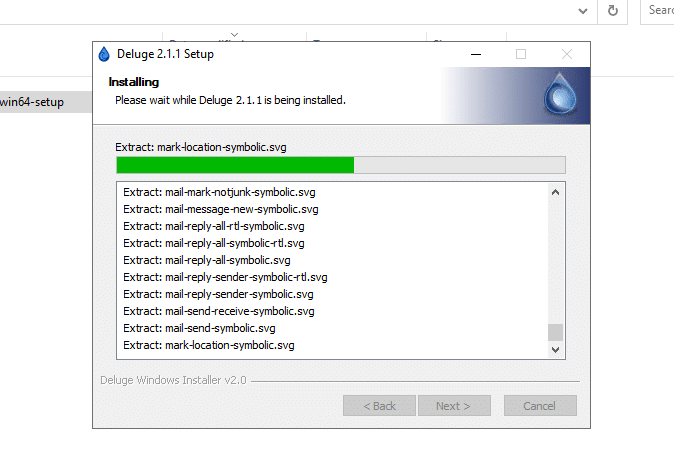
- The installation will begin.
- That’s it… The installation is finished.
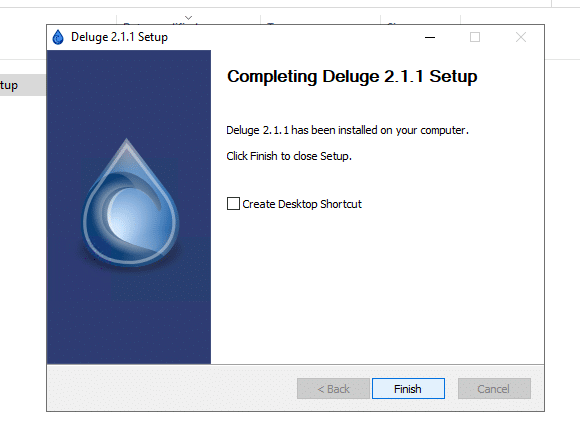
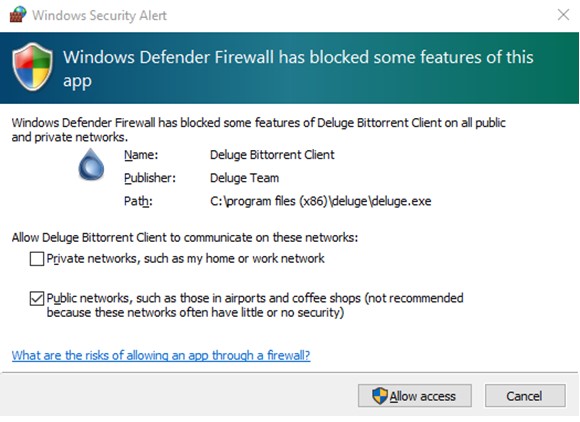
- You might be faced with the following Windows Security Alert from the Firewall. The firewall protects your computer from untrusted (or trusted) traffic from an application such as Deluge. “Allow Access” so Deluge operates anywhere you want (especially on public networks).
c. How to install the headless service on an Ubuntu Server?
As stated before, Deluge comes as a server (daemon or background process) and as the user interface (GTK or WebUI).
Deluged runs on a computer to facilitate file sharing using the Deluge BitTorrent client. It is the core part of the Deluge BitTorrent client, running in the background without any GUI. It manages the downloading and uploading of files and provides a web-based interface that users can access to manage their downloads and uploads. You can run Deluge server software as a headless service and control it from other machines.
How to install the headless server on an Ubuntu server?
- Before installing the headless service, you’ll need to set up your server.
- Create a “deluge” user and group. Create the user as a system user using their home directory as the main Deluge.
- Add a system user named “deluge” with a home directory of “/var/lib/deluge” and a primary group of “deluge”, you can use the following command:
|
1 |
sudo useradd -r -m -d /var/lib/deluge -s /usr/sbin/nologin -g deluge deluge |
- Take the Deluge directory and set its user ownership (with recursive).
|
1 |
sudo chown -R deluge:deluge /var/lib/deluge |
- To install the headless/server version and check its version, issue the following set of commands.
|
1 2 3 |
sudo apt update sudo apt install deluged deluged --version |

- To install the Deluged console and the web interface (if it is not installed already), issue the following.
|
1 2 |
sudo apt install deluged deluge-console sudo apt install deluged deluge-web |
- Additionally, you’ll need to configure the privilege for your deluge users by adding it to the authentication file. Find the auth file at (.config/deluge/auth), open it, and add an entry for the user.
- Now, from the deluge console, let’s enable a remote connection. This will allow deluged to accept connections from remote computers (other than localhost).
|
1 |
sudo deluge-console "config allow_remote" |
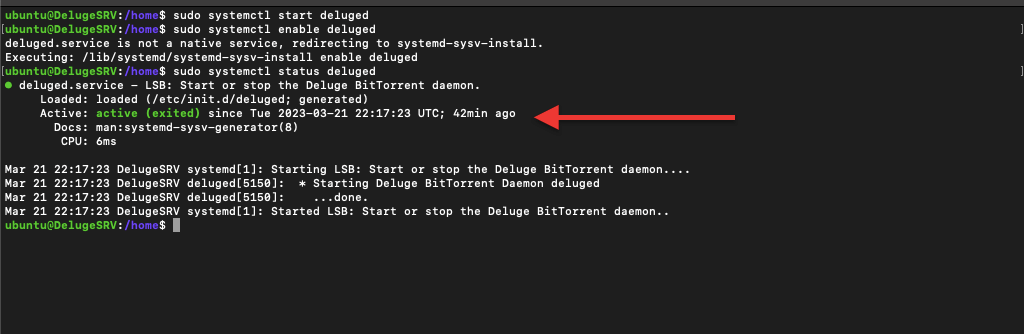
- By default, the Deluge daemon is disabled. Let’s enable it and start it.
|
1 2 |
sudo systemctl start deluged sudo systemctl enable deluged |
Update Deluge headless install.
As mentioned in the previous section, Deluge is included in the official Ubuntu repositories. But you still need to use the latest Deluge version, as the Ubuntu repositories may be outdated. Use the following Deluge PPA repository, which contains the latest Deluge releases for Ubuntu.
|
1 2 3 |
sudo add-apt-repository ppa:deluge-team/stable sudo apt update sudo apt install deluged deluge-web deluge-console |
d. Confirm the installation.
Now, let’s confirm the installation of “deluged” and “deluge-web”. We will also use the ‘which’ command to check the installation path for both binaries. Issue the following commands:
|
1 2 3 |
sudo apt-get install deluged deluge-web which deluged which deluge-web |

If the ‘which’ command does not return any output, the Deluge packages are not installed on your system or are not in your system’s PATH. In this case, you can try reinstalling the packages using the command above.
Check users and group
Use the following command to check your users and group. The last command will show you the groups that the “deluge” user belongs to (if you already created it)
|
1 2 3 |
$ cat /etc/passwd $ cat /etc/group $ groups deluge |
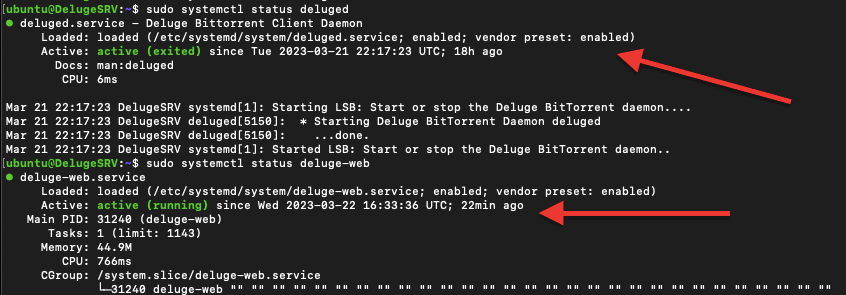
Check Deluge services.
If you are installed deluged and the Deluge Web, start (and check) the service.
|
1 2 |
$ sudo systemctl start deluged $ sudo systemctl start deluge-web |
|
1 2 |
$ sudo systemctl status deluged $ sudo systemctl status deluge-web |
Note: The Linux’s systemd service (for deluged and deluge-web) might need to be configured. Configuring the service is outside the scope of this guide, but you can follow official Deluge documentation to create and configure these services.
5. How to use Deluge.
a. Logging Into Deluge Web-UI console.
In the following example, we will log into a remote Deluge WebUI console.
For this guide, we will provide a walkthrough of how to use Deluge, using screenshots of its WebUI. Note that Deluge Web-UI (remote access) and Deluge (GTK desktop application) designs differ slightly.
Let’s access the Deluge WebUI from your web browser:
- Open your web browser and go to the following URL: http://localhost:8112
- If you are accessing the WebUI from a different machine on your network, replace “localhost” with the IP address of the machine running the Deluge daemon.
- For example, Rapidseedbox provides an installed Deluge server, where you only need credentials and the IP address to access deluge from anywhere just using your browser.
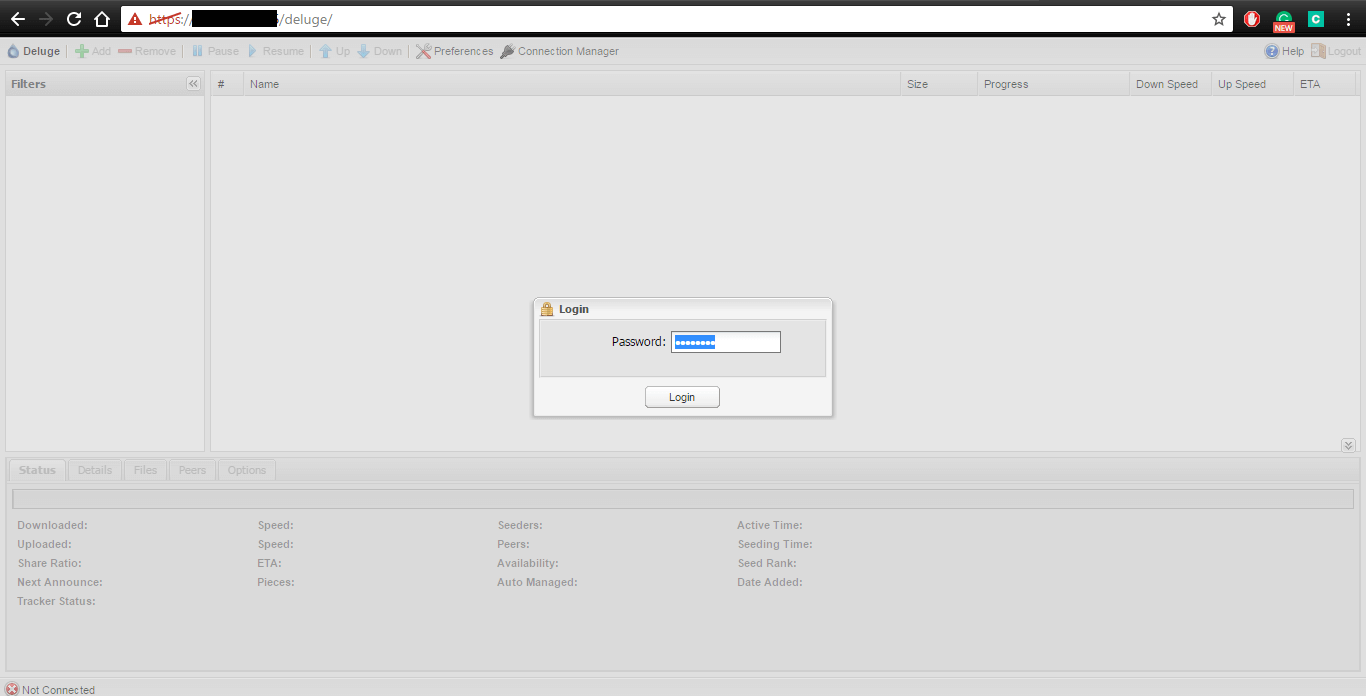
- Locate the URL of your Deluge client. It will be in the following format: https://111.222.333.444/deluge/.
- Navigate to this link, and you will be prompted for credentials, like in the picture below:
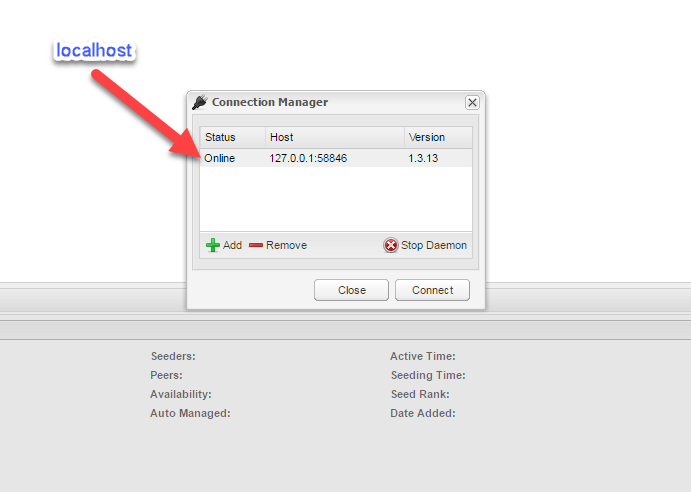
- Connection Manager will open. Select your localhost and click the Connect button, as shown in the picture below.
- When you log in successfully, you will see the Deluge WebUI console.
b. The Menu Bar.
- One of the most noticeable WebUI features is the menu bar. We will explain step-by-step what is the purpose of every button.

So let’s start explaining what every button does!
- “Add” button is for adding torrents.
- “Remove” button. With this button, we can delete single or multiple torrents.
- “Pause” button we can use for pausing torrents.
- “Resume” – button role is to resume downloading/uploading your torrent/torrents.
- “Up” Increase tracker order and priority of the tracker in use.
- “Down” Decrease tracker order and priority of the tracker in use.
- “Preferences” button where we can change all of the settings.
- “Connection Manager” use this button to add new connections and start Deluge daemon.
- “Help” button. Click this button to access official Deluge support page.
- “Logout” use this button to log out of the current user session.
c. How to load a torrent in Deluge?
You can load torrents in two ways, via the URL magnet link or using the .torrent file.
- To add a torrent in any of the two ways, click on the “Add” button, and you will get a popup window as shown in the picture below:
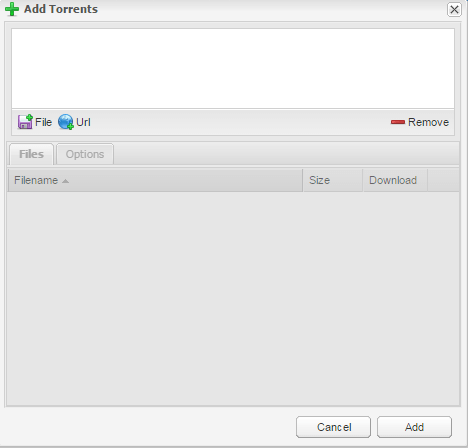
- “File” – Using this button, you can browse for .torrent files in your directory and add them to Deluge.
- “URL” – Using this button, you can add the URL magnet link of the torrent you wish to download and add it to Deluge.
- “Files” tab – This will show all the files that the torrent file contains.
- “Options” tab – In this tab, you can set up your download destination folder and the “max Download” and “max Upload” speed.
- “Remove” button – Remove added torrents from add window.
After we select “Add file” or “Add URL”, our torrent file will start downloading as shown in the picture below:

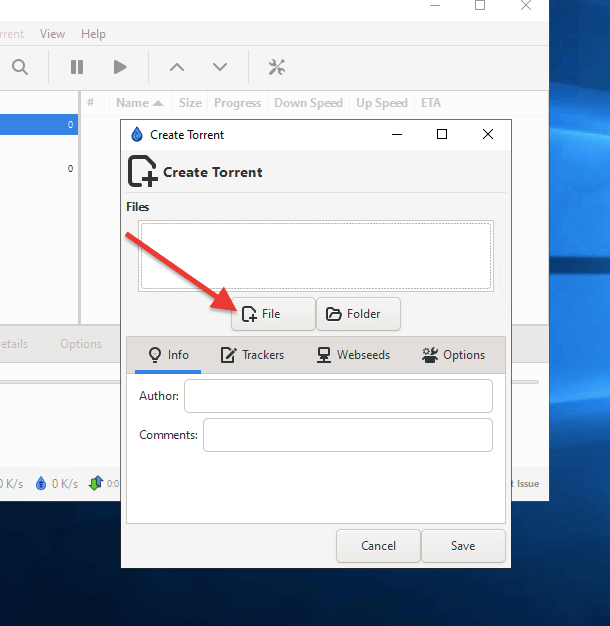
d. How to create a torrent with Deluge GUI?
You can’t create torrent files using the Deluge WebUI client. Instead, you must use the Deluge GUI client, thin client, or Deluge GTK. To create a torrent, open the Deluge client or connect to the remote server hosting Deluge.
- When Deluge opens, go to “File” tab in the top-left corner and select “Create Torrent.”
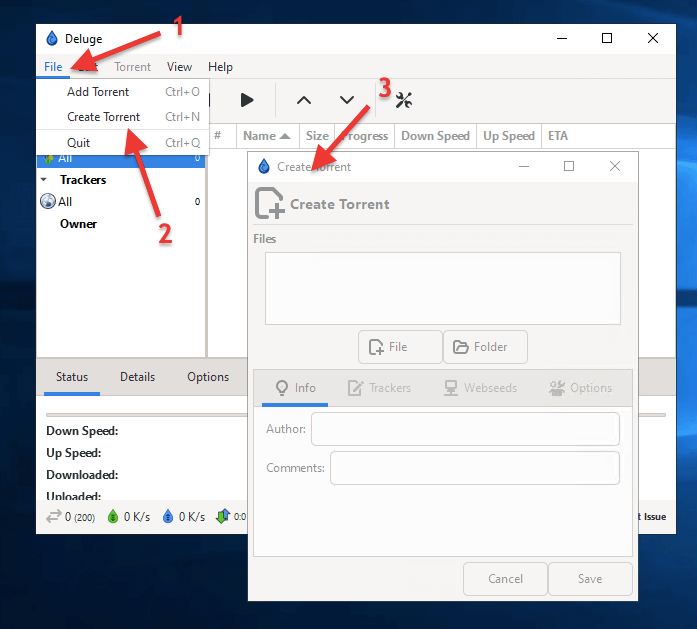
- A “Create Torrent” window will pop up. Enter the file path or folder along with the information, trackers, web seeds, and other options.
How to use the Deluge GTK’s “Create Torrent” feature?
Below is a brief description of the options in the “create torrent” panel.
- “File” – Using this button, you can browse the files in your directory that you want to create a torrent.
- “Folder” – Using this button, you can browse for folders in your directory that will create a torrent.
- “Info” – Using this tab, you can add information to your torrent file like “Author” and “Comments.”
- “Trackers” – This tab adds trackers to the torrent file you are creating.
- “Web seeds” – Add the location of the web address to the hosted file when creating the torrent.
- “Options” – In this tab, you can set “Private Flag” for your torrent file and set the “Piece Size” that you wish your torrent to have.
- “Save” – Save your torrent when you create it.
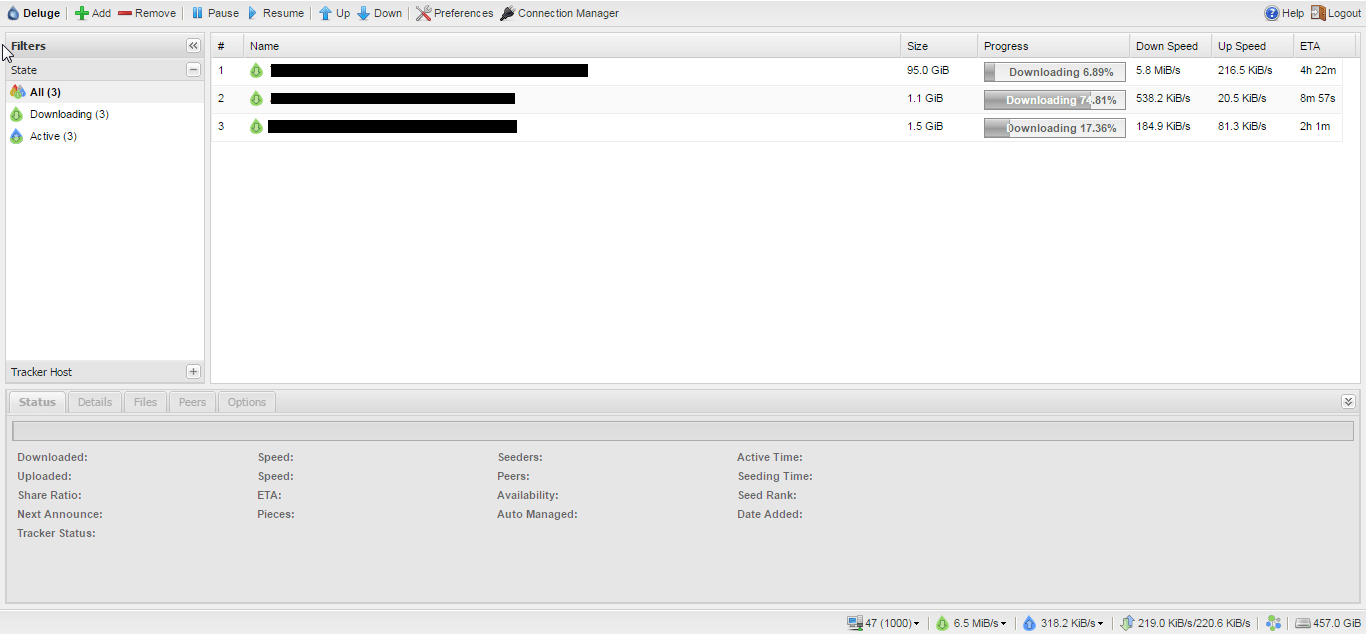
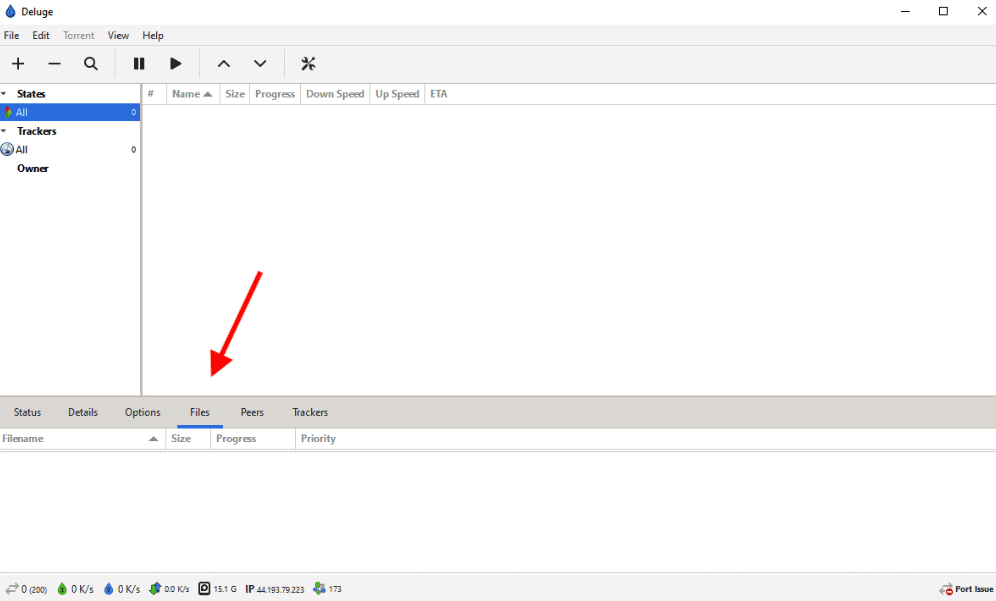
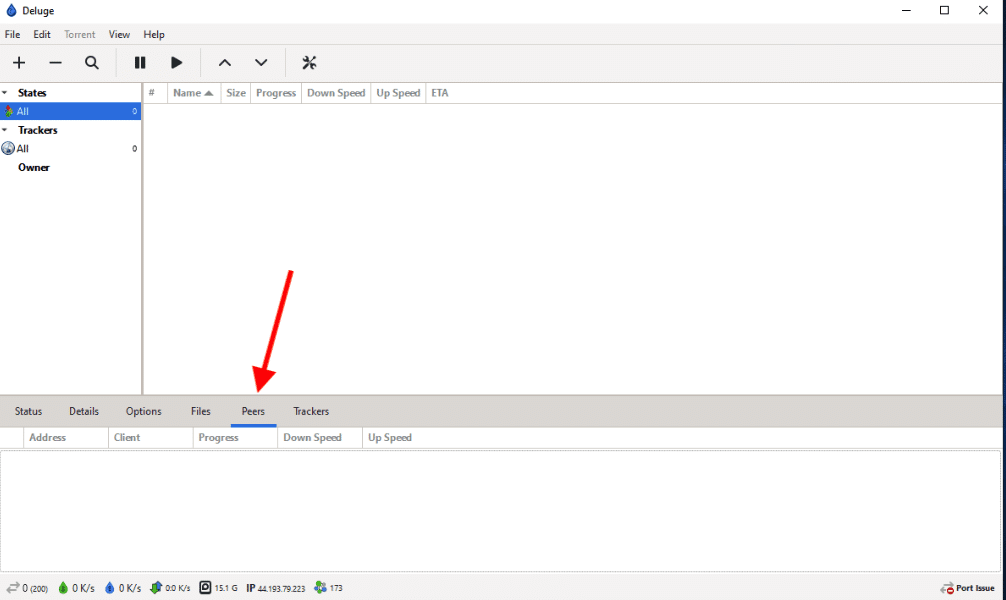
e. The Main Dashboard
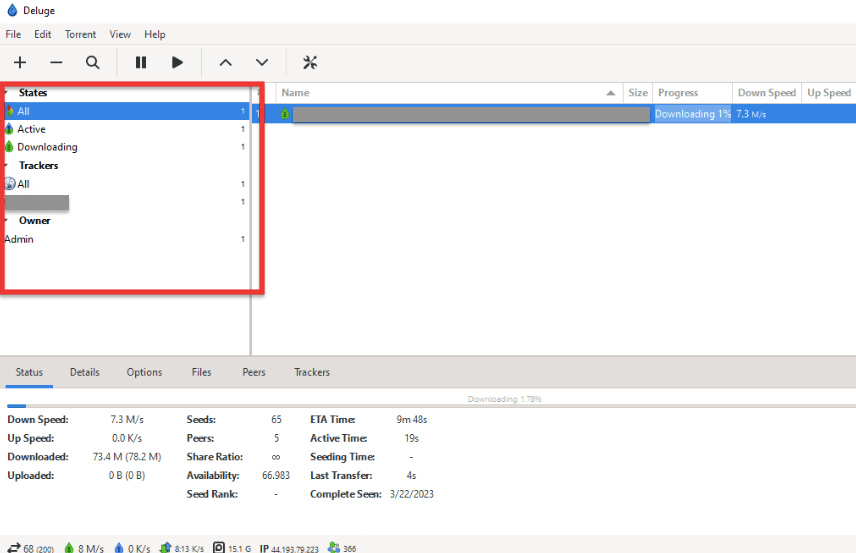
When you select a particular torrent (as shown in the picture), you’ll notice, at the bottom, all information related to that torrent.
- You will see the following tabs: Status, Details, Files, Peers, and Options. All are showing real-time metrics.
- That information displayed here is handy for keeping track of your loaded torrents.
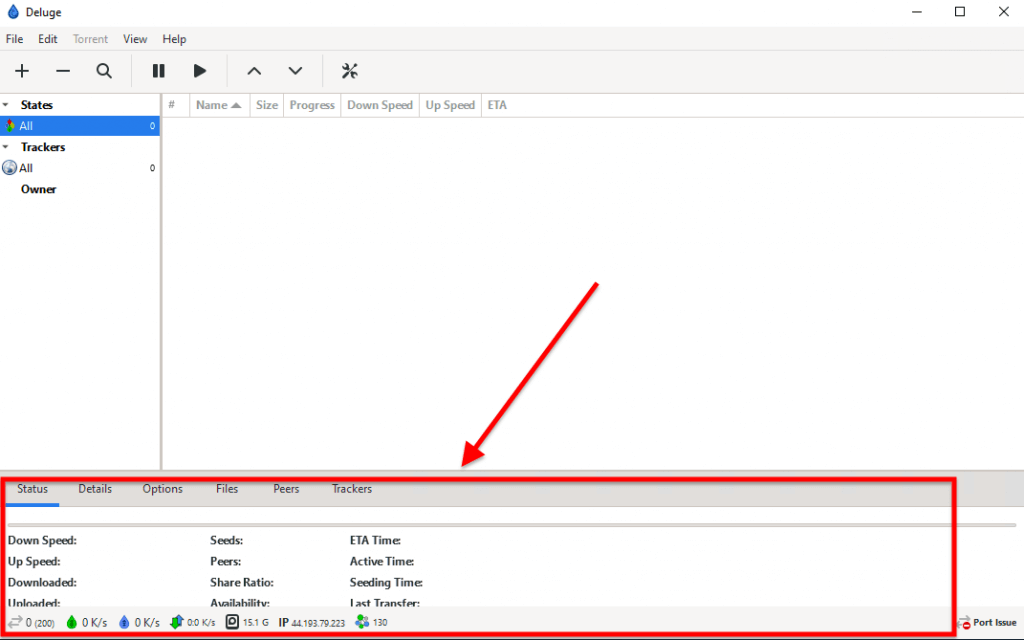
The Status tab.
In the “Status” tab, we can find info about:
- “Downloaded” – Showing how much data is currently being downloaded.
- “Speed (Download)” – Showing the speed of your downloads.
- “Uploaded” – Show how much data is uploaded.
- “Speed (Upload)” – Showing the speed of your uploads.
- “Seeders” – Showing how many seeders are connected now.
- “Peers” – Showing how much peers are connected.
- “Active Time” shows how long a particular torrent file is active.
- “Seeding Time” shows how long a specific torrent file is seeding.
- “Share Ratio” – The ratio calculated by dividing the amount of uploaded data by the amount of downloaded data.
- “ETA”– Estimated time your torrent needs to download the file.
- “Tracker Status” – Is showing the tracker URL and status info.
- “Pieces” shows how many pieces your torrent file is divided into and how big they are.
The Details tab
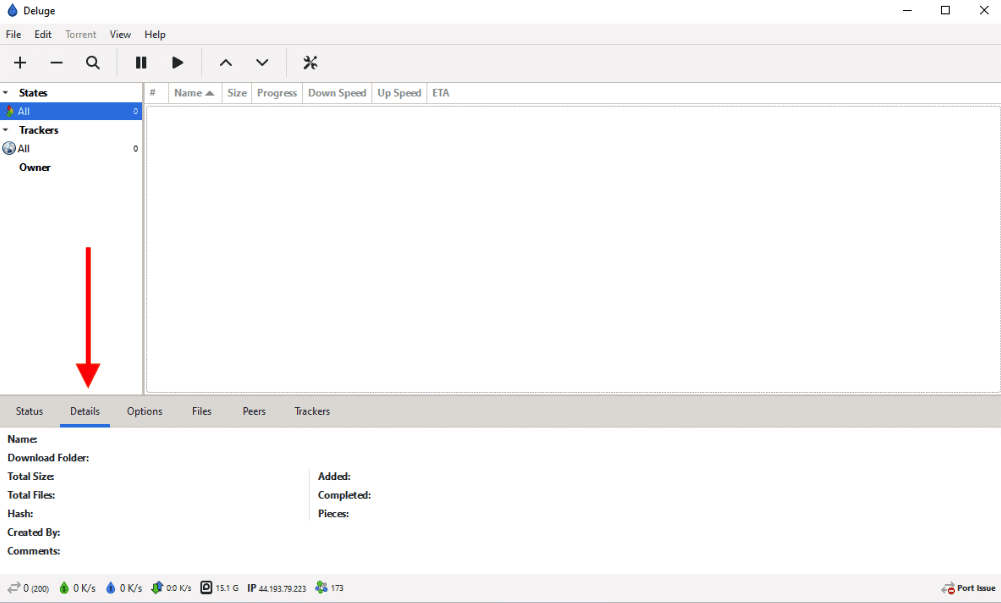
- “Name” – Name of the torrent file.
- “Hash” – Hash representation of your torrent file.
- “Path” – Path to your data.
- “Total size” – Total size of your torrent file after downloading.
- “# of files” – Number of files in the torrent file.
- “Comment” – Comment on the author of the torrent file created.
- “Status” – Status of your torrent file.
- “Tracker” – Tracker from where you are downloading your torrent file.
The Files tab
In the “Files” tab, we find info about particular files in torrent data. Here, you can see the file’s name, size, progress, and priority.
The Peers tab
The “Peers” tab shows real-time information about connected peers, their public IP address, country, speed, torrent client, and more. If you don’t want your IP address shown to others in the Peers tab, then using a torrenting anonymous method like seedbox, VPN, or proxy is a great idea.
The Options tab
You can configure different parameters related to your torrent files in the options tab. You can see three configuration groups of options: “Bandwidth,” “Queue,” and “General.”
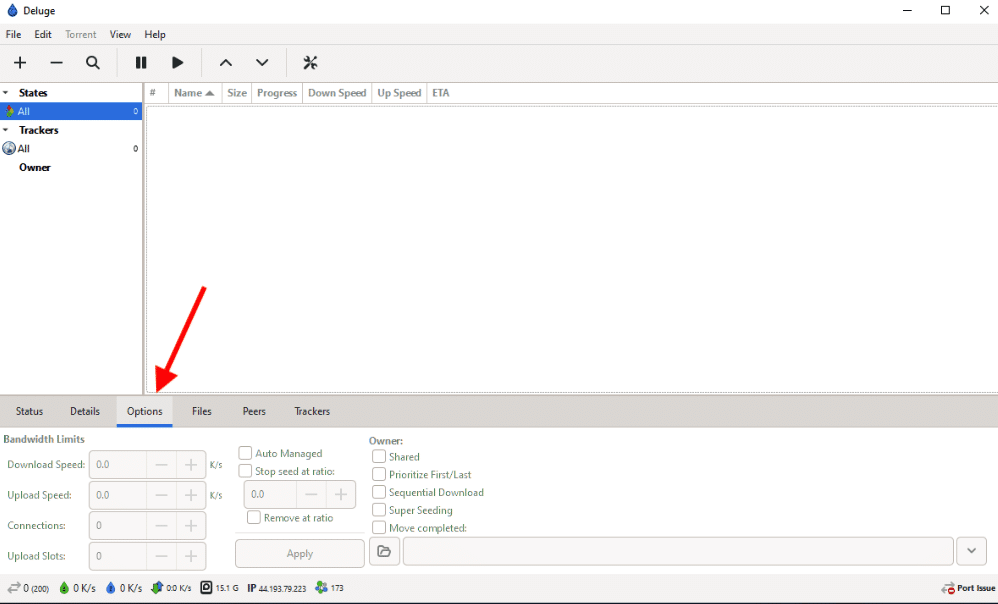
Bandwidth
- “Max Download Speed” – Here, you can set the max download speed of your torrent.
- “Maximal Upload Speed” – Here, you can set the max upload speed of your torrent.
- “Max Connections” – Set max connections to your torrent file.
- “Max Upload Slots” – Set the max number of upload slots for your torrent file.
Queue
- “Auto Managed” – Auto Manage your ratio and download location at torrent completion.
- “Stop seed at ratio” – Automatically stop seeding when you reach a specific ratio that you can manually set.
- “Remove at ratio” – Remove the torrent file from the client when it reaches a particular ratio you can manually set.
- “Move Compleated” – When a data file downloads, you can set the directory to which the file will be transferred.
General
- “Prioritize First/Last” – Set priority to your torrent files when they are downloading.
- “Edit Trackers” – Edit trackers from which you are downloading your data.
f. The Bottom menu bar explained
The Bottom menu bar shows vital information all the time.
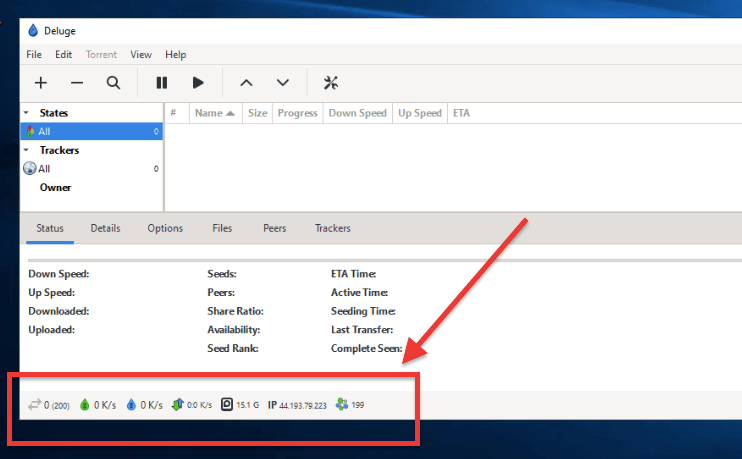
- Connections (limit): Displays the number of active connections that Deluge has established with other peers in the torrent network.
- Download speed (limit): This icon displays the current download speed of the torrent in kilobits per second (Kbps).
- Upload speed (limit): This icon displays the current upload speed of the torrent in kilobits per second (Kbps).
- Protocol traffic (Down:Up): The amount of data downloaded and uploaded by the torrent client, respectively. The values are displayed in kilobytes per second (KB/s) and are separated by a colon (:).
- Free Disk Space: This icon displays the amount of free disk space available on the drive to which the torrent data is being downloaded. This information helps avoid running out of disk space while downloading large files.
- External IP address: This icon displays the public IP address of the computer running the Deluge client.
- DHT Nodes: This shows the number of Distributed Hash Table (DHT) nodes that Deluge has discovered and is currently connected to.
Pro tip: As a best practice, it is recommended not to fill your HDD to 100% to prevent your torrent client from freezing and crashing.
g. The Left side menu
The left-side menu provides quick access to information about loaded torrents. It shows the current state of active torrents, such as downloading, seeding, paused, checking, errors, etc. In addition, the left-side menu also shows information about the trackers and the torrent owners.
- “All” – Sum of total loaded torrents.
- “Downloading” – Sum of torrents that are currently downloading.
- “Seeding” – Sum of torrents that are finished downloading and seeding.
- “Paused” – All paused torrents.
- “Checking” – All torrents that the client is checking.
- “Error” – All torrents with some active error preventing them from downloading/seeding.
- “Trackers” – Displays currently loaded trackers.
6. Tips to Optimize Deluge User Experience.
a. Organize your Downloads.
Your Downloads folder might get disorganized after a few many downloads. It is time to organize it and configure Deluge to continue keeping order. To manage your downloads, follow these instructions:
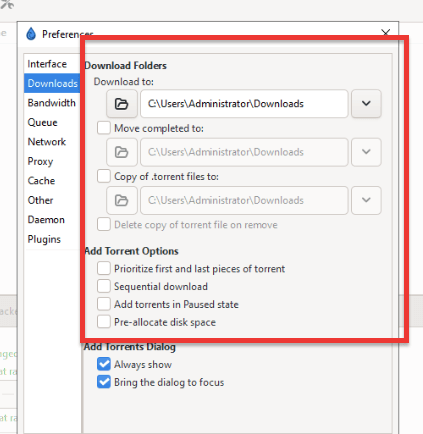
- Go to Edit > Preferences (or Ctrl+P) > Downloads
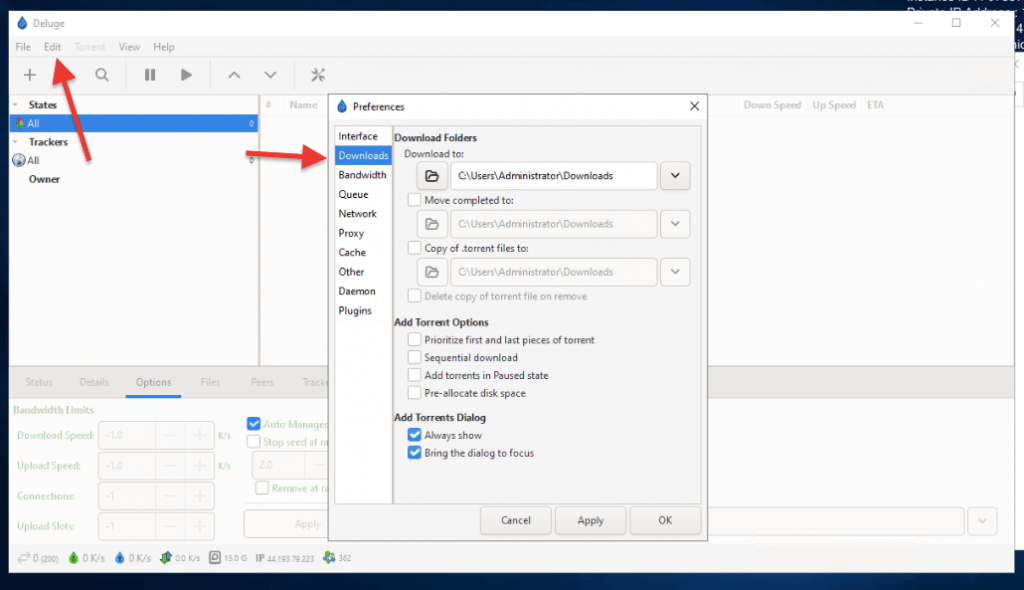
- Deluge will, by default, save all your downloads to the “Downloads” folder. You should change to a good and preferred location for the sake of the organization.
- On “Downloads Folders,” choose the desired folder to download all content. It could be media, stuff, a movie folder, or whatever name you give. You’ll notice the following settings “Download to,” “Move completed to:,” “copy of .torrent files to,” and Add Torrent options.
- “Download to”: This setting allows you to specify the location on your computer where you want Deluge to download your torrents.
- “Move completed to”: This setting allows you to specify the location on your computer where you want Deluge to move your completed torrents.
- “Copy of .torrent files to”: This setting allows you to specify the location on your computer where you want Deluge to save a copy of the .torrent file for each download.
b. Set up Deluge Thin Client for Remote Management.
To set up Deluge for remote access, you must configure the remote server first. Deluge daemon or “Deluged” can be installed on a central server so that other computers can access and control it remotely through any Deluge client, such as the desktop app or WebUI.
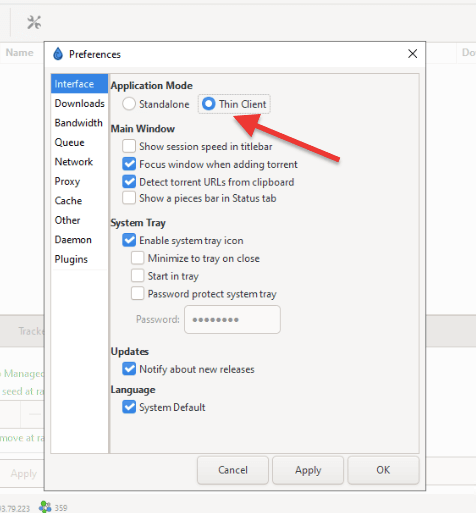
Your Deluge client can be used in two application modes or interface configurations: standalone and thin client. Standalone Mode is the default mode in which Deluge is installed and used as a regular desktop application. Deluge also functions as a BitTorrent client in this mode and can download and upload torrents independently. In the Thin Client Mode, Deluge runs as a background process on your computer, without a GUI, and serves as a server for remote control by a separate Deluge client application installed on another device. The Thin client lets you remotely control Deluge’s BitTorrent client functionality (torrent downloads, settings, or any other feature) from another computer or device.
i. Let’s set up the Deluge (deluged) server.
- If you have already installed the Deluge daemon “deluged” into a Server, you can configure the local client. If not, follow these steps:
- Log in to your remote Deluge server (Seedbox/VPS) to configure remote access.
- Make sure you are using a privileged account with “su -user” or use “sudo” prior to each command.
- To configure your thin client, you’ll need information like username, password, and server IP in the server’s config file. Or, if you are hiring a seedbox, you can see that information in your client area. The default Deluge port is 58846.
- If you can’t find the information, use these commands. Find your IP address: “ip a” or open “/sbin/ifconfig”. To find the username: “whoami”. To find the Deluge remote port (sed -rn ‘s/(.*)”daemon_port”: (.*),/\2/p’ ~/.config/deluge/core.conf), to find the password: (sed -rn “s/$(whoami):(.*):(.*)/\1/p” ~/.config/deluge/auth.
- To configure the Deluge remote option. Let’s first stop the deluged service (systemctl stop deluged). Now, we need to allow remote connections: “deluge-console “config -s allow_remote True” > “deluge-console “config allow_remote” and start deluge “deluged”
Looking to master Deluge?
Streamline your torrenting with RapidSeedbox’s high-speed seedbox, designed to improve your Deluge experience. Enjoy faster downloads, reliable performance, and expert support!
ii. Let’s set up the Deluge Thin Client
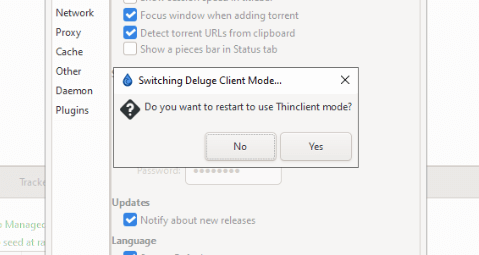
- For Windows, go to Preferences > Interface > Enable “Thin Client.” This action will hide most of the daemon functionality on your local computer.
- Deluge will ask you to restart the client.
- Once Deluge is back again, you’ll get the following “Connection Manager” popup:
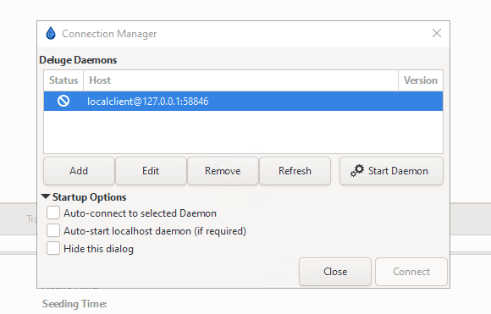
- Click the “Add” button to add a remote connection. Add the IP address/ hostname of your server and Username and Password. We previously configured a Thin Client service on an Ubuntu server; go back if you have any doubts about the server.
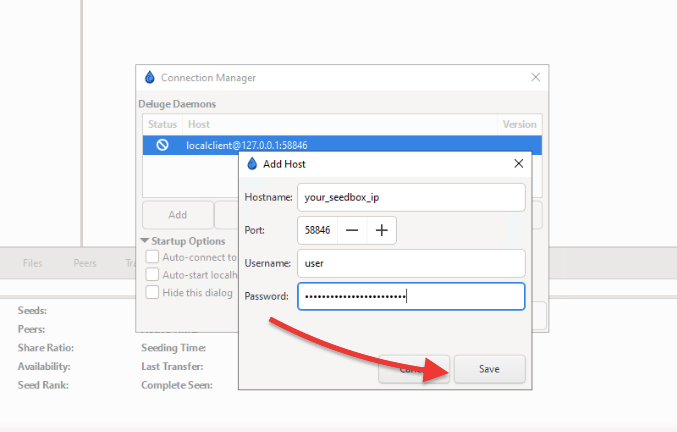
- Add the Host: Enter the hostname (or IP address), the port (default is 58846), and the credentials (username and password). Click on “Save.”
- Ensure your thin client accepts remote connections. Go to Edit > Preferences > Daemon > Connections > Click on “Allow Remote connections”
- Now, you should be able to initiate a remote connection with Deluge.
- For more information on installing Deluge Thin Client and the server, check out “How to control Deluge remotely with a thin client.”
c. Enable Deluge WebUI.
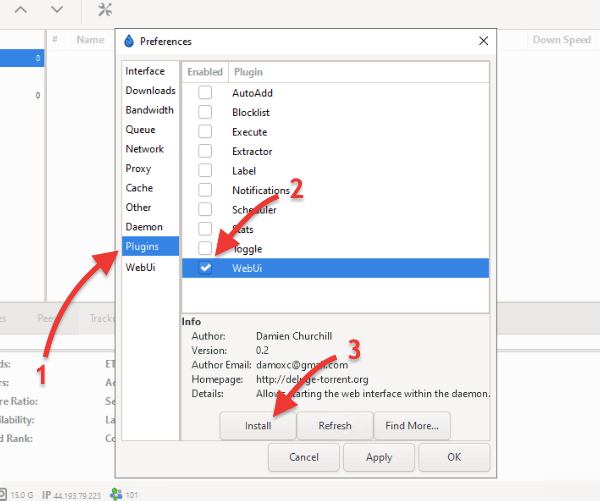
There are two requirements when enabling Deluge WebUi. First, your client’s interface mode should be set to “standalone,” You’ll need to install the WebUi plugin.
- To set the application mode to “Standalone.” Go to Preferences > Interface > Standalone.

- Next, you’ll need to enable the WebUI plugin. Go to Preferences > Plugin > WebUi > Click “install”
- Once installed, you’ll see the new “WebUi” plugin at the bottom of the right-hand menu in Preferences. Click on WebUi and ensure “enable web interface” and “SSL” are selected. Using both SSL and a strong password is strongly recommended to protect your Deluge WebUI from unauthorized access.

- The default password for the web interface is “deluge.”
- Older Deluge client versions allowed you to change the WebUI password from “Edit” > “Preferences” > “Interface” > “WebUI” section as you can learn here.
- To change the WebUi password (for Deluge client/daemon in Linux systems), go to the webui config file (.config/deluge directory) and change it from the text editor.
7. How to install a Deluge plugin.
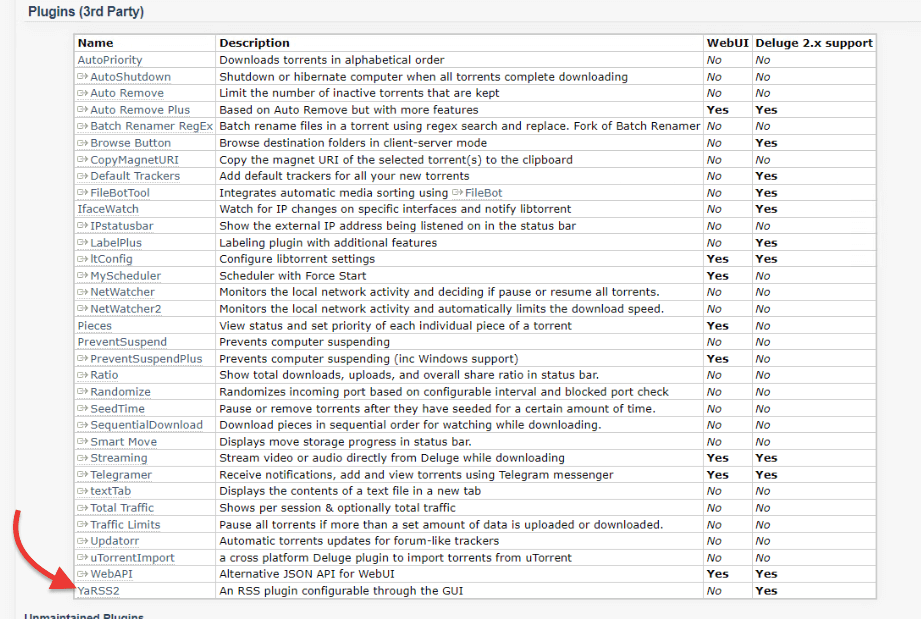
Plugins make Deluge one of the most fantastic torrent clients out there. These plugins are add-ons. They can be installed and enabled within the Deluge client. Some popular plugins are AutoAdd, Label, Scheduler, Notifications, Extractor, Blocklist, WebUI, LtConfig, and YaRRS2.
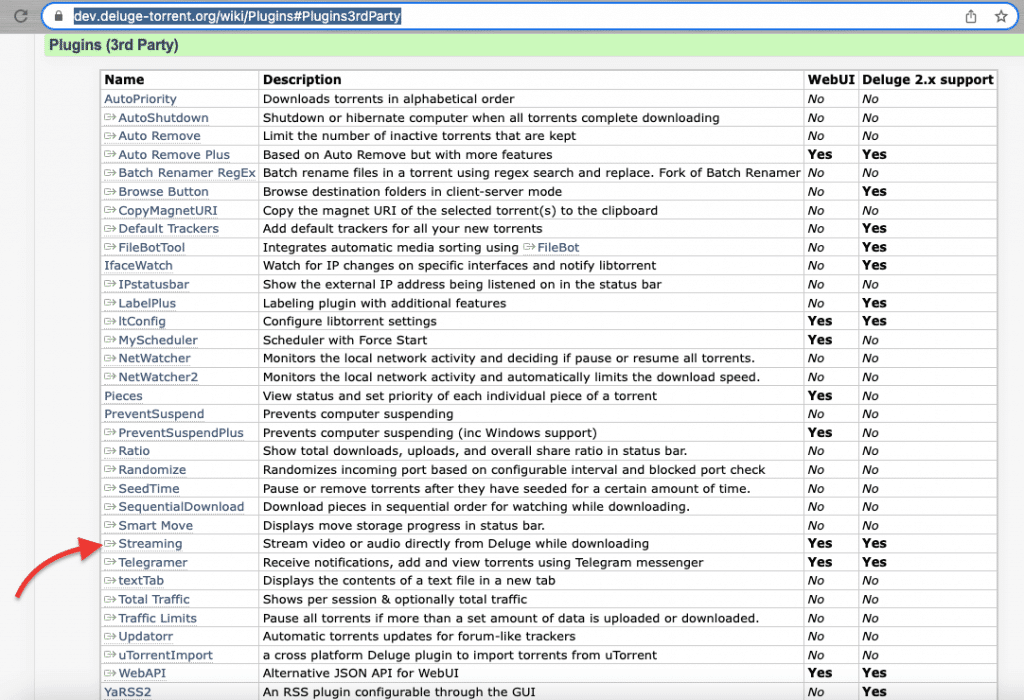
a. Example of how to install a 3rd-party plugin.
- To install a 3rd party plugin, go to the official Deluge plugin website, and browse through their library of 3rd party browsers or application plugins.
- In this example, you will learn how to integrate streaming video and audio directly from the Deluge client while downloading with the help of a 3rd party plugin.
- Find the “Streaming” plugin in the official Deluge library. As you will notice, from the picture below, not all plugins are supported by WebUI and Deluge 2.x.
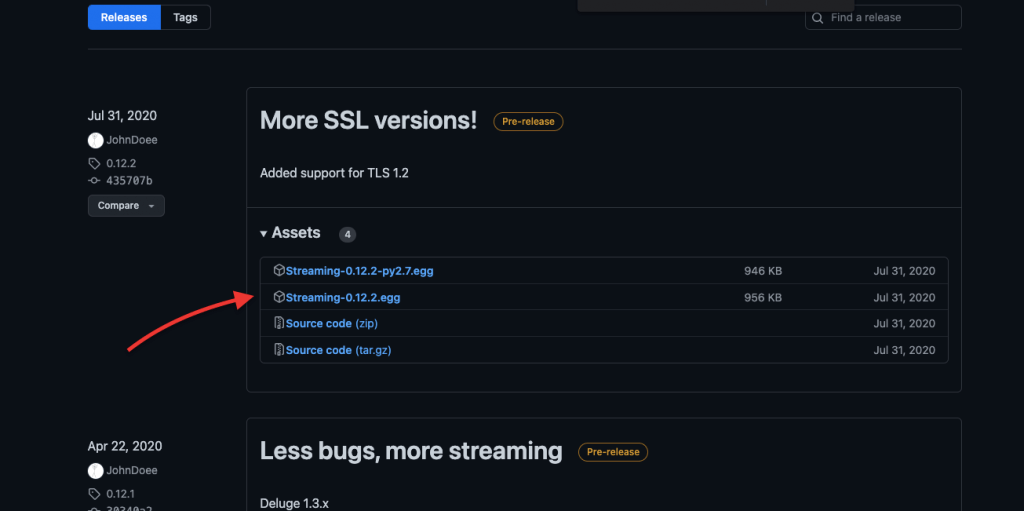
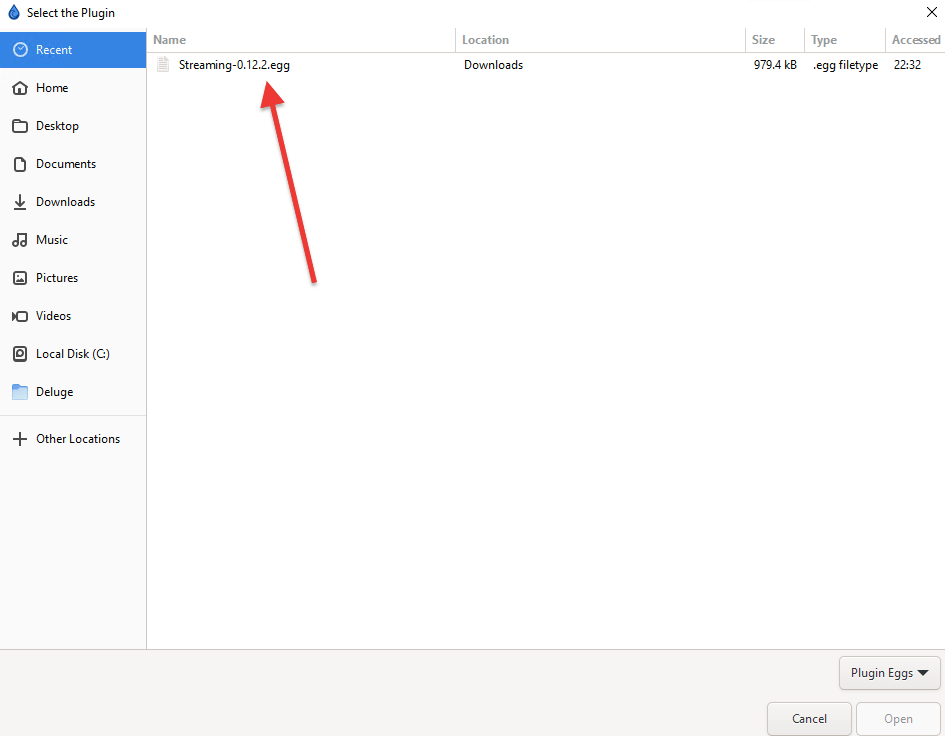
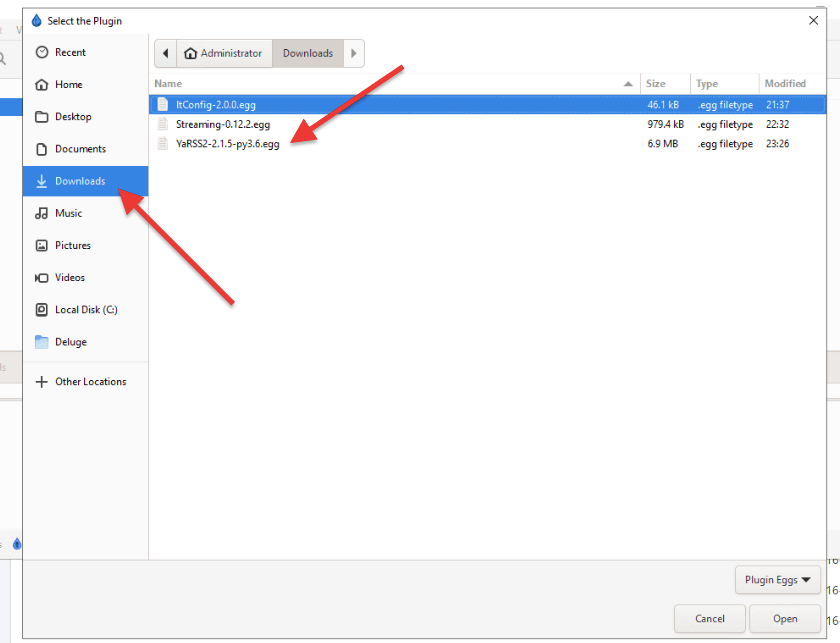
- Find the downloadable link. It could be a direct or Github link. For this “streaming plugin” example, we will download the “.egg file” found on the site. Make sure you download the correct version for your Operating System.
- Once downloaded, go to your Deluge client. Next, open Preferences > Plugins > Install Plugin.
- In the “Select the Plugin” window, go to where you downloaded the .egg file (for us, it was Downloads). Deluge will detect the .egg file and include it here.
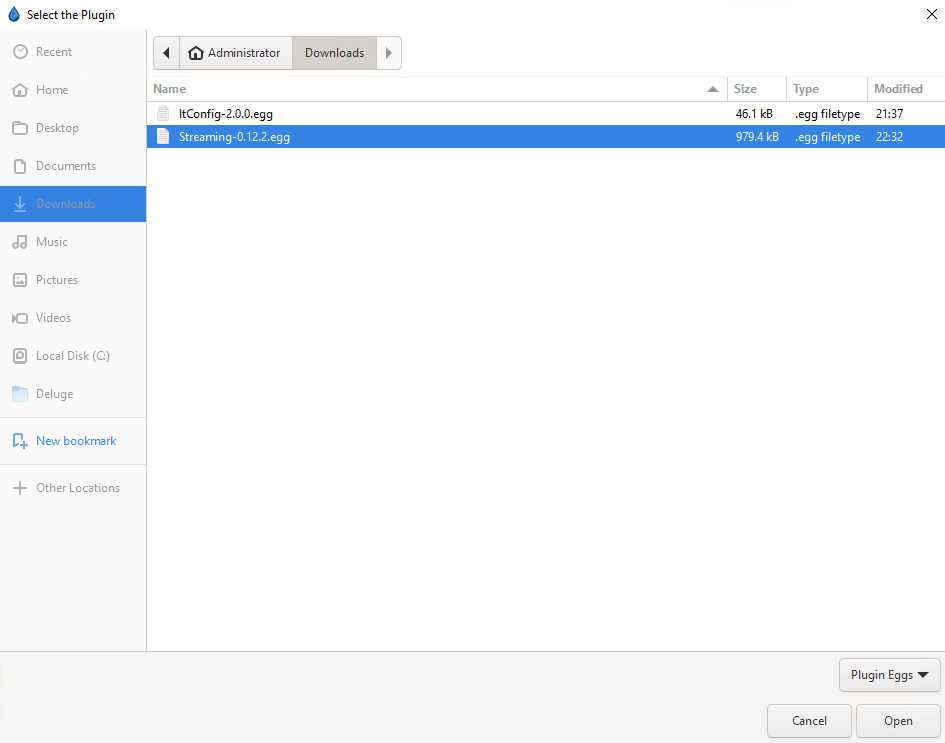
- Find the correct plugin and click on Open. If it doesn’t work, try with an older or newer plugin version.
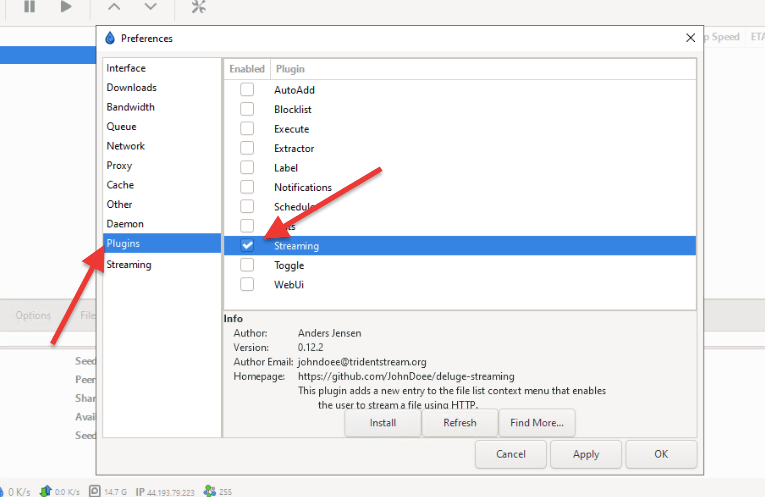
- Next, go back to “Plugins” > check on the “Streaming” option (or the name of the plugin you are installing) > “Apply” > “Ok.”
- It will take a few seconds. You will see the installed plugin on the “Recent” window of “Select the Plugin”
- The successful plugin Deluge installation will be shown in the left-hand side menu from Preferences (as shown below). Tweak the plugin’s properties as you see fit.
b. Let’s install the Scheduler Plugin for Deluge
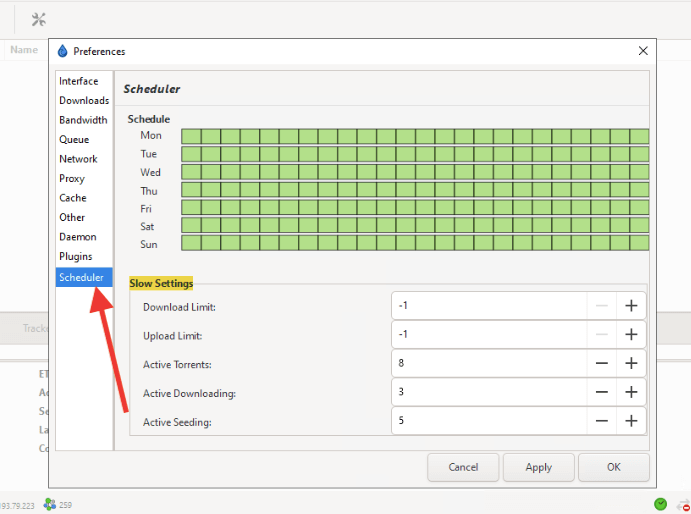
One of the most useful built-in features of Deluge is the Scheduler plugin. A unique feature of this plugin is the ability to place limits on bandwidth usage throughout the day. “Scheduler” is included in Deluge’s plugin, so you won’t have to download and install it. Enabling this plugin is relatively straightforward.
Here’s a short walk-through on how to activate the Scheduler on WebUI.
- Login to WebUI. Go to Preferences > Plugins.
- You’ll notice that “Scheduler” is already included but disabled. Go ahead and check on the box to enable it. Click “Apply” and “Ok.”
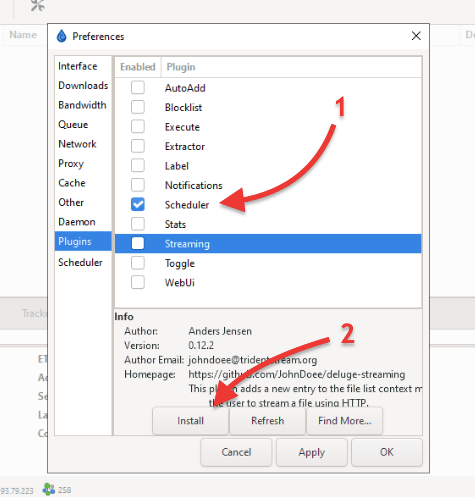
- Close this window and refresh. The “Scheduler” plugin appears in the Preference’s menu bar.
c. How to install and use the YaRSS2 plugin.
This section will show you how to use RSS on Deluge with the YaRSS2 plugin.
With the YaRRS2 plugin, Deluge can automatically check RSS feeds for new torrent files and download them to a specified directory on your computer. This plugin can be handy for keeping up with new content from your favorite torrent sites without manually searching and downloading each file.
- A prerequisite of YaRSS is Python, so make sure, before installing this plugin, that you have the latest version of Python.
- The “Plugin Egg” file is the “YaRSS2” plugin and is based on the “Python” version displayed on the file. So to find out the “Python” version you need, go to the terminal and type in this command “python –version” or “python3 –version”. Once you know the Python version, you’ll know the YaRSS2 version.
- Go to the official Plugin’s site. Notice that YaRSS2 is not supported by WebUi, only by the Deluge 2.x client.
- Click on it to get the downloadable link.
- Download YaRSS2 from the bitbucket repo. Download the latest .egg file.
- Open Deluge > “Preferences” > “Plugins” > click the “install” button. The window “Select the Plugin” will appear. Find the .egg file and click on “Open”
Using the YaRSS2 plugin.
- Open your Deluge client (thin or GTK), as “YaRSS2” is incompatible with WebUi.
- Open Deluge > Go to “Preferences > YaRSS2 > RRS Feed > Add Feed“
- Enter an “RSS Feed name” and the “RSS Feed URL” for your feed, then click the Save button.
- Next, click on the “Subscription Tab” and then “Add Subscription”
- A new window will appear where you must enter a name, select the feed you just added, and enter any filters you want. Click on Save.
- Under the “Subscriptions list,” right-click the subscription you just made, click “Run this subscription,” and click OK.
Now you will notice that your torrents will begin downloading automatically. And also, when you finish configuring your RSS feed, you can use your WebUI to check the status of torrents, or you can continue using your GTK over the remote desktop. For more on how to use YaRSS2, check out our YaRSS2 tutorial.
8. Improve Deluge speed and anonymity.
Note: The following suggested Deluge settings are not a “fit-to-all” approach. Scenarios change for every particular user. For instance, you might have the fastest bandwidth and best computer, but your ISP might be doing a great job blocking torrent traffic. Or, you are using Deluge VPN, but the VPN service provider keeps your logs.
a. Avoid bandwidth throttling.
Internet Service Providers (ISPs) are constantly hunting down P2P and BitTorrent traffic. There are mainly two reasons for this: it has been “historically” one of the top consumers in bandwidth utilization; second, it has received a bad reputation. So, when ISPs detect torrent traffic, usually with a port number, they will throttle it (limit it) or completely block it. Fortunately, there are ways to bypass these restrictions imposed by your local ISP, like changing ports.
Deluge ports.
Before we continue, let’s learn about the port numbers.
- The Deluge default port is: 58846
- The default Deluge port for WebUI is: 8112
By default, Deluge communicates on port 58846. But remember that this is signaling (communication) and not torrenting traffic. Regarding data (torrenting traffic), this torrent client uses random ports, usually between 50,000 and 65,000.
How to change the default Deluge ports?
You might have to adjust the default Deluge port settings to allow torrent traffic to flow freely in and out of your torrent client.
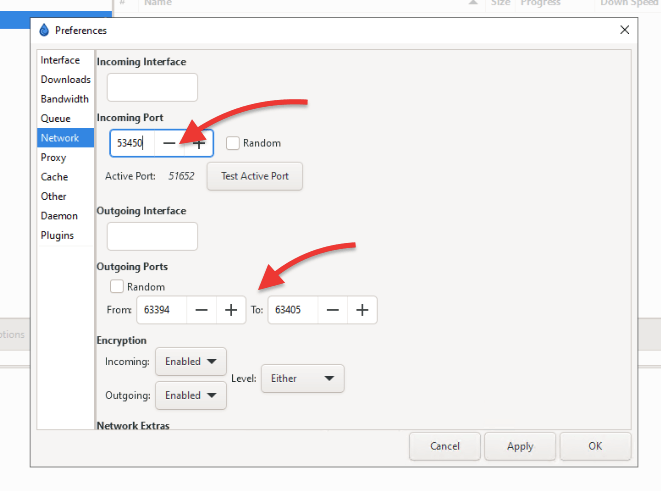
- Go to Edit > Preferences > Network. Uncheck “Random” for incoming and outcoming ports. Assigning a manual port is not always the best option, but it is helpful if you need to forward it (more on this in the next section).
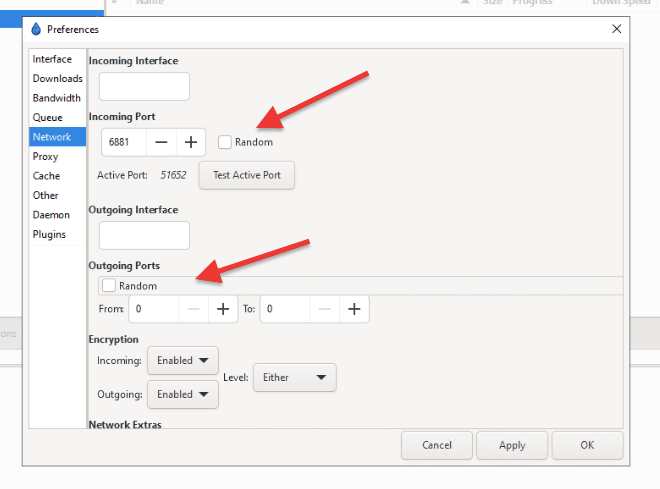
- You can manually change the port number to any number between 50,000 and 65,000. Especially avoid lower ports within the 6881-6999 range, as they tend to be blocked by ISPs.
b. Disabling vs. enabling DHT.
Note: Before you enable DHT (Distributed Hash Table)… keep in mind that some private trackers will require you to disable DHT or the “tracker-less” method. DHT could leak information about other users within the torrent swarm. These private trackers only provide torrent files with a private tag set, which won’t work when DHT is enabled.
On the other hand, leave DHT on if you are using a Deluge client on a public tracker. Although DHT requires more network overhead, it does provide benefits when it comes to public trackers. DHT helps find more peers, hence speed.
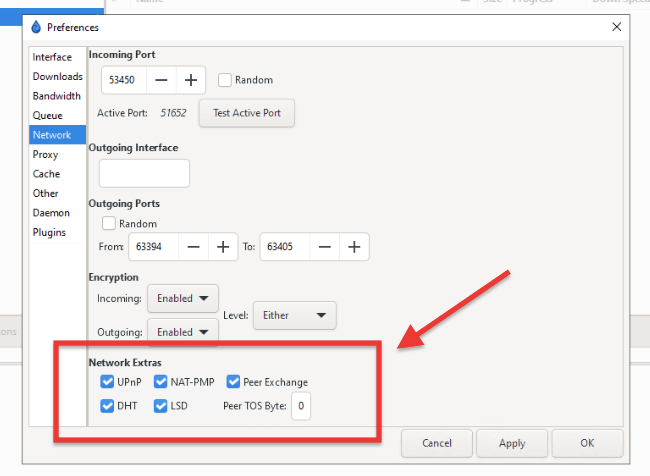
- You’ll find DHT under Network Extras. Disable it if you are using a private tracker.
- If you are using public trackers with your client, leaving all the Network Extras default settings on is recommended. DHT and Peer Exchange (PE) will help you find more peers and seeds to download your torrent faster.
- More on UPnP in the next section.
c. Enabling encryption torrent.
The torrent encryption support built-in the Deluge client is a valuable feature to strengthen torrenting privacy and anonymity. It encrypts the data transferred between peers using the BitTorrent Protocol Encryption (PE). This encryption method encrypts the header of each message sent between peers, helping prevent ISPs from identifying and throttling BitTorrent traffic.
Note: If a peer on the torrent swarm has enabled torrent encryption and you haven’t, the connection to this peer will fail. To improve torrent connectivity, ensure your client can connect to other peers with the “protocol encryption enabled.”
- Go to Edit > Preferences > Network > Encryption. Ensure Incoming and Outgoing are set to Enabled.
- Is Forced encryption necessary? With the “Forced” setting, the incoming connections will only be accepted if encrypted. You may have to play with the Forced setting a little bit. For instance, enable it for some time, monitor it, disable it after a while, and monitor it again. Force encryption is too rigid and will lower the chances of a successful connection.
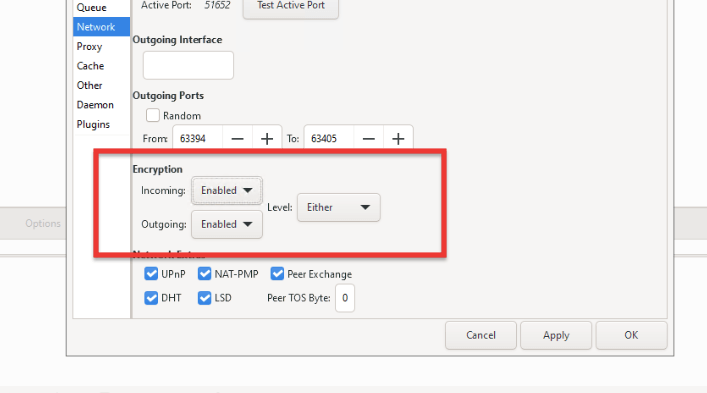
- Level of encryption: Choose the level of encryption to use for both incoming and outgoing connections. You can choose from “Handshake” or “Full stream.” If you select “Handshake,” only the initial handshake between peers will be encrypted. If you select “Full stream,” the entire data stream between peers will be encrypted. Leave the default “Either” unless you have specific reasons to choose others.
Note: Remember that the encryption torrent option only encrypts your inbound and outbound torrent traffic. Although it will not be readable, your traffic can still be intercepted and tagged as torrent traffic. If you want to increase your privacy, you’ll need to encrypt the entire layer 3 traffic (at the IP level), so it is recommended to set Deluge with VPN. To hide traffic at layer 7 (application layer), use a torrent Proxy. And finally, to hide, encrypt, and speed up your torrents, use a Seedbox.
d. Deluge Port Forwarding.
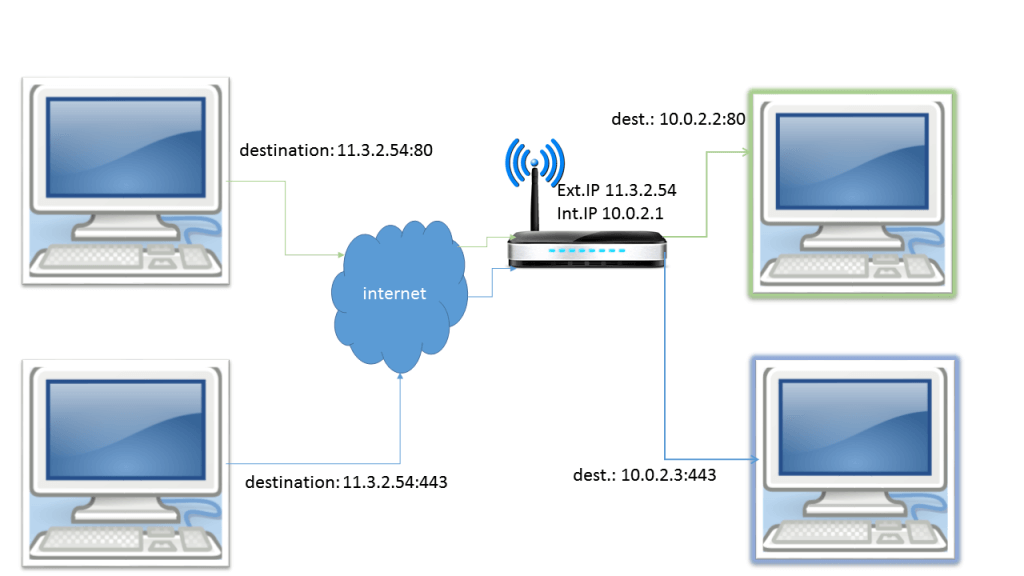
If your communication with other torrent peers is limited, slow, or impossible, then it is likely that a networking device might be blocking your Deluge ports. When the gateway, router, or firewall receives an incoming connection from an external remote client (a torrent peer), the device will not know where to forward it within your Local Area Network (LAN), so it discards it.
So, since you trust Deluge and the torrent peers, you’ll need to set up port forwarding so that such networking device knows exactly where to forward the traffic. With port forwarding, the device intercepting inbound traffic and doing the NAT will know where to deliver that remote Deluge client traffic.
How does port forwarding work?
(Refer to the diagram below) The remote client with external public IP 11.3.2.54 wants to talk to the internal computer with the green box, so it connects to your Internet gateway (router) through the external “public IP”. If the external computer (11.3.2.54:80) wants to have a conversation with the internal (10.0.2.2:80), the router (with predefined port forwarding rules) will know where to forward packets based on the port number.
How to Configure Deluge Port Forwarding?
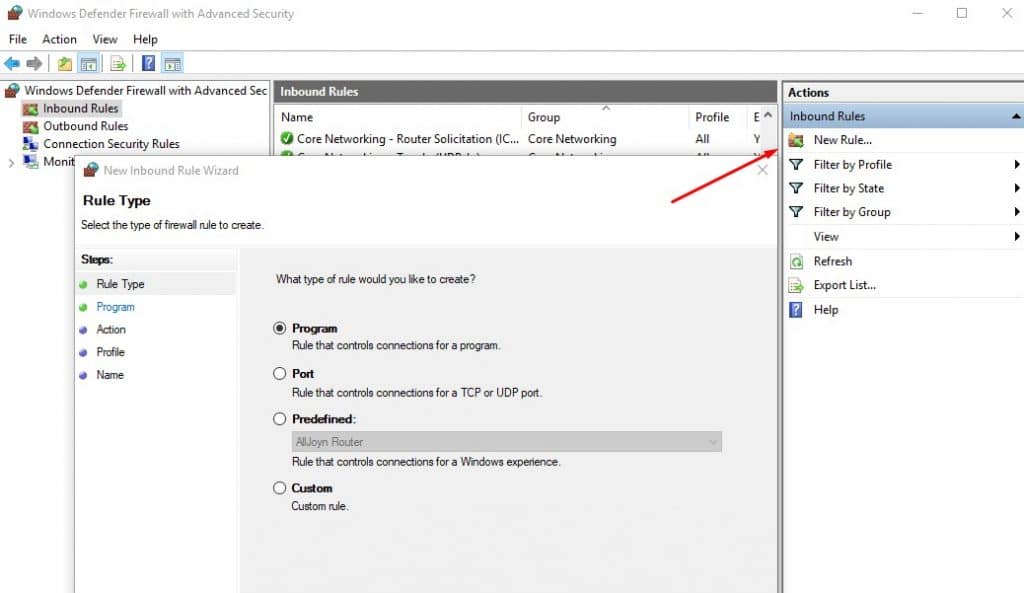
- Before you forward a port (network, layer 3), check the exceptions on your antivirus and firewall (application, layer 7) to ensure connectivity is allowed. For example, in Windows, go to the Windows Firewall, then Inbound and Outbound rules, and make sure that Deluge (the application layer) is set to “Allowed.” If there is no such rule, you must create a new one.
- To configure port forwarding in Deluge, you’ll need to log into your router and find the “port forwarding” settings. How to log into your router and change its port forwarding rules is outside the scope of this article.
- In your router, specify the public port for redirecting traffic to an internal LAN IP address and the private LAN port. So you’ll need to enter source/destination IP, and port, protocol information.
- Below is a screenshot of my Internet gateway’s port forwarding options.
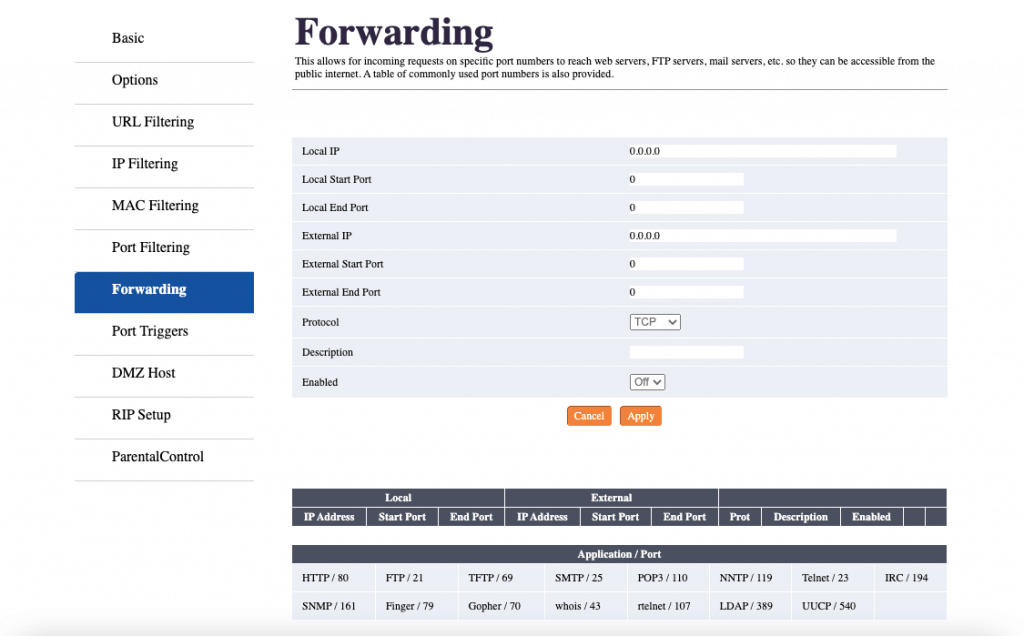
Port Forwarding: Provide the following information.
- Local or internal IP: Your computer’s IP. Note: Make sure your IP is assigned manually. If your network uses DHCP to allocate IPs, your IP will likely change as soon as more users connect or your router restarts. You can usually assign a static IP from the same router, which is most of the time a DHCP server (and NAT).
- Local start and end port: This is where you give the port or range of ports. For instance, 50000 – 65000 or a fixed port such as 52500. Remember to avoid ports within the 6881-6999 range, as they tend to be blocked by ISPs. Ensure this match with the Deluge client’s network configuration
- External IP: Leave default values. 0.0.0.0 means any IP.
- External start and end port: Leave default values.
- Protocol: BitTorrent uses TCP.
- Description. Enter whatever you like to describe your rule.
This new port forwarding rule will map a port or range of ports for the incoming connections to your LAN’s IP. Make sure that you are using a static IP.
Should you use UPnP instead of port forwarding?
An easy way to enable port forwarding in Deluge is ensuring that UPnP (Universal Plug-n-Play) is enabled under “Network extras.” UPnP helps by automatically modifying your router to allow port access. To use UPnP, your router will also need to be UPnP-enabled.
Note: Some users prefer to disable UPnP, as it has been identified with a vulnerability (CVE-2020-12695). It is a vulnerability exploited to gain control of your computer, turn it into a bot and perform a DDoS attack.
e. Improving Deluge download speed.
In the previous section, we configured port forwarding, which can help improve your download speeds. We also enabled “protocol encryption,” which can help improve your torrenting anonymity but slow down download speeds. Disable encryption (if the torrent tracker and peers allow it) and test your speed again.
Aside from those two ways, there are other ways to improve download speed.
- Increase the number of peers: The more peers you are connected to, the faster your download speed will be. You can increase the number of peers by selecting popular torrents with many seeders or using a tracker with many peers.
- Adjust upload speed: Limiting the upload speed can sometimes slow down the download speed, so you can try increasing the upload speed limit in the settings. However, it’s important to note that you should not set the upload speed limit to unlimited, as this can affect your internet speed and cause other issues.
Note: Many BitTorrent users would limit their “Upload Speed” and set their “Download speed” to unlimited. It seems logical to reserve more of the pipe’s capacity to improve the download speed of your torrents. But the BitTorrent protocol works differently than that. It uses a method known as “choke” to prevent congestion and unfair sharing. This choking algorithm limits download speeds; the more upload you limit.
Let’s configure bandwidth in Deluge.
- Find out your actual Internet speed. To test your Internet connection, use a speed test service such as Ookkla’s Speedtest. Deluge’s preferred metric is KiB/s, which differs from the usual Mbps or Kbps. You can convert these metrics in ConvertUnits.
- Perform the speed test and record your download/upload speed.
Note: Today’s most ISPs’ provided bandwidth is asymmetric. Most home Internet speeds use asymmetric bandwidth, where upload differs from the download speed.
- Go back to Deluge. Click on Edit > Preferences > Bandwidth.
- Connections and “Upload Slots” leave with their default values.
- Download Speed: Leave the default settings (-1.0) means unlimited.
- Upload Speed: Same as above, the default settings are unlimited (-1.0). Reduce this value between 80% to 90%. Do not go below, as it will likely affect your download speed.
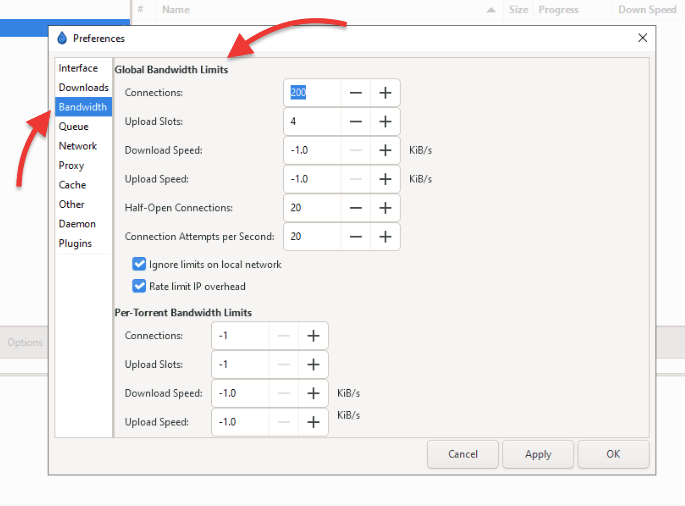
- Leave the rest of the parameters with their default values.
- You might notice that download and upload speeds are KiB/s (not Kbps or Mbps).
- 1 Kibibit per second (KiB/s) is equal to 1.024 kilobits per second (Kbps)
Let’s maximize your queue setting.
The queue settings in Deluge can affect the speed of your torrent downloads. The queue settings determine how many active downloads and uploads are allowed simultaneously and the maximum number of connections per torrent.
What are the proper queue settings?
If the queue settings are too restrictive, it can slow down the speed of your torrent downloads. Restricting the queue may not allow enough connections or active downloads/uploads to utilize your bandwidth fully. On the other hand, if the queue settings are too generous, it can lead to high CPU usage and slow down your overall system performance.
- To modify these settings, go to Edit > Preferences > Queue
- You’ll find the “New Torrents” and “Active Torrents” fields.
- Keep in mind that all active downloading torrents are also seeding simultaneously. And in this Deluge “Active Torrents” menu, the Total = downloading + seeding
- By default. Deluge already provides generous seeding configuration. We always recommend setting your “Total active seeding” the same as (or slightly lower than) “Total active” and the “Total active downloading” proportionally lower.
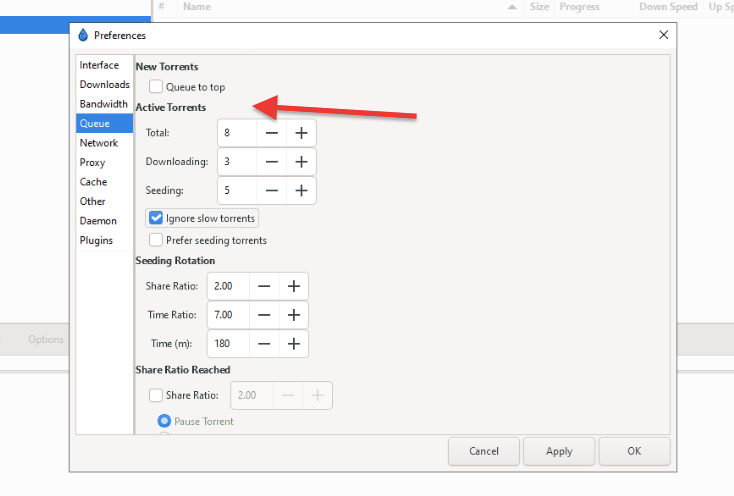
However, this decision can also depend on the previously measured bandwidth values. The active number of torrents can be proportional to your speed. Experiment with setting higher values if you have the proper bandwidth.
To maximize your number of downloads without affecting speed, click “Ignore slow torrents”, which will not count slow torrents towards your total active torrents.
f. Maximize Deluge speed and anonymity with other tools.
Regardless of what torrent client you use, using BitTorrent will always expose your information in some way or the other. All peers within the same swarm can easily see your data, including IP, country, OS, and even Deluge version. On top of that, even though you might be downloading legal Ubuntu files, your ISP will likely monitor and block all torrent activity. Understand the risks of downloading torrents.
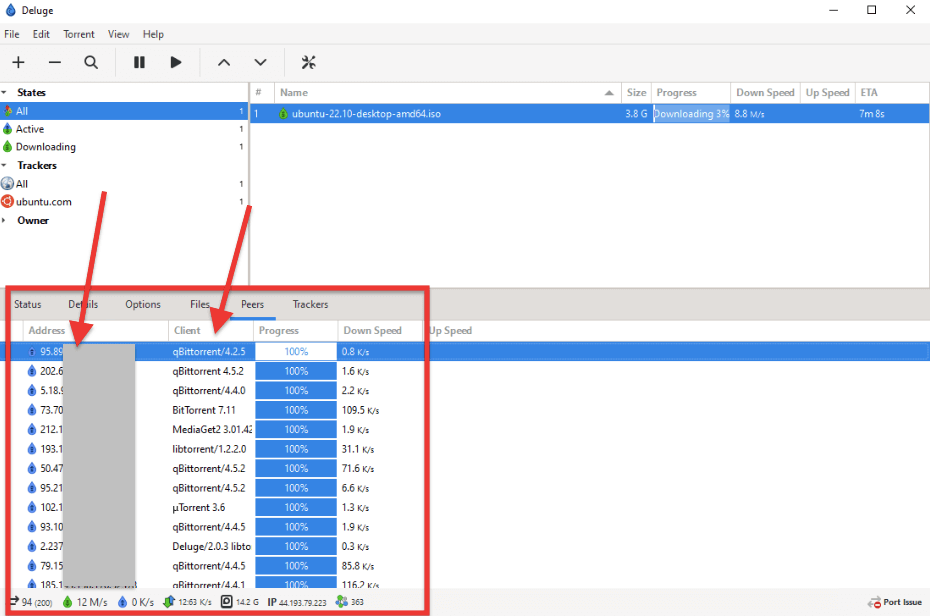
- To get an idea of your peers and their information, open Deluge > Go to your download.
- On the bottom bar, go to Peers, and you will see the information of other peers seeding the file.
- So, anybody can do the same: note down your IP and the content you are downloading and use a geolocation service to find your location and ISP. There are various ways services and websites can know your location.
How to stay anonymous with Deluge?
- A Proxy: Proxies mask IP information (they do not encrypt Layer 3 traffic), and, in some cases, as SOCKS5 proxies do, they protect your traffic with authentication. When torrenting, sometimes a proxy is much better than a VPN because proxies do not encrypt the entire traffic. Learn how to set up a proxy in Deluge.
- A VPN: Deluge VPNs provide much more robust privacy levels but compromise speed compared to proxies (VPN vs. Proxy). A VPN is the best way to protect yourself in a torrent swarm (because they mask your IP). VPN in Deluge is also useful for middle-man attacks or bandwidth throttling. What to use for VPN? OpenVPN is a great VPN tool to begin with.
- A Seedbox is a high-speed performance Virtual Private Server “VPS” in the cloud dedicated to downloading and seeding torrents. A Seedbox gives you the ultimate level of torrent privacy and speed. A seedbox does all the torrenting heavy lifting while you manage torrents with your computer or mobile. This is the best way to protect your identity online and stay secure.
Need more information on how to stay anonymous? The Ultimate Crib Sheet for Staying Anonymous Online might have your desired answers.
9. Troubleshooting Deluge.
Like any other application, Deluge might give you some headaches down the road, especially if you optimize and tweak it from its default settings. Fortunately, the community is helpful, so you’ll likely find easy solutions to your problems. Check the Deluge Forums, as you might find solutions to many problems.
The following are four of the most common problems found to be affecting many Deluge users
- Deluge not uploading or not seeding
- No incoming connections!
- Test active port fails.
- Deluge torrent error
Check if you have the same symptoms and try following any solutions.
a. Deluge not uploading or not seeding
If you’re having trouble with Deluge not uploading or not seeding, here are some troubleshooting steps you can try:
- Check your port forwarding settings: This torrent client requires specific ports to be open to upload and seed files. Ensure the right port is properly forwarded in your router or firewall settings. Go back to the port forwarding section to learn how to configure this.
- Check your upload limit settings: In the preferences or settings of Deluge, ensure you have set a reasonable limit for upload speeds. If you select the upload limit to zero, Deluge will not upload any data.
- Check your firewall settings: If you have a firewall installed on your computer, ensure it is not blocking Deluge from uploading data. You may need to add an exception in the firewall settings to allow it to connect to other peers.
- Check your internet connection: If it is slow or unstable, it may be difficult to upload data. Check your internet speed and stability by running a speed test and checking for network issues.
b. No Incoming Connections!
If you see the “No incoming connections!” at the bottom of the client, you might have a port mapping issue. The “no incoming connections” is probably due to a closed port.
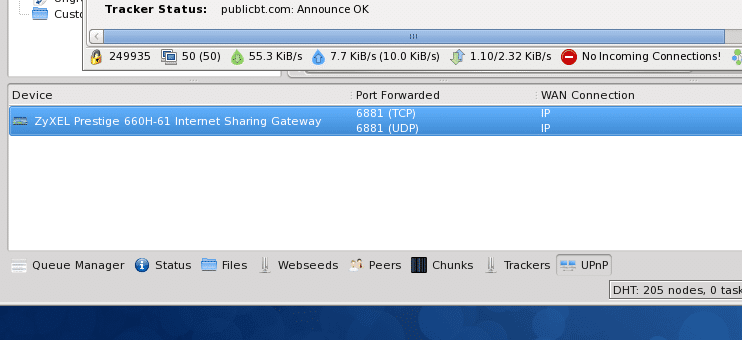
- Just like in previous troubleshooting cases, check your firewall settings. Ensure your firewall is not blocking Deluge from connecting and has the exception. Restarting any firewall or router that might be blocking the connection can help.
- Also, check your port forwarding settings: Deluge requires specific ports to be open to connect successfully. Ensure that the port is forwarded correctly on your router or firewall settings. Go back to the port forwarding section to learn how to configure this.
c. The “Test Active Port” fails.
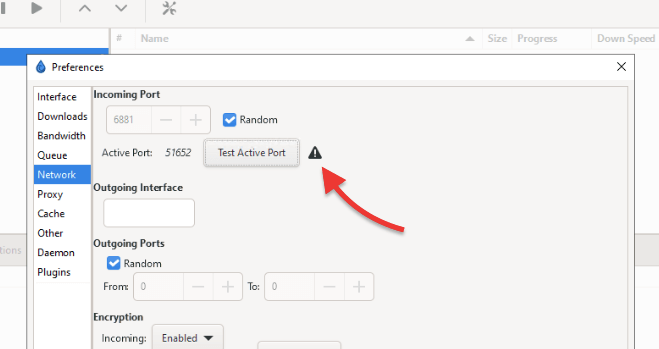
To pass the “Test Active Port,” you must ensure your port forwarding works. You can use an open port check tool like CanYouSeeMe and test whether the tool can see your Deluge through that port. If that fails, then it means your router is not forwarding ports.
Try the following solutions:
- Enable UPnP in Deluge and on the router. (Disable after testing).
- If UPnP works, disable it and configure manual port forwarding. Look into your device’s instructions manual and follow the steps to forward a port manually.
- Make sure that your firewall or antivirus is not blocking your connection.
- Go back to the port forwarding section.
d. Deluge torrent error.
The client stops downloading and shows an error message in the download bar “Deluge torrent error”. Along with this error, downloads randomly stop.
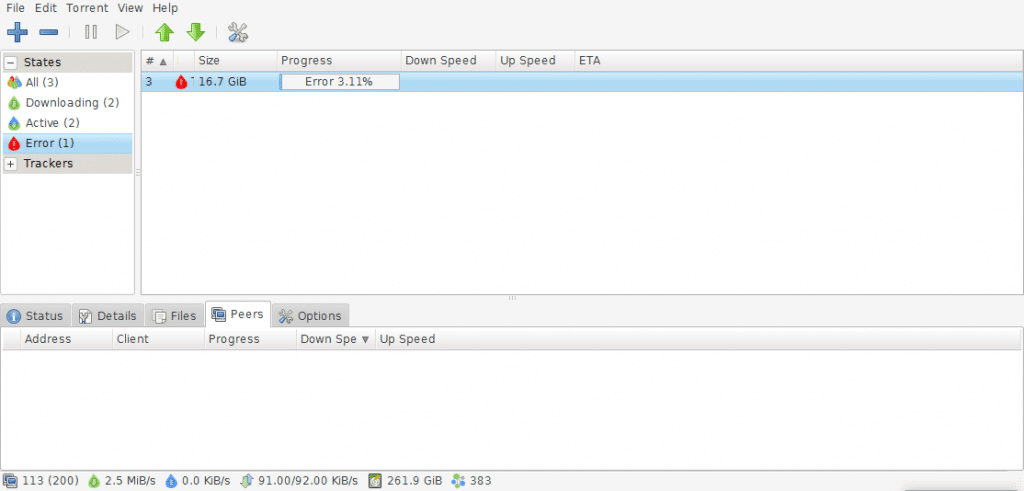
To solve this problem, you can try the following:
- Check whether the status of the torrent is Ok. The torrent file might be corrupt or incomplete. Try downloading a different torrent file or magnet link. You can also try updating the torrent tracker list.
- Check your antivirus or scanning software. Some file scanning applications like Antivirus might be stopping your download.
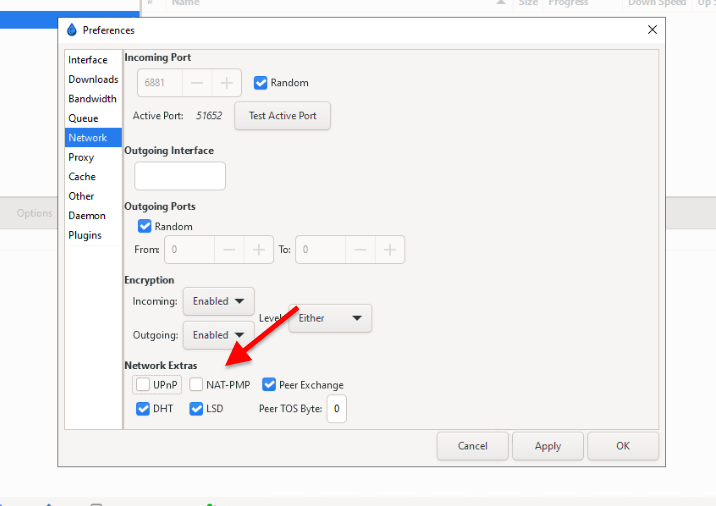
e. Torrents are not working with Deluge VPN.
While using a VPN with Deluge, your client cannot find peers for your torrents or downloads very slowly.
- If you can use Deluge without a VPN connection, but can’t use it with VPN, then it is likely your VPN provider does not allow P2P traffic. Contact and consult with them, or try different methods like proxy or seedbox.
Looking to master Deluge?
Streamline your torrenting with RapidSeedbox’s high-speed seedbox, designed to improve your Deluge experience. Enjoy faster downloads, reliable performance, and expert support!
- If they do support P2P traffic, but you are still having problems, then check the following:
- Check your VPN settings to ensure the VPN is not blocking Deluge or its ports. Some VPNs have built-in firewalls that can block specific applications, including torrent clients like Deluge.
- VPN’s IP might be blocked: Some torrent sites may block specific IP addresses, including those associated with VPNs. If your VPN’s IP address has been blocked, you may be unable to connect to particular torrent sites or peers.
- Try disabling UPnP and NAT-PMP, as they will automatically assign ports that might not be specified on the firewall of the VPN. These protocols can cause problems because they may reveal your true IP address to the internet, bypassing the VPN.
- To disable these parameters, Edit > Preferences > Network > Network Extras.
Frequently Asked Questions (FAQ)
Q: How do I stop seeding on Deluge?
A: To stop seeding a file in Deluge, right-click on the torrent and select “Stop,” or select the torrent and press the “Stop” button in the toolbar. If you want to stop seeding for all torrents, click “Stop All” in the toolbar.
Q: How can I make Deluge faster?
The most obvious answer to this question is to contact your local ISP and get a faster internet speed. However, other ways to make Deluge faster include increasing bandwidth allocation, adjusting queue settings, limiting simultaneous connections, optimizing the disk cache, and using a seedbox or proxy.
Q: Is Deluge safe to use?
A: Yes, this torrent client is generally considered safe to use. However, like any other torrent client, it is essential to use caution when downloading files and ensure that you are downloading from trusted sources to avoid downloading malicious or copyrighted content.
Q: How do I add a torrent file to Deluge?
A: To add a torrent file to Deluge, click the “Add Torrent” button in the toolbar or drag and drop the torrent file into the window. You can also add a magnet link by clicking the “Add Torrent” button and selecting “Add Magnet Link.”
Q: Can I schedule downloads in Deluge?
A: Yes, you can schedule downloads in Deluge by going to Preferences > Scheduler and setting the download and upload limits for different times of the day. You’ll need to enable the Scheduler plugin for this.
Q: Deluge 1.3 vs 2.0: Should I update to Deluge 2.0?
Deluge 2.0 is superior to Deluge 1.3 in terms of functionalities, features, and performance. The 2.0 version has performance updates that ensure the client can manage more torrents with faster response times. It also includes new features such as multi-user support, automatic re-checks, new console UI, migration to GTK3, magnet pre-fetching, support to libtorrent 1.2, and more.
Q: How to set up Deluge on Debian Jessie?
To install the default package version of Deluge, use the following command: “sudo apt-get install deluge” Or you can also install from PPA repository (as shown in the installation section): “sudo add-apt-repository ppa:deluge-team/ppa”> “sudo apt-get update”> “sudo apt-get install deluge”
Thanks guys for the great guide. 😀
You are welcome, Ian 🙂
As a brand new torrent user this is a God send. I have been looking for a how to guide to set what ever switches that may need to be set in deluge. Also, While I had the latest release I set in on my end to run in cojmpateable mode with os7 for windows not os1`0. But this article says it supports 7 thru 10.
So I will undo that and follow the guide for settings. Especially since I have exactly some of the errors
listed under trouble shooting. LIKE no incoming connections. Very frustrateing when you have no clue.
So yes very helpful and thank you for your time and effort to post this for all us newbies.
you are most welcome Floyd…
Great job explaining the different options and how to use the program most effectively! Thanks!
you are welcome Beth.
All the guides and help I find online talk about tuning Deluge when you connection is 200Kbps or 300Kbps. We moved past those speeds long, long ago. Do you have any tuning advice for those of us with modern broadband connections? I just ran Speedtest and got a result of 670Mbps down, 38Mbps up, which is typical for me. I’ve got Total Active Torrents set to 1024, and Active Downloading and Active seeding set to 512 each. Do these make ANY sense? If I use smaller numbers (let’s say 32 as an example) as soon as I get very slow or non-responsive torrents into the 32 queue slots I basically stop downloading.
Thanks for your guide – it’s great to have this in one place.
Thanks for your advice Andy.
The idea of the guide is to provide advice on how to optimize Deluge regardless of the external factors: say bandwidth or processing power, as these factors change dramatically from user to user… But thanks for the advice… we’ll update the speeds information to fit today’s average bandwidth speeds.
Tip o’ the iceberg ; )
indeed.
Really helpful, thanks!
you are welcome!
For me Deluge is so frustrating. I tested almost all known Linux distros (CentOS, Arch, Ubuntu 20.04/18.04) with all Deluge (1.3.15/2.0.3/2.0.4) and libtorrent versions. There are always new problems I can’t solve. Like 100% downloaded torrents which are still on queue and/or won’t move to “completed folder”. 2.0.3 stopped working at all after a certain amount of torrents in queue. On 1.3.15 I had to disable “use_read_cache” via ltconfig because of heavy disk read load. Now my Deluge (1.3.15/libtorrent 1.1.14) is not responsive at all. If I kill the process I guess I’ve to rehash TBs of torrent again.. WOW!
sorry to hear that Tom.
Hi,
Thanks for the guide it was really helpful.
Could you elaborate on Step 3: Maximizing your queue setting.
What is the calculation used to optimise this setting?
e.g. Speedtest upload is 35Mbs what would the calculations be?
Hi TorrentUser… we updated this section.
We believe there is no secret recipe for this… We have been experimenting with this feature and believe it is worth testing different queue settings… Not everybody has the same resources in terms of CPU, SSD, bandwidth, etc…
How do you update deluged headless install?
zen…
try the following…. if you have an Ubuntu.. of course 🙂
sudo add-apt-repository ppa:deluge-team/stable
sudo apt update
sudo apt install deluged deluge-web deluge-console
But we must warn you. This PPA repository has been quite unstable lately.
This actually answered my problem, thank you!
Glad to hear we can help!
Thanks so much for this! I am not nearly tech savvy enough to understand what most people on reddit say when trying to explain this stuff and you did very well. I was wondering if you maybe know how to STOP (end/finish) a Deluge download once it has finished? I have turned down the seeding to the lowest level and then pause it after a while, but it doesn’t seem as though there is any option to fully end/finish it? Any tips would be helpful 🙂
Hey Olivia… We noticed that you are not the only one with this question. We included this on the FAQ section at the end of this post. Anyhow here it goes:
To stop a Deluge download once it has finished, you can follow these steps:
1. Click on the “Downloads” tab on the left-hand side.
2. Locate the completed download in the list of active downloads.
3. Right-click on the completed download and select “Remove” from the context menu.
4. Look for the confirmation dialog box, and select the option to remove both the torrent and the data associated with it.
5. Click “OK” to confirm the removal.
We hope that helps!
Can you tell me why sometimes I have 0 DHT ? Most of the time I have 300+ but lately it’s been stuck on 0. Is there anyway to kickstart it into having the whole 300 easily?
Hi there Jason!
Here are some reasons why you might have 0 DHT peers in Deluge:
a. Your DHT settings might be disabled. Make sure that DHT is enabled in Deluge’s settings. We have that covered in the tutorial.
b. Your firewall may be blocking DHT traffic: Try temporarily disabling your firewall to see if this resolves the issue. But don’t forget to enable it again!
c. Are you trying with different torrents? The torrent (or torrents) you are downloading may not have any DHT peers.
To kickstart DHT in Deluge, try the following: Go to the “Preferences > “Network” > “Force Start” > “Apply” and then “OK”. This will force Deluge to start searching for DHT peers again.
I hope that helps!
Great guide guys! Thanks for taking the time to do it!
You are most welcome Shark!
We actually enjoyed making this guide…
This guide is ok, but it misses an important point.
WHICH PORT?
Allowing P2P users to make clean and fast connections through “Port Forwarding”.
you speak of a port but what port are you talking about?
Hello Jamie… the range of ports is specified across the guide.
BUT we created a new section for port forwarding along with the ports to configure, to make it clearer and easier to read.
“For torrenting: port number between 50,000 and 65,000. Avoid ports within the 6881-6999 range, as they tend to be blocked by ISPs.
For client communications Deluge listens to port 58846.”
Refer to this: https://www.rapidseedbox.com/kb/ultimate-deluge-guide#portforwarding
after your recent migration DelugeSiphon no longer works when I add magnet links. the server is right and password is right but something client side isn’t working anymore on the new ip.
Hi there JD…
Have you tried checking whether the plugin is installed or enabled? Or perhaps the filters on the DelugeSiphone plugin changed for some reason?
You are right; this problem of not working with magnet links could also be related to an IP address change… are your filters based on IP addresses or ranges? Also, your client or server must be restarted to take the new IP configuration.
However, this problem could also be higher level… related to firewall or network restrictions (ISP-level)… Don’t hesitate to get in touch with our customer support!
If only Deluge was able to use Kb/s or Mb/s.
Perhaps they should update to M/s or Mps. (Miles per second)
😂 or Meters/second!
You are right Deluge should update these metrics.
But most likely M/s – which should stand out for megabytes per second (MB/s), which is typically used to measure data transfer rates within networks.
Deluge appears to be a mess of false error messages, telling me that things are not working when they clearly are. My torrents are definitely downloading, even though there are allegedly port errors, and the port tests all fail.
It looks like the clothes are not fit for purpose, but at least it works, unlike Transmission, which breaks after first use, and cannot even load a torrent, and then breaks dpkg when it is removed.
But Linux users be warned, running “sudo upgrade-system” will completely purge Deluge from your system.
Thanks for that advice! We will surely also keep it in mind!
Thank you very much for this guide. i love Deluge. It has been my torrent client for years after having gone through everything else. It is literally NO FUSS out the box. Changing the network port to between 50,000 – 65,000 actually speeded it up. Thank you.
We also love Deluge Johnny… Glad we could help!
First I was thinking the guide was very helpful. Well, it is but the chapter “Improving Deluge download speed” is confusing because at some point the author mistakes bits and bytes (1 byte = 8 bits), so the calculations seems wrong. But it’s not sure they are. Maybe only one sentence is wrong, but the calculations are ok?
Whatever, if we follow the calculations of the queue depth blindly, with modern fiber channel it leads to astronomical numbers well above the 9999 maximum. And it does not seems right. But maybe it is?
Thanks for the obvservation Guig2000… and good eye on that.
What was missing was a 0 (in 150-250 kbps). Since Deluge presents its Internet speed using KiB/s AND 1 Kibibit per second (KiB/s) is equal to 1.024 kilobits per second (Kbps) – we had to give speeds in kbps (for the sake’s of simpliciy).
If 1500 Kbps / 1000 = 1.5 Mbps (which would be considered a standard low-end fiber channel speed), then setting the torrent queue makes more sense.
Thanks. Great guide. Bookmarked for a rainy day in case I run into one.
You are welcome!
Bonjour, je me demandais? Est-il possible de partager les torrents télécharger avec d’autres qui voudraient les avoir? Moi, j’ai un site pour télécharger des torrents mais j’aimerais les partagés sinon je ne pourrai plus télécharger sur mon site. Moi j’ai un Mac Pro. Si on peut comment faire svp? Et je me demandais si Deluge peut prendre les epub? Ou si c’est juste de la musique?
Merci énormément pour ce partage des explications de Deluge. Ohhh que ça m’aide. J’apprécie grandement.
Salut Sylvie. Vous pouvez utiliser Deluge pour créer un fichier torrent en utilisant l’option “File > Create Torrent”. Toutefois, ce fichier torrent doit être téléchargé sur un site torrent pour pouvoir être partagé.
Deluge est un client torrent et peut gérer tout type de fichier. Cela ne vous limite pas uniquement à la musique. J’espère que cela vous aidera!
if there is anyone wondering how to make Deluge a default torrent tracker for your mac with newer OS like SonomaOS, do this: right click on any “.torrent” file, then “get info”, then in “open with” area choose Deluge application and and press “Change all” button right below it, after that it will automatically open any torrent files with Deluge. You are welcome !
Ne fonctionne pas.
Sous linux.
“Trouvez le fichier d’authentification à (.config/deluge/auth), ouvrez-le et ajoutez une entrée pour l’utilisateur.”
C’est un tuto ou une chasse aux trésors ?
Jo,
Si tu es bloqué à l’étape du fichier “auth”, essaie ceci :
1. Localiser le fichier : Exécute cette commande pour le trouver :
sudo find / -name auth
2. Ajouter les identifiants : Ouvre le fichier et ajoute :
admin:yourpassword:10
3. Redémarrer Deluge : Applique les modifications :
sudo systemctl restart deluged
4. Tester : Utilise la console Deluge pour tester ta connexion :
deluge-console “connect 127.0.0.1:58846 admin yourpassword”
5. Vérifier les permissions : Assure-toi que le fichier auth appartient à Deluge et a des permissions sécurisées :
sudo chown deluge:deluge /var/lib/deluge/.config/deluge/auth
sudo chmod 600 /var/lib/deluge/.config/deluge/auth
J’espère que ça t’aidera !
Diego
Hola buenos dias, hace poco que en mi raspberry mas delugue no me funciona, en una instalacion totalmente limpia.
los torrents se agregan pero en la ventana de deluge, abajo del todo a la derecha pone: port issue
y nunca me habia pasado,, no se que hacer, y es que ademas en mi configuracion de mis routeres, nunca habia necesitado cambiar nada…. y ahora sin mas, me sale eso y no se porque.
he probado a instalar la rasp 2 veces desde 0 y me ha ocurrido en ambas instalaciones.
bueno, de cualquier modo, gracias y un saludo.
Parece que Deluge está experimentando un problema de puerto en tu Raspberry Pi, lo que impide una comunicación adecuada con torrent. Dado que esto sucedió de repente en una instalación nueva sin ningún cambio en tu enrutador, es probable que se deba a una de las siguientes razones: